


| 时间 | 版本 | 修改人 | 描述 |
|---|---|---|---|
| 2024年5月6日10:34:13 | V0.1 | 宋全恒 | 新建文档 |
| 2024年5月6日11:07:12 | V1.0 | 宋全恒 | 完成 |
简介
之前楼主曾经完成过一个shell工程的开发,记得当时项目名称叫做campus-shell,主要是用来一键完成多个模块的部署。当时的模块主要包括:
- 多个java工程
- python服务
- AI芯片上的服务
其实这也是之前积累的经验。主要是在构造这样的工程时,应该如何分配目录以及存放的东西。
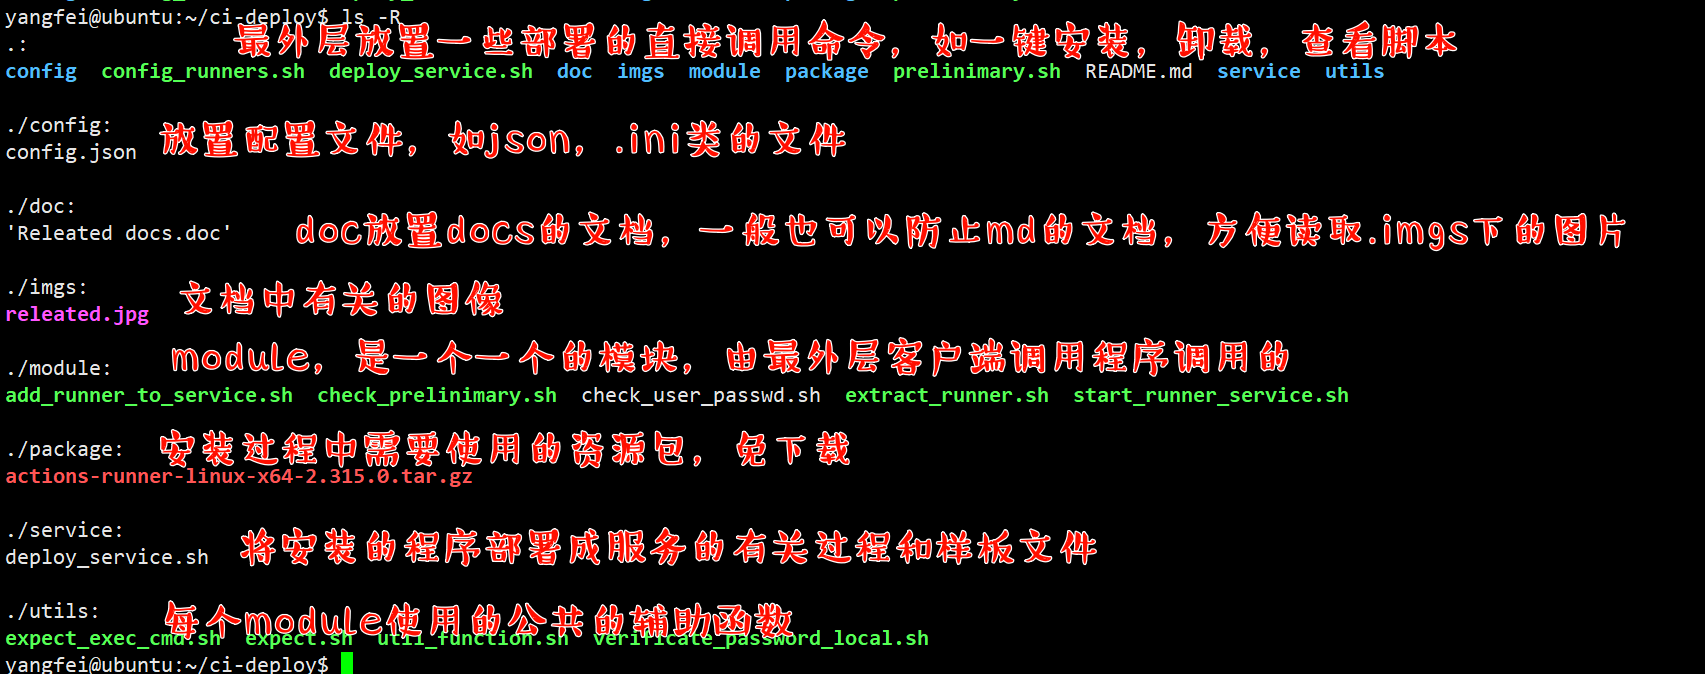
shell工程结构
注意事项
相对路径
由于在shell工程,主要是通过相对路径进行工作的,在执行shell时,要妥善的处理相对路径。如下所示:
yangfei@ubuntu:~/ci-deploy/module$ cat check_prelinimary.sh
#!/bin/bash

cd $(dirname $0)
pwd
config_file=../config/config.json

# 验证当前用户具有sudo权限
validate_sudo() {
    user_id=`id -u`

    # systemctl must run as sudo
    # this script is a convenience wrapper around systemctl
    if [ $user_id -ne 0 ]; then
        echo "Must run as sudo"
        exit 1
    fi

}
可以看到,在每个module中的shell执行时,最上层都有如下的代码
cd $(dirname $0)
pwd
config_file=../config/config.json
上述的代码的主要含义,是切换到当前shell所在的工作目录,并在当前的工作目录下定义配置文件的位置,当然是使用相对路径。这样整体就一致了。
配置文件处理
配置文件也是一个非常重要的点,因为在shell中,不像python处理ini或者json有比较良好的库,因此我们在处理shell的时候,也需要比较复杂的结构,以相同的策略,也可以使用json的配置文件,然后读取时采用相应的库。
具体可以参考 04-23 周二 shell环境下读取使用jq 读取json文件
接下来演示一个案例:
配置文件内容
yangfei@ubuntu:~/ci-deploy$ cat config/config.json
{
    "repositories": [
      {
        "repo_name": "LLMs_Inference",
        "runner_name": "LLMs_Inference_runner",
        "user": "zhangyi",
        "passwd": "123456",
        "url": "https://github.com/CodexDive/LLMs_Inference",
        "token": "BCTEUWMMR7EU7BFLLO76ADTGFHF3M",
        "directory": "actions-ci",
        "tags": [
          "inference","gpu","self-hosted", "Linux", "X64"
        ]
      },
      {
        "repo_name": "LLMChat",
        "runner_name": "LLMChat_runner",
        "user": "zhangweixing",
        "passwd": "123456",
        "url": "https://github.com/CodexDive/LLMChat",
        "token": "BCTEUWJ76AILP3ZL54L25JDGE5WBS",
        "directory": "actions-ci",
        "tags": [
          "application","self-hosted", "Linux", "X64"
        ]

      }
    ]
}
上述为一个json的配置文件,这个仓库的主要目标是一件完成为团队的仓库配置CI,想要固话这个目录,标签以及必要的信息。如上所示,我们为每个仓库配置了仓库的名称,运行器名称,以及token,和tags,在json中包含了数组结构,字符串结构,是一个相对复杂的结构。
读取配置文件
yangfei@ubuntu:~/ci-deploy$ cat config_runners.sh
#!/bin/bash


user_id=`id -u`

# we want to snapshot the environment of the config user
if [ $user_id -eq 0 -a -z "$RUNNER_ALLOW_RUNASROOT" ]; then
    echo "Must not run with sudo"
    exit 1
fi
cd $(dirname $0)
config_file="config/config.json"

jq -c '.repositories[]' "$config_file" | while IFS= read -r repository; do
    user=$(echo "$repository" | jq -r '.user')
    passwd=$(echo "$repository" | jq -r '.passwd')
    ci_dir=$(echo "$repository" | jq -r '.directory')
    url=$(echo "$repository" | jq -r '.url')
    token=$(echo "$repository" | jq -r '.token')
    tags=$(echo "$repository" | jq -r '.tags | join(",")')
    runner_name=$(echo "$repository" | jq -r '.runner_name')
    echo "tags: $Tags"
    work_dir_cmd="cd /home/$user/$ci_dir"
    cmd="./config.sh --unattended --url $url --token $token --labels "$tags" --name $runner_name"
    echo "$cmd"
    utils/expect_exec_cmd.sh "$user" "$passwd" "$work_dir_cmd" "$cmd"
上述代码演示了使用jq来读取配置文件的过程(一般我们在部署时,需要先配置好),具体含义,就不再赘述了。
可以看出上述的额代码,主要是读取配置文件之后,然后组装cmd命令,读取了user和passwd命令,并将这些参数以位置参数的形式传递给了脚本expect_exec_cmd.sh
shell脚本调用
其实在配置文件处理中已经描述了这个过程。
shell调用参数组织
jq -c '.repositories[]' "$config_file" | while IFS= read -r repository; do
    user=$(echo "$repository" | jq -r '.user')
    passwd=$(echo "$repository" | jq -r '.passwd')
    ci_dir=$(echo "$repository" | jq -r '.directory')
    url=$(echo "$repository" | jq -r '.url')
    token=$(echo "$repository" | jq -r '.token')
    tags=$(echo "$repository" | jq -r '.tags | join(",")')
    runner_name=$(echo "$repository" | jq -r '.runner_name')
    echo "tags: $Tags"
    work_dir_cmd="cd /home/$user/$ci_dir"
    cmd="./config.sh --unattended --url $url --token $token --labels "$tags" --name $runner_name"
    echo "$cmd"
    utils/expect_exec_cmd.sh "$user" "$passwd" "$work_dir_cmd" "$cmd"
通过读取配置文件中一些参数项的内容,我们完成了expect_exec_cmd.sh的脚本调用参数的组织,该脚本需要四个参数
$1: 用户名
$2: 密码
$3: 命令执行目录
$4: 待执行的命令
注,在调用shell文件的时候,依然采用的事相对位置的调用形式,如上述代码采用的是
utils/expect_exec_cmd.sh "$user" "$passwd" "$work_dir_cmd" "$cmd"
这表明在执行这部分代码时,是位于ci-deploy目录下的,所以执行环境可以正确找到utils/expect_exec_cmd.sh
shell脚本采用expect自动应答的形式执行命令
yangfei@ubuntu:~/ci-deploy$ cat utils/expect_exec_cmd.sh
#!/usr/bin/expect -f


# author: songquanheng
# date: 2024年4月24日16:17:43
# desc: 该脚本用于使用expect判断用户是否存在以及用户名密码是否匹配

# 设置超时时间,这里设置为10秒
set timeout 10

# 通过命令行参数传递用户名和密码
set username [lindex $argv 0]
set password [lindex $argv 1]
set work_dir_cmd [lindex $argv 2]
set cmd [lindex $argv 3]

puts "username $username"
puts "password $password"
puts "word_dir_cmd $work_dir_cmd"
set status_code 42

# puts "username: $username"
# puts "password: $password"
# 启动交互式程序
spawn su - $username

expect {
    "Password:" {
        # 提供密码
        send "$password\r"

    }
    -re "exist" {
        puts "user $username does not exist"
        exit 4
    }
}

expect {
    -re "Authentication failure" {
        puts "Login failed. password wrong."
        exit 1
    }
    -re "$username@" {
        puts "Login success."

    }

    timeout {
        puts "Login failed. Connection timed out.";
        exit 2
    }
}
send "$work_dir_cmd\r"
send "$cmd\r"
expect {
    "Settings Saved" {
        puts "runner authentication、registration、settings executes successfully";
        exit 0
    }
}

exit $status_code
当时为开发这个ci-deploy工程,上述代码也是失败的主要原因,因为该命令设置了Timeout 10,但是由于配置运行器需要和github进行交互,需要下载许多的网络资源,一因此执行时间不太保证,所以就失败了,这也是这个工程没有继续执行下去的核心原因所在。
但,这不影响,shell脚本调用的演示。
上述shell为expect脚本,主要的作用是接收几个参数来确定执行的用户,以及密码,并在指定目录下执行命令的过程。
注: 该脚本也演示了expect脚本设置变量,打印变量,并使用退出码来判断执行结果的演示,也演示了从调用处读取位置参数
总结
该文件主要是记录了一个shell工程的最佳实践和目录划分,并且给出了在开发这样工程时的三个注意事项:
- 相对路径
- 配置文件处理
- shell脚本调用
并且行文在演示shell脚本调用时,采用的是expect自动应答,免交互的形式,方便读者学习和使用。


 278
278

 被折叠的 条评论
为什么被折叠?
被折叠的 条评论
为什么被折叠?
 到【灌水乐园】发言


