


| 时间 | 版本 | 修改人 | 描述 |
|---|---|---|---|
| 2024年7月15日14:57:02 | V0.1 | 宋全恒 | 新建文档 |
简介
方案设计
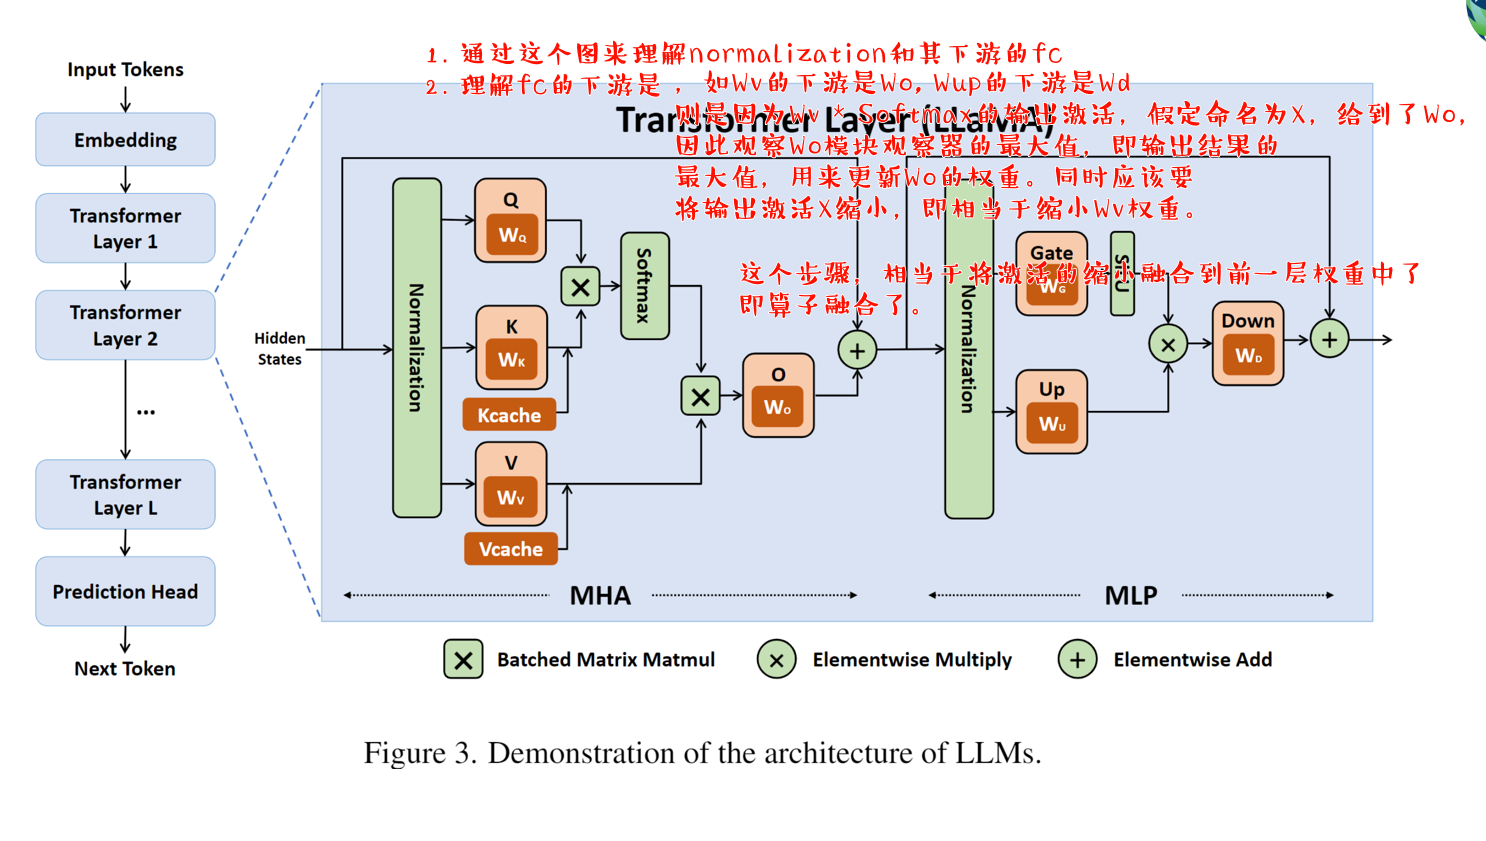
由于norm层的前后导致smoothquant执行量化不好融合,为了降低我事先的难度,所以就不再融合normalization的算子了,因为norm会有变化。因此,在推理执行时,Wv和Wo继续进行量化,Wq, Wk, Wv继续进行量化,但是需要导出迁移前度。
不融合,是norm在前,Q K V在后,但是融合呢?根据这个查询出来的迁移因子,为
但是,
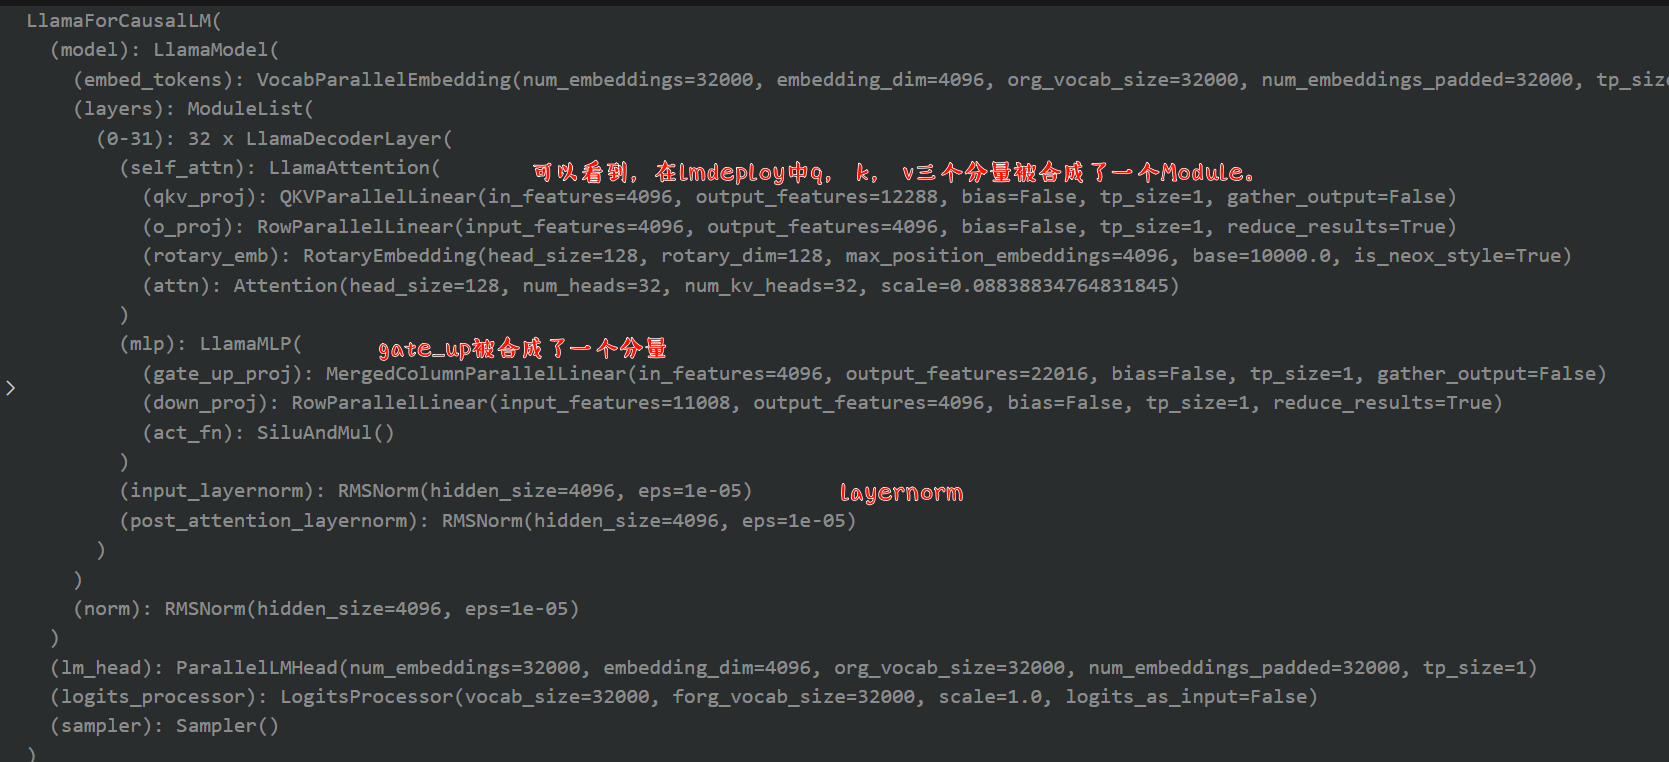
LLama2 模型
可以看到也是在lmdeploy仓库中的两种方式,即smooth_layers的两个过程。
smooth_ln_fcssmooth_fc_fcs
    layer_type = LAYER_TYPE_MAP[type(model).__name__]
    norm_type = NORM_TYPE_MAP[type(model).__name__]
    fc2fcs = FC_FCS_MAP[layer_type]
    norm2fcs = NORM_FCS_MAP[layer_type]

    layers = collect_target_modules(model, layer_type)
    fcs = {}
    for l_name, layer in layers.items():
        name2fc = collect_target_modules(layer, nn.Linear, prefix=l_name)
        fcs.update(name2fc)

    smooth_layers(layers, fc2fcs, norm2fcs, act_scales, -1, device)
- layers: 长度为32的字典,其中的内容是32层LlamaDecoderLayer
- fc2fcs: {‘self_attn.v_proj’: [‘self_attn.o_proj’], ‘mlp.up_proj’: [‘mlp.down_proj’]}
- norm2fc2: {‘input_layernorm’: [‘self_attn.k_proj’, ‘self_attn.q_proj’, ‘self_attn.v_proj’], ‘post_attention_layernorm’: [‘mlp.gate_proj’, ‘mlp.up_proj’]}
- act_scales: 一共是32 * 7即224个构建块的统计数据,使用的abs_max
- devce: ‘cuda’
主要调用了两个函数,smooth_ln_fcs和smooth_fc_fcs,对每一层都进行了处理。该函数的主要作用是根据input scales应用权重平滑。
{
    'input_layernorm': ['self_attn.k_proj', 'self_attn.q_proj', 'self_attn.v_proj'],
    'post_attention_layernorm': ['mlp.gate_proj', 'mlp.up_proj']
}
a_scales
inp_stats = torch.load(work_dir / 'inputs_stats.pth')
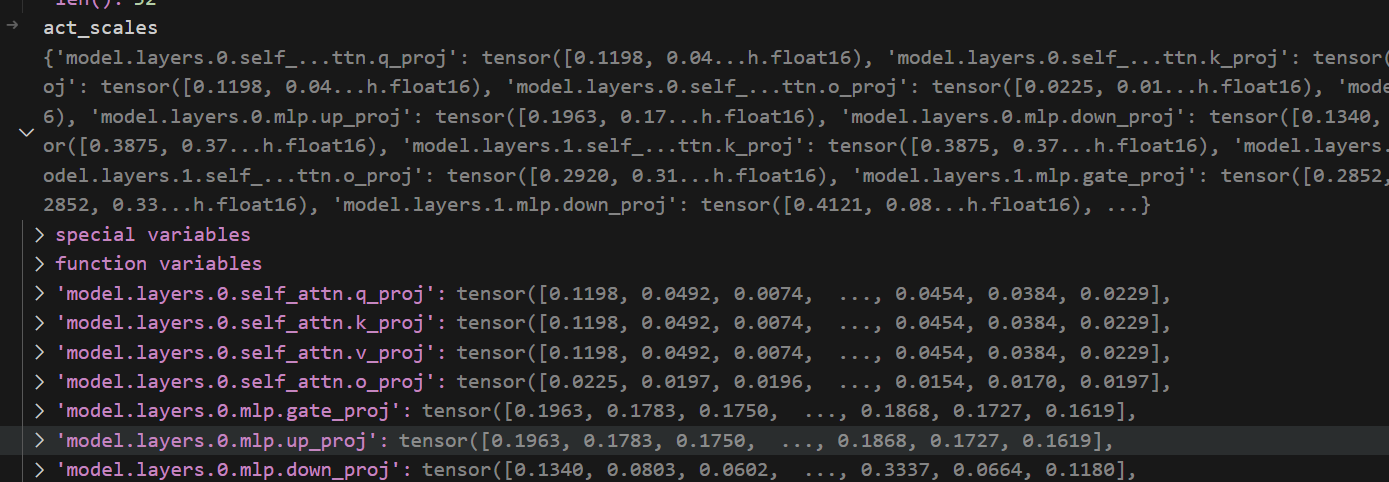
act_scales = inp_stats['absmax']
保存的是每个模块的输入统计数据。
{'model.layers.0.self_attn.q_proj': tensor([0.1198, 0.0492, 0.0074,  ..., 0.0454, 0.0384, 0.0229],
       dtype=torch.float16), 'model.layers.0.self_attn.k_proj': tensor([0.1198, 0.0492, 0.0074,  ..., 0.0454, 0.0384, 0.0229],
       dtype=torch.float16), 'model.layers.0.self_attn.v_proj': tensor([0.1198, 0.0492, 0.0074,  ..., 0.0454, 0.0384, 0.0229],
       dtype=torch.float16), 'model.layers.0.self_attn.o_proj': tensor([0.0225, 0.0197, 0.0196,  ..., 0.0154, 0.0170, 0.0197],
       dtype=torch.float16), 'model.layers.0.mlp.gate_proj': tensor([0.1963, 0.1783, 0.1750,  ..., 0.1868, 0.1727, 0.1619],
       dtype=torch.float16), 'model.layers.0.mlp.up_proj': tensor([0.1963, 0.1783, 0.1750,  ..., 0.1868, 0.1727, 0.1619],
       dtype=torch.float16), 'model.layers.0.mlp.down_proj': tensor([0.1340, 0.0803, 0.0602,  ..., 0.3337, 0.0664, 0.1180],
       dtype=torch.float16), 'model.layers.1.self_attn.q_proj': tensor([0.3875, 0.3723, 0.3545,  ..., 0.2433, 0.3320, 0.2622],
       dtype=torch.float16), 'model.layers.1.self_attn.k_proj': tensor([0.3875, 0.3723, 0.3545,  ..., 0.2433, 0.3320, 0.2622],
       dtype=torch.float16), 'model.layers.1.self_attn.v_proj': tensor([0.3875, 0.3723, 0.3545,  ..., 0.2433, 0.3320, 0.2622],
       dtype=torch.float16), 'model.layers.1.self_attn.o_proj': tensor([0.2920, 0.3186, 0.1959,  ..., 0.0396, 0.0433, 0.0407],
       dtype=torch.float16), 'model.layers.1.mlp.gate_proj': tensor([0.2852, 0.3372, 0.3159,  ..., 0.3936, 0.2954, 0.3220],
       dtype=torch.float16), 'model.layers.1.mlp.up_proj': tensor([0.2852, 0.3372, 0.3159,  ..., 0.3936, 0.2954, 0.3220],
       dtype=torch.float16), 'model.layers.1.mlp.down_proj': tensor([0.4121, 0.0886, 1.0986,  ..., 0.1576, 0.3171, 1.0928],
       dtype=torch.float16), ...}
act_scales['model.layers.30.self_attn.v_proj'].shape
torch.Size([4096])
layers['model.layers.30'].self_attn.v_proj
Linear(in_features=4096, out_features=4096, bias=False)
由于输入和输出均为4096,所以还看不出来统计是按行进行的还是按列进行的。
layers['model.layers.30'].mlp.down_proj
Linear(in_features=11008, out_features=4096, bias=False)
act_scales['model.layers.30.mlp.down_proj'].shape
torch.Size([11008])
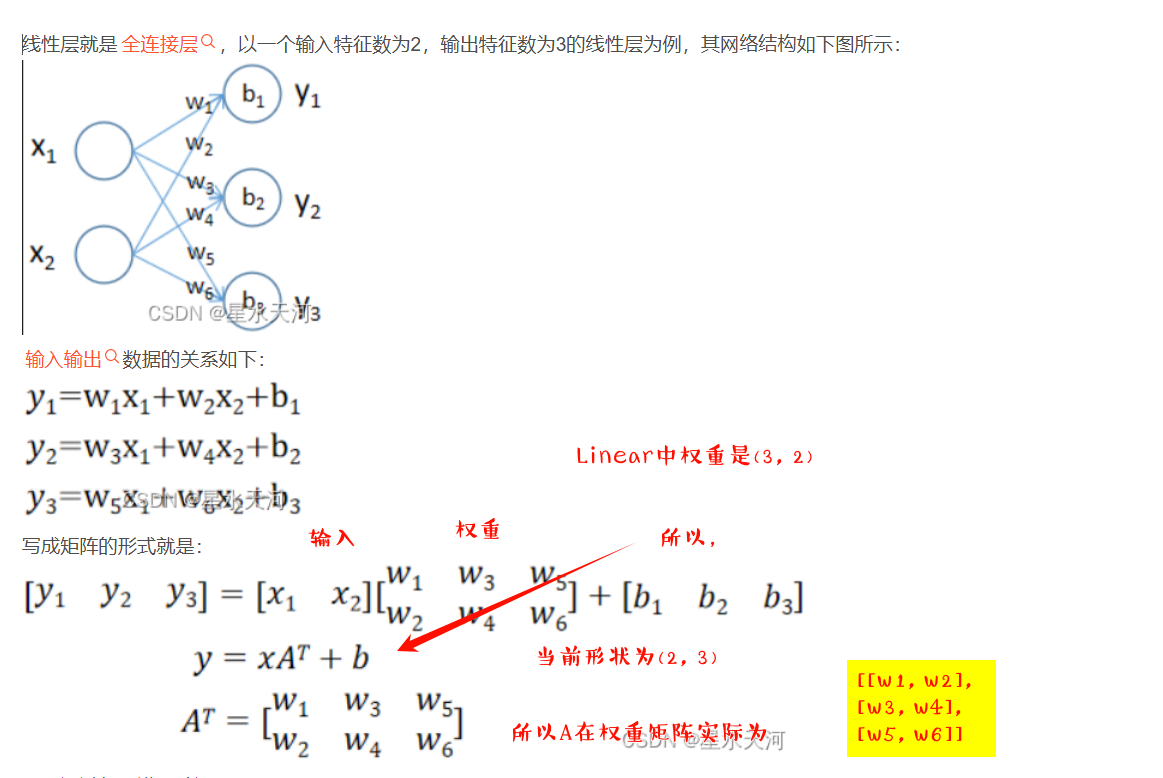
在给定的 Linear(in_features=11008, out_features=4096, bias=False) 中,权重的形状是 (4096, 11008) 。
这是因为对于线性层,权重矩阵的形状通常是 (输出特征数量, 输入特征数量) 。在这里,输出特征数量是 4096 ,输入特征数量是 11008 。
例如,如果我们有一个简单的线性层 Linear(in_features=2, out_features=3, bias=False) ,那么权重矩阵的形状就是 (3, 2) 。假设输入的数据是 [x1, x2] ,那么通过权重矩阵与输入相乘得到的输出就是 [w11*x1 + w12*x2, w21*x1 + w22*x2, w31*x1 + w32*x2] ,其中 w11, w12, w21, w22, w31, w32 就是权重矩阵中的元素。
根据上面的描述,则统计数据是按照维度跨行进行的,dim=0.
记录运行过程
{
  "metadata": {
    "total_size": 7006265344
  },
  "weight_map": {
    "lm_head.weight": "pytorch_model-00004-of-00004.bin",
    "model.embed_tokens.weight": "pytorch_model-00001-of-00004.bin",
    "model.layers.0.input_layernorm.weight": "pytorch_model-00001-of-00004.bin",
    "model.layers.0.mlp.down_proj.scale": "pytorch_model-00001-of-00004.bin",
    "model.layers.0.mlp.down_proj.weight": "pytorch_model-00001-of-00004.bin",
    "model.layers.0.mlp.gate_proj.scale": "pytorch_model-00001-of-00004.bin",
    "model.layers.0.mlp.gate_proj.weight": "pytorch_model-00001-of-00004.bin",
    "model.layers.0.mlp.up_proj.scale": "pytorch_model-00001-of-00004.bin",
    "model.layers.0.mlp.up_proj.weight": "pytorch_model-00001-of-00004.bin",
    "model.layers.0.post_attention_layernorm.weight": "pytorch_model-00001-of-00004.bin",
    "model.layers.0.self_attn.k_proj.scale": "pytorch_model-00001-of-00004.bin",
    "model.layers.0.self_attn.k_proj.weight": "pytorch_model-00001-of-00004.bin",
    "model.layers.0.self_attn.o_proj.scale": "pytorch_model-00001-of-00004.bin",
    "model.layers.0.self_attn.o_proj.weight": "pytorch_model-00001-of-00004.bin",
    "model.layers.0.self_attn.q_proj.scale": "pytorch_model-00001-of-00004.bin",
    "model.layers.0.self_attn.q_proj.weight": "pytorch_model-00001-of-00004.bin",
    "model.layers.0.self_attn.v_proj.scale": "pytorch_model-00001-of-00004.bin",
    "model.layers.0.self_attn.v_proj.weight": "pytorch_model-00001-of-00004.bin",
    "model.layers.1.input_layernorm.weight": "pytorch_model-00001-of-00004.bin",
    "model.layers.9.self_attn.v_proj.weight": "pytorch_model-00002-of-00004.bin",
    "model.norm.weight": "pytorch_model-00004-of-00004.bin"
  }
}
layers记录了所有层的信息
'model.layers.0':
LlamaDecoderLayer(
  (self_attn): LlamaSdpaAttention(
    (q_proj): Linear(in_features=4096, out_features=4096, bias=False)
    (k_proj): Linear(in_features=4096, out_features=4096, bias=False)
    (v_proj): Linear(in_features=4096, out_features=4096, bias=False)
    (o_proj): Linear(in_features=4096, out_features=4096, bias=False)
    (rotary_emb): LlamaRotaryEmbedding()
  )
  (mlp): LlamaMLP(
    (gate_proj): Linear(in_features=4096, out_features=11008, bias=False)
    (up_proj): Linear(in_features=4096, out_features=11008, bias=False)
    (down_proj): Linear(in_features=11008, out_features=4096, bias=False)
    (act_fn): SiLU()
  )
  (input_layernorm): LlamaRMSNorm()
  (post_attention_layernorm): LlamaRMSNorm()
)
即layers是一个字典,其保存了所有的层以及每层的名字。l_name
l_name
'model.layers.0'
{
    'input_layernorm': ['self_attn.k_proj', 'self_attn.q_proj', 'self_attn.v_proj'],
    'post_attention_layernorm': ['mlp.gate_proj', 'mlp.up_proj']
}
所以即ln_name依次取input_layernorm、post_attention_layernorm
        for ln_name, fc_names in norm2fcs.items():
            a_name = [f'{l_name}.{n}' for n in fc_names][0]
            print(f"a_name: {a_name}")
            ln = layer.get_submodule(ln_name)
            fcs = [layer.get_submodule(n) for n in fc_names]
full_fc_names = [f"{l_name}.{name}" for name in fc_names]
for name in full_fc_names:
    migration_scales[name] = migratrion_scale
fcs[0].weight.shape
torch.Size([11008, 4096])
fcs[0]
Linear(in_features=4096, out_features=11008, bias=False)
scales.shape
torch.Size([4096])

fcs
[Linear(in_features=4...ias=False), Linear(in_features=4...ias=False)]
special variables
function variables
0:
Linear(in_features=4096, out_features=11008, bias=False)
1:
Linear(in_features=4096, out_features=11008, bias=False)
len():
2
concat_w.shape
torch.Size([22016, 4096])
从上面的输出,输入特征,输出特征对应的weight是反过来的,weight的形状为([out_features, in_features]),并且在计算时,将多个全连接层拼接在一起,而且是按照行拼接的。相当于压在了一起。
act_scales.shape, concat_w.shape, scales.shape
(torch.Size([4096]), torch.Size([12288, 4096]), torch.Size([4096]))
从上面的输出可以看出,在执行量化时,主要是以列数为准。
过程
记录迁移尺度向量
重点关注了ln_fcs,因为需要重新处理layernorm。
对于fc_fcs,直接融合即可。
错误分析
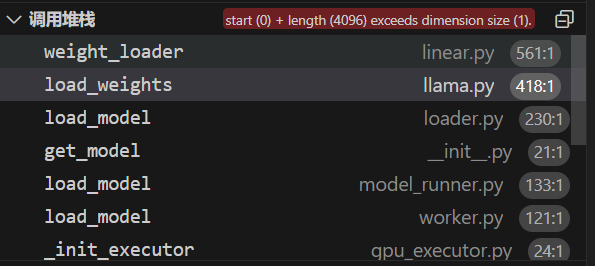
vllm程序将使用DefaultModelLoader载入这个模型权重,
模型结构已经生成
load_weights
关键是载入权重了
def load_weights(self, weights: Iterable[Tuple[str, torch.Tensor]]):
        stacked_params_mapping = [
            # (param_name, shard_name, shard_id)
            (".qkv_proj", ".q_proj", "q"),
            (".qkv_proj", ".k_proj", "k"),
            (".qkv_proj", ".v_proj", "v"),
            (".gate_up_proj", ".gate_proj", 0),
            (".gate_up_proj", ".up_proj", 1),
        ]
        params_dict = dict(self.named_parameters())
        for name, loaded_weight in weights:
上面显示了堆叠的参数映射。
class QKVParallelLinear(ColumnParallelLinear):
    """Linear layers for the attention's QKV transformation.

    Linear layers for the linear transformation of the query, key, and value
    vectors in the attention layer. The weight matrix is concatenated along
    the output dimension. The layer is parallelized along the head dimension.
    When the number of key/value heads is smaller than the number of query
    heads (e.g., multi-query/grouped-query attention), the key/value head may
    be replicated while the query heads are partitioned.

    Args:
        hidden_size: input hidden state size of the transformer.
        head_size: size of each attention head.
        total_num_heads: total number of attention query heads.
        total_num_kv_heads: total number of attention key/value heads. If
                            None, assume total_num_kv_heads = total_num_heads.
        bias: If true, add bias.
        skip_bias_add: This was added to enable performance optimizations where
                       bias can be fused with other element-wise operations. we
                       skip adding bias but instead return it.
        params_dtype: Data type for the parameters.
        quant_config: Quantization configure.
    """
这主要是input_dim, output_dim不理解导致的问题。
在神经网络和深度学习中,input_dim、output_dim 和 packed_dim 是常见的术语,尤其是在涉及多维数据和张量操作时。下面我将逐一解释这些术语的含义,并使用 PyTorch 演示它们的应用。

input_dim
input_dim 通常表示输入数据的维度或特征数。在神经网络的上下文中,这通常是输入层的大小。例如,在处理图像时,input_dim 可能是每个图像的像素数;在处理文本时,input_dim 可能是词向量的维度。

output_dim
output_dim 通常表示输出数据的维度或特征数。在神经网络的上下文中,这通常是输出层的大小。例如,对于分类任务,output_dim 可能是类别的数量;对于回归任务,output_dim 可能是输出值的数量。

packed_dim
packed_dim 这个术语比较少见,但在某些上下文中可能用来表示压缩或重新排列后的维度。它可能用于描述数据在某种处理后(如批量处理或降维处理)得到的新维度。
我们来用一个简单的例子演示如何在 PyTorch 中使用这些概念。
假设我们有一个简单的全连接神经网络层(线性层),其输入维度为 input_dim,输出维度为 output_dim。我们会创建一个输入张量(假设有一个批次大小为 batch_size),并通过这个线性层处理。
import torch
import torch.nn as nn

# 定义输入、输出和批次大小
input_dim = 10   # 输入特征数
output_dim = 5   # 输出特征数
batch_size = 4   # 批次大小

# 创建一个全连接层
linear_layer = nn.Linear(input_dim, output_dim)

# 创建一个输入张量(批次大小 x 输入特征数)
input_tensor = torch.randn(batch_size, input_dim)

# 通过线性层处理
output_tensor = linear_layer(input_tensor)

print("Input Tensor Shape:", input_tensor.shape)
print("Output Tensor Shape:", output_tensor.shape)
输入张量 input_tensor:形状为 (batch_size, input_dim),表示一个批次中有 batch_size 个样本,每个样本有 input_dim 个特征。
线性层 linear_layer:输入维度为 input_dim,输出维度为 output_dim,用于将输入特征转换为输出特征。
输出张量 output_tensor:形状为 (batch_size, output_dim),表示一个批次中有 batch_size 个样本,每个样本有 output_dim 个特征。
代码编辑
root@516d350076b6:/mnt/self-define/sunning/lmdeploy/lmdeploy# git diff 63c5da6051c85a13087ac7ef6935a89c05e0a5cf aeda1ac7992e39c86f55de3aeb2be95e60856030
diff --git a/lmdeploy/lite/apis/smooth_quant.py b/lmdeploy/lite/apis/smooth_quant.py
index 3d1bd2b..7b432d5 100644
--- a/lmdeploy/lite/apis/smooth_quant.py
+++ b/lmdeploy/lite/apis/smooth_quant.py
@@ -124,20 +124,18 @@ def smooth_quant(model: str,
         awq_layers(layers, fc2fcs, norm2fcs, act_scales, awq_ratios, -1,
                    device)
     else:
-        migration_scales =  smooth_layers(layers, fc2fcs, norm2fcs, act_scales, -1, device)
+        smooth_layers(layers, fc2fcs, norm2fcs, act_scales, -1, device)

     rmsnorms = collect_target_modules(model, norm_type)

     for name, linear in fcs.items():
         linear.to(device)
         q_linear = QLinear.from_float(linear)
-        q_linear.migration_scale.copy_(migration_scales[name])
         parent_name, _, child_name = name.rpartition('.')
         parent = model.get_submodule(parent_name)
         setattr(parent, child_name, q_linear)
         linear.to('cpu')
-
-    #TODO <E9><9C><80><E8><A6><81><E6><B3><A8><E9><87><8A><E6><8E><89><E8><AF><A5><E6><AE><B5><E8><90><BD>
+
     for name, norm in rmsnorms.items():
         norm.to(device)
         q_norm = QRMSNorm.from_float(norm)
diff --git a/lmdeploy/lite/quantization/awq.py b/lmdeploy/lite/quantization/awq.py
index f321177..508a26c 100644
--- a/lmdeploy/lite/quantization/awq.py
+++ b/lmdeploy/lite/quantization/awq.py
@@ -248,7 +248,7 @@ def smooth_layers(layers,
                   group_size=-1,
                   device='cuda'):
     """Apply weight smoothing based on input scales."""
-    migration_scales = {}
+
     for l_name, layer in layers.items():
         layer.to(device)
         for ln_name, fc_names in norm2fcs.items():
@@ -256,24 +256,18 @@ def smooth_layers(layers,

             ln = layer.get_submodule(ln_name)
             fcs = [layer.get_submodule(n) for n in fc_names]
-            migration_scale = smooth_ln_fcs(ln, fcs, a_scales[a_name], group_size)
-            full_fc_names = [f"{l_name}.{name}" for name in fc_names]
-            migration_scales.update({name: migration_scale for name in full_fc_names})
+            smooth_ln_fcs(ln, fcs, a_scales[a_name], group_size)

         for f_name, fc_names in fc2fcs.items():
             a_name = [f'{l_name}.{n}' for n in fc_names][0]

             fc = layer.get_submodule(f_name)
             fcs = [layer.get_submodule(n) for n in fc_names]
-
-            migration_scale = smooth_fc_fcs(fc, fcs, a_scales[a_name], group_size)
-            full_fc_names = [f"{l_name}.{name}" for name in fc_names]
-            migration_scales.update({name: migration_scale for name in full_fc_names})
+
+            smooth_fc_fcs(fc, fcs, a_scales[a_name], group_size)

         layer.to('cpu')
         print(f'{l_name} smooth weight done.')
-
-    return migration_scales


 def pseudo_quantize_tensor(w,
diff --git a/lmdeploy/pytorch/models/q_modules.py b/lmdeploy/pytorch/models/q_modules.py
index be3d97f..001fab7 100644
--- a/lmdeploy/pytorch/models/q_modules.py
+++ b/lmdeploy/pytorch/models/q_modules.py
@@ -96,11 +96,6 @@ class QLinear(nn.Module):
         self.register_buffer(
             'scale',
             torch.empty((out_features, 1), device=device, dtype=torch.float32))
-
-        self.register_buffer(
-            'migration_scale',
-            torch.empty((in_features), device=device, dtype=torch.float32))
-
         if bias:
             self.register_buffer('bias',
                                  torch.empty(out_features, **factory_kwargs))
主要是修改的如下的文件:
/lmdeploy/pytorch/models/q_modules.py
/lmdeploy/lite/apis/smooth_quant.py
/lmdeploy/lite/quantization/awq.py
这样执行之后导出之后,程序会将模型顺利导出到 pytorch_model.bin.index.json
{
  "metadata": {
    "total_size": 7010820096
  },
  "weight_map": {
    "lm_head.weight": "pytorch_model-00004-of-00004.bin",
    "model.embed_tokens.weight": "pytorch_model-00001-of-00004.bin",
    "model.layers.0.input_layernorm.weight": "pytorch_model-00001-of-00004.bin",
    "model.layers.0.mlp.down_proj.migration_scale": "pytorch_model-00001-of-00004.bin",
    "model.layers.0.mlp.down_proj.scale": "pytorch_model-00001-of-00004.bin",
    "model.layers.0.mlp.down_proj.weight": "pytorch_model-00001-of-00004.bin",
    "model.layers.0.mlp.gate_proj.migration_scale": "pytorch_model-00001-of-00004.bin",
    "model.layers.0.mlp.gate_proj.scale": "pytorch_model-00001-of-00004.bin",
    "model.layers.0.mlp.gate_proj.weight": "pytorch_model-00001-of-00004.bin",
    "model.layers.0.mlp.up_proj.migration_scale": "pytorch_model-00001-of-00004.bin",
    "model.layers.0.mlp.up_proj.scale": "pytorch_model-00001-of-00004.bin",
    "model.layers.0.mlp.up_proj.weight": "pytorch_model-00001-of-00004.bin",
    "model.layers.0.post_attention_layernorm.weight": "pytorch_model-00001-of-00004.bin",
    "model.layers.0.self_attn.k_proj.migration_scale": "pytorch_model-00001-of-00004.bin",
    "model.layers.0.self_attn.k_proj.scale": "pytorch_model-00001-of-00004.bin",
    "model.layers.0.self_attn.k_proj.weight": "pytorch_model-00001-of-00004.bin",
    "model.layers.0.self_attn.o_proj.migration_scale": "pytorch_model-00001-of-00004.bin",
    "model.layers.0.self_attn.o_proj.scale": "pytorch_model-00001-of-00004.bin",
    "model.layers.0.self_attn.o_proj.weight": "pytorch_model-00001-of-00004.bin",
    "model.layers.0.self_attn.q_proj.migration_scale": "pytorch_model-00001-of-00004.bin",
    "model.layers.0.self_attn.q_proj.scale": "pytorch_model-00001-of-00004.bin",
    "model.layers.0.self_attn.q_proj.weight": "pytorch_model-00001-of-00004.bin",
    "model.layers.0.self_attn.v_proj.migration_scale": "pytorch_model-00001-of-00004.bin",
    "model.layers.0.self_attn.v_proj.scale": "pytorch_model-00001-of-00004.bin",
    "model.layers.0.self_attn.v_proj.weight": "pytorch_model-00001-of-00004.bin",
     ...,
     "model.norm.weight": "pytorch_model-00004-of-00004.bin"
  }
}
在llama的模型结构中,单层共有7个线性层,因此,对于每个Linear 会有3个部分,因此,会得到21个成分。
理解量化的过程
论文理论


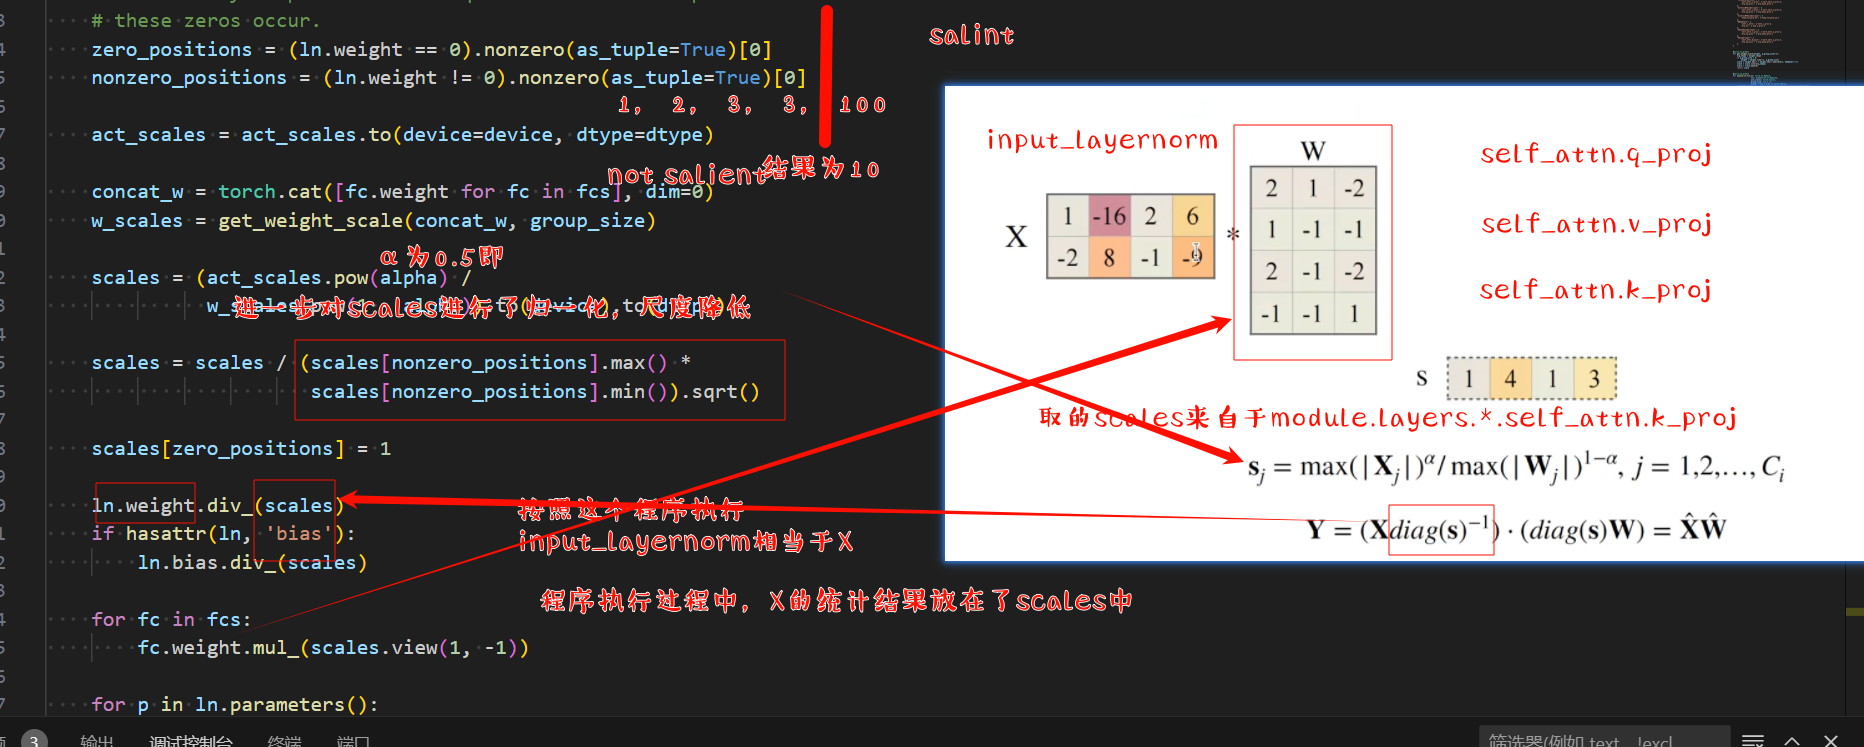
上图是很清楚的,我们首先统计出对于X,X按列取了最大值,得到一个向量,当然这个绝对值最大值是需要校准的。这个是跨行进行,即第0维。
[2, 16, 2, 9]
然后对于权重,我们求按列的最大值,即第一维度,求取绝对值最大值,得到了最大向量
[2, 1, 2, 1]
我们采用α=0.5,毕竟这是一个sweet number.
就可以得到迁移向量,s=
[1, 4, 1, 3]
计算w_scale
观察实际的代码演示,可以主要查看smooth_ln_fcs这个接口
    concat_w = torch.cat([fc.weight for fc in fcs], dim=0)
    w_scales = get_weight_scale(concat_w, group_size)
从上述代码看,concat_w相当于将权重按照0维度拼接在一起。实现的效果是将张量连接concatenate在一起,把它们端对端地叠起来形成一个更大的张量。我们只需要提供张量列表,并给出沿那个轴连接。
- 轴0, 按行,形状的第一个元素
- 按列 轴1, 形状的第二个元素。
按照轴0进行拼接,则结果的形状为(x.shape(0)+y.shape(0), x.shape(1)),即列的数量保持不变,而行变多,相当于积累了更多的样本数量。
按照轴1进行拼接,则结果的形状为(x.shape(0), x.shape(1)+y.shape(1)),即行数保持不变,而列数增多。
X = np.arange(12).reshape(3, 4)
Y = np.array([[2, 1, 4, 3], [1, 2, 3, 4], [4, 3, 2, 1]])
np.concatenate([X, Y], axis=0), np.concatenate([X, Y], axis=1)
从结果可以看出实际效果如下所示:
(array([[ 0.,  1.,  2.,  3.],
        [ 4.,  5.,  6.,  7.],
        [ 8.,  9., 10., 11.],
        [ 2.,  1.,  4.,  3.],
        [ 1.,  2.,  3.,  4.],
        [ 4.,  3.,  2.,  1.]]),
 array([[ 0.,  1.,  2.,  3.,  2.,  1.,  4.,  3.],
        [ 4.,  5.,  6.,  7.,  1.,  2.,  3.,  4.],
        [ 8.,  9., 10., 11.,  4.,  3.,  2.,  1.]]))
所以关键是get_weight_scale函数,获取了权重的scale
@torch.no_grad()
def get_weight_scale(weight, q_group_size=-1):
    org_shape = weight.shape
    if q_group_size > 0:
        weight = weight.view(-1, q_group_size)
    scale = weight.abs() / weight.abs().amax(dim=1, keepdim=True)
    scale = scale.view(org_shape)
    scale = scale.mean(0)
    return scale
上述函数,对于权重数据进行归一化,然后最后按照行求取了均值。然后就是恢复形状,求出了均值。可以看到scale的形状和input_dime的形状是相同的。
该函数用于计算给定权重参数的权重缩放因子。函数接受两个参数:weight(待计算权重缩放因子的权重参数)和q_group_size(量化组大小,默认为-1)。
- 首先,函数获取原始权重参数的形状并保存为
org_shape。 - 如果
q_group_size大于0,则将权重参数视图重塑为(-1, q_group_size)。 - 接下来,函数计算每个元素的绝对值,并将其除以每行的最大绝对值(使用
amax函数),得到一个缩放因子的视图。 - 然后,将该视图重新调整为原始形状。
- 最后,函数计算所有通道的平均缩放因子,并返回该平均值作为权重缩放因子。
进一步,发散,可以得到nn.Linear 这个Module
在 PyTorch 中,nn.Linear 模块表示一个线性层(也称为全连接层或密集层),用于实现线性变换。其权重张量的输入维度和输出维度与输入特征和输出特征之间有直接关系。
nn.Linear 模块的定义
nn.Linear 的构造函数如下:
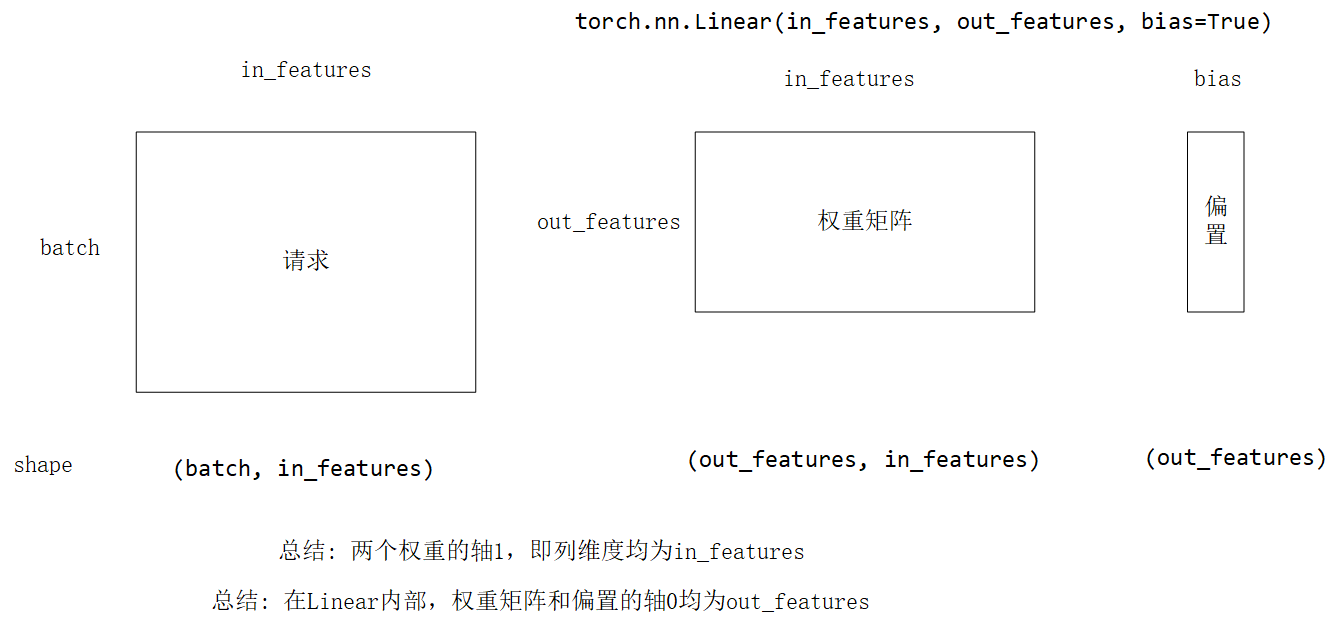
torch.nn.Linear(in_features, out_features, bias=True)
in_features:输入特征的数量,即输入张量的最后一个维度的大小。out_features:输出特征的数量,即输出张量的最后一个维度的大小。bias:是否使用偏置项。默认值为True。
权重张量的维度
- 权重张量
weight的维度是(out_features, in_features)。这意味着每个输出特征有一组与输入特征相对应的权重。
输入特征和输出特征的关系
- 输入特征:输入张量的最后一个维度的大小。
- 输出特征:输出张量的最后一个维度的大小。
关于形状示意图,可以查看下图:
计算过程
对于一个输入张量 x(形状为 (batch_size, in_features)),通过线性层后的输出张量 y 的形状为 (batch_size, out_features)。计算过程如下:
y=x⋅WT+by = x \cdot W^T + by=x⋅WT+b
其中:
- x 是输入张量,形状为
(batch_size, in_features)。 - W 是权重张量,形状为
(out_features, in_features)。 - b 是偏置项(如果存在),形状为
(out_features)。 - y 是输出张量,形状为
(batch_size, out_features)。
该函数的作用是在量化神经网络权重时,为每个权重通道计算一个缩放因子,以保持量化后的权重尽可能接近原始权重。
    for fc in fcs:
        fc.weight.mul_(scales.view(1, -1))
# 修改全连接层(fc)权重
# 使用`scales`张量的元素与`fc.weight`对应列的元素相乘
fc.weight.mul_(scales.view(1, -1))
功能解析:

当scales是一个具有torch.Size([4096])形状的一维张量时:

scales.view(1, -1): 此操作将scales从形状(4096,)转换为(1, 4096)。这样做的目的是为了能够与fc.weight的每一列进行逐元素相乘。假设fc.weight的形状为(N, 4096),其中N是输出特征的数量。

fc.weight.mul_(...): 这一步将scales的每一项与fc.weight的相应列进行乘法运算,即scales中的第一个元素会与fc.weight的第一列相乘,第二个元素与第二列相乘,以此类推。由于mul_是原地操作,fc.weight的值会被直接更新。

关键点:

这种操作常用于神经网络训练中,比如在特定情况下调整权重,如正则化、学习率衰减或应用特定的权重初始化策略。
确保scales的长度与fc.weight的列数相匹配,否则将引发形状不兼容的错误。
总结
在这个过程中,还是有很多的东西不明白的,很多的torch的API需要深刻的理解和体会,深度学习,也基本上都是逻辑组成的,了解大概之后,就可以上手了,不要有畏难的情绪。不过在这个过程中,真的和熟练的人沟通,放下那个可怜的不好意思,认真的去理解别人头脑中已经理解的东西,才是真正的王道。


 268
268

 被折叠的 条评论
为什么被折叠?
被折叠的 条评论
为什么被折叠?
 到【灌水乐园】发言


