创建项目 | 文件与显示 | 像素操作 | 图像彩色类型转换 | 模糊、平滑、去噪 | 锐化、边缘检测 | 二值化 | 形态学 | 位置变换 | 直方图 | 霍夫变换 | 图像优化 | 图像分割
平移、旋转、缩放、翻转、剪切等变换都属于仿射变换,而仿射变换又是透视变换的一种。所有仿射变换都可以用三个点到另外三个点去描述,而透视变换需要四个点。我们拍摄的图像里面,一般矩形的物体(例如纸张)都会变形,如果要转回规整的矩形,就要使用透视变换。

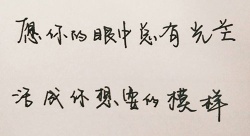
在本教程中,使用的原图都是:

一、翻转
Mat src = new Mat(img_word);

Mat map_x = new Mat(src.Size(), MatType.CV_32FC1);
Mat map_y = new Mat(src.Size(), MatType.CV_32FC1);
for (int i = 0; i < src.Width; i++)
{
    for (int j = 0; j < src.Height; j++)
    {
        map_x.Set(j, i, (float)(src.Width - i));
        map_y.Set(j, i, (float)j);
    }
}

Mat result = new Mat();
Cv2.Remap(src, result, map_x, map_y);
result.SaveImage(img_result);
效果如下:

二、旋转
Mat src = new Mat(img_word);
Mat M = Cv2.GetRotationMatrix2D(new Point2f(src.Width / 2, src.Height / 2), 30, 1);
Mat result = new Mat();
Cv2.WarpAffine(src, result, M, src.Size());
result.SaveImage(img_result);
效果如下:

三、缩放
Mat src = new Mat(img_word);
Mat result = new Mat();
Cv2.Resize(src, result, new OpenCvSharp.Size(src.Width / 2, src.Height / 2));
result.SaveImage(img_result);
效果如下:

四、平移
Mat src = new Mat(img_word);

Mat map_x = new Mat(src.Size(), MatType.CV_32FC1);
Mat map_y = new Mat(src.Size(), MatType.CV_32FC1);
for (int i = 0; i < src.Width - 100; i++)
{
    for (int j = 0; j < src.Height; j++)
    {
        map_x.Set(j, i, (float)(i + 100));
        map_y.Set(j, i, (float)j);
    }
}

Mat result = new Mat();
Cv2.Remap(src, result, map_x, map_y);
result.SaveImage(img_result);
效果如下:

五、剪切
Mat src = new Mat(img_word);
Mat M = Cv2.GetAffineTransform(new Point2f[] { new Point2f(0, 0), new Point2f(0, src.Height), new Point2f(src.Width, src.Height) },
    new Point2f[] { new Point2f(40, 40), new Point2f(0, src.Height), new Point2f(src.Width, src.Height) });
Mat result = new Mat();
Cv2.WarpAffine(src, result, M, new OpenCvSharp.Size(src.Width + 50, src.Height));
result.SaveImage(img_result);
效果如下:

六、透视变换
Mat src = new Mat(img_word);
Mat M = Cv2.GetPerspectiveTransform(new Point2f[] { new Point2f(0, 0), new Point2f(src.Width, 0), new Point2f(0, src.Height), new Point2f(src.Width, src.Height) },
    new Point2f[] { new Point2f(40, 40), new Point2f(src.Width - 40, 40), new Point2f(0, src.Height), new Point2f(src.Width, src.Height) });
Mat result = new Mat();
Cv2.WarpPerspective(src, result, M, new OpenCvSharp.Size(src.Width, src.Height));
result.SaveImage(img_result);
效果如下:


 3344
3344


 被折叠的 条评论
为什么被折叠?


