管道与重定向
只有在开水里,茶叶才能展开生命浓郁的香气.
一、重定向
标准输入、标准正确输出、标准错误输出
![](https://img-blog.csdnimg.cn/img_convert/a29fe32532abebe84cb8701f659849c7.png)
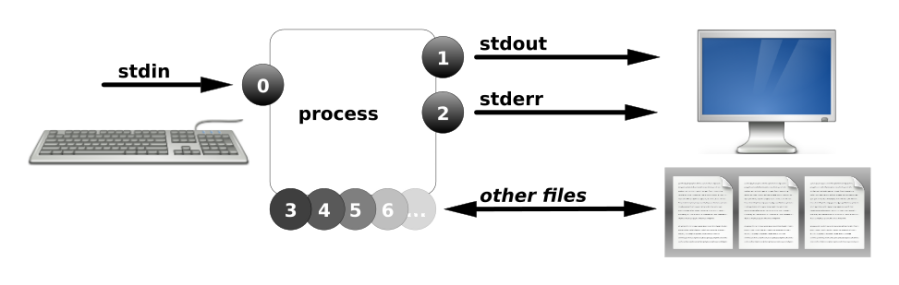
进程在运行的过程中根据需要会打开多个文件,每打开一个文件会有一个数字标识。这个标识叫文件描述符。
进程使用文件描述符来管理打开的文件(FD----file descriptors).
文件描述符:每打开一个程序都会有文件描述
0, 1, and 2, known as standard input, standard output, and standard error
0,标准输入(键盘)
1,标准输出
2,标准错误,
3+,进程在执行过程中打开的其他文件。
&:表示正确错误混合输出
二、输出重定向 (覆盖,追加)
> ----覆盖
>> ----追加
正确输出: 1> 1>> 等价于 > >>
错误输出: 2> 2>>
拓展知识:如果想将错误的指令写到正确的里面操作时 格式为2>&1
如果想将正确的指令写到错误的里面操作时 格式为1>&2
2.1. 案例1:输出重定向(覆盖)
[root@qfedu.com ~]# date 1> date.txt #正确输出--覆盖
# 注意:如果 > 前面什么都不加默认为1,标准正确输出。
2.2.案例2:输出重定向(追加)
[root@qfedu.com ~]# date >> date.txt #正确输出--追加
2.3. 案例3:错误输出重定向
[root@qfedu.com ~]# ls /home/ /aaaaaaaaa >list.txt
ls: cannot access /aaaaaaaaa: No such file or directory
[root@qfedu.com ~]# ls /home/ /aaaaaaaaa >list.txt 2>error.txt #重定向到不同的位置
[root@qfedu.com ~]# cat error.txt
ls: cannot access /aaaaaaaaa: No such file or directory
2.4.正确和错误都输入到相同位置
[root@qfedu.com ~]# ls /home/ /aaaaaaaaa &>list.txt #混合输出到相同文件
2.5.重定向到空设备/dev/null
[root@qfedu.com ~]# ls /home/ /aaaaaaaaa >list.txt 2>/dev/null #空设备,将错误的输出丢掉
[root@qfedu.com ~]# ls /home/ /aaaaaaaaa &>/dev/null #空设备,将正确与错误的输出丢掉
echo会将输入的内容送往标准输出(打印)
echo 内容 >> 文件名或脚本里面
2.6.脚本中使用重定向
实战一(没有使用重定向)
[root@qfedu.com ~]# vim ping1.sh
#!/bin/bash
ping -c1 10.18.40.100
if [ $? -eq 0 ];then
echo "10.18.40.100 is up."
else
echo "10.18.40.100 is down!"
fi
[root@qfedu.com ~]# chmod +x ping1.sh
[root@qfedu.com ~]# ./ping1.sh #执行文件(执行脚本)
PING 10.18.40.100 (10.18.40.100) 56(84) bytes of data.
--- 10.18.40.100 ping statistics ---
1 packets transmitted, 0 received, 100% packet loss, time 0ms
10.18.40.100 is down!
实战二(使用重定向)
[root@qfedu.com ~]# vim ping1.sh
#!/bin/bash
ping -c1 10.18.40.100 &>/dev/null
if [ $? -eq 0 ];then
echo "10.18.40.100 is up." >>up.txt
else
echo "10.18.40.100 is down!"
fi
[root@qfedu.com ~]# ./ping1.sh
三、输入重定向 <
标准输入: < 等价 0<
通过输入重定向创建文件
(cat > file <<EOF )是用来创建文件或者在脚本中使用,并向文件中输入信息输入的任何东西会被写入文件中,EOF命令结束。
语法:cat > file5 <<EOF #可以写到脚本或者文件里面
EOF:开始和结束的标记。
成对使用
结尾的另一个必须定格写。
例如:
[root@qqnc ~]# cat > asd <<hello
> qwe
> qwe
> qweads
> weqe
> hello
[root@qqnc ~]# cat asd
qwe
qwe
qweads
weqe
如例子所示,并不是只用EOF结束,例子就是用的hello结尾。
实战案例一:
[root@qfedu.com ~]# cat >file4 <<EOF
> 111
> 222
> 333
> 444
> EOF
[root@qfedu.com ~]# cat file4
111
222
333
444
实战案例二
利用重定向建立多行的文件 脚本创建多行文件
[root@qfedu.com ~]# vim create_file.sh
#!/bin/bash
cat >file200.txt <<EOF
111
222
333
yyy
ccc
EOF
[root@qfedu.com ~]# chmod +x create_file.sh
[root@qfedu.com ~]# ./create_file.sh
[root@qfedu.com ~]# cat file200.txt
111
222
333
yyy
ccc
四、管道 |
用法:command1 | command2 |command3 |...
实战案例一
[root@qfedu.com ~]# rpm -qa |grep 'httpd' #查询所有安装的软件包,过滤包含httpd的包
httpd-tools-2.4.6-90.el7.centos.x86_64
httpd-2.4.6-90.el7.centos.x86_64
[root@qfedu.com ~]# ps aux | grep 'sshd'
拓展知识: 管道包换tee命令就可以保存到文件内,并打印出来,tee -a 是可以追加,单个的tee是覆盖
格式: cat /etc/passwd | tee a.txt | grep root | tee b.txt| grep bin/bash | tee c.txt
实战案例二
将/etc/passwd中的用户按UID大小排序
[root@qfedu.com ~]# sort -t":" -k3 -n /etc/passwd #以: 分隔,将第三列按字数升序
[root@qfedu.com ~]# sort -t":" -k3 -n /etc/passwd -r #以: 分隔,将第三列按字数降序
[root@qfedu.com ~]# sort -t":" -k3 -n /etc/passwd |head #以: 分隔,将第三列按字数升序看前十行
[root@qfedu.com ~]# sort -t":" -k3 -n /etc/passwd |tail #以: 分隔,将第三列按字数升序看后十行
参数详解:
sort 排序,默认升序
-t 指定分隔符
-k 指定列
-n 按数值
-r 降序
head 默认输出前十行
tail 默认输出后十行
实战案例三
[root@qfedu.com ~]# netstat -lntp | awk 'NR==3 {print $4}' | awk -F':' '{print $2}'
22
五、参数传递:xargs
对:ls cp rm 管道不能执行。所以通过xargs。
语法:
cat a.txt | xargs -i cp {} /目录
{}:前面传过来的内容
-i :为了让大括号生效
目录时 -r
解释:前面传过来的东西交给大括号
cat file.txt |xargs ls -l
前面是目录或者目录的路径。 ls - l 后面可以不加大括号,直接执行。
实战案例一
[root@qfedu.com ~]# touch /home/file{1..5}
[root@qfedu.com ~]# vim files.txt
/home/file1
/home/file2
/home/file3
/home/file4
/home/file5
[root@qfedu.com ~]# cat files.txt |ls -l #不加xargs传参,看输出结果
[root@qfedu.com ~]# cat files.txt |rm -rvf #不加xargs传参,看输出结果
[root@qfedu.com ~]# cat files.txt |xargs ls -l
-rw-r--rwx. 1 root root 12 Nov 7 21:57 /home/file1
-rw-r--r--. 1 root root 0 Nov 7 21:57 /home/file2
-rw-r--r--. 1 root root 0 Nov 7 21:57 /home/file3
-rw-r--r--. 1 root root 0 Nov 7 21:57 /home/file4
-rw-r--r--. 1 root root 0 Nov 7 21:57 /home/file5
[root@qfedu.com ~]# cat files.txt |xargs rm -rvf
removed ‘/home/file1’
removed ‘/home/file2’
removed ‘/home/file3’
removed ‘/home/file4’
removed ‘/home/file5’
实战案例二
[root@qfedu.com ~]# touch /home/file{1..5}
[root@qfedu.com ~]# # cat files.txt | xargs -i cp -rvf {} /tmp/
‘/home/file1’ -> ‘/tmp/file1’
‘/home/file2’ -> ‘/tmp/file2’
‘/home/file3’ -> ‘/tmp/file3’
‘/home/file4’ -> ‘/tmp/file4’
‘/home/file5’ -> ‘/tmp/file5’
常用小命令
[root@qfedu.com ~]# du -h /etc/ #查看目录及目录中的文件大小
[root@qfedu.com ~]# du -sh /etc/ #查看目录的总大小
[root@qfedu.com ~]# ls /etc/ | wc -l #查看目录中有多少个文件
拓展知识:
&& 运算符:
格式command1 && command2
&&左边的命令(命令1)返回真(即返回0,成功被执行)后,&&右边的命令(命令2)才能够被执行;换句话说,“如果这个命令执行成功&&那么执行这个命令”。
语法格式如下:ommand1 && command2 && command3 ...
命令之间使用 && 连接,实现逻辑与的功能。
只有在 && 左边的命令返回真(命令返回值 $? == 0),&& 右边的命令才会被执行。
只要有一个命令返回假(命令返回值 $? == 1),后面的命令就不会被执行。
示例1中,cp命令首先从root的家目录复制文件文件anaconda-ks.cfg到 /data目录下;执行成功后,使用 rm 命令删除源文件;如果删除成功则输出提示信息"SUCCESS"。
[root@a ~ ]# cp anaconda-ks.cfg /data/ && rm -rf anaconda-ks.cfg && echo "SUCCESS"
SUCCESS
|| 运算符:
格式command1 || command2
||则与&&相反。如果||左边的命令(command1)未执行成功,那么就执行||右边的命令(command2);或者换句话说,“如果这个命令执行失败了||那么就执行这个命令。
命令之间使用 || 连接,实现逻辑或的功能。
只有在 || 左边的命令返回假(命令返回值 $? == 1),|| 右边的命令才会被执行。这和 c 语言中的逻辑或语法功能相同,即实现短路逻辑或操作。
只要有一个命令返回真(命令返回值 $? == 0),后面的命令就不会被执行。
如果 dir目录不存在,将输出提示信息 fail 。
[root@a ~ ]# ls /dir $>/dev/null || echo "fail"
fail
如果 dir 目录存在,将输出 success 提示信息;否则输出 fail 提示信息。