


0.Http协议
是什么?
计算机网络通信应用层协议
如何用?
(1)客户端->服务端
请求URL:访问的网络地址,也可在get方式下用键值对,发送一些信息,长度不超过2048个字符(2kB)
requestHeader:用于设定请求的元数据如,Accept-Encoding告诉服务器客户端支持的压缩格式,User-Agent告诉服务器这个请求来自什么浏览器
requestBody(get模式没有;post有):可以用放置任何字节流。
三部分构成
(2)服务端->客户端
responseHeader:响应头,用于返回响应的元数据,如Content-Encoding告诉客户端服务器使用了什么压缩格式,Content-Type:告诉返回的的是什么格式;Set-Cookie:可以设置多条Cookie信息给客户端。
ResponseBody:返回服务器的响应数据
1.HttpURLConnection
是什么?
一个URLConnnection用于支持Http协议;Google开发的用于支持Http的客户端类。
如何用?
参考官方文档:https://developer.android.com/reference/java/net/HttpURLConnection.html
(1)获取一个新的HttpURLConnection通过调用URL.openConnection()并且转化结果为HttpURLConnection
(2)准备请求。基本的请求属性是他的URI,请求头可能包括元数据如,证书,偏好的内容类型,会话Cookies.
(3)是否上传一个请求体是可选的。实例必须被配置使用setDoOutput(true),如果包含了一个请求体。
传输数据通过写入数据流(由getOutputStream()所返回的数据流)。
(4)读取响应。响应头典型的包括元数据,如响应体的内容类型和长度,修改日期和会话Cookies。
响应体可以从数据流(由getInputStream()返回)中读取。如果响应没有响应体,这个方法将返回一个空的数据流
(5)断开连接。一旦响应体被读取,HttpURLConnection应该被关闭,通过调用disconnect().断开连接释放了有连接所
占有的资源。因此他可能被关闭或者被拒绝。
例子:
(1)获取http://www.android.com的页面
URL  url=new URL("http://www.android.com");
HttpURLConnection urlConnection=(HttpURLConnection)url.openConnecton();
try{
 InputStream in=new BufferedInputStream(urlConnection.getInputStream());
 readStream(in);
}finally{
  urlConnection.disconnected();
}
(2)发送内容(Posting Content)
上传数据到服务器,社招连接为输出,使用setDoOutput(true)
为了更好的性能做好设置setFixedLengthStreamingMode()当请求体的长度
已知,未知时设置setChunkedStreamingMode(int),否则HttpURLConnection将被
强制缓存所有的请求体在内存中于传输之前,可能会浪费甚至耗尽堆内存和增加延时。
进行上传:
HttpURLConnection urlConnection=(HttpURLConnection)url.openConnection();
try{
urlConnection .setDoOutput(true);
urlConnection.setChunkedStreamingMode(0);
OutputStream out = new BufferedOutputStream(urlConnection.getOutputStream());
writeStream(out);
InputStream in = new BufferedInputStream(urlConnection.getInputStream());
readStream(in);
}finally{
urlConnection.disconnect();
}
更加详细的用法可参考:http://blog.csdn.net/iispring/article/details/51474529
2.Volley
是什么?
官网:https://developer.android.com/training/volley/index.html
Github:https://github.com/google/volley
是Google提供的Http开源库,用于Android应用的网络请求。Volley提供的好处:
(1)网络请求的自动调度
(2)多并发的网络连接
(3)具有标准Http缓存一致性的透明磁盘和内存响应缓存
(4)支持请求优先级
(5)取消请求api。可以取消单个请求,也可以设置一块或一个范围的请求取消
(6)易于定制化,例如重试和后退
(7)强序列化这使得容易正确的填充UI,使用由网络异步获得的数据
(8)消沉bug和追踪工具。
如何用?
适用于:
(1)Volley擅长于PRC类型的操作以填充UI,例如取得一页搜索结果作为结构化的数据。
不适合于:
(2)Volley不适合于大规模下载或者数据流操作,因为Volley在解析期间将所有的返回结果存储于内存中。
对于大规模下载可以使用DownloadManager。
使用教程:
可参考:http://blog.csdn.net/guolin_blog/article/details/17482095
(1)基本用法:
(a)发送一个简单的请求
(x1)添加网络权限
(x2)使用 newRequestQueue
final TextView mTextView = (TextView) findViewById(R.id.text);
...

// Instantiate the RequestQueue.
RequestQueue queue = Volley.newRequestQueue(this);
 TextView mTextView = (TextView) findViewById(R.id.text);
...

// Instantiate the RequestQueue.
RequestQueue queue = Volley.newRequestQueue(this);
String url ="http://www.google.com";
//Request a string response from the provided URL.
StringRequest stringRequest = new StringRequest(Request.Method.GET,url,
new Response.Listener<String>(){
@Override
public void onResponse(String response){
//Display the first 500 characters of the response string.
mTextView.setText("Response is:"+response.substring(0,500));
}
},new Response.ErrorListener(){
@Override
public void onErrorResponse(VolleyError error){
mTextView.setText("That didn't work!");
}
});
//Add the request to the RequestQueue.
queue.add(stringRequest);
(x3)发送一个请求
为了发送一个请求,你必须先构建和添加一个进入RequestQueue如上所示,一旦你添加请求,它就
通过管道移动,得到服务,并对其原始响应进行解析和传送。
请求的生命周期演示:
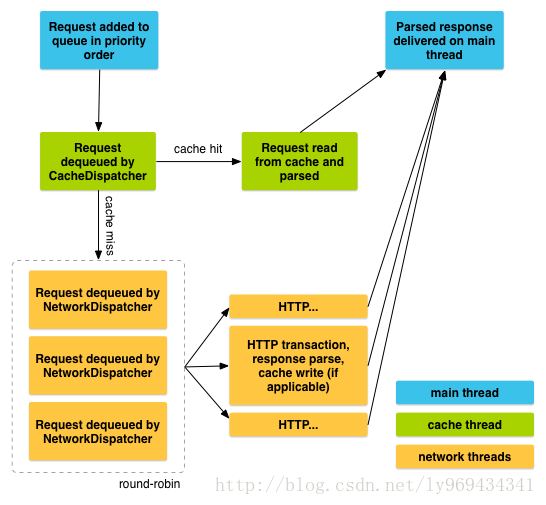
当你调用add(),Volley运行一个缓存处理线程,和一个网络分发线程池。
当你添加一个请求进入队列,他被缓存线程,接受和鉴别分类;如果请求在缓存中存在
,缓存结果在缓存线程中解析并被传送到住线程。
如果在缓存中没有命中,请求被加入到网络队列。第一个可用的网络线程将请求从队列中取出。
执行Http传输,解析响应结果在工作线程,写入缓存,并传送解析后的响应返回到住线程。
(x4)结束一个请求
参考: https://developer.android.com/training/volley/simple.html#simple
的最后一部分;
(b)设置请求队列
参考https://developer.android.com/training/volley/requestqueue.html#singleton
推荐创建一个请求队列成为单例,让请求队列在你app的生命周期里一直存在。
public class MySingleton {
	private static MySingleton mInstance;
	private RequestQueue mRequestQueue;
	private ImageLoader mImageLoader;
	private static Context mCtx;

	private MySingleton(Context context){
		mCtx=context;
		mRequestQueue=getRequestQueue();

		mImageLoader=new ImageLoader(mRequestQueue,
				new ImageLoader.ImageCache(){
			private final LruCache<String,Bitmap>
			     cache=new LruCache<String,Bitmap>(20);

			@Override
			public Bitmap getBitmap(String url){
				return cache.get(url);
			}

			@Override
			public void putBitmap(String url,Bitmap bitmap){
				cache.put(url,bitmap);
			}
		});
	}

	public static synchronized MySingleton getInstance(Context context){
		if(mInstance==null){
			mInstance=new MySingleton(context);
		}
		return mInstance;
	}

	public <T> void addToRequestQueue(Request<T> req){
		getRequestQueue().add(req);
	}

	public ImageLoader getImageLoader(){
		return mImageLoader;
	}

}
(c)做一个标准的请求
参考:https://developer.android.com/training/volley/request.html
TextView mTxtDisplay;
ImageView mImageView;
mTxtDisplay = (TextView) findViewById(R.id.txtDisplay);
String url = "http://my-json-feed";

JsonObjectRequest jsObjRequest = new JsonObjectRequest
        (Request.Method.GET, url, null, new Response.Listener<JSONObject>() {

    @Override
    public void onResponse(JSONObject response) {
        mTxtDisplay.setText("Response: " + response.toString());
    }
}, new Response.ErrorListener() {

    @Override
    public void onErrorResponse(VolleyError error) {
        // TODO Auto-generated method stub

    }
});

// Access the RequestQueue through your singleton class.
MySingleton.getInstance(this).addToRequestQueue(jsObjRequest); mTxtDisplay;
ImageView mImageView;
mTxtDisplay = (TextView) findViewById(R.id.txtDisplay);
String url = "http://my-json-feed";

JsonObjectRequest jsObjRequest = new JsonObjectRequest
        (Request.Method.GET, url, null, new Response.Listener<JSONObject>() {

    @Override
    public void onResponse(JSONObject response) {
        mTxtDisplay.setText("Response: " + response.toString());
    }
}, new Response.ErrorListener() {

    @Override
    public void onErrorResponse(VolleyError error) {
        // TODO Auto-generated method stub

    }
});

// Access the RequestQueue through your singleton class.
MySingleton.getInstance(this).addToRequestQueue(jsObjRequest);
(d)实现一个自定义的请求
参考:
参考链接:https://developer.android.com/training/volley/request-custom.html
(e)上传数据(post方式)
StringRequest stringRequest = new StringRequest(Method.POST, url, listener, errorListener);
由于StringRequest中没有提供设置PoSt参数的方法。
但是当发送Post请求时候,Volley会尝试调用StringRequest的父类-Request中的getParams()方法来获取Post参数,
因此解决方法为新建StringRequest实例时候,在StringReques的匿名类中重新getParams()方法,在这里设置Post参数
- StringRequest stringRequest = new StringRequest(Method.POST, url, listener, errorListener) {
- @Override
- protected Map<String, String> getParams() throws AuthFailureError {
- Map<String, String> map = new HashMap<String, String>();
- map.put("params1", "value1");
- map.put("params2", "value2");
- return map;
- }
- };
原理分析:
可参考:
(1)Android Volley完全解析(四),带你从源码的角度理解Volley:
http://blog.csdn.net/guolin_blog/article/details/17656437
(2)https://github.com/google/volley
3.ImageLoader
(Universal Image Loader)(UIL)
附注:Android四大图片缓存(Imageloader,Picasso,Glide,Fresco)原理、特性对比
http://www.cnblogs.com/linghu-java/p/5741358.html
是什么?
一个开源的Android图片加载库:
Github地址:https://github.com/nostra13/Android-Universal-Image-Loader
致力于提供强大的灵活的和高度可定制化的工具用于图片的加载,缓存和展示。他提供了大量的
可配置化选项,和一个很好的控制在图片加载和缓存过程中。
特征:
(1)多线程图片下载(异步或同步)
(2)广泛的自定义设置(线程池,下载器,解码器,内存和硬盘缓存,
展示图片选项等等)
(3)许多定制的选项对于每一个展示图片调用(短的图像,缓存选择,解码选择,Bitmap 处理和展示等等)
(4)图片缓存与内存 和/或 硬盘(device's file system or SD card)
(5)监听加载过程(包括下载过程)
如何用?
参考:https://github.com/nostra13/Android-Universal-Image-Loader
// Load image, decode it to Bitmap and display Bitmap in ImageView (or any other view
//	which implements ImageAware interface)
imageLoader.displayImage(imageUri, imageView, options, new ImageLoadingListener() {
	@Override
	public void onLoadingStarted(String imageUri, View view) {
		...
	}
	@Override
	public void onLoadingFailed(String imageUri, View view, FailReason failReason) {
		...
	}
	@Override
	public void onLoadingComplete(String imageUri, View view, Bitmap loadedImage) {
		...
	}
	@Override
	public void onLoadingCancelled(String imageUri, View view) {
		...
	}
}, new ImageLoadingProgressListener() {
	@Override
	public void onProgressUpdate(String imageUri, View view, int current, int total) {
		...
	}
});
原理分析:
Load & Display Task Flow

参考:http://blog.csdn.net/ly969434341/article/details/51720852
4.OkHttp
是什么?
参考:https://square.github.io/okhttp/
OKHttp是一个Http客户端
特性:
(1)Http/2支持所有的请求到同一个主机去共用一个套接字
(2)连接池减少请求延时
(3)透明的GZIP压缩下载的大小(透明压缩)--------亮点
(4)缓存响应结果避免网络重复请求
如何用?
参考:https://square.github.io/okhttp/3.x/okhttp/
可参考:https://www.jianshu.com/p/ca8a982a116b
Get A URL
This program downloads a URL and print its contents as a string
package okhttp3.guide;

import java.io.IOException;
import okhttp3.OkHttpClient;
import okhttp3.Request;
import okhttp3.Response;

public class GetExample {
  OkHttpClient client = new OkHttpClient();

  String run(String url) throws IOException {
    Request request = new Request.Builder()
        .url(url)
        .build();

    try (Response response = client.newCall(request).execute()) {
      return response.body().string();
    }
  }

  public static void main(String[] args) throws IOException {
    GetExample example = new GetExample();
    String response = example.run("https://raw.github.com/square/okhttp/master/README.md");
    System.out.println(response);
  }
}
Post To A Server
This program posts data to a service.
package okhttp3.guide;

import java.io.IOException;
import okhttp3.MediaType;
import okhttp3.OkHttpClient;
import okhttp3.Request;
import okhttp3.RequestBody;
import okhttp3.Response;

public class PostExample {
  public static final MediaType JSON
      = MediaType.parse("application/json; charset=utf-8");

  OkHttpClient client = new OkHttpClient();

  String post(String url, String json) throws IOException {
    RequestBody body = RequestBody.create(JSON, json);
    Request request = new Request.Builder()
        .url(url)
        .post(body)
        .build();
    try (Response response = client.newCall(request).execute()) {
      return response.body().string();
    }
  }

  String bowlingJson(String player1, String player2) {
    return "{'winCondition':'HIGH_SCORE',"
        + "'name':'Bowling',"
        + "'round':4,"
        + "'lastSaved':1367702411696,"
        + "'dateStarted':1367702378785,"
        + "'players':["
        + "{'name':'" + player1 + "','history':[10,8,6,7,8],'color':-13388315,'total':39},"
        + "{'name':'" + player2 + "','history':[6,10,5,10,10],'color':-48060,'total':41}"
        + "]}";
  }

  public static void main(String[] args) throws IOException {
    PostExample example = new PostExample();
    String json = example.bowlingJson("Jesse", "Jake");
    String response = example.post("http://www.roundsapp.com/post", json);
    System.out.println(response);
  }
}
原理分析:
参考:https://github.com/square/okhttp
参考:https://blog.piasy.com/2016/07/11/Understand-OkHttp/
https://blog.piasy.com/2016/07/11/Understand-OkHttp/index.html
该博主文章非常不错值得关注学习。
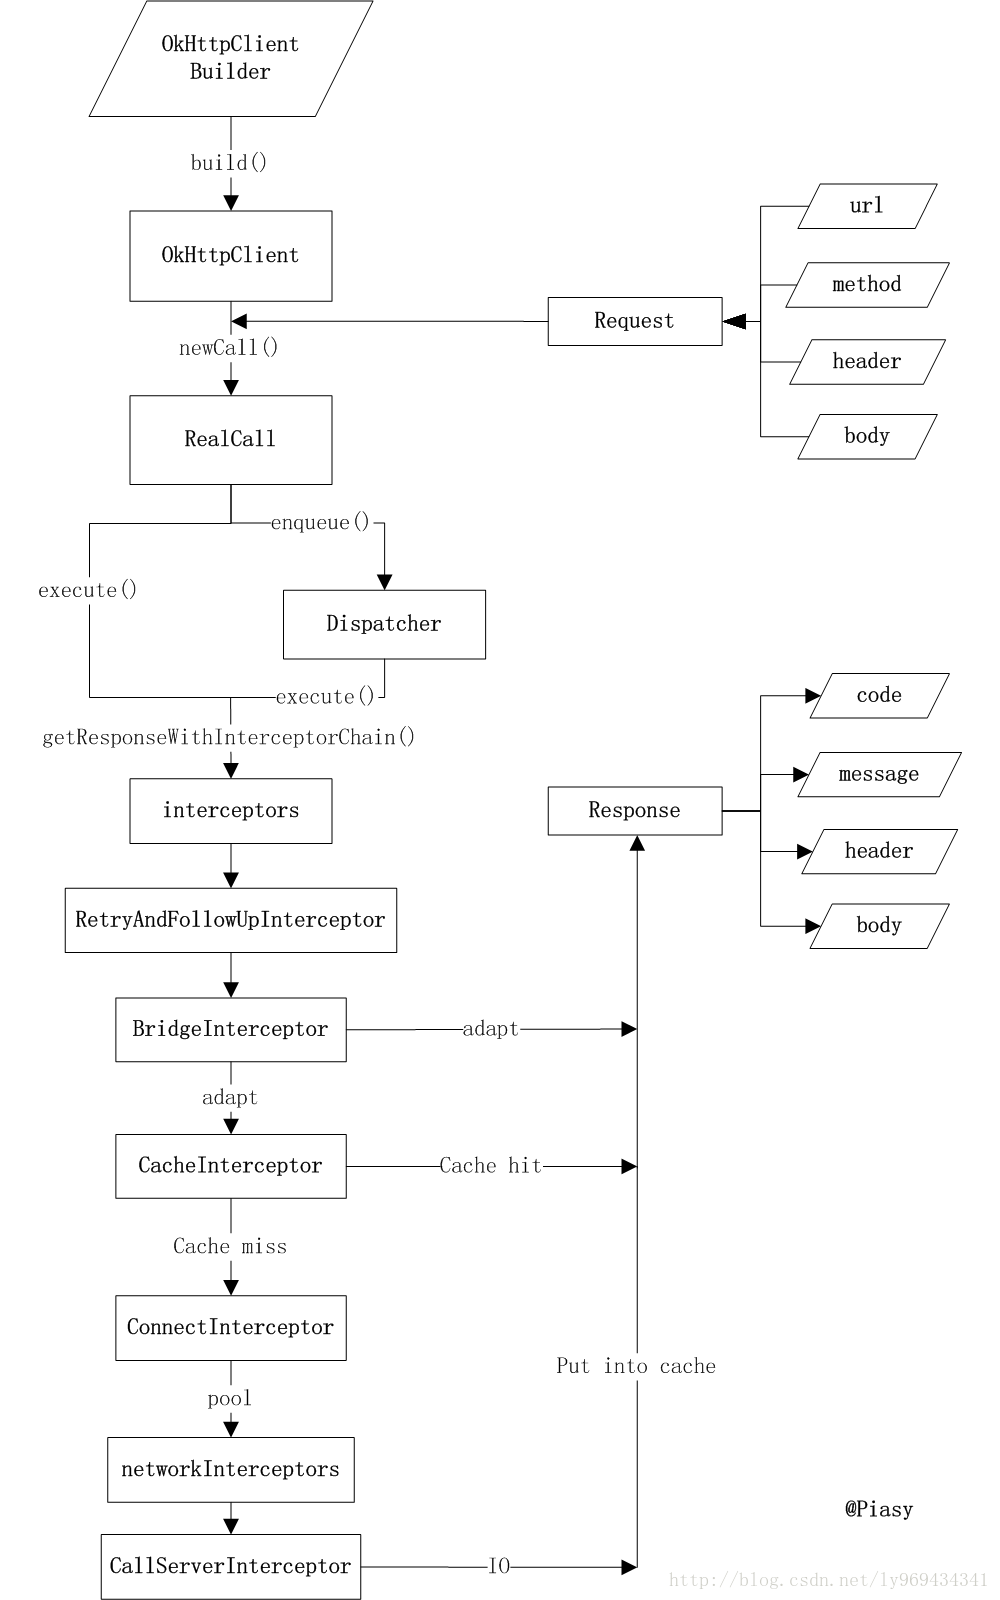
在将request如何变成response这就事情上使用了一连串的intercepter,每个Interceptor
都可能完成这件事,所以我们循着链条,让每个Interceptor自行决定能否完成任务已经怎么完成任务
(自力更生或者交给下一个Interceptor)。这样一来,完成网络请求这件事就彻底RealCall类剥离了出来。
简化了各自的责任和逻辑。——责任链模式
最后的总结分析:
轮子的构造使用参考:https://xiaozhuanlan.com/topic/4615238709
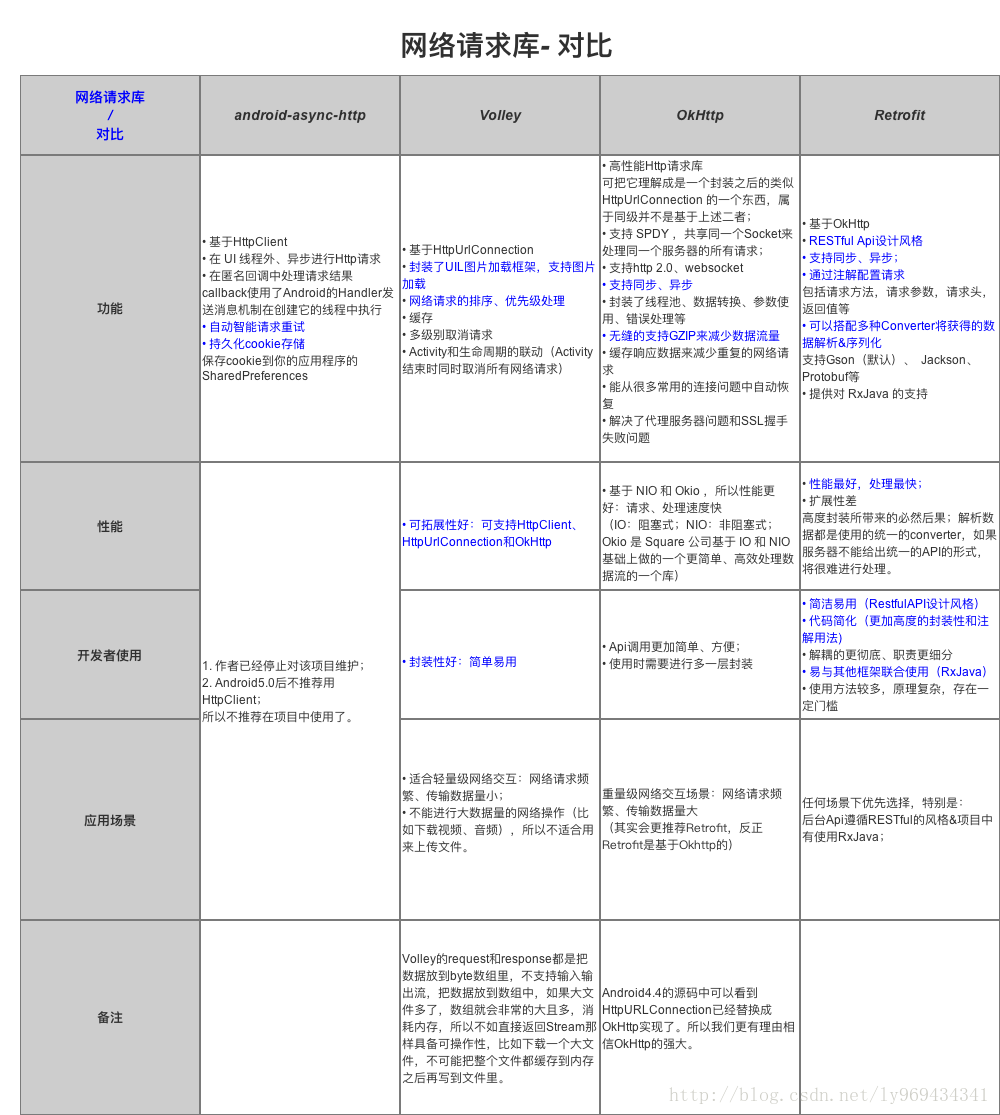
网络“三板斧”架构回顾

对比分析参考:http://blog.csdn.net/carson_ho/article/details/73732076
完美的安卓 model 层架构:
https://xiaozhuanlan.com/topic/6182975340
可以去参考这篇博客:走心的中级安卓工程师跳槽经验分享https://xiaozhuanlan.com/topic/0625137489


 1158
1158


 被折叠的 条评论
为什么被折叠?
被折叠的 条评论
为什么被折叠?
 到【灌水乐园】发言


