


版权声明:本文为博主原创文章,未经博主允许不得转载。 http://blog.csdn.net/baobao3456810/article/details/52894301
Ubuntu16.04 + Thinkpad-T440 自带显卡 + CUDA8.0
主要参考文章:http://blog.csdn.net/hjimce/article/details/51999566
有些配置上的不同,并出现了一些该文章中没有出现过的问题,记录一下
显卡:Thinkpad-T440 配置的独显 GeForce GT 720M,1G显存
环境:64位 Ubuntu16.06,CUDA 8.0
一. 安装 cuda 8.0
1. 下载
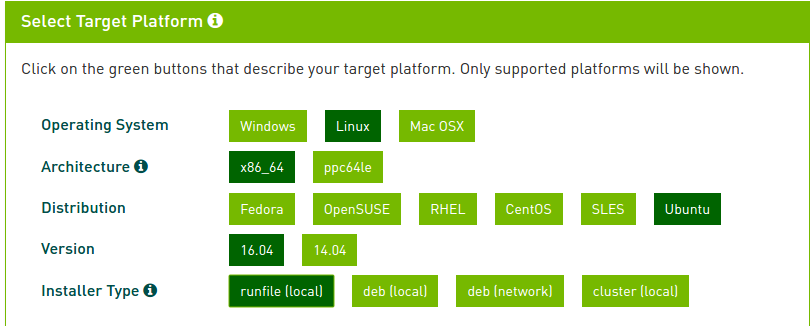
官网下载 cuda 8.0:https://developer.nvidia.com/cuda-downloads
注意:尽量选择 runfile,如下图所示:
2. 除掉旧驱动
打开终端,输入
sudo vim /etc/modprobe.d/blacklist.conf - 1
在文件最后加上以下内容,以禁用自带驱动 nouveau nvidia,但这里貌似没有去干净,后面会做进一步的处理
blacklist nouveau
sudo reboot
sudo apt-get remove --purge nvidia*- 1
- 2
- 3
重启系统
!!!安装成功后记得把加的几行代码删掉。
3. 安装 cuda 8.0
首先要结束 X-Window 的服务,否则会出现驱动无法正常安装的问题
在终端输入(注意:关闭后会黑屏,要进入tty1控制台,在黑屏状态下快捷键Ctrl+Alt+F1 即可,安装完成后会重新启动。建议在手机或其他电脑上打开说明。)
sudo service lightdm stop- 1
开始安装。进入到你下载好的 cuda_8.0.44_linux.run 的目录下,运行
chmod +x cuda*.run
sudo ./cuda*.run - 1
- 2
这里并没出现过引文中出现的X-lock问题,有需要的可以去引文中查找。
accept 协议之后,根据自己需求选择安装选项(我的做法是,有默认的默认,没有的都yes,安装路径要注意看一下)
安装完成时,应该有类似如下的提示:
===========
= Summary =
===========

Driver: Installed
Toolkit: Installed in /usr/local/cuda-8.0
Samples: Installed in ***- 1
- 2
- 3
- 4
- 5
- 6
- 7
并提示环境变量的配置 和 卸载方法。
安装完毕后,重新启动 X-Window
sudo service lightdm start- 1
若未自动回到图形界面,Ctrl+Alt+F7 可以进入到图形界面
4. 使用环境配置
ubuntu 的 gcc 编译器是 5.4.0,然而 cuda-8.0 不支持 5.0 以上的编译器,因此需要降级,把编译器版本降到 4.9
sudo apt-get install g++-4.9
sudo update-alternatives --install /usr/bin/gcc gcc /usr/bin/gcc-4.9 20
sudo update-alternatives --install /usr/bin/gcc gcc /usr/bin/gcc-5 10
sudo update-alternatives --install /usr/bin/g++ g++ /usr/bin/g++-4.9 20
sudo update-alternatives --install /usr/bin/g++ g++ /usr/bin/g++-5 10
sudo update-alternatives --install /usr/bin/cc cc /usr/bin/gcc 30
sudo update-alternatives --set cc /usr/bin/gcc
sudo update-alternatives --install /usr/bin/c++ c++ /usr/bin/g++ 30
sudo update-alternatives --set c++ /usr/bin/g++ - 1
- 2
- 3
- 4
- 5
- 6
- 7
- 8
- 9
配置环境变量
sudo vim /etc/profile- 1
在文件末尾加上
PATH=/usr/local/cuda/bin:/usr/local/cuda-8.0/bin:$PATH
export PATH - 1
- 2
在终端输入以下命令,使其生效
source /etc/profile - 1
在终端输入
sudo vim /etc/ld.so.conf.d/cuda.conf- 1
添加内容
/usr/local/cuda-8.0/lib64 - 1
5. 测试
我没有编译 examples,而是直接安装了 theano
sudo pip install theano- 1
若以安装,需加入-U参数
在用户的目录下(/home/*),创建/更改 .theanorc 文件
[global]
floatX=float32
device=gpu
base_compiledir=~/external/.theano/
allow_gc=False
warn_float64=warn
[mode]=FAST_RUN

[nvcc]
fastmath=True

[cuda]
root=/usr/local/cuda-8.0 - 1
- 2
- 3
- 4
- 5
- 6
- 7
- 8
- 9
- 10
- 11
- 12
- 13
运行下面的例子
from theano import function, config, shared, sandbox
import theano.tensor as T
import numpy
import time

vlen = 10 * 30 * 768  # 10 x #cores x # threads per core
iters = 1000

rng = numpy.random.RandomState(22)
x = shared(numpy.asarray(rng.rand(vlen), config.floatX))
f = function([], T.exp(x))
print(f.maker.fgraph.toposort())
t0 = time.time()
for i in range(iters):
    r = f()
t1 = time.time()
print("Looping %d times took %f seconds" % (iters, t1 - t0))
print("Result is %s" % (r,))
if numpy.any([isinstance(x.op, T.Elemwise) for x in f.maker.fgraph.toposort()]):
    print('Used the cpu')
else:
print('Used the gpu') - 1
- 2
- 3
- 4
- 5
- 6
- 7
- 8
- 9
- 10
- 11
- 12
- 13
- 14
- 15
- 16
- 17
- 18
- 19
- 20
- 21
- 22
可以看到结果:
Using gpu device 0: GeForce GT 720M (CNMeM is disabled, cuDNN not available)
[GpuElemwise{exp,no_inplace}(<CudaNdarrayType(float32, vector)>), HostFromGpu(GpuElemwise{exp,no_inplace}.0)]
Looping 1000 times took 0.919536 seconds
Result is [ 1.23178029  1.61879349  1.52278066 ...,  2.20771813  2.29967761
  1.62323296]
Used the gpu

Process finished with exit code 0- 1
- 2
- 3
- 4
- 5
- 6
- 7
- 8
6. 问题一
运行测试文件时
***libcublas.so.8.0: cannot open shared object file: No such file or directory- 1
解决方法是
sudo ldconfig /usr/local/cuda-8.0/lib64- 1
7. 问题二
modprobe: ERROR: could not insert 'nvidia_340_uvm': Invalid argument- 1
这个可能是由于原来的驱动没有删干净,在终端运行(提示的哪个就删掉哪个,我这里是340)
sudo apt-get remove nvidia-340- 1
8. 问题三
类似于
/etc/modprobe.d/blacklist.conf line 57: ignoring bad line starting with ×××- 1
的错误。这是由于上面加在blacklist.conf中的几行代码没有去掉,回去删掉就好了
9. 问题四
使用时需要注意的是,我的笔记本自带的显存为1G,大概要预留200M给显示,剩下内存不多了,使用theano 或 th后端的keras 相对来说还好,在使用tensorflow 时可能会用到 4-5G 的内存,所以我安装了cpu版本的tf。


 6983
6983

 被折叠的 条评论
为什么被折叠?
被折叠的 条评论
为什么被折叠?
 到【灌水乐园】发言


