8. 网络中的网络(NiN)
前文所述的LeNet、AlexNet和VGG,在设计上的共同点是:
先以由卷积层构成的模块充分抽取空间特征,再以由全连接层构成的模块来输出分类结果。
其中,AlexNet和VGG对LeNet的改进,主要在于:
如何对卷积层模块和全连接层模块,加宽(增加通道数)和加深。
网络中的网络(NiN)提出了另一个思路:
通过串联多个由卷积层和“全连接”层构成的小网络,来构建一个深层网络。
8.1 NiN块
卷积层的输入和输出通常是四维数组(样本,通道,高,宽),而全连接层的输入和输出则通常是二维数组(样本,特征)。
如果想在全连接层后再接上卷积层,需要将全连接层的输出变换为四维。
在 (四)卷积神经网络 – 3 多输入通道和多输出通道 一节里介绍的1×1卷积层,可以看作全连接层。其中,空间维度(高和宽)上的每个元素相当于样本,通道相当于特征。
因此,NiN使用1×1卷积层来替代全连接层,从而使空间信息能够自然传递到后面的层中去。
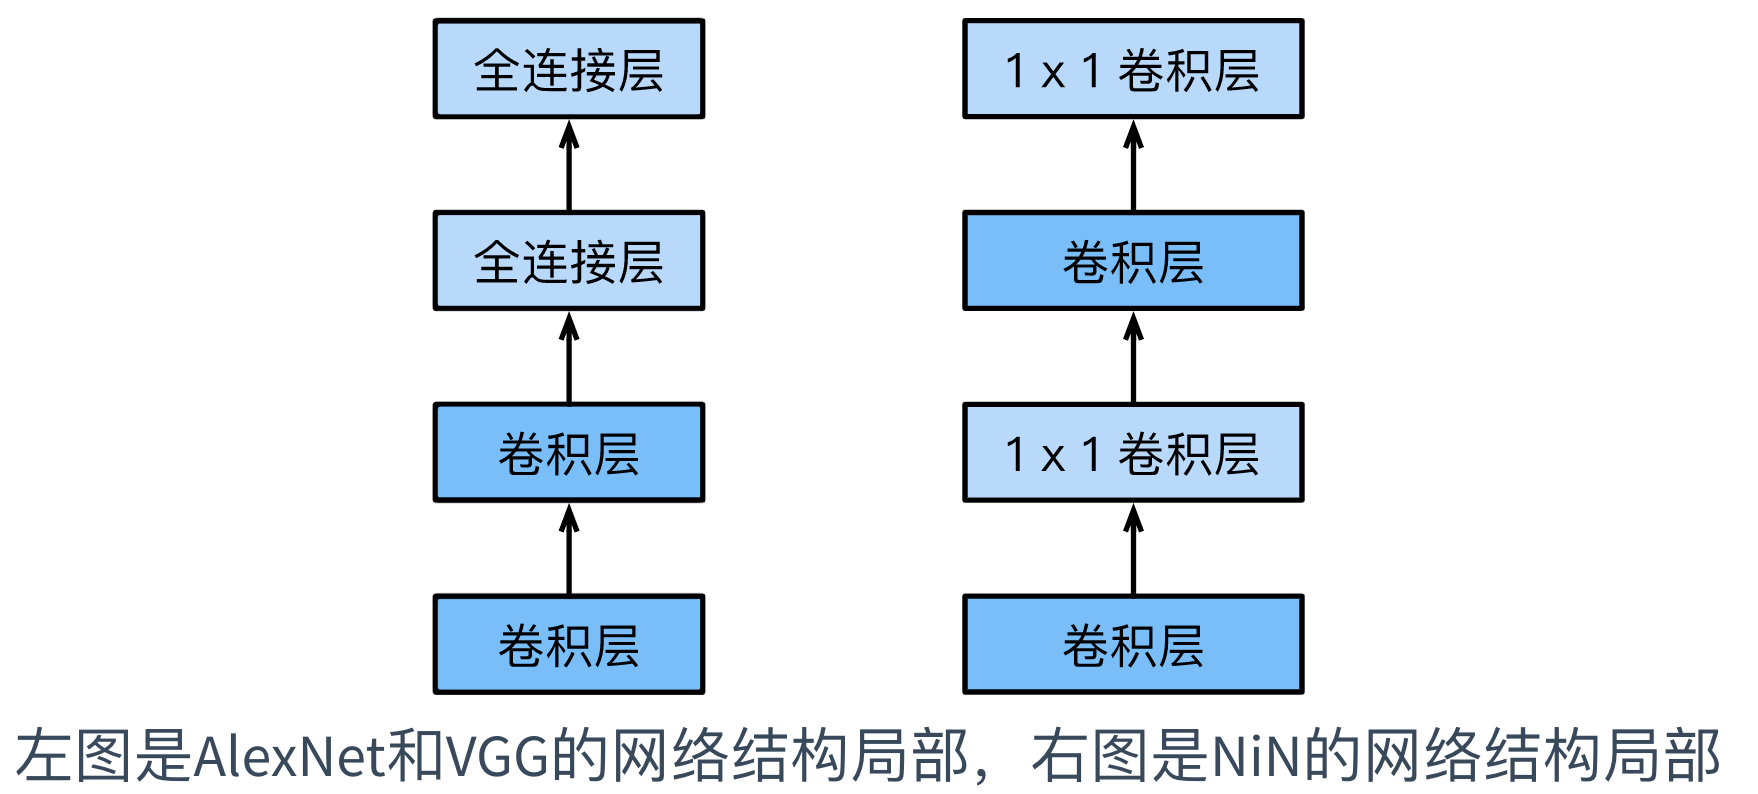
下图对比了NiN同AlexNet和VGG等网络在结构上的主要区别:

NiN块是NiN中的基础块,它由一个卷积层加两个充当全连接层的1×1卷积层串联而成。
其中,第一个卷积层的超参数可以自行设置,而第二和第三个卷积层的超参数一般是固定的。
代码实现如下:
import tensorflow as tf
print(tf.__version__)

import numpy as np

from tensorflow.keras import Sequential


for gpu in tf.config.experimental.list_physical_devices('GPU'):
    tf.config.experimental.set_memory_growth(gpu, True)
2.3.0
def nin_block(num_channels, kernel_size, strides, padding):
    blk = Sequential()
    blk.add(Conv2D(num_channels, kernel_size, strides, padding, activation='relu'))
    blk.add(Conv2D(num_channels, kernel_size=1, activation='relu'))
    blk.add(Conv2D(num_channels, kernel_size=1, activation='relu'))
    return blk
8.2 NiN模型
NiN是在AlexNet问世不久后提出的,
两者相似点:
NiN使用卷积窗口形状分别为11×11、5×5和3×3的卷积层,相应的输出通道数也与AlexNet中的一致;
每个NiN块后接一个步幅为2、窗口形状为3×3的最大池化层。
两者不同点:
使用NiN块;
NiN去掉了AlexNet最后的3个全连接层,替换为输出通道数等于标签类别数的NiN块,然后使用全局平均池化层对每个通道中所有元素求平均并直接用于分类。
其中,全局平均池化层,指窗口形状等于输入空间维形状的平均池化层。
NiN的这个设计的好处是,可以显著减小模型参数尺寸,从而缓解过拟合。
然而,该设计有时会造成获得有效模型的训练时间的增加。
代码实现如下:
net = Sequential()
net.add(nin_block(96, kernel_size=11, strides=4, padding='valid'))
net.add(MaxPool2D(pool_size=3, strides=2))
net.add(nin_block(256, kernel_size=5, strides=1, padding='same'))
net.add(MaxPool2D(pool_size=3, strides=2))
net.add(nin_block(384, kernel_size=3, strides=1, padding='same'))
net.add(MaxPool2D(pool_size=3, strides=2))
net.add(Dropout(0.5))
net.add(nin_block(10, kernel_size=3, strides=1, padding='same'))
net.add(GlobalAveragePooling2D())
net.add(Flatten())
构造一个高和宽均为224的单通道数据样本观察每一层的输出形状:
X = tf.random.uniform((1, 224, 224, 1))
for blk in net.layers:
    X = blk(X)
    print(blk.name, "output shape: ", X.shape)
sequential_1 output shape:  (1, 54, 54, 96)
max_pooling2d output shape:  (1, 26, 26, 96)
sequential_2 output shape:  (1, 26, 26, 256)
max_pooling2d_1 output shape:  (1, 12, 12, 256)
sequential_3 output shape:  (1, 12, 12, 384)
max_pooling2d_2 output shape:  (1, 5, 5, 384)
dropout output shape:  (1, 5, 5, 384)
sequential_4 output shape:  (1, 5, 5, 10)
global_average_pooling2d output shape:  (1, 10)
flatten output shape:  (1, 10)
8.3 数据获取和模型训练
依然使用Fashion-MNIST数据集来训练模型。
NiN的训练与AlexNet和VGG的类似,但这里使用的学习率更大。
数据获取
class DataLoader():

    def __init__(self):

#         fashion_mnist = tf.keras.datasets.fashion_mnist
#         (self.train_images, self.train_labels), (self.test_images, self.test_labels) = fashion_mnist.load_data()

        # load data from local

        with open("../input/fashionmnist/train-labels-idx1-ubyte", 'rb') as f:
            self.train_labels = np.frombuffer(f.read(), np.uint8, offset=8)

        with open("../input/fashionmnist/train-images-idx3-ubyte", 'rb') as f:
            self.train_images = np.frombuffer(f.read(), np.uint8, offset=16).reshape(len(self.train_labels), 28, 28)

        with open("../input/fashionmnist/t10k-labels-idx1-ubyte", 'rb') as f:
            self.test_labels = np.frombuffer(f.read(), np.uint8, offset=8)

        with open("../input/fashionmnist/t10k-images-idx3-ubyte", 'rb') as f:
            self.test_images = np.frombuffer(f.read(), np.uint8, offset=16).reshape(len(self.test_labels), 28, 28)


        # np.expand_dims(images, axis=-1) -- convert (10000, 28, 28) into (10000, 28, 28, 1)

        self.train_images = np.expand_dims(self.train_images.astype(np.float32)/255.0,axis=-1)
        self.test_images = np.expand_dims(self.test_images.astype(np.float32)/255.0,axis=-1)

        self.train_labels = self.train_labels.astype(np.int32)
        self.test_labels = self.test_labels.astype(np.int32)

        self.num_train, self.num_test = self.train_images.shape[0], self.test_images.shape[0]


    def get_batch_train(self, batch_size):
        """
        Examples
        --------
        >>> np.random.randint(0, 10, size=2)
        array([5, 7])

        """
        index = np.random.randint(0, np.shape(self.train_images)[0], batch_size)
        resized_images = tf.image.resize_with_pad(self.train_images[index],224,224)
        return resized_images.numpy(), self.train_labels[index]


    def get_batch_test(self, batch_size):
        index = np.random.randint(0, np.shape(self.test_images)[0], batch_size)
        resized_images = tf.image.resize_with_pad(self.test_images[index],224,224)
        return resized_images.numpy(), self.test_labels[index]


batch_size = 128
dataLoader = DataLoader()
x_batch, y_batch = dataLoader.get_batch_train(batch_size)
print("x_batch shape:",x_batch.shape,"y_batch shape:", y_batch.shape)
x_batch shape: (128, 224, 224, 1) y_batch shape: (128,)
模型训练
模型训练过程与(四)卷积神经网络 – 6 AlexNet 小节类似,且使用更大的学习率:
def train_nin():
    epoch = 5
    num_iter = dataLoader.num_train//batch_size
    for e in range(epoch):
        for n in range(num_iter):
            x_batch, y_batch = dataLoader.get_batch_train(batch_size)
            net.fit(x_batch, y_batch)
            if n%20 == 0:
                net.save_weights("5.8_nin_weights.h5")

optimizer = tf.keras.optimizers.Adam(lr=1e-7)

net.compile(optimizer=optimizer,
            loss='sparse_categorical_crossentropy',
            metrics=['accuracy'])

x_batch, y_batch = dataLoader.get_batch_train(batch_size)
net.fit(x_batch, y_batch)

train_nin()
读入训练好的参数,在测试集上评估准确率:
net.load_weights("5.8_nin_weights.h5")

x_test, y_test = dataLoader.get_batch_test(2000)
net.evaluate(x_test, y_test, verbose=2)
63/63 - 1s - loss: 6.9264 - accuracy: 0.0945
[6.926401138305664, 0.09449999779462814]


 496
496

 被折叠的 条评论
为什么被折叠?


