


效果
输入:
 左图 左图
|
 右图 右图
|
输出:
 视差图
视差图
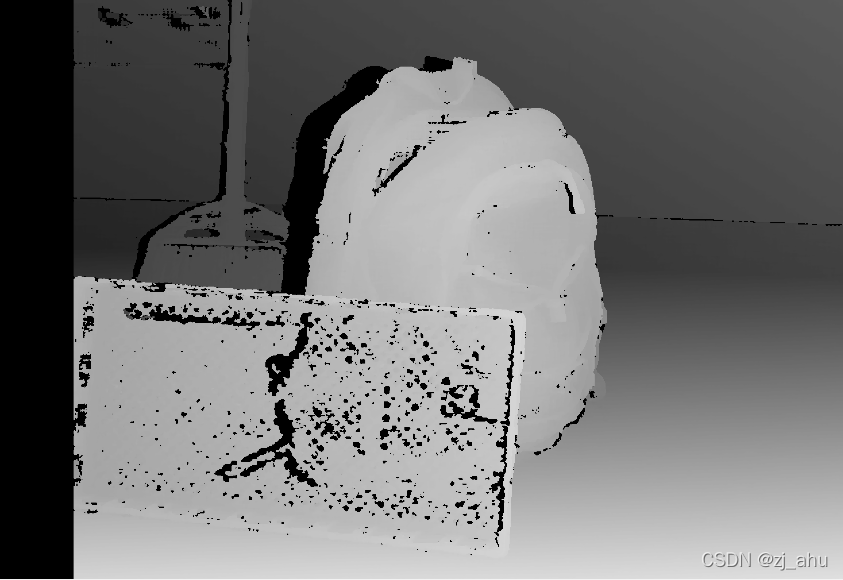
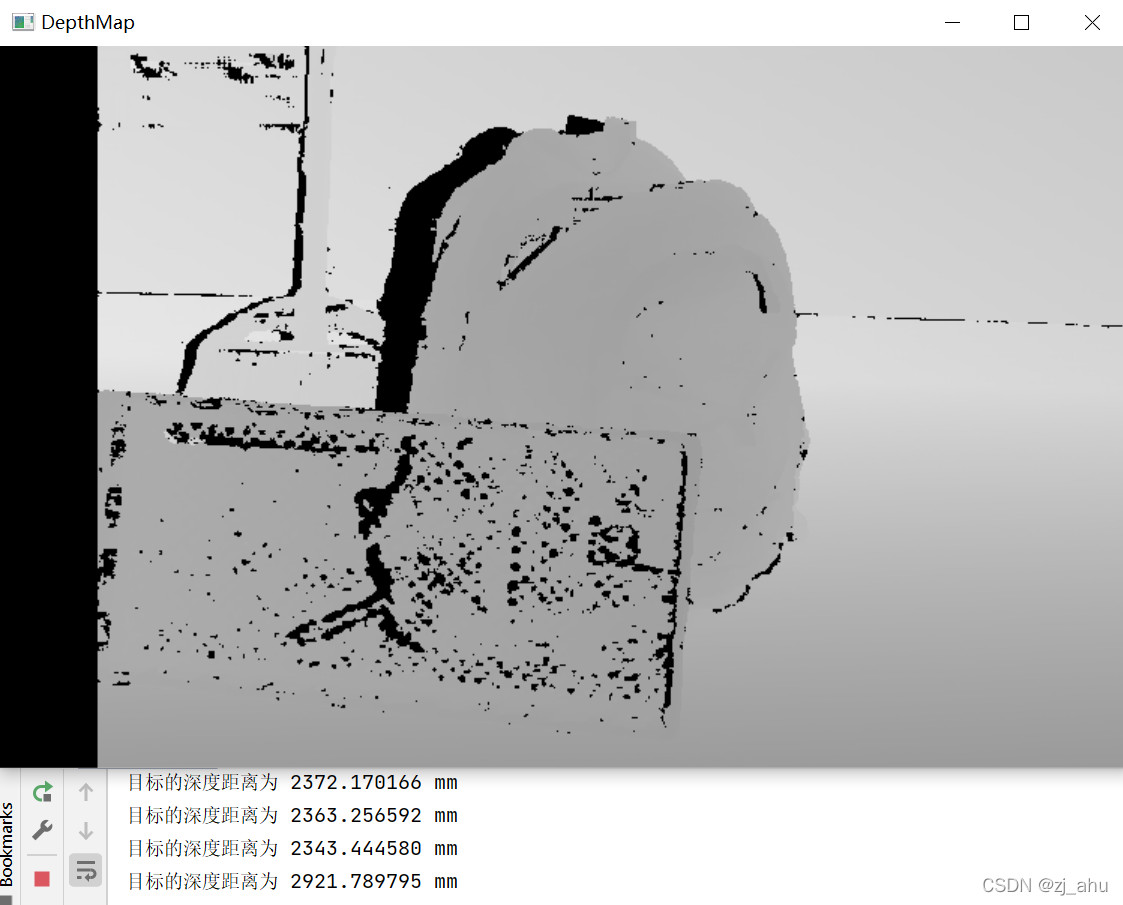 深度图
深度图
实现了鼠标点击图片中的位置,显示其深度。
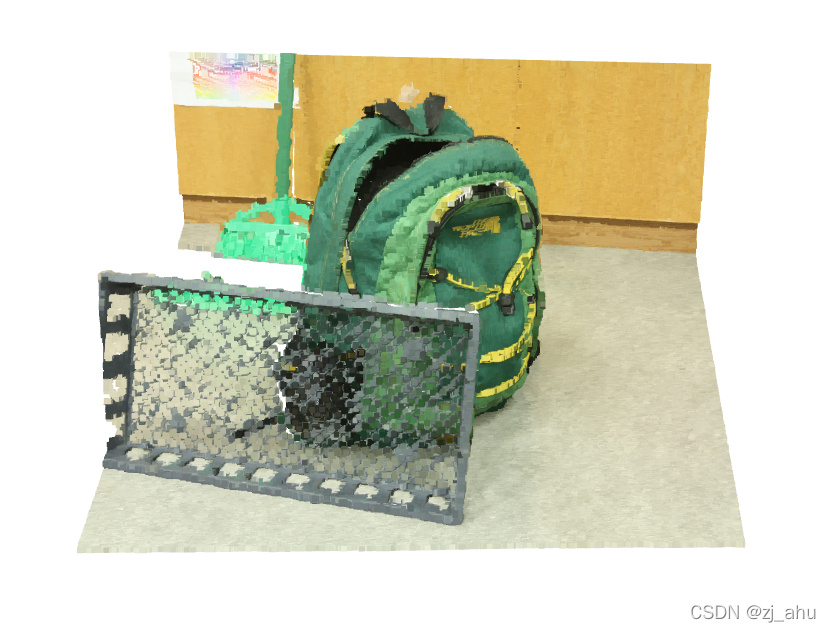 点云
点云
其他例子点云:
 bicycle bicycle
|
 motorcycle motorcycle
|
使用自己的双目摄像头拍摄的图片:
 bottle bottle
|
 laptop laptop
|
代码
stereoConfig.py
# -*- coding: utf-8 -*-
# @Time : 2022/3/25 16:06
# @Author : Zhang Jun
# @File : stereoConfig.py
# @Software: PyCharm
import numpy as np


####################仅仅是一个示例###################################


# 双目相机参数
class stereoCamera(object):
    def __init__(self):
        # 左相机内参
        self.cam_matrix_left = np.array([[1499.641, 0, 1097.616],
                                         [0., 1497.989, 772.371],
                                         [0., 0., 1.]])
        # 右相机内参
        self.cam_matrix_right = np.array([[1494.855, 0, 1067.321],
                                          [0., 1491.890, 777.983],
                                          [0., 0., 1.]])

        # 左右相机畸变系数:[k1, k2, p1, p2, k3]
        self.distortion_l = np.array([[-0.1103, 0.0789, -0.0004, 0.0017, -0.0095]])
        self.distortion_r = np.array([[-0.1065, 0.0793, -0.0002, -8.9263e-06, -0.0161]])

        # 旋转矩阵
        self.R = np.array([[0.9939, 0.0165, 0.1081],
                           [-0.0157, 0.9998, -0.0084],
                           [-0.1082, 0.0067, 0.9940]])

        # 平移矩阵
        self.T = np.array([[-423.716], [2.561], [21.973]])

        # 主点列坐标的差
        self.doffs = 0.0

        # 指示上述内外参是否为经过立体校正后的结果
        self.isRectified = False

    # def setMiddleBurryParams(self):
    #     self.cam_matrix_left = np.array([[3997.684, 0, 225.0],
    #                                      [0., 3997.684, 187.5],
    #                                      [0., 0., 1.]])
    #     self.cam_matrix_right = np.array([[3997.684, 0, 225.0],
    #                                       [0., 3997.684, 187.5],
    #                                       [0., 0., 1.]])
    #     self.distortion_l = np.zeros(shape=(5, 1), dtype=np.float64)
    #     self.distortion_r = np.zeros(shape=(5, 1), dtype=np.float64)
    #     self.R = np.identity(3, dtype=np.float64)
    #     self.T = np.array([[-193.001], [0.0], [0.0]])
    #     self.doffs = 131.111
    #     self.isRectified = True
    def setMiddleBurryParams(self):
        self.cam_matrix_left = np.array([[7190.247, 0, 1035.513],
                                         [0., 7190.247, 945.196],
                                         [0., 0., 1.]])
        self.cam_matrix_right = np.array([[7190.247, 0, 1378.036],
                                          [0., 7190.247, 945.196],
                                          [0., 0., 1.]])
        self.distortion_l = np.zeros(shape=(5, 1), dtype=np.float64)
        self.distortion_r = np.zeros(shape=(5, 1), dtype=np.float64)
        self.R = np.identity(3, dtype=np.float64)
        self.T = np.array([[-174.945], [0.0], [0.0]])
        self.doffs = 342.523
        self.isRectified = True
stereo.py
# -*- coding: utf-8 -*-
# @Time : 2022/3/25 16:05
# @Author : Zhang Jun
# @File : stereo.py
# @Software: PyCharm
# -*- coding: utf-8 -*-
import sys
import cv2
import numpy as np
import stereoConfig
import open3d as o3d


# 预处理
def preprocess(img1, img2):
    # 彩色图->灰度图
    if (img1.ndim == 3):
        img1 = cv2.cvtColor(img1, cv2.COLOR_BGR2GRAY)  # 通过OpenCV加载的图像通道顺序是BGR
    if (img2.ndim == 3):
        img2 = cv2.cvtColor(img2, cv2.COLOR_BGR2GRAY)

    # 直方图均衡
    img1 = cv2.equalizeHist(img1)
    img2 = cv2.equalizeHist(img2)

    return img1, img2


# 消除畸变
def undistortion(image, camera_matrix, dist_coeff):
    undistortion_image = cv2.undistort(image, camera_matrix, dist_coeff)

    return undistortion_image


# 获取畸变校正和立体校正的映射变换矩阵、重投影矩阵
# @param:config是一个类,存储着双目标定的参数:config = stereoconfig.stereoCamera()
def getRectifyTransform(height, width, config):
    # 读取内参和外参
    left_K = config.cam_matrix_left
    right_K = config.cam_matrix_right
    left_distortion = config.distortion_l
    right_distortion = config.distortion_r
    R = config.R
    T = config.T

    # 计算校正变换
    R1, R2, P1, P2, Q, roi1, roi2 = cv2.stereoRectify(left_K, left_distortion, right_K, right_distortion,
                                                      (width, height), R, T, alpha=0)

    map1x, map1y = cv2.initUndistortRectifyMap(left_K, left_distortion, R1, P1, (width, height), cv2.CV_32FC1)
    map2x, map2y = cv2.initUndistortRectifyMap(right_K, right_distortion, R2, P2, (width, height), cv2.CV_32FC1)

    return map1x, map1y, map2x, map2y, Q


# 畸变校正和立体校正
def rectifyImage(image1, image2, map1x, map1y, map2x, map2y):
    rectifyed_img1 = cv2.remap(image1, map1x, map1y, cv2.INTER_AREA)
    rectifyed_img2 = cv2.remap(image2, map2x, map2y, cv2.INTER_AREA)

    return rectifyed_img1, rectifyed_img2


# 立体校正检验----画线
def draw_line(image1, image2):
    # 建立输出图像
    height = max(image1.shape[0], image2.shape[0])
    width = image1.shape[1] + image2.shape[1]

    output = np.zeros((height, width, 3), dtype=np.uint8)
    output[0:image1.shape[0], 0:image1.shape[1]] = image1
    output[0:image2.shape[0], image1.shape[1]:] = image2

    # 绘制等间距平行线
    line_interval = 50  # 直线间隔:50
    for k in range(height // line_interval):
        cv2.line(output, (0, line_interval * (k + 1)), (2 * width, line_interval * (k + 1)), (0, 255, 0), thickness=2,
                 lineType=cv2.LINE_AA)

    return output


# 视差计算
def stereoMatchSGBM(left_image, right_image, down_scale=False):
    # SGBM匹配参数设置
    if left_image.ndim == 2:
        img_channels = 1
    else:
        img_channels = 3
    blockSize = 3
    paraml = {'minDisparity': 0,
              'numDisparities': 128,
              'blockSize': blockSize,
              'P1': 8 * img_channels * blockSize ** 2,
              'P2': 32 * img_channels * blockSize ** 2,
              'disp12MaxDiff': 1,
              'preFilterCap': 63,
              'uniquenessRatio': 15,
              'speckleWindowSize': 100,
              'speckleRange': 1,
              'mode': cv2.STEREO_SGBM_MODE_SGBM_3WAY
              }

    # 构建SGBM对象
    left_matcher = cv2.StereoSGBM_create(**paraml)
    paramr = paraml
    paramr['minDisparity'] = -paraml['numDisparities']
    right_matcher = cv2.StereoSGBM_create(**paramr)

    # 计算视差图
    size = (left_image.shape[1], left_image.shape[0])
    if down_scale == False:
        disparity_left = left_matcher.compute(left_image, right_image)
        disparity_right = right_matcher.compute(right_image, left_image)
    else:
        left_image_down = cv2.pyrDown(left_image)
        right_image_down = cv2.pyrDown(right_image)
        factor = left_image.shape[1] / left_image_down.shape[1]

        disparity_left_half = left_matcher.compute(left_image_down, right_image_down)
        disparity_right_half = right_matcher.compute(right_image_down, left_image_down)
        disparity_left = cv2.resize(disparity_left_half, size, interpolation=cv2.INTER_AREA)
        disparity_right = cv2.resize(disparity_right_half, size, interpolation=cv2.INTER_AREA)
        disparity_left = factor * disparity_left
        disparity_right = factor * disparity_right

    # 真实视差(因为SGBM算法得到的视差是×16的)
    trueDisp_left = disparity_left.astype(np.float32) / 16.
    trueDisp_right = disparity_right.astype(np.float32) / 16.

    return trueDisp_left, trueDisp_right


def getDepthMapWithQ(disparityMap: np.ndarray, Q: np.ndarray) -> np.ndarray:
    points_3d = cv2.reprojectImageTo3D(disparityMap, Q)
    depthMap = points_3d[:, :, 2]
    reset_index = np.where(np.logical_or(depthMap < 0.0, depthMap > 65535.0))
    depthMap[reset_index] = 0

    return depthMap.astype(np.float32)


def getDepthMapWithConfig(disparityMap: np.ndarray, config: stereoConfig.stereoCamera) -> np.ndarray:
    fb = config.cam_matrix_left[0, 0] * (-config.T[0])
    doffs = config.doffs
    depthMap = np.divide(fb, disparityMap + doffs)
    reset_index = np.where(np.logical_or(depthMap < 0.0, depthMap > 65535.0))
    depthMap[reset_index] = 0
    reset_index2 = np.where(disparityMap < 0.0)
    depthMap[reset_index2] = 0
    return depthMap.astype(np.float32)


if __name__ == '__main__':
    # 读取MiddleBurry数据集的图片
    iml = cv2.imread('perfect001/Backpack-perfect/im0.png', 1)  # 左图
    imr = cv2.imread('perfect001/Backpack-perfect/im1.png', 1)  # 右图
    if (iml is None) or (imr is None):
        print("Error: Images are empty, please check your image's path!")
        sys.exit(0)
    height, width = iml.shape[0:2]

    # 读取相机内参和外参
    # 使用之前先将标定得到的内外参数填写到stereoconfig.py中的StereoCamera类中
    config = stereoConfig.stereoCamera()
    config.setMiddleBurryParams()
    print(config.cam_matrix_left)

    # 立体校正
    map1x, map1y, map2x, map2y, Q = getRectifyTransform(height, width, config)  # 获取用于畸变校正和立体校正的映射矩阵以及用于计算像素空间坐标的重投影矩阵
    iml_rectified, imr_rectified = rectifyImage(iml, imr, map1x, map1y, map2x, map2y)
    print(Q)

    # 绘制等间距平行线,检查立体校正的效果
    line = draw_line(iml_rectified, imr_rectified)
    cv2.imwrite('check_rectification.png', line)

    # 立体匹配
    iml_, imr_ = preprocess(iml, imr)  # 预处理,一般可以削弱光照不均的影响,不做也可以
    disp, _ = stereoMatchSGBM(iml, imr, True)  # 这里传入的是未经立体校正的图像,因为我们使用的middleburry图片已经是校正过的了
    cv2.imwrite('disaprity.png', disp)

    # 计算深度图
    #depthMap = getDepthMapWithQ(disp, Q)
    depthMap = getDepthMapWithConfig(disp, config)
    minDepth = np.min(depthMap)
    maxDepth = np.max(depthMap)
    print(minDepth, maxDepth)
    depthMapVis = (255.0 * (depthMap - minDepth)) / (maxDepth - minDepth)
    depthMapVis = depthMapVis.astype(np.uint8)

    def callbackFunc(e, x, y, f, p):
        if e == cv2.EVENT_LBUTTONDOWN:
            print('目标的深度距离为 %2f mm' % depthMap[y][x])

    cv2.namedWindow('DepthMap', 0)
    cv2.setMouseCallback("DepthMap", callbackFunc, None)
    cv2.imshow("DepthMap", depthMapVis)
    cv2.waitKey(0)

    # 使用open3d库绘制点云
    iml = cv2.cvtColor(iml, cv2.COLOR_BGR2RGB)
    colorImage = o3d.geometry.Image(iml)
    depthImage = o3d.geometry.Image(depthMap)
    rgbdImage = o3d.geometry.RGBDImage.create_from_color_and_depth(colorImage, depthImage, depth_scale=1000.0,
                                                                     depth_trunc=np.inf,convert_rgb_to_intensity=False)
    intrinsics = o3d.camera.PinholeCameraIntrinsic()
    fx = config.cam_matrix_left[0, 0]
    fy = fx
    cx = config.cam_matrix_left[0, 2]
    cy = config.cam_matrix_left[1, 2]
    print(fx, fy, cx, cy)
    intrinsics.set_intrinsics(width, height, fx=fx, fy=fy, cx=cx, cy=cy)
    extrinsics = np.array([[1., 0., 0., 0.],
                           [0., 1., 0., 0.],
                           [0., 0., 1., 0.],
                           [0., 0., 0., 1.]])
    pointcloud = o3d.geometry.PointCloud().create_from_rgbd_image(rgbdImage, intrinsic=intrinsics, extrinsic=extrinsics)


    # 计算像素点的3D坐标(左相机坐标系下)
    points_3d = cv2.reprojectImageTo3D(disp, Q)  # 参数中的Q就是由getRectifyTransform()函数得到的重投影矩阵

    # 构建点云--Point_XYZRGBA格式
    o3d.io.write_point_cloud("0/PointCloud.pcd", pointcloud=pointcloud)
    o3d.visualization.draw_geometries([pointcloud], width=720, height=480)


 648
648

 被折叠的 条评论
为什么被折叠?
被折叠的 条评论
为什么被折叠?
 到【灌水乐园】发言


