


前言
主要将自己基于PYQT5和YOLOv5进行检测界面制作的全程流程做一个总结,进行分享,在看这篇文章前,请先阅读我的上一篇文章,所有详细内容在上一篇中:
(超详细流程-适合小白入门-一篇就够)基于YOLOv8和PYQT5进行检测界面的制作-CSDN博客
以下是我的项目代码:
mbl1234/YOLOv5_PYQT5_GUI: 基于YOLOv5和PYQT5的检测界面 (github.com)
想直接使用我的项目,避免YOLOv5的版本变化,可以直接使用我当时的版本进行模型训练,再将模型直接嵌入项目代码,进行测试使用就行:
mbl1234/YOLOv5_PYQT5_GUI: 基于YOLOv5和PYQT5的检测界面 (github.com)
项目介绍
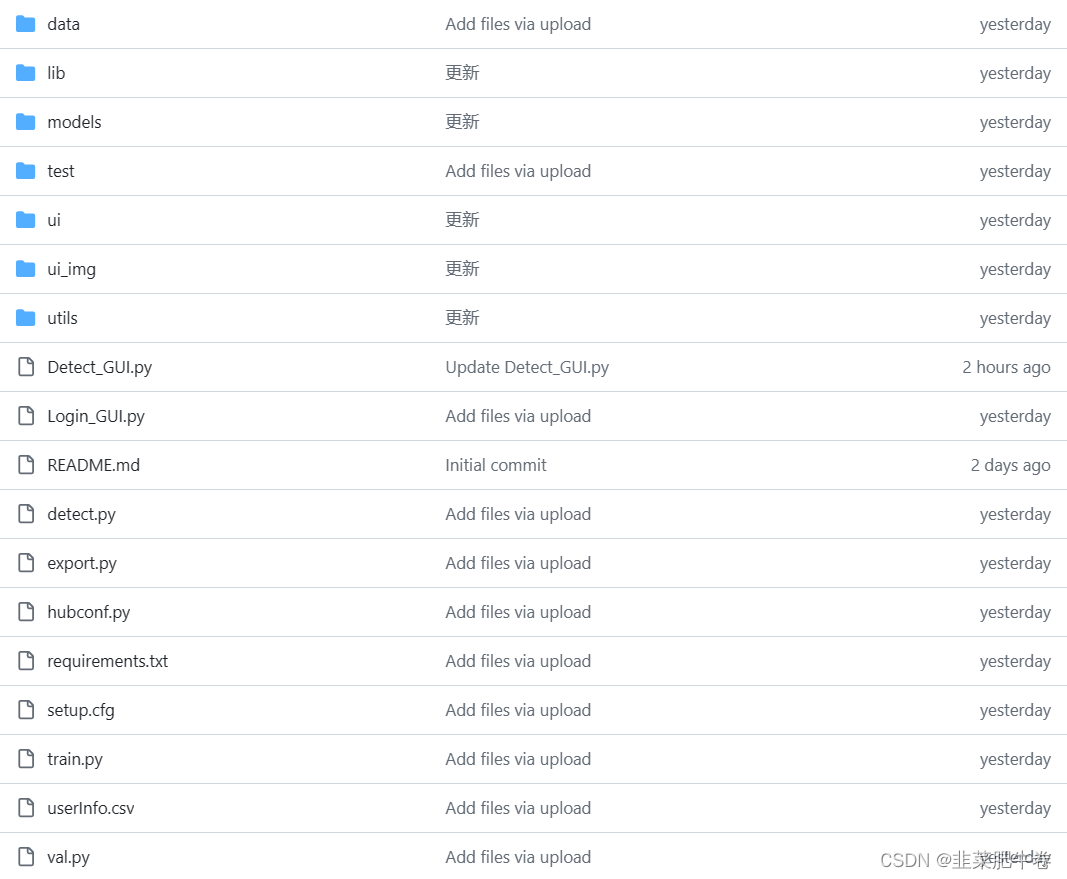
以上是项目目录,除了跑GUI文件YOLOv5中需要的文件外:
test文件夹中存放:测试YOLOv5_PYQT5_GUI所需要的权重文件和图像,用的都是官方权重和图像.
ui文件夹中存放:QT Designer制作的.ui文件和转换生成的.py文件.
ui_img文件夹中存放:QT Designer制作GUI界面需要的图像文件.
Detect_GUI.py文件主要是直接进入检测界面.
Login_GUI.py文件主要是从注册和登录界面进入检测界面.
userInfo.csv文件中主要存放注册界面生成的账号.
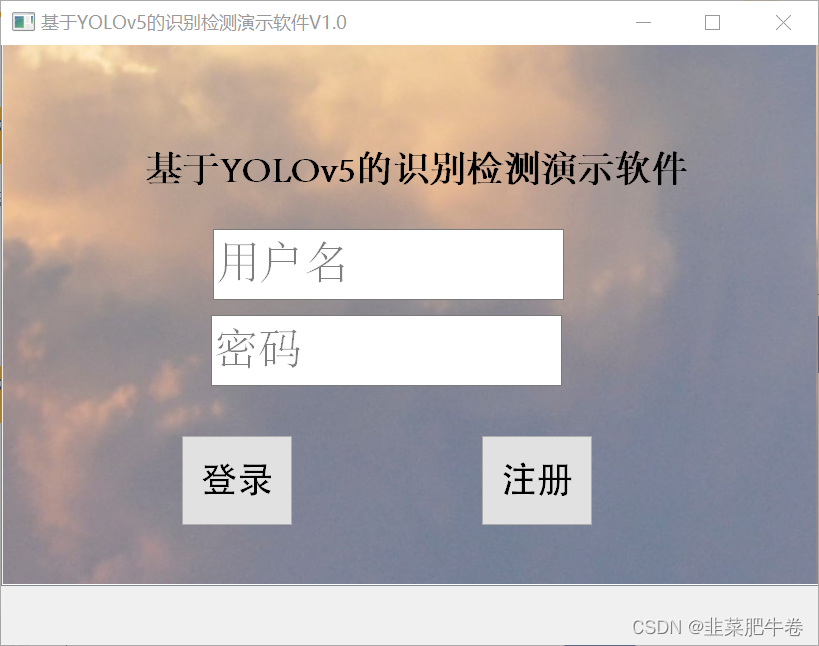
登录
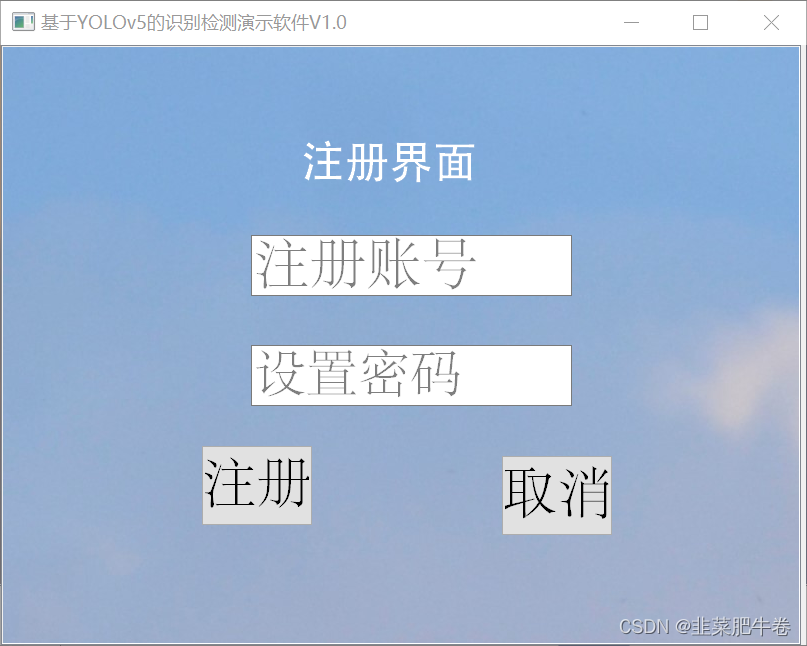
注册
检测
除了正常的登录和注册界面以外,检测界面主要能够完成以下任务:
最优模型选择,模型初始化,选择检测图像,保存结果图像,清除结果图像,退出应用

Detect_GUI.py文件
可以好好看看这段代码中的注释,对于各个功能模块所牵涉到的功能函数进行了备注.
其中在图像打开之后直接嵌入了模型调用命令行进行调用和检测.
# -*- coding: utf-8 -*-
# Form implementation generated from reading ui file 'ui/ui/detect_ui.ui'
#
# Created by: PyQt5 UI code generator 5.15.4
#
# WARNING: Any manual changes made to this file will be lost when pyuic5 is
# run again.  Do not edit this file unless you know what you are doing.
import sys
import cv2
import argparse
import random
import torch
import numpy as np
import torch.backends.cudnn as cudnn
from models.common import DetectMultiBackend
from models.experimental import attempt_load
from utils.augmentations import letterbox
from utils.general import check_img_size, non_max_suppression, scale_coords, increment_path
from utils.torch_utils import select_device
from utils.plots import Annotator, plot_one_box2
from PyQt5 import QtCore, QtGui, QtWidgets
from PyQt5.QtCore import *
from PyQt5.QtGui import *
from PyQt5.QtWidgets import *
import ui_img.detect_rc
class Ui_MainWindow(QMainWindow):
    def __init__(self):
        super(Ui_MainWindow, self).__init__()
        self.setWindowTitle("基于YOLOv5的识别检测演示软件V1.0")
        self.resize(1600, 900)
        self.centralwidget = QWidget()
        self.centralwidget.setObjectName("centralwidget")
        # 背景图像
        self.listView = QtWidgets.QListView(self.centralwidget)
        self.listView.setGeometry(QtCore.QRect(-11, -10, 1661, 931))
        self.listView.setStyleSheet("background-image: url(:/detect/detect.JPG);")
        self.listView.setObjectName("listView")
        # 模型选择
        self.btn_selet_model = QtWidgets.QPushButton(self.centralwidget)
        self.btn_selet_model.setGeometry(QtCore.QRect(70, 810, 112, 51))
        font = QtGui.QFont()
        font.setFamily("Adobe 宋体 Std L")
        font.setPointSize(12)
        self.btn_selet_model.setFont(font)
        self.btn_selet_model.setObjectName("btn_selet_model")
        self.btn_selet_model.clicked.connect(self.seletModels)
        # 呈现原始图像
        self.label_show_yuanshi = QtWidgets.QLabel(self.centralwidget)
        self.label_show_yuanshi.setGeometry(QtCore.QRect(70, 80, 700, 700))
        self.label_show_yuanshi.setStyleSheet("background-color: rgb(255, 255, 255);")
        self.label_show_yuanshi.setObjectName("label_show_yuanshi")
        # 模型初始化
        self.btn_init_model = QtWidgets.QPushButton(self.centralwidget)
        self.btn_init_model.setGeometry(QtCore.QRect(220, 810, 112, 51))
        font = QtGui.QFont()
        font.setFamily("Adobe 宋体 Std L")
        font.setPointSize(12)
        self.btn_init_model.setFont(font)
        self.btn_init_model.setObjectName("btn_init_model")
        self.btn_init_model.clicked.connect(self.initModels)
        # 选择图像进行检测
        self.btn_detect_img = QtWidgets.QPushButton(self.centralwidget)
        self.btn_detect_img.setGeometry(QtCore.QRect(370, 810, 112, 51))
        font = QtGui.QFont()
        font.setFamily("Adobe 宋体 Std L")
        font.setPointSize(12)
        self.btn_detect_img.setFont(font)
        self.btn_detect_img.setObjectName("btn_detect_img")
        self.btn_detect_img.clicked.connect(self.openImage)
        # 保存结果图像
        self.btn_save_img = QtWidgets.QPushButton(self.centralwidget)
        self.btn_save_img.setGeometry(QtCore.QRect(1125, 810, 112, 51))
        font = QtGui.QFont()
        font.setFamily("Adobe 宋体 Std L")
        font.setPointSize(12)
        self.btn_save_img.setFont(font)
        self.btn_save_img.setObjectName("btn_save_img")
        self.btn_save_img.clicked.connect(self.saveImage)
        # 清除结果图像
        self.btn_clear_img = QtWidgets.QPushButton(self.centralwidget)
        self.btn_clear_img.setGeometry(QtCore.QRect(1275, 810, 112, 51))
        font = QtGui.QFont()
        font.setFamily("Adobe 宋体 Std L")
        font.setPointSize(12)
        self.btn_clear_img.setFont(font)
        self.btn_clear_img.setObjectName("btn_clear_img")
        self.btn_clear_img.clicked.connect(self.clearImage)
        # 退出应用
        self.btn_exit_app = QtWidgets.QPushButton(self.centralwidget)
        self.btn_exit_app.setGeometry(QtCore.QRect(1425, 810, 112, 51))
        font = QtGui.QFont()
        font.setFamily("Adobe 宋体 Std L")
        font.setPointSize(12)
        self.btn_exit_app.setFont(font)
        self.btn_exit_app.setObjectName("btn_exit_app")
        self.btn_exit_app.clicked.connect(self.exitApp)
        # 呈现结果图像
        self.label_show_jieguo = QtWidgets.QLabel(self.centralwidget)
        self.label_show_jieguo.setGeometry(QtCore.QRect(840, 80, 700, 700))
        self.label_show_jieguo.setStyleSheet("background-color: rgb(255, 255, 255);")
        self.label_show_jieguo.setObjectName("label_show_jieguo")
        # 标题
        self.label_show_title = QtWidgets.QLabel(self.centralwidget)
        self.label_show_title.setGeometry(QtCore.QRect(430, 20, 800, 41))
        self.label_show_title.setObjectName("label_show_title")
        # 主窗口
        self.setCentralWidget(self.centralwidget)
        self.retranslateUi(self.centralwidget)
        QtCore.QMetaObject.connectSlotsByName(self.centralwidget)

    # 图像检测函数
    def detectImage(self, name_list, img):
        '''
        :param name_list: 文件名列表
        :param img: 待检测图片
        :return: info_show:检测输出的文字信息
        '''
        showimg = img
        with torch.no_grad():
            img = letterbox(img, new_shape=self.opt.imgsz)[0]
            # Convert
            img = img[:, :, ::-1].transpose(2, 0, 1)  # BGR to RGB, to 3x416x416
            img = np.ascontiguousarray(img)
            img = torch.from_numpy(img).to(self.device)
            img = img.half() if self.opt.half else img.float()  # uint8 to fp16/32
            img /= 255.0  # 0 - 255 to 0.0 - 1.0
            if len(img.shape) == 3:
                img = img[None]
            # Inference
            pred = self.model(img, augment=self.opt.augment, visualize=self.opt.visualize)
            # Apply NMS
            pred = non_max_suppression(pred, self.opt.conf_thres, self.opt.iou_thres, classes=self.opt.classes, agnostic=self.opt.agnostic_nms, max_det=self.opt.max_det)
            info_show = ""
            # Process detections
            annotator = Annotator(img, line_width=self.opt.line_thickness, example=str(self.names))
            for i, det in enumerate(pred):
                if det is not None and len(det):
                    # Rescale boxes from img_size to im0 size
                    det[:, :4] = scale_coords(img.shape[2:], det[:, :4], showimg.shape).round()
                    for *xyxy, conf, cls in reversed(det):
                        c = int(cls)
                        print(c)
                        label = None if self.opt.hide_labels else (self.names[c] if self.opt.hide_conf else f'{self.names[c]} {conf:.2f}')
                        name_list.append(self.names[int(cls)])
                        single_info = plot_one_box2(xyxy, showimg, label=label, color=self.colors[int(cls)], line_thickness=2)
                        print(single_info)
                        info_show = info_show + single_info + "\n"
    # 模型选择函数
    def seletModels(self):
        self.openfile_name_model, _ = QFileDialog.getOpenFileName(self.btn_selet_model, '选择weights文件', '.', '权重文件(*.pt)')
        if not self.openfile_name_model:
            QMessageBox.warning(self, "Warning:", "打开权重失败", buttons=QMessageBox.Ok,)
        else:
            print('加载weights文件地址为:' + str(self.openfile_name_model))
            QMessageBox.information(self, u"Notice", u"权重打开成功", buttons=QtWidgets.QMessageBox.Ok)

    # 模型初始化函数
    def initModels(self):
        # 模型相关参数配置
        parser = argparse.ArgumentParser()
        parser.add_argument('--weights', nargs='+', type=str, default='runs/train/exp/weights/best.pt', help='model path(s)')
        parser.add_argument('--source', type=str, default='data/applenew5/images/test/', help='file/dir/URL/glob, 0 for webcam')
        parser.add_argument('--data', type=str, default='data/coco128.yaml', help='(optional) dataset.yaml path')
        parser.add_argument('--imgsz', '--img', '--img-size', nargs='+', type=int, default=640, help='inference size h,w')
        parser.add_argument('--conf-thres', type=float, default=0.25, help='confidence threshold')
        parser.add_argument('--iou-thres', type=float, default=0.45, help='NMS IoU threshold')
        parser.add_argument('--max-det', type=int, default=1000, help='maximum detections per image')
        parser.add_argument('--device', default='', help='cuda device, i.e. 0 or 0,1,2,3 or cpu')
        parser.add_argument('--view-img', action='store_true', help='show results')
        parser.add_argument('--save-txt', action='store_true', help='save results to *.txt')
        parser.add_argument('--save-conf', action='store_true', help='save confidences in --save-txt labels')
        parser.add_argument('--save-crop', action='store_true', help='save cropped prediction boxes')
        parser.add_argument('--nosave', action='store_true', help='do not save images/videos')
        parser.add_argument('--classes', nargs='+', type=int, help='filter by class: --classes 0, or --classes 0 2 3')
        parser.add_argument('--agnostic-nms', action='store_true', help='class-agnostic NMS')
        parser.add_argument('--augment', action='store_true', help='augmented inference')
        parser.add_argument('--visualize', action='store_true', help='visualize features')
        parser.add_argument('--update', action='store_true', help='update all models')
        parser.add_argument('--project', default='runs/detect', help='save results to project/name')
        parser.add_argument('--name', default='exp', help='save results to project/name')
        parser.add_argument('--exist-ok', action='store_true', help='existing project/name ok, do not increment')
        parser.add_argument('--line-thickness', default=3, type=int, help='bounding box thickness (pixels)')
        parser.add_argument('--hide-labels', default=False, action='store_true', help='hide labels')
        parser.add_argument('--hide-conf', default=False, action='store_true', help='hide confidences')
        parser.add_argument('--half', action='store_true', help='use FP16 half-precision inference')
        parser.add_argument('--dnn', action='store_true', help='use OpenCV DNN for ONNX inference')
        self.opt = parser.parse_args()
        print(self.opt)
        # 默认使用opt中的设置(权重等)来对模型进行初始化
        source, weights, view_img, save_txt, imgsz, half, data, dnn, visualize, max_det = \
            self.opt.source, self.opt.weights, self.opt.view_img, self.opt.save_txt, self.opt.imgsz, self.opt.half, self.opt.data, self.opt.dnn, self.opt.visualize, self.opt.max_det
        # 若openfile_name_model不为空,则使用此权重进行初始化
        if self.openfile_name_model:
            weights = self.openfile_name_model
            print("Using button choose model")
        self.device = select_device(self.opt.device)
        cudnn.benchmark = True
        # Load model
        self.model = DetectMultiBackend(weights, device=self.device, dnn=self.opt.dnn, data=self.opt.data, fp16=half)
        stride = self.model.stride # model stride
        self.imgsz = check_img_size(imgsz, s=stride)  # check img_size
        # Get names and colors
        self.names = self.model.names
        self.colors = [[random.randint(0, 255) for _ in range(3)] for _ in self.names]
        print("model initial done")
        # 设置提示框
        QtWidgets.QMessageBox.information(self, u"Notice", u"模型加载完成", buttons=QtWidgets.QMessageBox.Ok,
                                      defaultButton=QtWidgets.QMessageBox.Ok)
    # 图像选择函数
    def openImage(self):
        print('openImage')
        name_list = []
        fname, _ = QFileDialog.getOpenFileName(self, '打开文件', '.', '图像文件(*.jpg)')
        print(fname)
        # if not fname:
        #     QMessageBox.warning(self, u"Warning", u"打开图片失败", buttons=QMessageBox.Ok)
        # else:
        self.label_show_yuanshi.setPixmap(QPixmap(fname))
        self.label_show_yuanshi.setScaledContents(True)
        img = cv2.imread(fname)
        print(img)
        print("model initial done21")
        self.detectImage(name_list, img)
        info_show = self.detectImage(name_list, img)
        print(info_show)
        # 检测结果显示在界面
        print("model initial done23")
        self.result = cv2.cvtColor(img, cv2.COLOR_BGR2BGRA)
        self.result = cv2.resize(self.result, (1000, 1000), interpolation=cv2.INTER_AREA)
        self.QtImg = QImage(self.result.data, self.result.shape[1], self.result.shape[0], QImage.Format_RGB32)
        self.qImg = self.QtImg
        self.label_show_jieguo.setPixmap(QtGui.QPixmap.fromImage(self.QtImg))
        print(self.label_show_jieguo)
        self.label_show_jieguo.setScaledContents(True)  # 设置图像自适应界面大小
        return self.qImg

    # 图像保存函数
    def saveImage(self):
        fd, _ = QFileDialog.getSaveFileName(self, "保存图片", ".", "*.jpg")
        self.qImg.save(fd)

    # 图像清除函数
    def clearImage(self, stopp):
        result = QMessageBox.question(self, "Warning:", "是否清除本次检测结果", QMessageBox.Yes | QMessageBox.No, QMessageBox.Yes)
        if result == QMessageBox.Yes:
            self.label_show_yuanshi.clear()
            self.label_show_jieguo.clear()
        else:
            stopp.ignore()

    # 应用退出函数
    def exitApp(self, event):
        event = QApplication.instance()
        result = QMessageBox.question(self, "Notice:", "您真的要退出此应用吗", QMessageBox.Yes | QMessageBox.No, QMessageBox.Yes)
        if result == QMessageBox.Yes:
            event.quit()
        else:
            event.ignore()

    def retranslateUi(self, MainWindow):
        _translate = QtCore.QCoreApplication.translate
        MainWindow.setWindowTitle(_translate("MainWindow", "MainWindow"))
        self.btn_selet_model.setText(_translate("MainWindow", "最优模型选择"))
        self.label_show_yuanshi.setText(_translate("MainWindow", "<html><head/><body><p align=\"center\"><span style=\" font-size:16pt;\">原始图像</span></p></body></html>"))
        self.btn_init_model.setText(_translate("MainWindow", "模型初始化"))
        self.btn_detect_img.setText(_translate("MainWindow", "选择检测图像"))
        self.btn_save_img.setText(_translate("MainWindow", "保存结果图像"))
        self.btn_clear_img.setText(_translate("MainWindow", "清除结果图像"))
        self.btn_exit_app.setText(_translate("MainWindow", "退出应用"))
        self.label_show_jieguo.setText(_translate("MainWindow", "<html><head/><body><p align=\"center\"><span style=\" font-size:16pt;\">结果图像</span></p></body></html>"))
        self.label_show_title.setText(_translate("MainWindow", "<html><head/><body><p align=\"center\"><span style=\" font-size:26pt; color:#ffffff;\">基于YOLOv5的识别检测演示软件</span></p></body></html>"))

if __name__ == '__main__':
    app = QApplication(sys.argv)
    ui = Ui_MainWindow()
    ui.show()
    sys.exit(app.exec_())
Login_GUI.py
登录界面中包含登录和检测,其中还需要导入你在QT Designer中制作的的登录注册界面的.ui文件转换成的.py文件.
import sys
from datetime import datetime
from PyQt5 import QtWidgets
from PyQt5.QtWidgets import *
from utils.id_utils import get_id_info, sava_id_info # 账号信息工具函数
from lib.share import shareInfo # 公共变量名
# 导入QT-Design生成的UI
from ui.login_ui import Ui_Form
from ui.registe_ui import Ui_Dialog
# 导入设计好的检测界面
from Detect_GUI import Ui_MainWindow
import matplotlib.backends.backend_tkagg
# 界面登录
class win_Login(QMainWindow):
    def __init__(self, parent = None):
        super(win_Login, self).__init__(parent)
        self.ui_login = Ui_Form()
        self.ui_login.setupUi(self)
        self.init_slots()
        self.hidden_pwd()
    # 密码输入框隐藏
    def hidden_pwd(self):
        self.ui_login.edit_password.setEchoMode(QLineEdit.Password)
    # 绑定信号槽
    def init_slots(self):
        self.ui_login.btn_login.clicked.connect(self.onSignIn) # 点击按钮登录
        self.ui_login.edit_password.returnPressed.connect(self.onSignIn) # 按下回车登录
        self.ui_login.btn_regeist.clicked.connect(self.create_id)
    # 跳转到注册界面
    def create_id(self):
        shareInfo.createWin = win_Register()
        shareInfo.createWin.show()
    # 保存登录日志
    def sava_login_log(self, username):
        with open('login_log.txt', 'a', encoding='utf-8') as f:
            f.write(username + '\t log in at' + datetime.now().strftimestrftime+ '\r')
    # 登录
    def onSignIn(self):
        print("You pressed sign in")
        # 从登陆界面获得输入账户名与密码
        username = self.ui_login.edit_username.text().strip()
        password = self.ui_login.edit_password.text().strip()
        print(username)
        print(password)
        # 获得账号信息
        USER_PWD = get_id_info()
        # print(USER_PWD)
        if username not in USER_PWD.keys():
            replay = QMessageBox.warning(self,"登陆失败!", "账号或密码输入错误", QMessageBox.Yes)
        else:
            # 若登陆成功,则跳转主界面
            if USER_PWD.get(username) == password:
                print("Jump to main window")
                # 所以使用公用变量名
                # shareInfo.mainWin = UI_Logic_Window()
                shareInfo.mainWin = Ui_MainWindow()
                shareInfo.mainWin.show()
                # 关闭当前窗口
                self.close()
            else:
                replay = QMessageBox.warning(self, "!", "账号或密码输入错误", QMessageBox.Yes)
# 注册界面
class win_Register(QMainWindow):
    def __init__(self, parent = None):
        super(win_Register, self).__init__(parent)
        self.ui_register = Ui_Dialog()
        self.ui_register.setupUi(self)
        self.init_slots()
    # 绑定槽信号
    def init_slots(self):
        self.ui_register.pushButton_regiser.clicked.connect(self.new_account)
        self.ui_register.pushButton_cancer.clicked.connect(self.cancel)
    # 创建新账户
    def new_account(self):
        print("Create new account")
        USER_PWD = get_id_info()
        # print(USER_PWD)
        new_username = self.ui_register.edit_username.text().strip()
        new_password = self.ui_register.edit_password.text().strip()
        # 判断用户名是否为空
        if new_username == "":
            replay = QMessageBox.warning(self, "!", "账号不准为空", QMessageBox.Yes)
        else:
            # 判断账号是否存在
            if new_username in USER_PWD.keys():
                replay = QMessageBox.warning(self, "!", "账号已存在", QMessageBox.Yes)
            else:
                # 判断密码是否为空
                if new_password == "":
                    replay = QMessageBox.warning(self, "!", "密码不能为空", QMessageBox.Yes)
                else:
                    # 注册成功
                    print("Successful!")
                    sava_id_info(new_username, new_password)
                    replay = QMessageBox.warning(self,  "!", "注册成功!", QMessageBox.Yes)
                    # 关闭界面
                    self.close()
    # 取消注册
    def cancel(self):
        self.close() # 关闭当前界面
if __name__ == "__main__":
    app = QApplication(sys.argv)
    # 利用共享变量名来实例化对象
    shareInfo.loginWin = win_Login() # 登录界面作为主界面
    shareInfo.loginWin.show()
    sys.exit(app.exec_())


 463
463

 被折叠的 条评论
为什么被折叠?
被折叠的 条评论
为什么被折叠?
 到【灌水乐园】发言


