


目录
环境准备
xLua导入
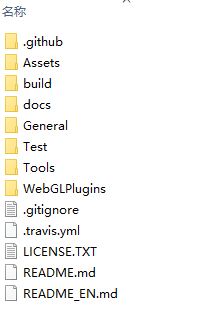
我们来到github搜索xLua,直接下载zip压缩包
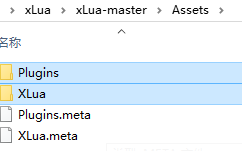
我们把这两个文件夹复制到工程中
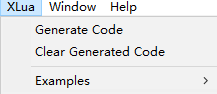
编译完之后窗口上就会有这个Xlua的选项(这里有可能会提示某个脚本编译失败,加个using System.Reflection)
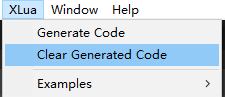
我们可以先点击第二个选项,再点击第一个选项生成
然后这里要导入ABbrowser工具,详情请看AssetBundle详解
这里根据教程还需要导入三个类
我依次写到这上面
BaseManager
using System.Collections;
using System.Collections.Generic;
using UnityEngine;

public class BaseManager<T>where T:new()//where T:new() 指定了泛型类型 T 必须具有无参数的构造函数
{
    private static T instance;

    public static T GetInstance()
    {
        if (instance == null)
            instance = new T();
        return instance;
    }
}
SingletonAutoMono
using System.Collections;
using System.Collections.Generic;
using UnityEngine;

public class SingletonAutoMono<T>:MonoBehaviour where T : Monobehaviour
{
    private static T instance;
    public static T GetInstance()
    {
        if (instance == null)
        {
            GameObject obj = new GameObject();
            obj.name = typeof(T).ToString();
            DontDestoryOnLoad(obj);
            instance = obj.AddComponent<T>();
        }
        return instance;
    }
}
SingletonMono类
using System.Collections;
using System.Collections.Generic;
using UnityEngine;


    // Start is called before the first frame update

    public class SingletonMono<T> : MonoBehaviour where T : MonoBehaviour
    {
    private static T instance;
    public static T Getinstance()
    {
        retrun instance;
    }
    protected virtual void Awake()
    {
        instance = this;
    }
    }
然后我们要导入AB包管理器,这个也在AssetBundle详解里
C#调用Lua
Lua解析器
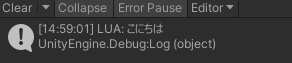
这里的核心就是LuaEnv,我们把脚本附着到相机上,然后运行
public class Lesson1_LuaEnv : MonoBehaviour
{
    // Start is called before the first frame update
    void Start()
    {
        //Lua解析器 能够让我们在Unity中执行Lua
        LuaEnv env = new LuaEnv();

        //执行Lua语言
        env.DoString("print('こにちは')");
    }

    // Update is called once per frame
    void Update()
    {

    }
}
//帮助我们定时清除Lua中没有手动释放的对象
//在帧更新中定时执行或切场景时执行
env.Tick();
//销毁Lua解析器
env.Dispose();
这里如果有很多个语句需要执行,一句一句调用太慢了怎么办,我们这里可以使用DoString通过字符名来执行Lua脚本名,Lua中使用require来跨脚本运行
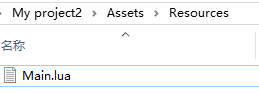
我们现在先在Unity中新建一个Resources文件夹,
然后在文件夹中新建一个.txt文件再把后缀更改为.lua
再用相应的lua软件打开
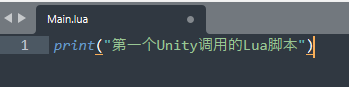
我们先只写一句话
但是现在又有个问题,Unity无法直接识别Lua文件,所以再改成Main.lua.txt
env.DoString("require('Main')");

Lua文件加载重定向
这部分的内容是自定义lua文件加载路径
当require被调用时,会先去Addloader中的函数路径找文件,然后再去默认路径(Resources)中寻找
我们现在写一个基本逻辑,Addloder会实现重定向功能,它接受一个委托
void Start()
    {
        LuaEnv env = new LuaEnv();
        env.AddLoader(MyCustomLoader);
        env.DoString("require('Main')");

    }
    //自动执行
    private byte[] MyCustomLoader(ref string filePath)
    {
        Debug.Log(filePath);
        //通过函数中的逻辑,去加载lua文件
        return null;
    }
我们新建一个叫做Lua的文件夹
然后在里面新建一个Main文件
我们来详细解释一下这段代码
这里AddLoader的调用参数是一个委托变量,类似于C++中的函数指针,而MyCustomLoader这里是通过env传入的lua文件名。如果我把 env.DoString(“require(‘Main’)”);这行注释掉,那么MyCustomLoader将不会执行
在这里,filePath是Main,Application.dataPath是Unity/xxx/Asset
using System.Collections;
using System.Collections.Generic;
using UnityEngine;
using XLua;
using System.IO;
using Unity.VisualScripting;

public class Lesson2_Loader : MonoBehaviour
{

    void Start()
    {
        LuaEnv env = new LuaEnv();

        env.AddLoader(MyCustomLoader);

        env.DoString("require('Main')");

    }

    //自动执行
    private byte[] MyCustomLoader(ref string filePath)
    {
        //传入的参数是require执行的脚本文件名
        string path = Application.dataPath + "/Lua/" + filePath + ".lua";
        Debug.Log(path);

        if(File.Exists(path))
        {
            return(File.ReadAllBytes(path));
        }
        else
        {
            Debug.Log("重定向失败,文件名为" + filePath);
        }


       //拼接一个lua所在路径
        //通过函数中的逻辑,去加载lua文件
        return null;
    }
}
Lua解析管理器
我们用一个管理器来管理LuaEnv
其他逻辑都是前面提到过的
using System.Collections;
using System.Collections.Generic;
using UnityEngine;
using XLua;
using System.IO;

//Lua管理器
//提供lua解析器
//保证解析器的唯一性
public class LuaMgr:BaseManager<LuaMgr>
{
    //执行Lua语言的函数
    //释放垃圾
    //销毁
    //重定向

    private LuaEnv luaEnv;

    public void Init()
    {
        //如果已经初始化了,直接返回
        if (luaEnv != null)
            return;
        luaEnv = new LuaEnv();

        //加载lua脚本重定向
        luaEnv.AddLoader(MyCustomLoader);

    }

    private byte[] MyCustomLoader(ref string filePath)
    {

        string path = Application.dataPath + "/Lua/" + filePath + ".lua";
        Debug.Log(path);

        if (File.Exists(path))
        {
            return (File.ReadAllBytes(path));
        }
        else
        {
            Debug.Log("重定向失败,文件名为" + filePath);
        }

        return null;
    }

    public void DoString(string str)
    {
        luaEnv.DoString(str);
    }

    public void Tick()
    {
        luaEnv.Tick();
    }

    public void Dispose()
    {
        luaEnv.Dispose();
        luaEnv = null;
    }
}
然后我们写一个测试类来测试
我们的代码逻辑在这个脚本中第一次使用LuaMgr,所以需要Init,如果初始化之后在其他的脚本就可以直接使用LuaMgr了
using System.Collections;
using System.Collections.Generic;
using UnityEngine;

public class Lesson3_LuaMgr : MonoBehaviour
{
    // Start is called before the first frame update
    void Start()
    {
        LuaMgr.GetInstance().Init();//LuaMgr是一个单例类,所以可以直接访问

        LuaMgr.GetInstance().DoString("require('Main')");
    }

    // Update is called once per frame
    void Update()
    {

    }
}
接下来我们讲AB包和Mgr相关逻辑
由于AB包不识别lua,所以还是先修改成txt
我们选中Main文件,新建一个lua的AB包

我们先清除一下代码
然后构建
现在我们要做的其实就是在AB包中执行lua
我们再来解释函数逻辑
这里我们又加了一个重定向逻辑MyCustomABLoader,用来从AB包中加载数据,在MyCustomABLoader中,我们之前使用的逻辑是手动声明AB包的对象然后进行读取,但是我们在AB包的教程中做了一个AB包管理器,所以这里使用AB包管理器来做
using System.Collections;
using System.Collections.Generic;
using UnityEngine;
using XLua;
using System.IO;

//Lua管理器
//提供lua解析器
//保证解析器的唯一性
public class LuaMgr:BaseManager<LuaMgr>
{
    //执行Lua语言的函数
    //释放垃圾
    //销毁
    //重定向

    private LuaEnv luaEnv;

    public void Init()
    {
        //如果已经初始化了,直接返回
        if (luaEnv != null)
            return;
        luaEnv = new LuaEnv();

        //加载lua脚本重定向
        luaEnv.AddLoader(MyCustomLoader);
        luaEnv.AddLoader(MyCustomABLoader);


    }

   public void DoLuaFIle(string fileName)
    {
        string str = string.Format("require('{0}')",fileName);
    }

    private byte[] MyCustomLoader(ref string filePath)
    {

        string path = Application.dataPath + "/Lua/" + filePath + ".lua";
        Debug.Log(path);

        if (File.Exists(path))
        {
            return (File.ReadAllBytes(path));
        }
        else
        {
            Debug.Log("重定向失败,文件名为" + filePath);
        }

        return null;
    }

    //重定向加载AB包中的lua脚本
    private byte[] MyCustomABLoader(ref string filePath)
    {
        //从AB包中加载lua文件
        //加载AB包
       // string path = Application.streamingAssetsPath + "/lua";

       // AssetBundle ab = AssetBundle.LoadFromFile(path);

       // TextAsset tx = ab.LoadAsset<TextAsset>(filePath+".lua");

       // //加载除了lua文件 byte数组

        return tx.bytes;

        TextAsset lua=ABMgr.GetInstance().LoadRes<TextAsset>("lua",filePath+".lua");
        if (lua != null)
            return lua.bytes;
        else
            return null;

    }
    public void DoString(string str)
    {
        luaEnv.DoString(str);
    }

    public void Tick()
    {
        luaEnv.Tick();
    }

    public void Dispose()
    {
        luaEnv.Dispose();
        luaEnv = null;
    }
}
全局变量的获取
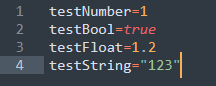
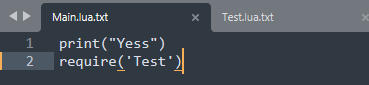
我们在Main.lua的文件下新建一个Test.lua
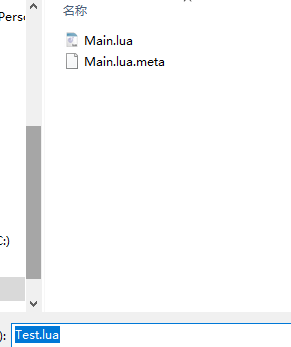
在test中定义如下变量
这里我们访问全局变量的方式是通过Main.lua进行的
这里很有意思的是,require调用Test的逻辑本质上并不是Main自己调用的,而是xlua调用的,通过堆栈可以看到
所以如果我require(‘一个不存在的文件’),会在xlua层报错也是有迹可循的了。
现在我们要使用mgr来调用Test中的变量
这个Globe有点类似大G表,可以通过这个操纵Test中的数据
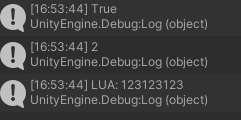
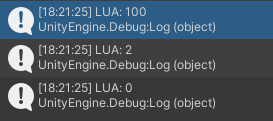
 int i=LuaMgr.GetInstance().Global.Get<int>("testNumber");
 Debug.Log(i);
可以发现成功打印

但是这里取到的值也只是个拷贝,并不会修改原来的数
如果想修改可以使用set
这里也不能取到test中声明的本地变量,换言之只能操作大G表的内容
全局函数的获取
函数我们依旧在test中写
我们先调用无参无返回值方法,使用委托
public class Lesson5_CallFunction : MonoBehaviour
{
    // Start is called before the first frame update
    void Start()
    {
        LuaMgr.GetInstance().Init();

        LuaMgr.GetInstance().DoLuaFile("Main");

        //无参无返回的获取
        //委托

        CustomCall call = LuaMgr.GetInstance().Global.Get<CustomCall>("testFun");
        call();

    }

    // Update is called once per frame
    void Update()
    {

    }
}

有参有返回:
public delegate void CustomCall2(int a);

//调用
[CSharpCallLua]//自定义委托一定要有
  CustomCall2 call2 = LuaMgr.GetInstance().Global.Get<CustomCall2>("testFun2");
        call2(10);
这里可能会报错,去xlua窗口重新生成一下就好了


这里委托都可以使用Unity/C#/提供的,不需要自己写
接下来是多返回值,在C#中使用out 和 ref来接收
首先是声明委托
//多返回值委托
[CSharpCallLua]
public delegate int CustomCall3(int a, out int b, out bool c, out string d, out int e);
然后是接收
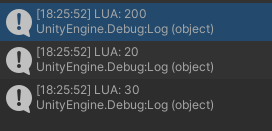
//多返回值获取
CustomCall3 call3 = LuaMgr.GetInstance().Global.Get<CustomCall3>("testFun3");
int b;bool c; string d; int e;
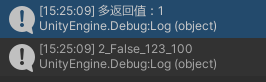
Debug.Log("多返回值:" + call3(100, out b, out c, out d, out e));
Debug.Log(b + "_" + c + "_" + d + "_" + e);
然后是变长参数
首先说一下ref和out的区别
ref 关键字用于传递一个已初始化的变量作为参数,并且要求方法在使用这个参数之前初始化它。
out 关键字用于传递一个未初始化的变量作为参数,方法在使用这个参数之前必须将其初始化。
我们依旧可以用这些参数
[CSharpCallLua]
public delegate int CustomCall4(int a, ref int b, ref bool c, ref string d, ref int e);
//多返回值获取
CustomCall4 call4 = LuaMgr.GetInstance().Global.Get<CustomCall4>("testFun3");
int b1=0; bool c1=false; string d1=""; int e1=0;//要初始化
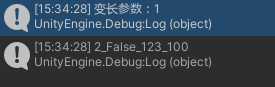
Debug.Log("变长参数:" + call4(100, ref b, ref c, ref d, ref e));
Debug.Log(b + "_" + c + "_" + d + "_" + e);
以下是完整代码
using System.Collections;
using System.Collections.Generic;
using UnityEngine;
using UnityEngine.UIElements;
using XLua;

//无参无返回值的委托
public delegate void CustomCall();

//有参有返回的委托
[CSharpCallLua]
public delegate void CustomCall2(int a);

//多返回值委托
[CSharpCallLua]
public delegate int CustomCall3(int a, out int b, out bool c, out string d, out int e);

//变长参数
[CSharpCallLua]
public delegate int CustomCall4(int a, ref int b, ref bool c, ref string d, ref int e);

public class Lesson5_CallFunction : MonoBehaviour
{
    // Start is called before the first frame update
    void Start()
    {
        LuaMgr.GetInstance().Init();

        LuaMgr.GetInstance().DoLuaFile("Main");

        //无参无返回的获取
        //委托

        CustomCall call = LuaMgr.GetInstance().Global.Get<CustomCall>("testFun");
        call();

        //有参有返回的获取
        CustomCall2 call2 = LuaMgr.GetInstance().Global.Get<CustomCall2>("testFun2");
        call2(10);

        //多返回值获取
        CustomCall3 call3 = LuaMgr.GetInstance().Global.Get<CustomCall3>("testFun3");
        int b;bool c; string d; int e;
        Debug.Log("多返回值:" + call3(100, out b, out c, out d, out e));
        Debug.Log(b + "_" + c + "_" + d + "_" + e);

        //多返回值获取
        CustomCall4 call4 = LuaMgr.GetInstance().Global.Get<CustomCall4>("testFun3");
        int b1=0; bool c1=false; string d1=""; int e1=0;
        Debug.Log("变长参数:" + call4(100, ref b, ref c, ref d, ref e));
        Debug.Log(b + "_" + c + "_" + d + "_" + e);


    }

    // Update is called once per frame
    void Update()
    {

    }
}
List和Dictionary映射table
我们先在test中声明
testList={1,2,3,4,5,6}

testList2={"123","123",true,1,1.2}

--Dictionary

testDic1={
	["1"]=1,
	["2"]=1,
	["3"]=1,
	["4"]=1
}

testDic2={
	["1"]=1,
	[true]=1,
	[false]=true
	["123"]=false
}
老方法调用
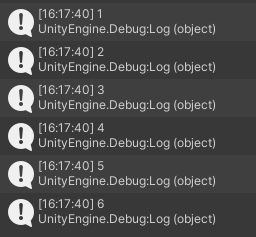
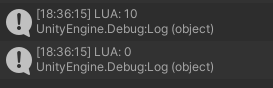
  List<int> list = LuaMgr.GetInstance().Global.Get<List<int>>("testList");
        for(int i = 0; i < list.Count; i++)
        {
            Debug.Log(list[i]);
        }
不过get还是不能改数据本身
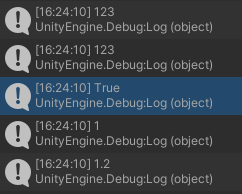
我们再看一下刚才的testDic,testList2存的不只有int型
所以我们在取到值的时候选择object
 List<object> list2 = LuaMgr.GetInstance().Global.Get<List<object>>("testList2");
        for (int i = 0; i < list2.Count; i++)
        {
            Debug.Log(list2[i]);
        }
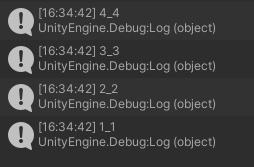
   Dictionary<string, int> dic = LuaMgr.GetInstance().Global.Get<Dictionary<string, int>>("testDic1");
        foreach(string i in dic.Keys)
        {
            Debug.Log(i + "_" + dic[i]);
        }
至于testDic2,我们可以都用dictory<object,object>和上述一样
类映射table
在这里我们要实现类逻辑
首先在test中写一个类逻辑
testClass={
testInt=2,
testBool=true,
testString="123",
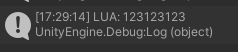
testFun=function()
print("123123123")
end
}
然后在脚本中声明一个名字一样的类
public class CallLuaClass
{
    //在这个类中声明成员变量
    //名字一定要和Lua那边的一样
    public int testInt;
    public bool testBool;
    public float testFloat;
    public string testString;
    public UnityAction testFun;

    //这个自定义中的变量可以更多也可以更少
    //如果比lua中的多少都会忽略

}
然后在脚本中把这个类”实例化“出来
LuaMgr.GetInstance().Init();
LuaMgr.GetInstance().DoLuaFile("Main");
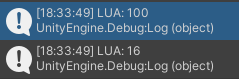
CallLuaClass obj = LuaMgr.GetInstance().Global.Get<CallLuaClass>("testClass");
Debug.Log(obj.testBool);
Debug.Log(obj.testInt);
Debug.Log(obj.testFun);
和之前一样,这个是值拷贝而不是引用拷贝
然后我们再来看一下嵌套映射,我们在这个类里再加一个
testClass={
	testInt=2,
	testBool=true,
	testString="123",
	testFun=function()
		print("123123123")
	end
	testClass2={
		testInt2=3;
	}
}
然后在声明处
public class CallLuaClass2
{
    public int testInt2;
}
 void Start()
    {
        LuaMgr.GetInstance().Init();
        LuaMgr.GetInstance().DoLuaFile("Main");
        CallLuaClass obj = LuaMgr.GetInstance().Global.Get<CallLuaClass>("testClass");
        // Debug.Log(obj.testClass2.testInt2);
        CallLuaClass2 obj2 = obj.testClass2;
        Debug.Log(obj2.testInt2);
    }
接口映射table
先定义一个接口
[CSharpCallLua]//这里也要加
public interface ICSharpCallInterface
{
    //接口中是不允许有成员变量的
    //用属性来接收

    public int testInt
    {
        get;
        set;
    }
    public bool testBool
    {
        get;
        set;
    }

    UnityAction testFun
    {
        get;
        set;
    }

}
  ICSharpCallInterface obj = LuaMgr.GetInstance().Global.Get<ICSharpCallInterface>("testClass");
  obj.testFun();
但是这里唯一不同的是,接口拷贝是引用拷贝,lua表中的值也变了
LuaTable映射table
我们经常使用的Globe本质上就是一个luaTable
所以想访问一个属性很简单
   LuaTable table= LuaMgr.GetInstance().Global.Get<LuaTable>("testClass");
   ebug.Log(table.Get<int>("testInt"));

   table.Get<LuaFunction>("testFun").Call();//调用函数
不建议使用LuaTable和luaFunction 效率比较低
用完之后一定要记住table.Dispose销毁
Lua调用C#
准备工作
我们先来新建一个文件夹,专门存Lua调用C#的代码
然后新建一个Main脚本
Lua没有办法直接访问C#,一定是先从C#调用Lua脚本后才把核心逻辑交给Lua来编写
先做准备工作
using System.Collections;
using System.Collections.Generic;
using UnityEngine;

public class Main : MonoBehaviour
{
    void Start()
    {
        LuaMgr.GetInstance().Init();
        LuaMgr.GetInstance().DoLuaFile("Main");
    }

}
把Main脚本放到摄像机上
我们新建一个lua

我们在Main中调用新建的lua

Lua使用C#类
Lua使用C#的类非常简单
CS.命名空间.类名
先看Main脚本
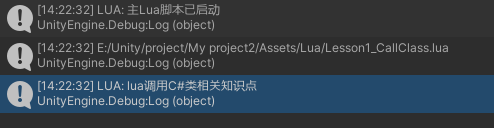
--Main脚本
print("主Lua脚本已启动")
require("Lesson1_CallClass")
然后是Lesson1_CallClass脚本
Lua中没有new 所以我们类名括号就是实例化对象
--Lesson1_CallClass
print("lua调用C#类相关知识点")
local obj1=CS.UnityEngine.GameObject()
我们来梳理一下函数逻辑
- 首先我们在C#中调用初始化函数:先创建唯一实例LuaEnv,然后使用重定向(找到lua文件的位置)
- 通过LuaEnv的DoString方法执行lua逻辑
- 现在我们到了lua脚本中,由于之前我们已经声明将调用lua中的Main文件,所以来到Main文件,这里执行打印语句,然后执行require语句,转到Lesson1_CallClass中
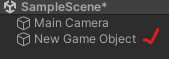
- 来到Lesson1_CallClass中,先打印,然后在场景中创建一个空GameObject
结果:
现在我使用CS.UnityEngine.GameObject()相当于调用一个无参函数,我也可以在括号里面传入名字作为一个有参函数
如果是类对象中的成员方法,要加冒号
这里我们使用带参构造函数,并且使用Gameobject作为别名,我们通过obj3.transform再加冒号调用translate
print("lua调用C#类相关知识点")

local obj2=CS.UnityEngine.GameObject("Theshy")

GameObject=CS.UnityEngine.GameObject

local obj3=GameObject.Find("Theshy")

obj3.transform:Translate(CS.UnityEngine.Vector3.right)
可以发现确实移动了

我们之前看的都是Unity自己的类,现在我们写一个我们自己的类
public class Test
{
    public void Speak(string str)
    {
        Debug.Log(str);
    }
}

namespace Theshy
{
    public class Test2
    {
        public void Speak(string str)
        {
            Debug.Log("Test2: " + str);
        }
    }
}
然后在lua里
local t=CS.Test()
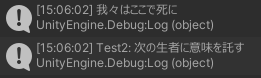
t:Speak("我々はここで死に")
local t2=CS.Theshy.Test2()
t2:Speak("次の生者に意味を託す")
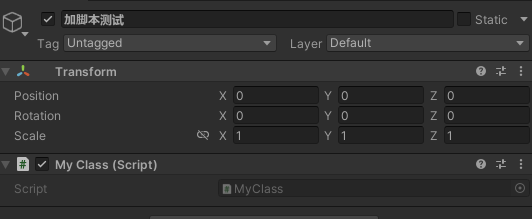
接下来我们要为实例化对象添加脚本,这里别忘了还是使用冒号
GameObject=CS.UnityEngine.GameObject
local obj5=GameObject("加脚本测试")
obj5:AddComponent(typeof(CS.MyClass))
Lua调用C#枚举
我们先声明一个枚举
然后利用这个枚举创建一个立方体
PrimitiveType=CS.UnityEngine.PrimitiveType
GameObject=CS.UnityEngine.GameObject

local obj=GameObject.CreatePrimitive(PrimitiveType.Cube)--创建立方体

我们这里自己新建一个枚举,和刚才我们自己写类的方法一样
CS.(命名空间.)枚举名
Lua使用C# 数组 List 字典
数组
我们先在C#脚本中定义一个数组,list,字典
public class VectorSet
{
    public int[] array = new int[5] { 1, 2, 3, 4, 5 };
    public List<int> list = new List<int>();
    public Dictionary<int, string> dic = new Dictionary<int, string>();
}
然后我们在lua中,先写数组逻辑
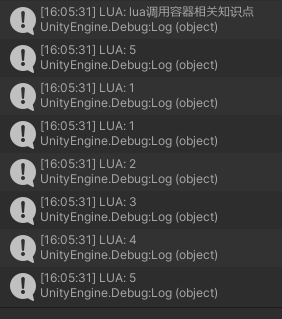
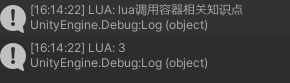
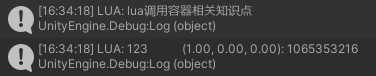
print("lua调用容器相关知识点")

local obj = CS.VectorSet()

--Lua使用C#数组
--这里不能使用#
print(obj.array.Length)
--访问元素
print(obj.array[0])
然后是数组的遍历,虽然lua中的索引从1开始
但是数组是C#的数组,所以还要按C#的来
并且在lua的for循环默认最后条件是<=的,所以要减一
for i=0,obj.array.Length-1 do
	print(obj.array[i])
end
如果我想在Lua中创建C#的数组呢?
由于lua中没有new,所以不能像C#一样声明数组,但是在Unity中数组是一个数组类,里面提供了一个静态方法,直接创建一个数组,所以我们这里直接调用这个静态方法就可以了
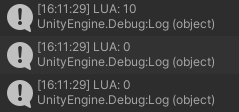
local array2=CS.System.Array.CreateInstance(typeof(CS.System.Int32),10)

print(array2.Length)
print(array2[0])
print(array2[1])
List
对于List也一样,遍历和数组一模一样
obj.list:Add(1)
obj.list:Add(2)
obj.list:Add(3)

print(obj.list.Count)
接下来要写用list创建对象
分两个版本
老版本(2.1.12之前)
local list2=CS.System.Collections.Generic["List`1[System.String]"]()
新版本
local List_String=CS.System.Collections.Generic.List(CS.System.String)--相当于得到一个类
local list3=List_String()
字典
添加元素用add,和上面两个一样
遍历需要用pairs
for k,v in pairs(obj.doc)do
	print(k,v)
end
然后是在Lua中创建一个字典对象
local Dic_String_Vector3=CS.System.Collections.Generic.Dictionary(CS.System.String,CS.UnityEngine.Vector3)
local dic2=Dic_String_Vector3()
dic2:Add("123",CS.UnityEngine.Vector3.right)
for i,v in pairs(dic2) do
	print(i,v)
end
如果我现在想通过我刚才新建的dic2来访问键值呢?
可以发现打印的是nil
print(dic2["123"])
这里要用
print(dic2:get_Item("123"))

如果要修改键值也要用set_Item
Lua使用C#扩展方法
先声明一个类和一个拓展方法
public static class Tools
{
    //拓展方法
    public static void Move(this testClass obj)
    {
        Debug.Log(obj.name + "移动");
    }
}

public class testClass
{
    public string name = "Theshy";
    public void Speak(string str)
    {
        Debug.Log(str);
    }

    public static void Eat()
    {
        Debug.Log("吃东西");
    }
}
然后在lua中调用
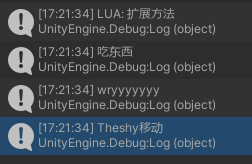
print("扩展方法")

testclass=CS.testClass
--使用静态方法

testclass.Eat()

--使用成员函数

local obj=testclass()

obj:Speak("wryyyyyyy")

--使用拓展方法,和使用成员方法方法一致

CS.Tools.Move(obj)
但是会报错

所以想要在xLua中使用扩展方法,一定要在工具类前面加上特性,然后不要忘了重新生成代码
如果考虑性能的话,可以把所有lua中需要的东西都写上LuaCallCSharp,因为lua底层是通过反射来与C#联系的,会有一定性能损失
  [XLua.LuaCallCSharp]
    //拓展方法
    public static void Move(this testClass obj)
    {
        Debug.Log(obj.name + "移动");
    }
Lua使用C# ref和out函数
ref
我们先在Unity中写个类
public class Lesson5
{
    public int RefFun(int a,ref int b ,ref int c,int d)
    {
        b = a + d;
        c = a - d;
        return 100;
    }

    public int OufFun(int a, out int b, out int c, int d)
    {
        b = a;
        c = d;
        return 200;
    }

    public int RefOutFun(int a, out int b, ref int c)
    {
        b = a * 10;
        c = a * 20;
        return 300;
    }
}
我们先来看ref的,ref是多返回值,并且需要显式初始化
首先a是第一个返回值,接收的就是函数本身的返回值100,然后b和c分别接ref b ref c
Lesson5=CS.Lesson5

local obj=Lesson5()

local a,b,c=obj.RefFun(1,0,0,1)

print(a)

print(b)

print(c)
out
out不需要传占位置的值
local obj=Lesson5()

local a,b,c=obj:OutFun(20,30)

print(a)

print(b)

print(c)
函数重载
我们先写几个简单的重载函数
public class Lesson6
{
   public int Calc()
    {
        return 100;
    }

    public int Calc(int a,int b)
    {
        return a+b;
    }

    public int Calc(int a)
    {
        return a;
    }

    public float Calc(float a)
    {
        return a;
    }
}
然后是lua层
local obj=CS.Lesson6()
print(obj:Calc())
print(obj:Calc(15,1))
可以看出lua支持调用C#中的重载函数
然后我们再调用后面的
print(obj:Calc(10))
print(obj:Calc(10.2))
lua中只有number类型,而C#中有多个属性,所以对多精度数据支持的并不好
用反射来解决多精度重载(效率低,尽量别用)
local m1=typeof(CS.Lesson6):GetMethod("Calc",{typeof(CS.System.Int32)})

local m2=typeof(CS.Lesson6):GetMethod("Calc",{typeof(CS.System.Single)})

local f1=xlua.tofunction(m1)
local f2=xlua.tofunction(m2)

f1(obj,10)
f1(obj,10.2)
lua调用C# 委托和事件
我们再写个类,一个委托,一个事件,和一个调用事件的函数
public class Lesson7
{
    public UnityAction del;
    public event UnityAction eventAction;

    public void DoEvent()
    {
        eventAction();
    }
}
这里不能直接+=,并且第一次往委托中加函数是nil不能直接加
local obj=CS.Lesson7()

local fun = function ( )
	print("Lua函数Fun")
end

obj.del=fun

obj.del()--执行委托
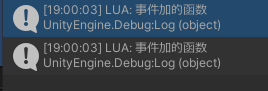
然后是事件
local obj=CS.Lesson7()

local fun2=function()
	print("事件加的函数")
end

obj:eventAction("+",fun2)
obj:eventAction("+",fun2)

obj:DoEvent()
相应的,想减少调用就用减号
如果我想清除事件,不能直接像委托del=nil
而是需要在C#层加一个函数
 public void ClearEvent()
    {
        eventAction = null;
    }
然后
obj:ClearEvent()
Lua使用C#二维数组
我们先在C#中声明一个二维数组
public class Lesson8
{
    public int[,] array = new int[2, 3] { { 1, 2, 3 }, { 4, 5, 6 } };
}
我们在lua中先取到一个简单的二维数组
print("二维数组")

local obj=CS.Lesson8()

--获取长度
print(obj.array:GetLength(0))
print(obj.array:GetLength(1))
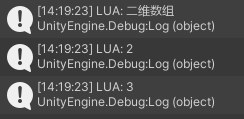
在Lua中访问C#的二维数组不能通过[0,0]或[0][0]来访问
和之前array一样,二维数组提供了一个方法来返回值
print(obj.array:GetValue(0,0))
print(obj.array:GetValue(0,1))
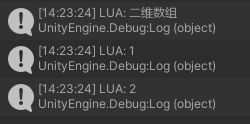
然后是二维数组的遍历
for i=0,obj:GetLength(0)-1 do
for j=0,obj:GetLength(1)-1 do
	print(obj.GetValue(i,j))
end
end
Lua中null与nil的比较
我们现在实现一个需求,先实例化一个物体吗,然后判断其有没有刚体组件,如果没有再加
GameObject=CS.UnityEngine.GameObject
Rigidbody=CS.UnityEngine.Rigidbody
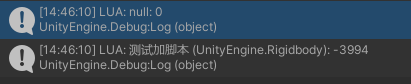
local obj=GameObject("测试加脚本")
local rig=obj:GetComponent(typeof(Rigidbody))
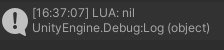
print(rig)
if rig==nil then
rig=obj:AddComponent(typeof(Rigidbody))
end
print(rig)
这里发现即使没有脚本,也不会新加,可以通过测试发现if rig==nil 这行逻辑没进
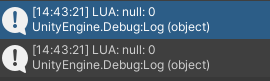
原因是因为null 和nil不是一个东西
所以这里要用
我们可以自己在lua中的Main文件中写一个逻辑
function IsNull( obj )
	if obj==nil or obj:Equals(nil) then
		return true
	else return false
end
我们也可以使用一个扩展方法,这样就把核心逻辑写在C#中而不是lua中了
系统类型与Lua互相访问
如果我需要在lua中使用一个只读的代码(系统库或三方库),不能加LuaCallCSharp代码,应该怎么做:
假如说我现在需要为UnityAction< float >加特性
我们写这么一段代码
public static class Lesson10
{
    [CSharpCallLua]
    public static List<Type> csharpCallLuaList = new List<Type>()
    {
        typeof(UnityAction<float>)
    };
}
然后点生成代码
lua使用C#协程
这里我们为新创建的Gameobject添加了一个脚本,然后通过这个脚本调用StartCoroutine
GameObject =CS.UnityEngine.GameObject

WaitForSeconds=CS.UnityEngine.WaitForSeconds

local obj=GameObject("Coroutine")

local mono=obj:AddComponent(typeof(CS.LuaCallCSharp))

--希望用来被开启的协程
fun=function ()
	local a=1
	while true do
		coroutine.yield()
		print(a)
		a=a+1
	end
end

mono:StartCoroutine(fun)
但是这样会报错

所以不能通过StartCoroutine来直接调用fun
所以我们使用一个xlua官方自带的一个工具表
util=require("xlua.util")
mono:StartCoroutine(util.cs_generator(fun))
Lua使用C#泛型
我们先在C#里写几个泛型函数
public class Lesson12
{
public interface ITest
{
}
public class TestFather
{
}
public class TestChild:TestFather,ITest
{
}
public void TestFun1<T>(T a, T b) where T : TestFather
{
Debug.Log("有参数有约束的泛型方法");
}
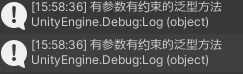
public void TestFun2<T>(T a)
{
Debug.Log("有参数,无约束");
}
public void TestFun3<T>() where T : TestFather
{
Debug.Log("无参数,有约束");
}
public void TestFun4<T>(T a) where T : ITest
{
Debug.Log("有参数,有约束,约束不是类是接口");
}
}
然后来到lua
我们先来测试第一个
local obj=CS.Lesson12()

local child = CS.Lesson12.TestChild()
local father = CS.Lesson12.TestFather()

obj:TestFun1(child,father)
obj:TestFun1(father,child)
然后我们来调用第二组
报错了,可以发现lua中不支持不约束的泛型

然后第三组,可以发现lua也不支持无参带约束的泛型

然后看最后一组
因为在C#中child类继承自接口,所以用child传进去
obj:TestFun4(child)
可以发现4也不行,lua中不支持非class的约束

接下来讲让上面不支持的泛型函数变得能用
local testFun2=xlua.get_generic_method(CS.Lesson12,"TestFun2")
local testFun2_R=testFun2(CS.System.Int32)
--第一个参数传调用函数的对象
testFun2_R(obj,1)


 365
365

 被折叠的 条评论
为什么被折叠?
被折叠的 条评论
为什么被折叠?
 到【灌水乐园】发言


