


文档扫描预览
将图片中的档变成易于查看的扫描件
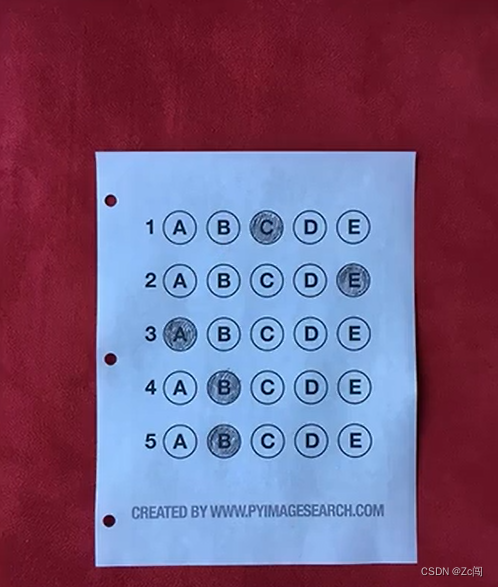
当前图片:
处理后的图片:

具体实现
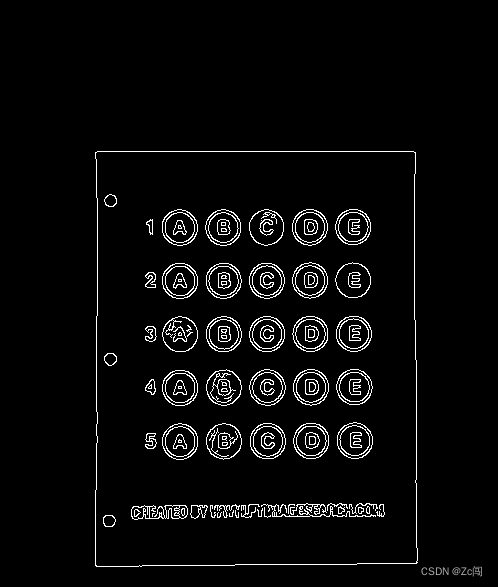
利用Canny算子对图片进行处理
利用Canny算子对图片进行边缘检测,得到一个二值化相对较好的图片,滤除背景颜色。
#滤波
blur_picture = cv2.GaussianBlur(picture_for_scan, (5, 5), 0)
cv_show('blur_picture', blur_picture)

#canny算子,边缘检测(双阈值处理)
edged_picture = cv2.Canny(blur_picture, 50, 200)
ret , edged_picture = cv2.threshold(edged_picture, 200, 255, cv2.THRESH_BINARY)
cv_show('edged_picture', edged_picture)
边缘处理后的图片:
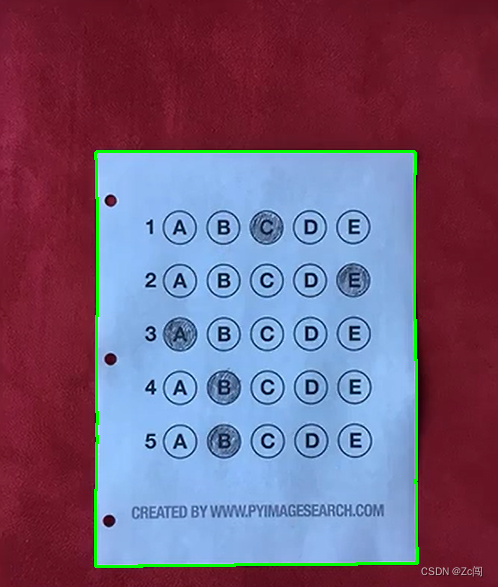
对处理后图片进行轮廓检测
contours , hes = cv2.findContours(edged_picture.copy(), cv2.RETR_EXTERNAL, cv2.CHAIN_APPROX_SIMPLE)
draw_contours_picture = cv2.drawContours(color_picture, contours, -1, (0, 255, 0), 2)
cv_show('draw_contours_picture', draw_contours_picture)
轮廓检测效果:
筛选轮廓并拉直为四边形
因为检测出的轮廓可能是多个,我们选择面积最大的那个轮廓框架。
if len(contours) > 0:
    #按面积大小排序
    contours = sorted(contours, key = cv2.contourArea , reverse = True)
选出最大轮廓后,因为轮廓可能是个多边形,所以需要把它拉直为四边形。
#将轮廓拉直为四边形
c = contours[0]
peri = cv2.arcLength(c, True)
for k in np.arange(0,0.1,0.01):
    approx = cv2.approxPolyDP(c, k*peri, True)
    if len(approx) == 4:
        docCnt = approx
        break
对图像进行透视变换
对轮廓的四角坐标进行排序
将四个角坐标进行重排,重排顺序为:左上, 右上, 左下, 右下。
#将四个角坐标排序:左上, 右上, 左下, 右下
def order_points(pts):
	#按x坐标重排
    sort_id = np.argsort(pts[:,0])
    pts = pts[sort_id, :]
    #按y坐标重排
    mid_sort_id = np.argsort(pts[0:2, 1])
    pts[0:2, :] = pts[mid_sort_id, :]
    mid_sort_id = np.argsort(pts[2:4, 1])
    mid_pts = pts[2:4, :]
    pts[2:4 :] = mid_pts[mid_sort_id, :]
    return pts
得到变换后坐标,并变换
选取长变和最大的高作为变换后图片的长和宽。(ps:变换后坐标顺序为:左上, 右上, 左下, 右下)
rect = order_points(pts)
(tl, tr, bl, br) = rect

#计算轮廓参数
widthA = distance(br, bl)
widthB = distance(tr, tl)
maxWidth = max(int(widthA), int(widthB))

heigthA = distance(tr, br)
heigthB = distance(tl, bl)
maxHeigth = max(int(heigthA), int(heigthB))

#变换后坐标
dst = np.array([
    [0, 0],
    [0, maxWidth-1],
    [maxHeigth-1, 0],
    [maxHeigth-1, maxWidth-1]
],dtype = np.float32)
#数据类型转换
rect = rect.astype(np.float32)
坐标变换:
#计算变换矩阵
M = cv2.getPerspectiveTransform(rect, dst)
#图像坐标变换
warped = cv2.warpPerspective(img, M, (maxHeigth, maxWidth))
附录
源代码:GitHub下载地址
懒人链接:EXE文件


 1114
1114


 被折叠的 条评论
为什么被折叠?
被折叠的 条评论
为什么被折叠?
 到【灌水乐园】发言


