


前言:经常使用扫描全能王,非常喜欢其中的实现图片转成扫描件的功能,花了点时间使用python大致实现了图像增强的功能(主要实现亮度提升和降噪)。
具体包括以下步骤:
1、安装相关的包
pip install Pillow
pip install opencv-python
pip install numpy
pip install scikit-image
pip install multiprocessing
2、主函数
if __name__ == "__main__":
    # 选择要处理的图像的目录
    folder_path = "C:/Users/Desktop/data"
    # 遍历此目录
    for filename in os.listdir(folder_path):
        if filename.endswith(('.jpg', '.jpeg', '.png', '.bmp', '.gif')):
            image_path = os.path.join(folder_path, filename)
            if os.path.isfile(image_path):
                print(f" 正在处理: {image_path}")
                num_blocks = 4  # 将图像分成的块数

                # 读取图像
                image = cv2.imread(image_path)

                # 获取图像尺寸和块大小
                height, width = image.shape[:2]
                block_width = width // num_blocks
                block_height = height // num_blocks

                # 构建图像块列表
                image_blocks = []
                for i in range(num_blocks):
                    for j in range(num_blocks):
                        x = j * block_width
                        y = i * block_height
                        image_blocks.append((image_path, x, y, block_width, block_height))

                # 使用多进程并行处理图像块
                pool = Pool()
                processed_blocks = pool.map(process_image, image_blocks)
                pool.close()
                pool.join()

                # 将处理后的图像块合并为完整图像
                processed_image = np.zeros_like(image)
                for block, processed_block in zip(image_blocks, processed_blocks):
                    _, x, y, width, height = block
                    processed_image[y:y+height, x:x+width] = processed_block[y:y+height, x:x+width]

                # 保存处理后的图像
                cv2.imwrite(image_path, processed_image)
3、图像处理函数
def process_image(image_block):
    # 读取图像块
    image_path, x, y, width, height = image_block
    image = cv2.imread(image_path)
    # 裁剪图像块
    image_block = image[y:y+height, x:x+width]

    # 转换为RGB格式
    image_block = cv2.cvtColor(image_block, cv2.COLOR_BGR2RGB)

    # 转换为灰度图像
    gray = cv2.cvtColor(image_block, cv2.COLOR_RGB2GRAY)

    # 中值滤波去除噪声
    gray = cv2.GaussianBlur(gray, (3, 3), 0)


    # 自适应阈值处理
    thresh = threshold_local(gray, 55, offset=12, method="gaussian")
    binary = (gray > thresh).astype(np.uint8) * 255

    # 去除小黑点
    binary = remove_small_noise(binary, 8)

    # 将处理后的图像块放回原图像中
    image_block = cv2.cvtColor(binary, cv2.COLOR_GRAY2BGR)
    image[y:y+height, x:x+width] = image_block
    # 返回图像
    return image
4、去除小黑点函数
# 去除小黑点
def remove_small_noise(binary, min_size):
# 提高min_size的大小会去除更多的黑点,但同时有可能对图片内容造成影响
    num_labels, labels, stats, centroids = cv2.connectedComponentsWithStats(255 - binary, connectivity=8)

    for i in range(1, num_labels):
        if stats[i, cv2.CC_STAT_AREA] < min_size:
            binary[labels == i] = 255

    return binary
全部代码如下:
import cv2
import numpy as np
from skimage.filters import threshold_local
import os
from multiprocessing import Pool
# 去除小黑点
def remove_small_noise(binary, min_size):
    num_labels, labels, stats, centroids = cv2.connectedComponentsWithStats(255 - binary, connectivity=8)

    for i in range(1, num_labels):
        if stats[i, cv2.CC_STAT_AREA] < min_size:
            binary[labels == i] = 255

    return binary

def process_image(image_block):
    # 读取图像块
    image_path, x, y, width, height = image_block
    image = cv2.imread(image_path)
    # 裁剪图像块
    image_block = image[y:y+height, x:x+width]

    # 转换为RGB格式
    image_block = cv2.cvtColor(image_block, cv2.COLOR_BGR2RGB)

    # 转换为灰度图像
    gray = cv2.cvtColor(image_block, cv2.COLOR_RGB2GRAY)

    # 中值滤波去除噪声
    gray = cv2.GaussianBlur(gray, (3, 3), 0)


    # 自适应阈值处理
    thresh = threshold_local(gray, 55, offset=12, method="gaussian")
    binary = (gray > thresh).astype(np.uint8) * 255

    # 去除小黑点
    binary = remove_small_noise(binary, 8)

    # 将处理后的图像块放回原图像中
    image_block = cv2.cvtColor(binary, cv2.COLOR_GRAY2BGR)
    image[y:y+height, x:x+width] = image_block
    # 返回图像
    return image

if __name__ == "__main__":
    # 选择要处理的图像的目录
    folder_path = "C:/Users/Desktop/data"
    # 遍历此目录
    for filename in os.listdir(folder_path):
        if filename.endswith(('.jpg', '.jpeg', '.png', '.bmp', '.gif')):
            image_path = os.path.join(folder_path, filename)
            if os.path.isfile(image_path):
                print(f" 正在处理: {image_path}")
                num_blocks = 4  # 将图像分成的块数

                # 读取图像
                image = cv2.imread(image_path)

                # 获取图像尺寸和块大小
                height, width = image.shape[:2]
                block_width = width // num_blocks
                block_height = height // num_blocks

                # 构建图像块列表
                image_blocks = []
                for i in range(num_blocks):
                    for j in range(num_blocks):
                        x = j * block_width
                        y = i * block_height
                        image_blocks.append((image_path, x, y, block_width, block_height))

                # 使用多进程并行处理图像块
                pool = Pool()
                processed_blocks = pool.map(process_image, image_blocks)
                pool.close()
                pool.join()

                # 将处理后的图像块合并为完整图像
                processed_image = np.zeros_like(image)
                for block, processed_block in zip(image_blocks, processed_blocks):
                    _, x, y, width, height = block
                    processed_image[y:y+height, x:x+width] = processed_block[y:y+height, x:x+width]

                # 保存处理后的图像
                cv2.imwrite(image_path, processed_image)
看看最终效果吧:
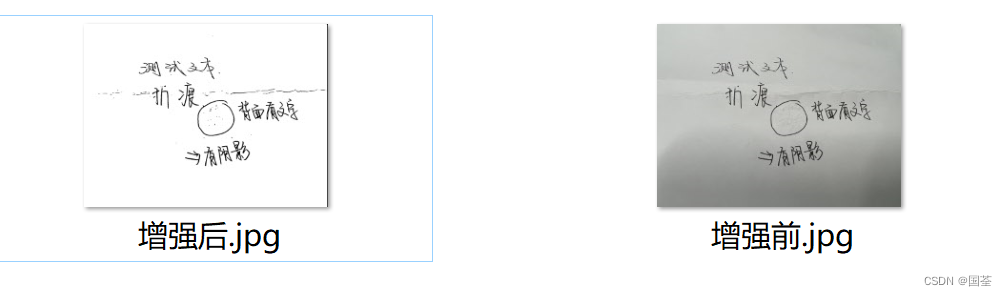
说明:图像处理中的各种参数可调,比如中值滤波的核大小可调大,也可换成高斯滤波。再比如remove_small_noise的min_size,我在这里写的比较小是因为我有处理较小和较大文字的需求,为了有更好的泛化能力,经过测试而定的。大家可以根据自己的实际需求来修改这些数值大小。


 1714
1714

 被折叠的 条评论
为什么被折叠?
被折叠的 条评论
为什么被折叠?
 到【灌水乐园】发言


