


秋招面试专栏推荐 :深度学习算法工程师面试问题总结【百面算法工程师】——点击即可跳转
💡💡💡本专栏所有程序均经过测试,可成功执行💡💡💡
专栏目录: 《YOLOv5入门 + 改进涨点》专栏介绍 & 专栏目录 |目前已有70+篇内容,内含各种Head检测头、损失函数Loss、Backbone、Neck、NMS等创新点改进
为了加速神经网络,通常减少浮点运算(FLOPs),但FLOPs降低并不总是等同于延迟降低。这是因为运算效率低,尤其是深度可分离卷积频繁内存访问。本文介绍一种部分卷积(PConv)以高效提取特征,减少冗余计算和内存访问。基于PConv,构建了FasterNet神经网络,它在多种设备上运行更快,且机会不影响视觉任务的准确性。文章在介绍主要的原理后,将手把手教学如何进行模块的代码添加和修改,并将修改后的完整代码放在文章的最后,方便大家一键运行,小白也可轻松上手实践。以帮助您更好地学习深度学习目标检测YOLO系列的挑战。
目录
1. 原理

论文地址:Run, Don’t Walk: Chasing Higher FLOPS for Faster Neural Networks——点击即可跳转
官方代码: 官方代码仓库——点击即可跳转
FasterNet 神经网络,主要侧重于提高计算速度(FLOPS - 每秒浮点运算次数),同时保持浮点运算 (FLOP) 数量较低。核心思想是,由于许多现有方法的内存访问效率低下和 FLOPS 较低,减少 FLOP 并不总是意味着降低延迟或提高性能。
关键概念和创新
-
FLOP 与 FLOPS:
-
加速神经网络的传统方法侧重于降低 FLOP,这衡量了计算复杂度。然而,这并不一定会降低延迟,因为它忽略了实际的计算速度,即 FLOPS。
-
FLOPS 表示每秒可以执行多少次浮点运算,并直接影响网络的实际速度。作者认为,仅仅减少 FLOP 而不考虑 FLOPS 在某些情况下甚至可能会增加延迟。
内存访问瓶颈:
-
许多现有运算符,如深度卷积 (DWConv),都存在频繁内存访问的问题,这会降低整体计算速度。尽管这些运算符在 FLOP 方面很高效,但它们通常会导致较低的 FLOPS,从而增加延迟。
部分卷积 (PConv):
-
为了解决这些低效率问题,本文提出了一种称为部分卷积 (PConv) 的新运算符。PConv 通过将卷积滤波器仅应用于部分输入通道,而其余通道保持不变,从而减少了计算冗余。这种方法减少了 FLOP 并增加了 FLOPS,从而缩短了执行时间。
-
PConv 能够有效地提取空间特征,同时减少内存访问,这是提高 CPU 和 GPU 等设备的实际处理速度的关键因素。
FasterNet:
-
FasterNet 以 PConv 为基础,是一个新的神经网络系列,旨在在不牺牲准确性的情况下在各种设备上普遍更快。例如,较小的变体 FasterNet-T0 比 MobileViT-XXS 等竞争模型更快、更准确。
-
FasterNet 的设计考虑了实际部署,确保它在各种硬件配置(包括 GPU、CPU 和 ARM 处理器)上都能表现良好。
结论
FasterNet 代表了神经网络架构的进步,它解决了计算复杂度 (FLOP) 和实际计算速度 (FLOPS) 问题。通过引入 PConv 并强调高效的内存访问,它在不同设备上实现了更快的性能,同时与现有模型相比保持甚至提高了准确性。
2. 将C3_EMSCP添加到yolov5网络中
2.1 C3_EMSCP 代码实现
关键步骤一: 将下面的代码粘贴到\yolov5\models\common.py中
from timm.models.layers import DropPath
class Partial_conv3(nn.Module):
    def __init__(self, dim, n_div=4, forward='split_cat'):
        super().__init__()
        self.dim_conv3 = dim // n_div
        self.dim_untouched = dim - self.dim_conv3
        self.partial_conv3 = nn.Conv2d(self.dim_conv3, self.dim_conv3, 3, 1, 1, bias=False)

        if forward == 'slicing':
            self.forward = self.forward_slicing
        elif forward == 'split_cat':
            self.forward = self.forward_split_cat
        else:
            raise NotImplementedError

    def forward_slicing(self, x):
        # only for inference
        x = x.clone()   # !!! Keep the original input intact for the residual connection later
        x[:, :self.dim_conv3, :, :] = self.partial_conv3(x[:, :self.dim_conv3, :, :])
        return x

    def forward_split_cat(self, x):
        # for training/inference
        x1, x2 = torch.split(x, [self.dim_conv3, self.dim_untouched], dim=1)
        x1 = self.partial_conv3(x1)
        x = torch.cat((x1, x2), 1)
        return x

class Faster_Block(nn.Module):
    def __init__(self,
                 inc,
                 dim,
                 n_div=4,
                 mlp_ratio=2,
                 drop_path=0.1,
                 layer_scale_init_value=0.0,
                 pconv_fw_type='split_cat'
                 ):
        super().__init__()
        self.dim = dim
        self.mlp_ratio = mlp_ratio
        self.drop_path = DropPath(drop_path) if drop_path > 0. else nn.Identity()
        self.n_div = n_div

        mlp_hidden_dim = int(dim * mlp_ratio)

        mlp_layer = [
            Conv(dim, mlp_hidden_dim, 1),
            nn.Conv2d(mlp_hidden_dim, dim, 1, bias=False)
        ]

        self.mlp = nn.Sequential(*mlp_layer)

        self.spatial_mixing = Partial_conv3(
            dim,
            n_div,
            pconv_fw_type
        )

        self.adjust_channel = None
        if inc != dim:
            self.adjust_channel = Conv(inc, dim, 1)

        if layer_scale_init_value > 0:
            self.layer_scale = nn.Parameter(layer_scale_init_value * torch.ones((dim)), requires_grad=True)
            self.forward = self.forward_layer_scale
        else:
            self.forward = self.forward

    def forward(self, x):
        if self.adjust_channel is not None:
            x = self.adjust_channel(x)
        shortcut = x
        x = self.spatial_mixing(x)
        x = shortcut + self.drop_path(self.mlp(x))
        return x

    def forward_layer_scale(self, x):
        shortcut = x
        x = self.spatial_mixing(x)
        x = shortcut + self.drop_path(
            self.layer_scale.unsqueeze(-1).unsqueeze(-1) * self.mlp(x))
        return x

class C3_Faster(C3):
    def __init__(self, c1, c2, n=1, shortcut=False, g=1, e=0.5):
        super().__init__(c1, c2, n, shortcut, g, e)
        c_ = int(c2 * e)  # hidden channels
        self.m = nn.Sequential(*(Faster_Block(c_, c_) for _ in range(n)))
2.2 Faster_Block的神经网络模块代码解析
1. 初始化与参数设定 (__init__ 方法):
-
输入参数:
-
inc: 输入特征图的通道数。 -
dim: 模块中间层的通道数(也即输出的通道数)。 -
n_div: 部分卷积(Partial_conv3)的分割因子,用于控制部分卷积操作的分组数。 -
mlp_ratio: MLP层的宽度倍率,决定了中间层的隐藏通道数。 -
drop_path: DropPath概率,决定了跳跃连接中随机失活的比例。 -
layer_scale_init_value: 层级缩放因子初始值,控制了残差连接中输出的缩放比例。 -
pconv_fw_type: 部分卷积的前向传播类型。
-
-
内部层:
-
mlp: 包含两个1x1卷积层的MLP层,用于通道之间的特征变换。 -
spatial_mixing: 使用Partial_conv3实现的部分卷积层,用于空间信息混合。 -
adjust_channel: 当输入通道数inc与模块的通道数dim不一致时,用于调整通道数的一层1x1卷积。
-
2. 前向传播 (forward 方法):
-
通道调整:
-
如果输入通道数不等于目标通道数
dim,则通过adjust_channel调整输入通道数。
-
-
部分卷积 (
spatial_mixing):-
将输入特征图通过
Partial_conv3进行部分卷积操作,这一步通过分割因子n_div将输入通道分为若干组,并对每组执行卷积操作。此步骤提取空间特征,同时减少了计算量。
-
-
MLP与残差连接:
-
将部分卷积后的特征图输入到MLP层,进行通道间的特征变换。
-
使用残差连接将输入的快捷路径(
shortcut)与MLP的输出相加,这有助于在训练过程中稳定梯度传递。 -
如果启用了DropPath,则在加和之前随机失活一部分路径,以增加模型的鲁棒性。
-
3. 层级缩放 (forward_layer_scale 方法):
-
作用:
-
如果
layer_scale_init_value大于0,使用层级缩放因子调整残差连接的输出权重。 -
在计算MLP输出时,残差连接中的输出会乘以一个可学习的缩放因子(
layer_scale),以更好地控制不同层之间的特征信息。
-
-
步骤:
-
layer_scale参数会按通道展开(使用unsqueeze),与MLP输出相乘,之后再加到输入的快捷路径(shortcut)上。
-
总结
Faster_Block通过结合部分卷积和MLP层,在保持高效特征提取的同时减少了计算量和内存访问。残差连接确保了信息的有效传递,而可选的层级缩放提供了额外的模型灵活性,有助于提高训练和推理的稳定性与效率。

2.3 新增yaml文件
关键步骤二:在下/yolov5/models下新建文件 yolov5_C3_Faster.yaml并将下面代码复制进去
- 目标检测yaml文件
# Ultralytics YOLOv5 🚀, AGPL-3.0 license

# Parameters
nc: 80 # number of classes
depth_multiple: 1.0 # model depth multiple
width_multiple: 1.0 # layer channel multiple
anchors:
  - [10, 13, 16, 30, 33, 23] # P3/8
  - [30, 61, 62, 45, 59, 119] # P4/16
  - [116, 90, 156, 198, 373, 326] # P5/32

# YOLOv5 v6.0 backbone
backbone:
  # [from, number, module, args]
  [
    [-1, 1, Conv, [64, 6, 2, 2]], # 0-P1/2
    [-1, 1, Conv, [128, 3, 2]], # 1-P2/4
    [-1, 3, C3_Faster, [128]],
    [-1, 1, Conv, [256, 3, 2]], # 3-P3/8
    [-1, 6, C3_Faster, [256]],
    [-1, 1, Conv, [512, 3, 2]], # 5-P4/16
    [-1, 9, C3_Faster, [512]],
    [-1, 1, Conv, [1024, 3, 2]], # 7-P5/32
    [-1, 3, C3_Faster, [1024]],
    [-1, 1, SPPF, [1024, 5]], # 9
  ]

# YOLOv5 v6.0 head
head: [
    [-1, 1, Conv, [512, 1, 1]],
    [-1, 1, nn.Upsample, [None, 2, "nearest"]],
    [[-1, 6], 1, Concat, [1]], # cat backbone P4
    [-1, 3, C3_Faster, [512, False]], # 13

    [-1, 1, Conv, [256, 1, 1]],
    [-1, 1, nn.Upsample, [None, 2, "nearest"]],
    [[-1, 4], 1, Concat, [1]], # cat backbone P3
    [-1, 3, C3_Faster, [256, False]], # 17 (P3/8-small)

    [-1, 1, Conv, [256, 3, 2]],
    [[-1, 14], 1, Concat, [1]], # cat head P4
    [-1, 3, C3_Faster, [512, False]], # 20 (P4/16-medium)

    [-1, 1, Conv, [512, 3, 2]],
    [[-1, 10], 1, Concat, [1]], # cat head P5
    [-1, 3, C3_Faster, [1024, False]], # 23 (P5/32-large)

    [[17, 20, 23], 1, Detect, [nc, anchors]], # Detect(P3, P4, P5)
  ]
- 语义分割yaml文件
# Ultralytics YOLOv5 🚀, AGPL-3.0 license

# Parameters
nc: 80 # number of classes
depth_multiple: 1.0 # model depth multiple
width_multiple: 1.0 # layer channel multiple
anchors:
  - [10, 13, 16, 30, 33, 23] # P3/8
  - [30, 61, 62, 45, 59, 119] # P4/16
  - [116, 90, 156, 198, 373, 326] # P5/32

# YOLOv5 v6.0 backbone
backbone:
  # [from, number, module, args]
  [
    [-1, 1, Conv, [64, 6, 2, 2]], # 0-P1/2
    [-1, 1, Conv, [128, 3, 2]], # 1-P2/4
    [-1, 3, C3_Faster, [128]],
    [-1, 1, Conv, [256, 3, 2]], # 3-P3/8
    [-1, 6, C3_Faster, [256]],
    [-1, 1, Conv, [512, 3, 2]], # 5-P4/16
    [-1, 9, C3_Faster, [512]],
    [-1, 1, Conv, [1024, 3, 2]], # 7-P5/32
    [-1, 3, C3_Faster, [1024]],
    [-1, 1, SPPF, [1024, 5]], # 9
  ]

# YOLOv5 v6.0 head
head: [
    [-1, 1, Conv, [512, 1, 1]],
    [-1, 1, nn.Upsample, [None, 2, "nearest"]],
    [[-1, 6], 1, Concat, [1]], # cat backbone P4
    [-1, 3, C3_Faster, [512, False]], # 13

    [-1, 1, Conv, [256, 1, 1]],
    [-1, 1, nn.Upsample, [None, 2, "nearest"]],
    [[-1, 4], 1, Concat, [1]], # cat backbone P3
    [-1, 3, C3_Faster, [256, False]], # 17 (P3/8-small)

    [-1, 1, Conv, [256, 3, 2]],
    [[-1, 14], 1, Concat, [1]], # cat head P4
    [-1, 3, C3_Faster, [512, False]], # 20 (P4/16-medium)

    [-1, 1, Conv, [512, 3, 2]],
    [[-1, 10], 1, Concat, [1]], # cat head P5
    [-1, 3, C3_Faster, [1024, False]], # 23 (P5/32-large)

    [[17, 20, 23], 1, Segment, [nc, anchors, 32, 256]], # Detect(P3, P4, P5)
  ]
温馨提示:本文只是对yolov5基础上添加模块,如果要对yolov5n/l/m/x进行添加则只需要指定对应的depth_multiple 和 width_multiple。
# YOLOv5n
depth_multiple: 0.33  # model depth multiple
width_multiple: 0.25  # layer channel multiple

# YOLOv5s
depth_multiple: 0.33  # model depth multiple
width_multiple: 0.50  # layer channel multiple

# YOLOv5l
depth_multiple: 1.0  # model depth multiple
width_multiple: 1.0  # layer channel multiple

# YOLOv5m
depth_multiple: 0.67  # model depth multiple
width_multiple: 0.75  # layer channel multiple

# YOLOv5x
depth_multiple: 1.33  # model depth multiple
width_multiple: 1.25  # layer channel multiple
2.4 注册模块
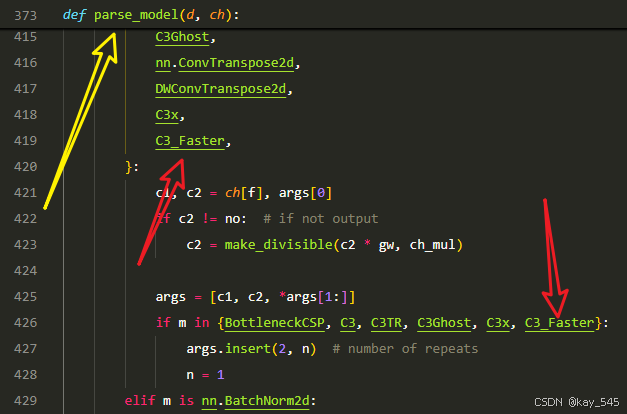
关键步骤三:在yolo.py的parse_model函数替换添加C3_Faster
2.5 执行程序
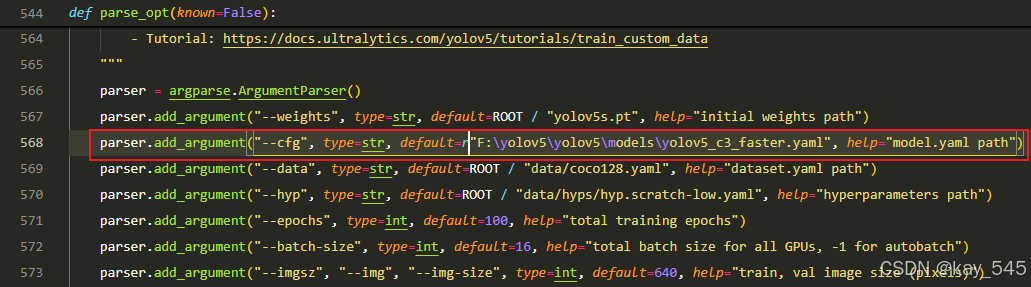
在train.py中,将cfg的参数路径设置为yolov5_C3_Faster.yaml的路径
建议大家写绝对路径,确保一定能找到
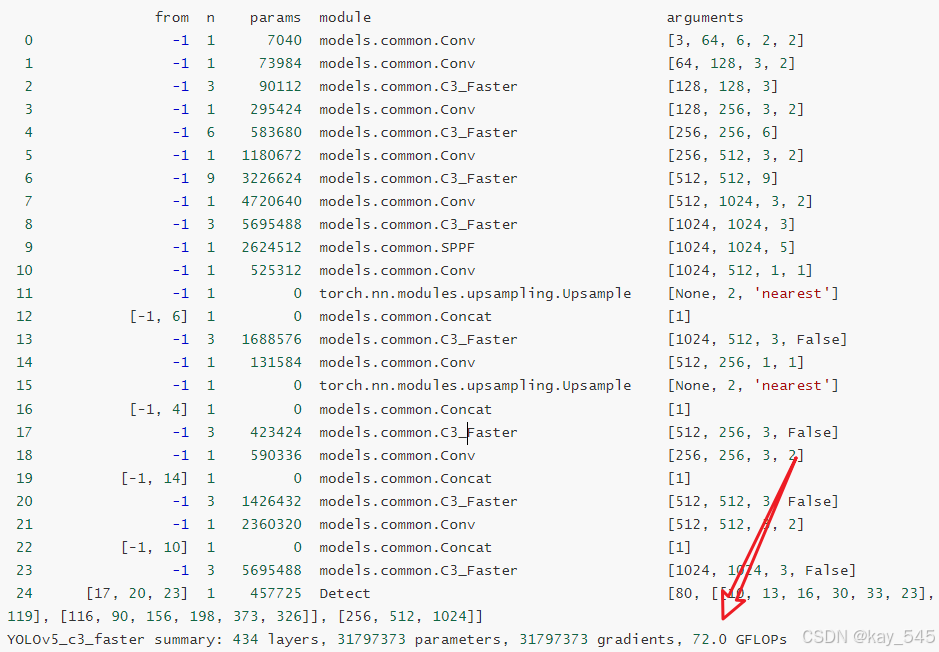
🚀运行程序,如果出现下面的内容则说明添加成功🚀
                 from  n    params  module                                  arguments
  0                -1  1      7040  models.common.Conv                      [3, 64, 6, 2, 2]
  1                -1  1     73984  models.common.Conv                      [64, 128, 3, 2]
  2                -1  3     90112  models.common.C3_Faster                 [128, 128, 3]
  3                -1  1    295424  models.common.Conv                      [128, 256, 3, 2]
  4                -1  6    583680  models.common.C3_Faster                 [256, 256, 6]
  5                -1  1   1180672  models.common.Conv                      [256, 512, 3, 2]
  6                -1  9   3226624  models.common.C3_Faster                 [512, 512, 9]
  7                -1  1   4720640  models.common.Conv                      [512, 1024, 3, 2]
  8                -1  3   5695488  models.common.C3_Faster                 [1024, 1024, 3]
  9                -1  1   2624512  models.common.SPPF                      [1024, 1024, 5]
 10                -1  1    525312  models.common.Conv                      [1024, 512, 1, 1]
 11                -1  1         0  torch.nn.modules.upsampling.Upsample    [None, 2, 'nearest']
 12           [-1, 6]  1         0  models.common.Concat                    [1]
 13                -1  3   1688576  models.common.C3_Faster                 [1024, 512, 3, False]
 14                -1  1    131584  models.common.Conv                      [512, 256, 1, 1]
 15                -1  1         0  torch.nn.modules.upsampling.Upsample    [None, 2, 'nearest']
 16           [-1, 4]  1         0  models.common.Concat                    [1]
 17                -1  3    423424  models.common.C3_Faster                 [512, 256, 3, False]
 18                -1  1    590336  models.common.Conv                      [256, 256, 3, 2]
 19          [-1, 14]  1         0  models.common.Concat                    [1]
 20                -1  3   1426432  models.common.C3_Faster                 [512, 512, 3, False]
 21                -1  1   2360320  models.common.Conv                      [512, 512, 3, 2]
 22          [-1, 10]  1         0  models.common.Concat                    [1]
 23                -1  3   5695488  models.common.C3_Faster                 [1024, 1024, 3, False]
 24      [17, 20, 23]  1    457725  Detect                                  [80, [[10, 13, 16, 30, 33, 23], [30, 61, 62, 45, 59, 119], [116, 90, 156, 198, 373, 326]], [256, 512, 1024]]
YOLOv5_c3_faster summary: 434 layers, 31797373 parameters, 31797373 gradients, 72.0 GFLOPs
3. 完整代码分享
https://pan.baidu.com/s/1rMq05bPiaIqI9IN66ZbGQA?pwd=8p3j提取码: 8p3j

4. GFLOPs
关于GFLOPs的计算方式可以查看:百面算法工程师 | 卷积基础知识——Convolution
未改进的GFLOPs

改进后的GFLOPs
5. 进阶
可以结合损失函数或者卷积模块进行多重改进
YOLOv5改进 | 损失函数 | EIoU、SIoU、WIoU、DIoU、FocuSIoU等多种损失函数——点击即可跳转
6. 总结
FasterNet的主要工作原理在于通过优化神经网络的计算效率来提高实际运行速度(FLOPS),而不仅仅是减少浮点运算次数(FLOPs)。传统方法常通过减少FLOPs来降低计算复杂度,但这并不总能带来实际延迟的减少,主要因为频繁的内存访问限制了实际计算速度。为了解决这一问题,FasterNet引入了部分卷积(PConv)这一新型操作符,通过仅对部分输入通道进行卷积操作,减少了冗余计算和内存访问需求,同时保持高效的空间特征提取能力。基于PConv,FasterNet设计了一系列神经网络,在各种设备上实现了显著更快的运行速度,并在图像分类等任务中保持了较高的准确性。总的来说,FasterNet通过兼顾FLOPs和FLOPS,达到了更低的延迟和更高的吞吐量,适用于GPU、CPU和ARM处理器等多种硬件平台。


 2304
2304

 被折叠的 条评论
为什么被折叠?
被折叠的 条评论
为什么被折叠?
 到【灌水乐园】发言


