


# 相关示例代码
!pip install tensorflow==2.3.0
!pip install scikit-learn==0.24.2
!pip install opencv-python
# 相关示例代码
import pandas as pd
import numpy as np
import tensorflow as tf
import cv2
from PIL import Image
import matplotlib.pyplot as plt
import warnings
warnings.filterwarnings("ignore")
# 相关示例代码
input_shape = (4, 28, 28, 3)

# 根据上述向量形状,创建随机张量Tensor(输入)
x = tf.random.normal(input_shape)
print(x.shape)
# 相关示例代码
y = tf.keras.layers.Conv2D(filters=2, kernel_size=(3,3), activation='relu', input_shape=input_shape[1:])(x)
print(y.shape)
# 相关示例代码
# 定义卷积层
conv_layer1 = tf.keras.layers.Conv2D(2, 3, activation='relu', input_shape=input_shape[1:])
# 放入卷积层
y1 = conv_layer1(x)

print(y.shape)
# 相关示例代码
#获得权重
print( conv_layer1.get_weights()[0].shape )
# 相关示例代码
y2 = tf.keras.layers.Conv2D(filters=2, kernel_size=(3,3), padding='same',activation='relu', input_shape=input_shape[1:])(x) # padding='same' 边界补零
print(y2.shape)
# 相关示例代码
# 假设输入图像大小为 (4, 28, 28, 1)
input_shape = (4, 28, 28, 1)

# 定义卷积层 输出特征图8,卷积核大小(3,3), 滑动步长(1,1),激活函数 relu,padding='same'
y3 = tf.keras.layers.Conv2D(8, 3,strides=(1, 1), activation='relu', padding='same', input_shape=input_shape)(x)
print(y3.shape)#(4, 28, 28, 8)
# 相关示例代码
# 读取图像
img = Image.open("1.jpg")

# 显示图像
plt.imshow(img)
plt.axis('off')  # 关闭坐标轴
plt.show()
# 相关示例代码
# 将图像转换为NumPy数组
img_array = np.asarray(img)
img = img_array[np.newaxis, :] # np.newaxis 添加一个新的维度,将其变成四维。
print(img.shape)
print(img.dtype)
img = img.astype("float32")/255.0  #通常要将图像的像素值转换为浮点数,并进行归一化
print(img.dtype)

#显示图像
plt.imshow(img[0])  # 注意:由于现在图像是四维的,所以需要使用 img[0] 来取出第一个图像
plt.axis('off')  # 关闭坐标轴
plt.show()
# 相关示例代码
init_kernel = np.array([[-1.0,-1.0,-1.0],
                      [0,0,0],
                      [1.0,1.0,1.0],

                      [-2.0,-2.0,-2.0],
                      [0,0,0],
                      [2.0,2.0,2.0],

                      [-1.0,-1.0,-1.0],
                      [0,0,0],
                      [1.0,1.0,1.0]])

print(init_kernel.shape)
init_kernel = init_kernel.reshape([3,3,3,1])    # height width inc outc
# 相关示例代码
kernel_initializer = tf.keras.initializers.constant(init_kernel)
conv_layer = tf.keras.layers.Conv2D(1, (3, 3),
                                    activation='relu',
                                    padding="same",
                                    input_shape=img.shape[1:],
                                    kernel_initializer=kernel_initializer)

print(conv_layer.get_weights())  # 尚未进行计算
# 相关示例代码
out = conv_layer(img)

# 查看卷积结果
print(out.shape)
outimg = np.squeeze(out)
print(outimg.shape)

outimg = outimg.astype("uint8")#将输出图像数组的数据类型转换为 uint8

# 显示图像
plt.imshow(outimg)
plt.axis('off')  # 关闭坐标轴
plt.show()

# 相关示例代码
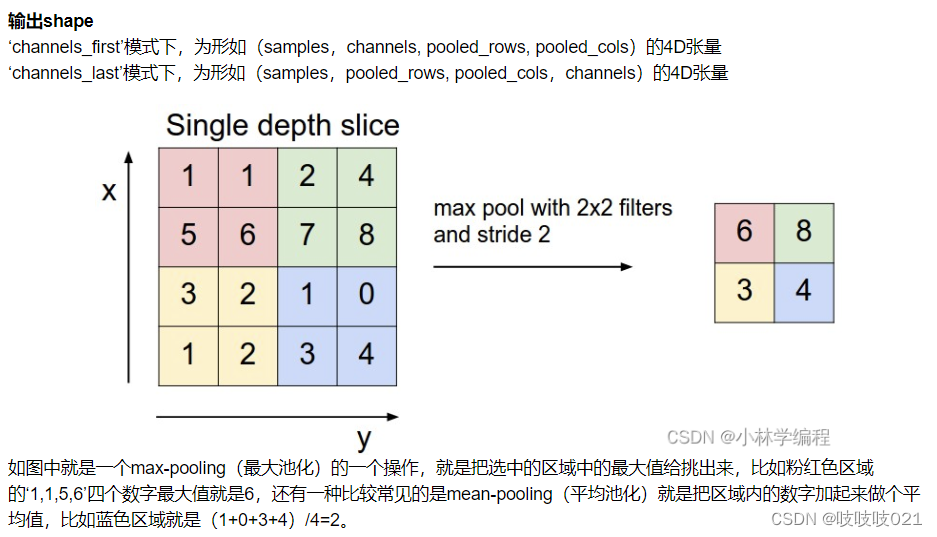
# 最大池化
max_pooling_layer = tf.keras.layers.MaxPooling2D(pool_size=(2, 2))
out_max_pool = max_pooling_layer(out)
print(out_max_pool.shape)
# 相关示例代码
outimg = np.squeeze(out_max_pool) #降低维度
print(outimg.shape)


# 显示图像
plt.imshow(outimg)
plt.axis('off')  # 关闭坐标轴
plt.show()


 769
769

 被折叠的 条评论
为什么被折叠?
被折叠的 条评论
为什么被折叠?
 到【灌水乐园】发言


