


因为我在找如何提取YOLOv8-pose的关键点的时候,大多都是针对静态图像,视频直接套用不太行,因此就改进了一下,如下:
初步代码:
import torch # 导入PyTorch库
import cv2 as cv # 导入OpenCV库并重命名为cv
import numpy as np # 导入NumPy库并重命名为np
from ultralytics.data.augment import LetterBox # 从ultralytics.data.augment中导入LetterBox类
from ultralytics.utils import ops # 从ultralytics.utils中导入ops模块
from ultralytics.engine.results import Results # 从ultralytics.engine.results中导入Results类
import copy # 导入copy模块
# 视频路径
video_path = 'D:/cs/yolov8_2/ultralytics/ceshi1.mp4' # 将此处路径改为你的视频文件路径
device = 'cuda:0' # 设备类型,此处使用CUDA
conf = 0.25 # 置信度阈值
iou = 0.7 # IoU(交并比)阈值
# 加载视频
cap = cv.VideoCapture(video_path)
# 检查视频是否成功打开
if not cap.isOpened():
print("Error: Could not open video.") # 打印错误消息
exit() # 退出程序
# 加载模型
ckpt = torch.load('yolov8n-pose.pt', map_location='cpu') # 加载模型参数
model = ckpt['model'].to(device).float() # 将模型加载到指定设备(CPU或GPU)并转换为浮点数类型
model.eval() # 将模型设置为评估模式
results = [] # 存储结果的列表
while True:
ret, frame = cap.read() # 读取视频帧
# 如果没有读取到帧或者视频结束,则退出循环
if not ret:
break
orig_img = frame # 原始图像
# 预处理
im = [orig_img] # 图像列表
im = [LetterBox([640, 640], auto=True, stride=32)(image=x) for x in im] # 对图像进行LetterBox缩放
im = im[0][None] # 转换为数组形式
im = im[..., ::-1].transpose((0, 3, 1, 2)) # BGR转RGB,BHWC转BCHW
im = np.ascontiguousarray(im) # 转换为连续的内存布局
im = torch.from_numpy(im) # 将数组转换为PyTorch张量
img = im.to(device) # 将张量移动到指定设备
img = img.float() # 转换为浮点数类型
img /= 255 # 归一化
# 推理
preds = model(img) # 模型推理
prediction = ops.non_max_suppression(preds, conf, iou, agnostic=False, max_det=300, classes=None, nc=len(model.names)) # 非最大抑制得到预测结果
for i, pred in enumerate(prediction):
shape = orig_img.shape # 图像形状
pred[:, :4] = ops.scale_boxes(img.shape[2:], pred[:, :4], shape).round() # 缩放边界框坐标
pred_kpts = pred[:, 6:].view(len(pred), *model.kpt_shape) if len(pred) else pred[:, 6:] # 获取关键点坐标
pred_kpts = ops.scale_coords(img.shape[2:], pred_kpts, shape) # 缩放关键点坐标
results.append(
Results(orig_img=orig_img, # 原始图像
path=video_path, # 视频路径
names=model.names, # 类别名称
boxes=pred[:, :6], # 边界框
keypoints=pred_kpts)) # 关键点
# 获取关键点坐标及其对应的序号
for j, kpts in enumerate(pred_kpts):
keypoints = kpts.cpu().numpy() # 将关键点转换为NumPy数组
# keypoints 包含了所有关键点的坐标,每一行是一个关键点的坐标
# 根据模型的结构,关键点序号可能是从0到N-1,N是关键点的总数
# 您可以在这里使用 keypoints 获取关键点的坐标和对应的序号
for k, keypoint in enumerate(keypoints):
x, y = keypoint[:2] # 关键点的坐标
keypoint_index = k # 关键点的序号
# 这里可以对每个关键点的坐标和序号执行您需要的操作
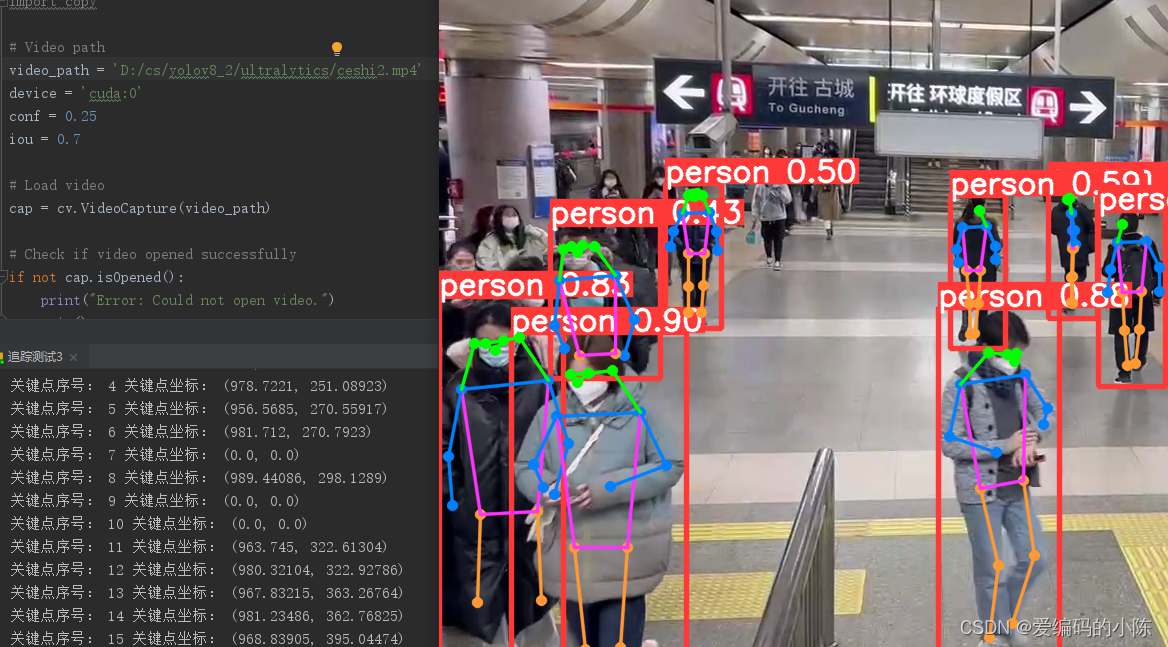
print("关键点序号:", keypoint_index, "关键点坐标:", (x, y))
# 显示帧
plot_args = {'line_width': None, 'boxes': True, 'conf': True, 'labels': True} # 绘图参数
plot_args['im_gpu'] = img[0] # 图像张量
plotted_img = results[-1].plot(**plot_args) # 显示处理后的最后一帧结果
cv.imshow('plotted_img', plotted_img) # 显示图像
# 按 'q' 键退出
if cv.waitKey(1) & 0xFF == ord('q'):
break
# 释放视频捕获并关闭所有窗口
cap.release()
cv.destroyAllWindows()
效果:
进一步通过骨架信息进行动作识别:
DA.py代码如下:
import math

def distance(A, B):
    if A is None or B is None:
        return 0
    else:
        return math.sqrt((A[0] - B[0]) ** 2 + (A[1] - B[1]) ** 2) #A[0]代表x坐标,A[1]代表y坐标

def Angle(A, B, C):
    if A is None or B is None or C is None:
        return 0
    else:
        a = distance(B, C)
        b = distance(A, C)
        c = distance(A, B)
        if 2 * a * c != 0:
            return math.degrees(a ** 2 + c ** 2 - b ** 2) / (2 * a * c)  # 计算出cos弧度,转换为角度
动作代码:
import torch
import cv2 as cv
import numpy as np
from ultralytics.data.augment import LetterBox
from ultralytics.utils import ops
from ultralytics.engine.results import Results
from DA import distance, Angle
import copy

# Video path
video_path = 'D:/cs/yolov8_2/ultralytics/help.mp4'  # Change this to your video file path
device = 'cuda:0'
conf = 0.25
iou = 0.7

# Load video
cap = cv.VideoCapture(video_path)

# Check if video opened successfully
if not cap.isOpened():
    print("Error: Could not open video.")
    exit()

# Load model
ckpt = torch.load('yolov8n-pose.pt', map_location='cpu')
model = ckpt['model'].to(device).float()  # FP32 model
model.eval()

results = []

while True:
    ret, frame = cap.read()

    # If no frame is read or end of video
    if not ret:
        break

    orig_img = frame

    # Preprocess
    im = [orig_img]
    im = [LetterBox([640, 640], auto=True, stride=32)(image=x) for x in im]
    im = im[0][None]  # im = np.stack(im)
    im = im[..., ::-1].transpose((0, 3, 1, 2))  # BGR to RGB, BHWC to BCHW, (n, 3, h, w)
    im = np.ascontiguousarray(im)  # contiguous
    im = torch.from_numpy(im)
    img = im.to(device)
    img = img.float()
    img /= 255

    # Inference
    preds = model(img)
    prediction = ops.non_max_suppression(preds, conf, iou, agnostic=False, max_det=300, classes=None, nc=len(model.names))

    for i, pred in enumerate(prediction):
        shape = orig_img.shape
        pred[:, :4] = ops.scale_boxes(img.shape[2:], pred[:, :4], shape).round()
        pred_kpts = pred[:, 6:].view(len(pred), *model.kpt_shape) if len(pred) else pred[:, 6:]

        pred_kpts = ops.scale_coords(img.shape[2:], pred_kpts, shape)

        results.append(
            Results(orig_img=orig_img,
                    path=video_path,
                    names=model.names,
                    boxes=pred[:, :6],
                    keypoints=pred_kpts))

        for j, kpts in enumerate(pred_kpts):
            keypoints = kpts.cpu().numpy()

            distance0 = int(distance(keypoints[7], keypoints[9]))
            distance1 = int(distance(keypoints[7], keypoints[5]))
            distance2 = int(distance(keypoints[9], keypoints[5]))
            distance3 = int(distance(keypoints[10], keypoints[8]))
            distance4 = int(distance(keypoints[8], keypoints[6]))
            distance5 = int(distance(keypoints[10], keypoints[6]))

            angle0 = Angle(keypoints[5], keypoints[9], keypoints[7])
            angle00 = angle0 + 90
            angle1 = Angle(keypoints[8], keypoints[6], keypoints[10])
            angle11 = angle1 + 90

            if angle00 is not None and angle11 is not None and keypoints[9][1] is not None and keypoints[7][1] is not None and keypoints[0][1] is not None:
                if (angle00 > 80 and angle11 > 80) and (keypoints[0][1] > keypoints[7][1] > keypoints[9][1]):
                    # Display "Help" in red, bold font on the frame
                    font = cv.FONT_HERSHEY_SIMPLEX
                    font_scale = 1
                    font_thickness = 2
                    text = "Help"
                    text_size = cv.getTextSize(text, font, font_scale, font_thickness)[0]
                    text_x = orig_img.shape[1] - text_size[0] - 10  # Right align with a margin of 10 pixels
                    text_y = text_size[1] + 10  # 10 pixels from the top
                    cv.putText(orig_img, text, (text_x, text_y), font, font_scale, (0, 0, 255), font_thickness, cv.LINE_AA)

        # Display frame
    plot_args = {'line_width': None, 'boxes': True, 'conf': True, 'labels': True}
    plot_args['im_gpu'] = img[0]
    plotted_img = results[-1].plot(**plot_args)  # Display the result of the last frame processed
    cv.imshow('plotted_img', plotted_img)

    # Press 'q' to exit
    if cv.waitKey(1) & 0xFF == ord('q'):
        break

# Release video capture and close all windows
cap.release()
cv.destroyAllWindows()
参考:


 3504
3504


 被折叠的 条评论
为什么被折叠?
被折叠的 条评论
为什么被折叠?
 到【灌水乐园】发言


