


目录
概括
人脸轮廓绘制起始于一个基本圆形,代表头部的基本形状。随后,通过精细地定位眼睛、鼻子、嘴巴等关键特征点,构建出准确的人脸比例。在绘制过程中,注意保持面部的对称性和透视变化,以确保最终作品的三维感和立体感。最后,运用线条的粗细、深浅等技巧,对人脸轮廓进行细致的描绘,使画面更具表现力和艺术感。
具体实现:
1.加载模型
'''关键点定位:定位到人脸的眼睛、鼻子、眉毛、轮廓等'''
import numpy as np
import cv2
import dlib  #导入dlib库

image = cv2.imread('./zjy.jpg')
detect = dlib.get_frontal_face_detector()  # 构造人脸检测器
faces = detect(image, 0)  # 检测人脸

# dlib.shape_predictor载入模型(加载预测器)
# 可以从https://github.com/davisking/dlib-models下载  xmlopencv自己训练好的特征,dlib人脸关键点的检测模型
predictor = dlib.shape_predictor('./shape_predictor_68_face_landmarks.dat')
faces = detector(image,n)使用人脸检测器返回检测到的人脸框
参数:image: 待检测的可能含有人脸的图像。
参数n:表示采用上采样的次数。上采样会让图像变大,能够检测到更多人脸对象,提高小人脸的检测效果
返回值faces:返回检测图像中的所有人脸框。
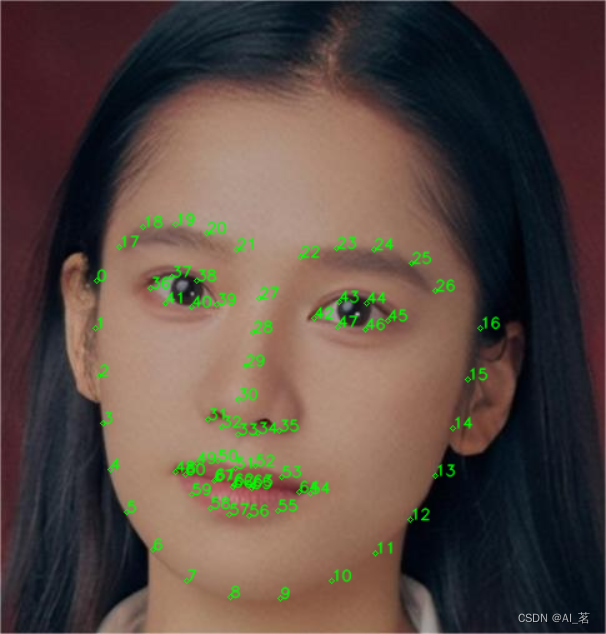
2.获取脸部的关键点(实现检测)
for face in faces:  # 获取每一张脸的关键点(实现检测)
    shape = predictor(image, face)  # 获取关键点

    # 将关键点转换为坐标(x,y)的形式
    landmarks = np.matrix([[p.x, p.y] for p in shape.parts()])
3.绘制每一张脸的关键点
     for i, point in enumerate(landmarks):
            position = (point[0, 0], point[0, 1])  # 当前关键的坐标
            # 针对当前关键点,绘制一个实心圆
            cv2.circle(image, position, 2, (0, 255, 0))
            cv2.putText(image, str(i), position, cv2.FONT_HERSHEY_SIMPLEX, 0.4, (255, 255, 255), 1, cv2.LINE_AA)
cv2.circle(image,圆心坐标,半径,颜色)
cv2.putText(image, 绘制内容, (绘制位置), 字体类型, 字体大小, (字体颜色), 线条粗细)
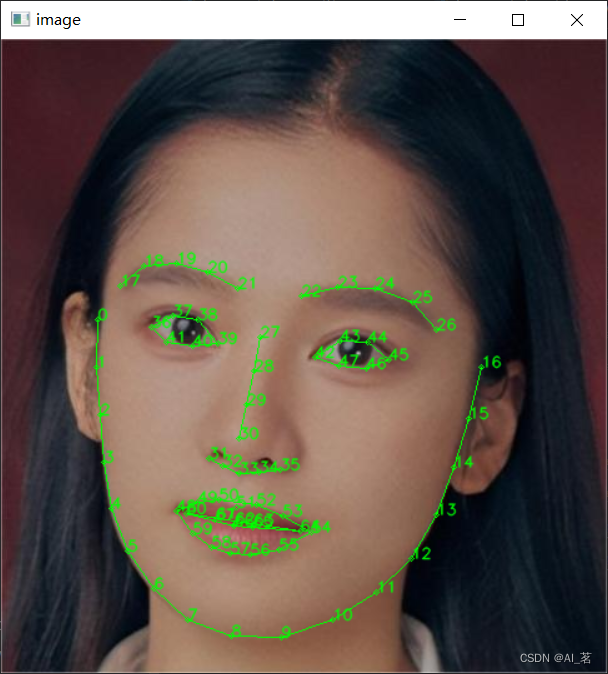
4.绘制五官凸包
具体绘制点位可运行上面代码查看
按照上述加载的模型,点位一般是固定的
    def draw_convex_hull(start, end):
    # 将指定的点构成一个凸包,绘制成轮廓,一般眼睛、嘴使用凸包用来绘制
    points = shape[start:end + 1]  #需加1,不然取不到最后一个点
    cnts = cv2.convexHull(points)  # 凸包函数
    cv2.drawContours(image, [cnts], -1, (0, 255, 0), 1)


    draw_convex_hull(36, 41)  # 绘制右眼凸包
    draw_convex_hull(42, 47)  # 绘制左眼凸包
    draw_convex_hull(48, 59)  # 绘制嘴外部凸包
    draw_convex_hull(60, 67)  # 绘制嘴内部凸包
5.将指定的点连接起来
def draw_line(start, end):  # 将指定的点连接起来
    lines = np.array(shape[start:end + 1])  # 获取点集,并将矩阵matrix数据转换为array数据
    #将相连的点进行连线
    for line in range(1, len(lines)):
        pts1 = lines[line - 1]
        pts2 = lines[line]
        cv2.line(image, pts1, pts2, (0, 255, 0), 1)

draw_line(0, 16)  # 绘制脸颊点线
draw_line(17, 21)  # 绘制左眉毛点线
draw_line(22, 26)  # 绘制右眉毛点线
draw_line(27, 30)  # 绘制鼻子点线
draw_line(31, 35)  # 绘制鼻子点线
完整代码展示
import cv2
import dlib
import numpy as np


def draw_convex_hull(start, end):
    # 将指定的点构成一个凸包,绘制成轮廓,一般眼睛、嘴使用凸包用来绘制
    points = shape[start:end + 1]
    cnts = cv2.convexHull(points)  # 凸包函数
    cv2.drawContours(image, [cnts], -1, (0, 255, 0), 1)


def draw_line(start, end):  # 将指定的点连接起来
    lines = np.array(shape[start:end + 1])  # 获取点集,并将矩阵matrix数据转换为array数据
    for line in range(1, len(lines)):
        pts1 = lines[line - 1]
        pts2 = lines[line]
        cv2.line(image, pts1, pts2, (0, 255, 0), 1)


image = cv2.imread('./zjy.jpg')

detect = dlib.get_frontal_face_detector()  # 构造脸部位置检测器
faces = detect(image, 0)  # 检测人脸方框位置

# 读取人脸关键点定位模型
predictor = dlib.shape_predictor('./shape_predictor_68_face_landmarks.dat')

for face in faces:  # 对检测到的rects,逐个遍历
    points = predictor(image, face)  # 获取关键点
    # 将关键点转换为坐标(x,y)的形式
    shape = np.matrix([[p.x, p.y] for p in points.parts()])
    for i, point in enumerate(shape):
        position = (point[0, 0], point[0, 1])
        cv2.circle(image, position, 2, (0, 255, 0), 1)
        cv2.putText(image, str(i), position, cv2.FONT_HERSHEY_SIMPLEX, 0.4, (0, 255, 0), 1, cv2.LINE_AA)
    draw_convex_hull(36, 41)  # 绘制右眼凸包
    draw_convex_hull(42, 47)  # 绘制左眼凸包
    draw_convex_hull(48, 59)  # 绘制嘴外部凸包
    draw_convex_hull(60, 67)  # 绘制嘴内部凸包

    draw_line(0, 16)  # 绘制脸颊点线
    draw_line(17, 21)  # 绘制左眉毛点线
    draw_line(22, 26)  # 绘制右眉毛点线
    draw_line(27, 30)  # 绘制鼻子点线
    draw_line(31, 35)  # 绘制鼻子点线

cv2.imshow('image', image)
cv2.waitKey(0)
效果展示


 887
887

 被折叠的 条评论
为什么被折叠?
被折叠的 条评论
为什么被折叠?
 到【灌水乐园】发言


