


MATLAB GUI界面设计教程可以帮助用户创建交互式的图形用户界面,以简化与MATLAB程序的交互过程。以下是一个简化的教程,指导你如何进行MATLAB GUI界面设计:
1. 启动GUIDE或App Designer
- GUIDE:在MATLAB命令窗口中输入
guide命令,然后按Enter键启动GUIDE。 - App Designer:在MATLAB的“Apps”标签下选择“App Designer”来启动。

2. 选择模板或新建空白GUI
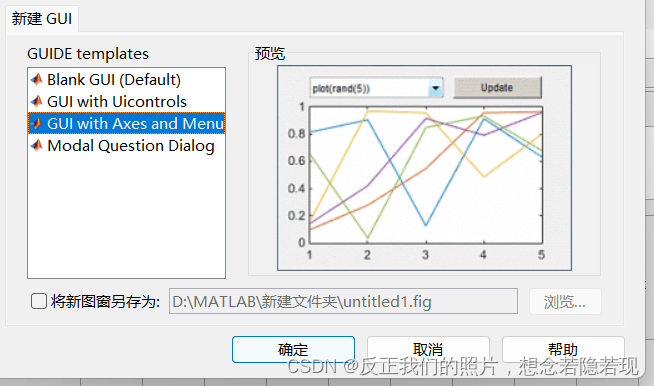
- 在GUIDE或App Designer中,你可以选择现有的模板作为基础,或者选择新建一个空白GUI开始设计,其中GUIDE给我们提供了以下四种模板。


- App Designer我们提供了以下五种模板。

3. 添加和布局组件
- 从组件面板中选择所需的控件,如按钮、文本框、滑动条等,并拖拽到GUI界面上。
- 调整控件的大小和位置,以创建所需的界面布局。
- 常见的控件有以下10种:可编程文本是动态文本,静态文本不会变化;axes1是坐标区,用于绘制图像;滑块用于查看长文本或者长图形。
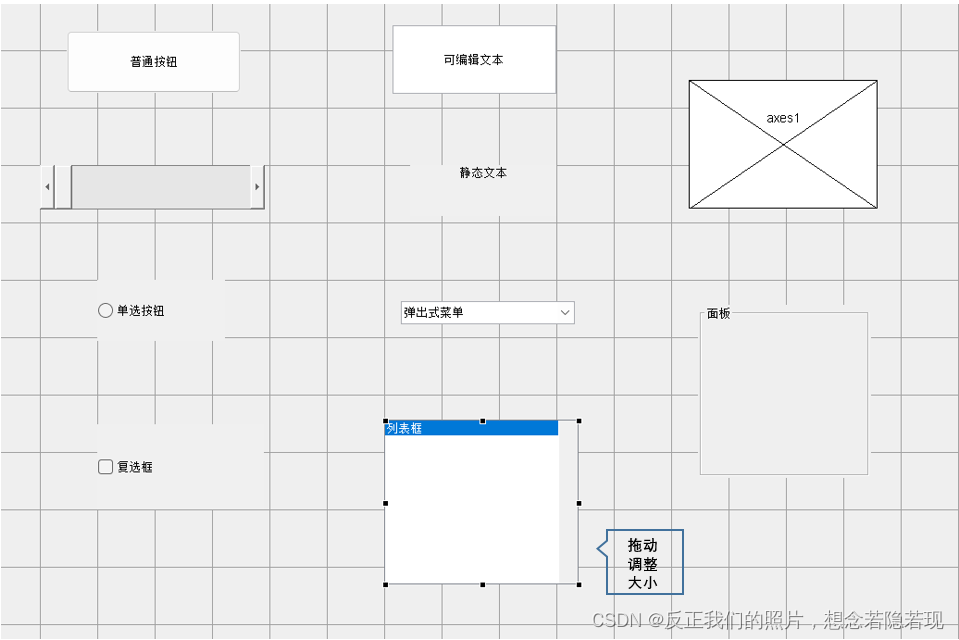
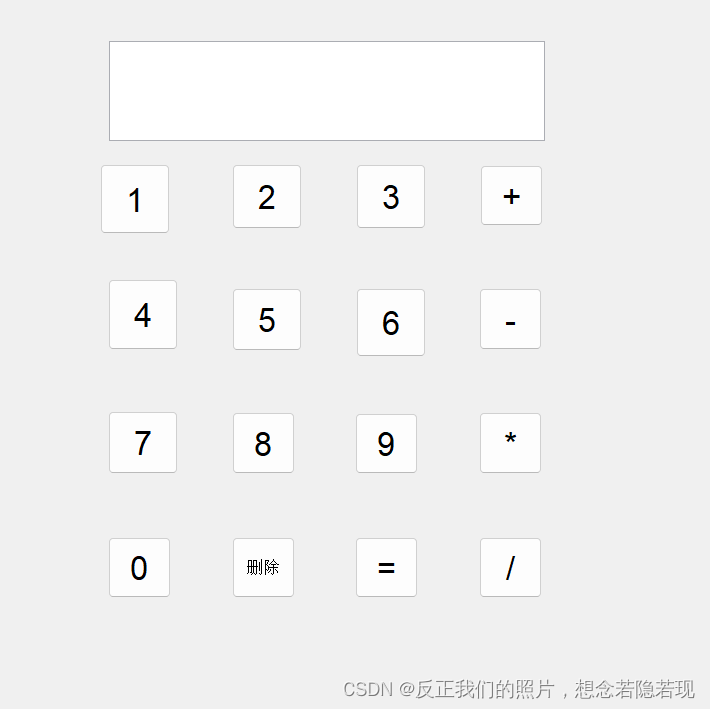
- 将所需控件组装成以下模样,最上方的文本框是可编辑文本,下方的按钮都是普通按钮:
4. 设置组件属性
- 双击控件或选择它,并在属性编辑器中设置其属性,如字体、颜色、标签文本等。
- BackgroundColor——背景颜色
- FontAngle——字体倾斜角度
- FontName——字体名称
- FontSize——字体大小
- FontUnits——字体单元
- ForegroundColor——字体颜色
- Position——控件位置
- String——控件显示名称
- Tag——控件真实名称
5. 编写回调函数
- 回调函数定义了当用户与GUI中的控件交互时应该执行的操作。
- 在GUIDE中,你可以双击控件并选择“Create Callback”来生成一个空的回调函数框架。
- 在App Designer中,选择控件并在右侧的代码编辑器中编写或修改回调函数。
%清空功能
set(handles.edit1,'String','');
%标签功能(0-9,小数点,+-*/)
textString = get(handles.edit1,'String'); %获取可编辑文本的字符串
textString =strcat(textString,'1');%拼接
set(handles.edit1,'String',textString);
%等号功能
textString = get(handles.edit1,'String');
answer=eval(textString);%求解表达式
set(handles.edit1,'String',answer); - 将上述代码写入回调函数可获得完整代码,可以根据需求添加小数点、开方等操作。
function varargout = myapp2(varargin)
% MYAPP2 MATLAB code for myapp2.fig
%      MYAPP2, by itself, creates a new MYAPP2 or raises the existing
%      singleton*.
%
%      H = MYAPP2 returns the handle to a new MYAPP2 or the handle to
%      the existing singleton*.
%
%      MYAPP2('CALLBACK',hObject,eventData,handles,...) calls the local
%      function named CALLBACK in MYAPP2.M with the given input arguments.
%
%      MYAPP2('Property','Value',...) creates a new MYAPP2 or raises the
%      existing singleton*.  Starting from the left, property value pairs are
%      applied to the GUI before myapp2_OpeningFcn gets called.  An
%      unrecognized property name or invalid value makes property application
%      stop.  All inputs are passed to myapp2_OpeningFcn via varargin.
%
%      *See GUI Options on GUIDE's Tools menu.  Choose "GUI allows only one
%      instance to run (singleton)".
%
% See also: GUIDE, GUIDATA, GUIHANDLES

% Edit the above text to modify the response to help myapp2

% Last Modified by GUIDE v2.5 11-Apr-2024 12:06:28

% Begin initialization code - DO NOT EDIT
gui_Singleton = 1;
gui_State = struct('gui_Name',       mfilename, ...
                   'gui_Singleton',  gui_Singleton, ...
                   'gui_OpeningFcn', @myapp2_OpeningFcn, ...
                   'gui_OutputFcn',  @myapp2_OutputFcn, ...
                   'gui_LayoutFcn',  [] , ...
                   'gui_Callback',   []);
if nargin && ischar(varargin{1})
    gui_State.gui_Callback = str2func(varargin{1});
end

if nargout
    [varargout{1:nargout}] = gui_mainfcn(gui_State, varargin{:});
else
    gui_mainfcn(gui_State, varargin{:});
end
% End initialization code - DO NOT EDIT


% --- Executes just before myapp2 is made visible.
function myapp2_OpeningFcn(hObject, eventdata, handles, varargin)
% This function has no output args, see OutputFcn.
% hObject    handle to figure
% eventdata  reserved - to be defined in a future version of MATLAB
% handles    structure with handles and user data (see GUIDATA)
% varargin   command line arguments to myapp2 (see VARARGIN)

% Choose default command line output for myapp2
handles.output = hObject;

% Update handles structure
guidata(hObject, handles);

% UIWAIT makes myapp2 wait for user response (see UIRESUME)
% uiwait(handles.figure1);


% --- Outputs from this function are returned to the command line.
function varargout = myapp2_OutputFcn(hObject, eventdata, handles)

% varargout  cell array for returning output args (see VARARGOUT);
% hObject    handle to figure
% eventdata  reserved - to be defined in a future version of MATLAB
% handles    structure with handles and user data (see GUIDATA)

% Get default command line output from handles structure
varargout{1} = handles.output;


% --- Executes on button press in pushbutton1.
function pushbutton1_Callback(hObject, eventdata, handles)
textString = get(handles.edit1,'String');
textString = strcat(textString,'1');
set(handles.edit1,'String',textString);
% hObject    handle to pushbutton1 (see GCBO)
% eventdata  reserved - to be defined in a future version of MATLAB
% handles    structure with handles and user data (see GUIDATA)


% --- Executes on button press in pushbutton2.
function pushbutton2_Callback(hObject, eventdata, handles)
textString = get(handles.edit1,'String');
textString = strcat(textString,'2');
set(handles.edit1,'String',textString);
% hObject    handle to pushbutton2 (see GCBO)
% eventdata  reserved - to be defined in a future version of MATLAB
% handles    structure with handles and user data (see GUIDATA)


% --- Executes on button press in pushbutton3.
function pushbutton3_Callback(hObject, eventdata, handles)
textString = get(handles.edit1,'String');
textString = strcat(textString,'4');
set(handles.edit1,'String',textString);

% hObject    handle to pushbutton3 (see GCBO)
% eventdata  reserved - to be defined in a future version of MATLAB
% handles    structure with handles and user data (see GUIDATA)


% --- Executes on button press in pushbutton4.
function pushbutton4_Callback(hObject, eventdata, handles)
textString = get(handles.edit1,'String');
textString = strcat(textString,'5');
set(handles.edit1,'String',textString);
% hObject    handle to pushbutton4 (see GCBO)
% eventdata  reserved - to be defined in a future version of MATLAB
% handles    structure with handles and user data (see GUIDATA)


% --- Executes on button press in pushbutton5.
function pushbutton5_Callback(hObject, eventdata, handles)
textString = get(handles.edit1,'String');
textString = strcat(textString,'7');
set(handles.edit1,'String',textString);
% hObject    handle to pushbutton5 (see GCBO)
% eventdata  reserved - to be defined in a future version of MATLAB
% handles    structure with handles and user data (see GUIDATA)


% --- Executes on button press in pushbutton6.
function pushbutton6_Callback(hObject, eventdata, handles)
textString = get(handles.edit1,'String');
textString = strcat(textString,'8');
set(handles.edit1,'String',textString);
% hObject    handle to pushbutton6 (see GCBO)
% eventdata  reserved - to be defined in a future version of MATLAB
% handles    structure with handles and user data (see GUIDATA)


% --- Executes on button press in pushbutton7.
function pushbutton7_Callback(hObject, eventdata, handles)
textString = get(handles.edit1,'String');
textString = strcat(textString,'0');
set(handles.edit1,'String',textString);
% hObject    handle to pushbutton7 (see GCBO)
% eventdata  reserved - to be defined in a future version of MATLAB
% handles    structure with handles and user data (see GUIDATA)


% --- Executes on button press in pushbutton8.
function pushbutton8_Callback(hObject, eventdata, handles)
set(handles.edit1,'String','');
% hObject    handle to pushbutton8 (see GCBO)
% eventdata  reserved - to be defined in a future version of MATLAB
% handles    structure with handles and user data (see GUIDATA)


% --- Executes on button press in pushbutton9.
function pushbutton9_Callback(hObject, eventdata, handles)
textString = get(handles.edit1,'String');
textString = strcat(textString,'3');
set(handles.edit1,'String',textString);
% hObject    handle to pushbutton9 (see GCBO)
% eventdata  reserved - to be defined in a future version of MATLAB
% handles    structure with handles and user data (see GUIDATA)


% --- Executes on button press in pushbutton10.
function pushbutton10_Callback(hObject, eventdata, handles)
textString = get(handles.edit1,'String');
textString = strcat(textString,'6');
set(handles.edit1,'String',textString);
% hObject    handle to pushbutton10 (see GCBO)
% eventdata  reserved - to be defined in a future version of MATLAB
% handles    structure with handles and user data (see GUIDATA)


% --- Executes on button press in pushbutton11.
function pushbutton11_Callback(hObject, eventdata, handles)
textString = get(handles.edit1,'String');
textString = strcat(textString,'9');
set(handles.edit1,'String',textString);
% hObject    handle to pushbutton11 (see GCBO)
% eventdata  reserved - to be defined in a future version of MATLAB
% handles    structure with handles and user data (see GUIDATA)


% --- Executes on button press in pushbutton12.
function pushbutton12_Callback(hObject, eventdata, handles)
textString = get(handles.edit1,'String');
answer = eval(textString,'3');%计算表达式
set(handles.edit1,'String',answer);
% hObject    handle to pushbutton12 (see GCBO)
% eventdata  reserved - to be defined in a future version of MATLAB
% handles    structure with handles and user data (see GUIDATA)


% --- Executes on button press in pushbutton13.
function pushbutton13_Callback(hObject, eventdata, handles)
textString = get(handles.edit1,'String');
textString = strcat(textString,'+');
set(handles.edit1,'String',textString);
% hObject    handle to pushbutton13 (see GCBO)
% eventdata  reserved - to be defined in a future version of MATLAB
% handles    structure with handles and user data (see GUIDATA)


% --- Executes on button press in pushbutton14.
function pushbutton14_Callback(hObject, eventdata, handles)
textString = get(handles.edit1,'String');
textString = strcat(textString,'-');
set(handles.edit1,'String',textString);
% hObject    handle to pushbutton14 (see GCBO)
% eventdata  reserved - to be defined in a future version of MATLAB
% handles    structure with handles and user data (see GUIDATA)


% --- Executes on button press in pushbutton15.
function pushbutton15_Callback(hObject, eventdata, handles)
textString = get(handles.edit1,'String');
textString = strcat(textString,'*');
set(handles.edit1,'String',textString);
% hObject    handle to pushbutton15 (see GCBO)
% eventdata  reserved - to be defined in a future version of MATLAB
% handles    structure with handles and user data (see GUIDATA)


% --- Executes on button press in pushbutton16.
function pushbutton16_Callback(hObject, eventdata, handles)
textString = get(handles.edit1,'String');
textString = strcat(textString,'/');
set(handles.edit1,'String',textString);
% hObject    handle to pushbutton16 (see GCBO)
% eventdata  reserved - to be defined in a future version of MATLAB
% handles    structure with handles and user data (see GUIDATA)


function edit1_Callback(hObject, eventdata, handles)
% hObject    handle to edit1 (see GCBO)
% eventdata  reserved - to be defined in a future version of MATLAB
% handles    structure with handles and user data (see GUIDATA)

% Hints: get(hObject,'String') returns contents of edit1 as text
%        str2double(get(hObject,'String')) returns contents of edit1 as a double


% --- Executes during object creation, after setting all properties.
function edit1_CreateFcn(hObject, eventdata, handles)
% hObject    handle to edit1 (see GCBO)
% eventdata  reserved - to be defined in a future version of MATLAB
% handles    empty - handles not created until after all CreateFcns called

% Hint: edit controls usually have a white background on Windows.
%       See ISPC and COMPUTER.
if ispc && isequal(get(hObject,'BackgroundColor'), get(0,'defaultUicontrolBackgroundColor'))
    set(hObject,'BackgroundColor','white');
end
6. 保存和运行GUI
- 在GUIDE中,保存你的GUI,它将生成一个
.fig文件(保存布局信息)和一个.m文件(包含初始化代码和回调函数)。 - 在App Designer中,直接保存并运行你的App。
- 运行
.m文件或App,以查看和测试你的GUI。

7. 调试和优化
- 使用MATLAB的调试工具来识别和修复任何错误或问题。
- 根据需要调整布局、颜色、字体等,以优化GUI的用户体验。
gui视频
注意事项:
- 命名规范:为控件和回调函数选择描述性的名称,以提高代码的可读性。
- 注释:在代码中添加注释,解释每个控件和回调函数的作用,以便于后期维护和修改。
- 用户体验:考虑界面的易用性和美观性,确保用户能够轻松理解和使用你的GUI。
通过遵循以上步骤和注意事项,你可以使用MATLAB创建功能强大且用户友好的GUI界面。


 2万+
2万+


 被折叠的 条评论
为什么被折叠?
被折叠的 条评论
为什么被折叠?
 到【灌水乐园】发言


