


之前一直都没注意显存,也没注意数据格式,直到跑模型的时候电脑直接崩了,因为排队用TPU,感觉人多,就直接在自己电脑上跑,我自己是有一张8G的4070,没想到啊,光是读取数据,就占用了6G

历次成绩
这个是用分布式gpu跑的,kaggle给配了两张16G显存的卡,TPU我前面56个人,人太多了,分辨率本身有影响,我使用192×192

这里使用512×512的分辨率,效果明显提高了,Tan和Le,2019年论文,迁移u学习会随着分辨率提高而变得更好,分辨率太小容易过拟合

试着把batchnomalization层也去掉,跑最后一次,看keras官方文档说从头开始训练很难找到合适的正则化,直接放弃,效果确实提高了

导入包和读取数据
导入包
import re
import os
import random
import numpy as np
import pandas as pd
import tensorflow as tf
import matplotlib.pyplot as plt
import math
读取数据
AUTO可以优化数据加载和预处理过程,之前都不知道有这么个东西,看着自己GPU利用率跳上跳下,很多时候利用率只有40%,后面还有一个map我看其他博主说,也是用来提高利用率的,原理没仔细看,直接拿来用了,因为是本地来跑代码,就选了最小尺寸,我4070和TPU跑的时候速度差不多,但我显存不够,之前电脑一直卡死,在选择卷积基的时候,因为只有一张卡,batchsize也不敢设太高,在TPU上因为有128G,能设成128,选择512尺寸的图片。
AUTO = tf.data.AUTOTUNE
BATCH_SIZE = 16
EPOCHS = 20
IMAGE_SIZE = [192, 192]
CLASSES = ['pink primrose',    'hard-leaved pocket orchid', 'canterbury bells', 'sweet pea',     'wild geranium',     'tiger lily',           'moon orchid',              'bird of paradise', 'monkshood',        'globe thistle',         # 00 - 09
           'snapdragon',       "colt's foot",               'king protea',      'spear thistle', 'yellow iris',       'globe-flower',         'purple coneflower',        'peruvian lily',    'balloon flower',   'giant white arum lily', # 10 - 19
           'fire lily',        'pincushion flower',         'fritillary',       'red ginger',    'grape hyacinth',    'corn poppy',           'prince of wales feathers', 'stemless gentian', 'artichoke',        'sweet william',         # 20 - 29
           'carnation',        'garden phlox',              'love in the mist', 'cosmos',        'alpine sea holly',  'ruby-lipped cattleya', 'cape flower',              'great masterwort', 'siam tulip',       'lenten rose',           # 30 - 39
           'barberton daisy',  'daffodil',                  'sword lily',       'poinsettia',    'bolero deep blue',  'wallflower',           'marigold',                 'buttercup',        'daisy',            'common dandelion',      # 40 - 49
           'petunia',          'wild pansy',                'primula',          'sunflower',     'lilac hibiscus',    'bishop of llandaff',   'gaura',                    'geranium',         'orange dahlia',    'pink-yellow dahlia',    # 50 - 59
           'cautleya spicata', 'japanese anemone',          'black-eyed susan', 'silverbush',    'californian poppy', 'osteospermum',         'spring crocus',            'iris',             'windflower',       'tree poppy',            # 60 - 69
           'gazania',          'azalea',                    'water lily',       'rose',          'thorn apple',       'morning glory',        'passion flower',           'lotus',            'toad lily',        'anthurium',             # 70 - 79
           'frangipani',       'clematis',                  'hibiscus',         'columbine',     'desert-rose',       'tree mallow',          'magnolia',                 'cyclamen ',        'watercress',       'canna lily',            # 80 - 89
           'hippeastrum ',     'bee balm',                  'pink quill',       'foxglove',      'bougainvillea',     'camellia',             'mallow',                   'mexican petunia',  'bromelia',         'blanket flower',        # 90 - 99
           'trumpet creeper',  'blackberry lily',           'common tulip',     'wild rose']
GCS_PATH = '/home/linjiongji/下载/tpu-getting-started/tfrecords-jpeg-192x192'
TRAINING_FILENAMES = tf.io.gfile.glob(GCS_PATH + '/train/*.tfrec')
VALIDATION_FILENAMES = tf.io.gfile.glob(GCS_PATH + '/val/*.tfrec')
TEST_FILENAMES = tf.io.gfile.glob(GCS_PATH + '/test/*.tfrec')
设置用来读取的函数和展示图片的函数
用于读取数据的函数
这些函数用来读取数据,用于后面训练和调参
def decode_image(image_data):
    image = tf.image.decode_jpeg(image_data, channels=3)
    image = tf.cast(image, tf.float32) / 255.0
    image = tf.reshape(image, [*IMAGE_SIZE, 3])
    return image
def read_labeled_tfrecord(example):
    LABELED_TFREC_FORMAT = {
        "image": tf.io.FixedLenFeature([], tf.string),
        "class": tf.io.FixedLenFeature([], tf.int64),
    }
    example = tf.io.parse_single_example(example, LABELED_TFREC_FORMAT)
    image = decode_image(example['image'])
    label = tf.cast(example['class'], tf.int32)
    return image, label
def read_unlabeled_tfrecord(example):
    UNLABELED_TFREC_FORMAT = {
        "image": tf.io.FixedLenFeature([], tf.string),
        "id": tf.io.FixedLenFeature([], tf.string),
    }
    example = tf.io.parse_single_example(example, UNLABELED_TFREC_FORMAT)
    image = decode_image(example['image'])
    idnum = example['id']
    return image, idnum
def load_dataset(filenames, labeled=True, ordered=False):
    ignore_order = tf.data.Options()
    if not ordered:
        ignore_order.experimental_deterministic = False
    dataset = tf.data.TFRecordDataset(filenames, num_parallel_reads=AUTO)
    dataset = dataset.with_options(ignore_order)
    dataset = dataset.map(read_labeled_tfrecord if labeled else read_unlabeled_tfrecord, num_parallel_calls=AUTO)
    return dataset
IMAGE_HEIGHT=192
IMAGE_WIDTH=192
def get_training_dataset():
    dataset = load_dataset(TRAINING_FILENAMES, labeled=True)
    dataset = dataset.map(data_augment, num_parallel_calls=AUTO)
    dataset = dataset.repeat() # the training dataset must repeat for several epochs
    dataset = dataset.shuffle(2048)
    dataset = dataset.batch(BATCH_SIZE)
    dataset = dataset.prefetch(AUTO) # prefetch next batch while training (autotune prefetch buffer size)
    return dataset
def get_validation_dataset(ordered=False):
    dataset = load_dataset(VALIDATION_FILENAMES, labeled=True, ordered=ordered)
    dataset = dataset.batch(BATCH_SIZE)
    dataset = dataset.cache()
    dataset = dataset.prefetch(AUTO) # prefetch next batch while training (autotune prefetch buffer size)
    return dataset
def get_train_valid_datasets():
    dataset = load_dataset(TRAINING_FILENAMES + VALIDATION_FILENAMES, labeled=True)
    dataset = dataset.map(data_augment, num_parallel_calls=AUTO)
    dataset = dataset.repeat() # the training dataset must repeat for several epochs
    dataset = dataset.shuffle(2048)
    dataset = dataset.batch(BATCH_SIZE)
    dataset = dataset.prefetch(AUTO) # prefetch next batch while training (autotune prefetch buffer size)
    return dataset

def get_test_dataset(ordered=False):
    dataset = load_dataset(TEST_FILENAMES, labeled=False, ordered=ordered)
    dataset = dataset.batch(BATCH_SIZE)
    dataset = dataset.prefetch(AUTO) # prefetch next batch while training (autotune prefetch buffer size)
    return dataset
def count_data_items(filenames):
    n = [int(re.compile(r"-([0-9]*)\.").search(filename).group(1)) for filename in filenames]
    return np.sum(n)
NUM_TRAINING_IMAGES = count_data_items(TRAINING_FILENAMES)
NUM_VALIDATION_IMAGES = count_data_items(VALIDATION_FILENAMES)
NUM_TEST_IMAGES = count_data_items(TEST_FILENAMES)
print('Dataset: {} training images, {} validation images, {} unlabeled test images'.format(NUM_TRAINING_IMAGES, NUM_VALIDATION_IMAGES, NUM_TEST_IMAGES))
数据增强
这里我做了数据增强,进行了翻转,对比度,亮度,缩放方面的数据增强
def data_augment(image, label):
    image = tf.image.random_flip_left_right(image)
    image = tf.image.random_brightness(image, max_delta=0.2)
    image = tf.image.random_contrast(image, lower=0.5, upper=1.5)
    image = tf.image.resize(image, [IMAGE_HEIGHT, IMAGE_WIDTH])
    return image, label
用于绘图的函数
# 绘图
from matplotlib import pyplot as plt
def batch_to_numpy_images_and_labels(data):
    images, labels = data
    numpy_images = images.numpy()
    numpy_labels = labels.numpy()
    if numpy_labels.dtype == object:  # binary string in this case,
        # these are image ID strings
        numpy_labels = [None for _ in enumerate(numpy_images)]
    # If no labels, only image IDs, return None for labels (this is
    # the case for test data)
    return numpy_images, numpy_labels
def title_from_label_and_target(label, correct_label):
    if correct_label is None:
        return CLASSES[label], True
    correct = (label == correct_label)
    return "{} [{}{}{}]".format(CLASSES[label], 'OK' if correct else 'NO', u"\u2192" if not correct else '',
                                CLASSES[correct_label] if not correct else ''), correct


def display_one_flower(image, title, subplot, red=False, titlesize=16):
    plt.subplot(*subplot)
    plt.axis('off')
    plt.imshow(image)
    if len(title) > 0:
        plt.title(title, fontsize=int(titlesize) if not red else int(titlesize / 1.2), color='red' if red else 'black',
                  fontdict={'verticalalignment': 'center'}, pad=int(titlesize / 1.5))
    return (subplot[0], subplot[1], subplot[2] + 1)


def display_batch_of_images(databatch, predictions=None):
    images, labels = batch_to_numpy_images_and_labels(databatch)
    if labels is None:
        labels = [None for _ in enumerate(images)]
    rows = int(math.sqrt(len(images)))
    cols = len(images) // rows
    FIGSIZE = 13.0
    SPACING = 0.1
    subplot = (rows, cols, 1)
    if rows < cols:
        plt.figure(figsize=(FIGSIZE, FIGSIZE / cols * rows))
    else:
        plt.figure(figsize=(FIGSIZE / rows * cols, FIGSIZE))

    # display
    for i, (image, label) in enumerate(zip(images[:rows * cols], labels[:rows * cols])):
        title = '' if label is None else CLASSES[label]
        correct = True
        if predictions is not None:
            title, correct = title_from_label_and_target(predictions[i], label)
        dynamic_titlesize = FIGSIZE * SPACING / max(rows,
                                                    cols) * 40 + 3  # magic formula tested to work from 1x1 to 10x10 images
        subplot = display_one_flower(image, title, subplot, not correct, titlesize=dynamic_titlesize)

    # layout
    plt.tight_layout()
    if label is None and predictions is None:
        plt.subplots_adjust(wspace=0, hspace=0)
    else:
        plt.subplots_adjust(wspace=SPACING, hspace=SPACING)
    plt.show()
这个用来看花的,没什么用就是了,毕竟101种花,下面这段代码就是看花用的,花长下面这样,对于分析没多大帮助,他这里这个数据说明中有说花的数据是不平衡的,有的花甚至只有一张图,不知道有没有人对这里进行一个加权。
ds_iter = iter(get_training_dataset().unbatch().batch(20))
one_batch = next(ds_iter)
display_batch_of_images(one_batch)
自定义callback
下面这个使用来调整训练过程的learning_rate,可以用这种自定义的callback,Keras官方文档里面有教
def lrfn(epoch):
    LR_START = 0.00001
    LR_MAX = 0.00005 * strategy.num_replicas_in_sync
    LR_MIN = 0.00001
    LR_RAMPUP_EPOCHS = 5
    LR_SUSTAIN_EPOCHS = 0
    LR_EXP_DECAY = .8

    if epoch < LR_RAMPUP_EPOCHS:
        lr = (LR_MAX - LR_START) / LR_RAMPUP_EPOCHS * epoch + LR_START
    elif epoch < LR_RAMPUP_EPOCHS + LR_SUSTAIN_EPOCHS:
        lr = LR_MAX
    else:
        lr = (LR_MAX - LR_MIN) * LR_EXP_DECAY**(epoch - LR_RAMPUP_EPOCHS - LR_SUSTAIN_EPOCHS) + LR_MIN
    return lr
lr_schedule = tf.keras.callbacks.LearningRateScheduler(lrfn, verbose=1)
选择合适的卷积基
这里我看别的博主说Res系列效果不错,总共6个模型,这里要重头开始训练,不能冻结卷积基,冻结后效果特别差,10%出头的准确率。由于我显卡只有8G,我一次跑4个模型,20个轮次。
下面是代码,你可以自己改,主要就用来调参。
#选择适合的基
STEPS_PER_EPOCH = NUM_TRAINING_IMAGES // BATCH_SIZE
TL_Models =[
    tf.keras.applications.ResNet101(weights='imagenet',include_top=False ,input_shape=[*IMAGE_SIZE, 3]),
    tf.keras.applications.ResNet101V2(weights='imagenet',include_top=False ,input_shape=[*IMAGE_SIZE, 3]),
    tf.keras.applications.ResNet152(weights='imagenet',include_top=False ,input_shape=[*IMAGE_SIZE, 3]),
    tf.keras.applications.ResNet152V2(weights='imagenet',include_top=False ,input_shape=[*IMAGE_SIZE, 3]),
]
TL_Models_NAMES = ['ResNet101','ResNet101V2','ResNet152','ResNet152V2']
#训练模型
batch_size=BATCH_SIZE
from keras.models import Sequential
import tensorflow as tf
#端到端训练
#选择Res系列,但是显存不够,只能跑4个,多了电脑卡死,还有两个,但是验证集准确率都比较低,整个系列是6个
HISTORIES = []
for i in TL_Models:
    model = tf.keras.Sequential([
        i,
        tf.keras.layers.BatchNormalization(),
        tf.keras.layers.GlobalAveragePooling2D(),
        tf.keras.layers.BatchNormalization(),
        tf.keras.layers.Dense(len(CLASSES), activation='softmax')])
    model.compile(optimizer='adam', loss='sparse_categorical_crossentropy', metrics=['sparse_categorical_accuracy'])
    history = model.fit(get_training_dataset(), steps_per_epoch=STEPS_PER_EPOCH, epochs=20, callbacks=[lr_schedule],validation_data=get_validation_dataset())
    HISTORIES.append(history.history)
#绘图选择卷积基
styles=[':','-.','--','-',':','-.','--','-',':','-.','--','-']
plt.figure(figsize=(10, 8))
plt.subplot(2, 1, 1)
for i in range(len(HISTORIES)):
    plt.plot(HISTORIES[i]['val_sparse_categorical_accuracy'], linestyle=styles[i])
plt.legend(TL_Models_NAMES, loc='upper left')
plt.title('Validation Accuracy')
plt.xlabel('Epoch')
plt.ylabel('Accuracy')
plt.subplot(2, 1, 2)
for i in range(len(HISTORIES)):
    plt.plot(HISTORIES[i]['val_loss'], linestyle=styles[i])
plt.legend(TL_Models_NAMES, loc='upper left')
plt.title('Validation Loss')
plt.xlabel('Epoch')
plt.ylabel('Loss')
plt.show()
上面这一段跑完结果如下,看的出来ResNet101效果最好,还差两个,也跑一下。

#再把剩余两个RES系列也跑一下
STEPS_PER_EPOCH = NUM_TRAINING_IMAGES // BATCH_SIZE
TL_Models =[
    tf.keras.applications.ResNet101(weights='imagenet',include_top=False ,input_shape=[*IMAGE_SIZE, 3]),
    tf.keras.applications.ResNet50(weights='imagenet',include_top=False ,input_shape=[*IMAGE_SIZE, 3]),
    tf.keras.applications.ResNet50V2(weights='imagenet',include_top=False ,input_shape=[*IMAGE_SIZE, 3]),
]
TL_Models_NAMES = ['ResNet101','ResNet50','ResNet50V2']
#训练模型
batch_size=BATCH_SIZE
from keras.models import Sequential
import tensorflow as tf
HISTORIES = []
for i in TL_Models:
    model = tf.keras.Sequential([
        i,
        tf.keras.layers.BatchNormalization(),
        tf.keras.layers.GlobalAveragePooling2D(),
        tf.keras.layers.BatchNormalization(),
        tf.keras.layers.Dense(len(CLASSES), activation='softmax')])
    model.compile(optimizer='adam', loss='sparse_categorical_crossentropy', metrics=['sparse_categorical_accuracy'])
    history = model.fit(get_training_dataset(), steps_per_epoch=STEPS_PER_EPOCH, epochs=10, callbacks=[lr_schedule],validation_data=get_validation_dataset())
    HISTORIES.append(history.history)
#绘图选择卷积基
styles=[':','-.','--','-',':','-.','--','-',':','-.','--','-']
plt.figure(figsize=(10, 8))
plt.subplot(2, 1, 1)
for i in range(len(HISTORIES)):
    plt.plot(HISTORIES[i]['val_sparse_categorical_accuracy'], linestyle=styles[i])
plt.legend(TL_Models_NAMES, loc='upper left')
plt.title('Validation Accuracy')
plt.xlabel('Epoch')
plt.ylabel('Accuracy')
plt.subplot(2, 1, 2)
for i in range(len(HISTORIES)):
    plt.plot(HISTORIES[i]['val_loss'], linestyle=styles[i])
plt.legend(TL_Models_NAMES, loc='upper left')
plt.title('Validation Loss')
plt.xlabel('Epoch')
plt.ylabel('Loss')
plt.show()
这一段跑出来也是101最好,所以最后就选择101了

选择dropout_rate
我还调整了一下dropout
#选择适合的droprate
batch_size=BATCH_SIZE
from keras.models import Sequential
HISTORIES = []
rate = [0.2,0.3,0.4,0.5,0.6,0.7]
for i in rate:
     model = tf.keras.Sequential([
        tf.keras.applications.ResNet101(weights='imagenet',include_top=False ,input_shape=[*IMAGE_SIZE, 3]),
        tf.keras.layers.BatchNormalization(),
        tf.keras.layers.GlobalAveragePooling2D(),
        tf.keras.layers.BatchNormalization(),
        tf.keras.layers.Dropout(i),
        tf.keras.layers.Dense(len(CLASSES), activation='softmax')
    ])
     model.compile(optimizer='adam',loss = 'sparse_categorical_crossentropy',metrics=['sparse_categorical_accuracy'])
     history = model.fit(get_training_dataset(), steps_per_epoch=STEPS_PER_EPOCH,epochs=10,callbacks=[lr_schedule],validation_data=get_validation_dataset())
     HISTORIES.append(history.history)
#进行绘图选择dropout_rate
styles=[':','-.','--','-',':','-.','--','-',':','-.','--','-']
plt.figure(figsize=(10, 8))
plt.subplot(2, 1, 1)
names = ["2", "3", "4",'5','6','7']
for i in range(len(HISTORIES)):
    plt.plot(HISTORIES[i]['val_sparse_categorical_accuracy'], linestyle=styles[i])
plt.legend(names, loc='upper left')
plt.title('Validation Accuracy')
plt.xlabel('Epoch')
plt.ylabel('Accuracy')
plt.subplot(2, 1, 2)
for i in range(len(HISTORIES)):
    plt.plot(HISTORIES[i]['val_loss'], linestyle=styles[i])
plt.legend(names, loc='upper left')
plt.title('Validation Loss')
plt.xlabel('Epoch')
plt.ylabel('Loss')
plt.show()
这里跑出来结果如下,最后选0.2,但是之后又重新试了一下,好像不加更好

这之后重新跑了一下,好像不加更好

训练最终模型并提交
这里得到网站提交完整的notebook,我写完的时候tpu还没轮到我,我还没提交,我最终提交时吧论次改成25
#训练最终模型
model = tf.keras.Sequential([
        tf.keras.applications.ResNet101(weights='imagenet',include_top=False ,input_shape=[*IMAGE_SIZE, 3]),
        tf.keras.layers.BatchNormalization(),
        tf.keras.layers.GlobalAveragePooling2D(),
        tf.keras.layers.BatchNormalization(),
        tf.keras.layers.Dense(len(CLASSES), activation='softmax')])
model.compile(optimizer='adam',loss = 'sparse_categorical_crossentropy',metrics=['sparse_categorical_accuracy'],)
history = model.fit(get_train_valid_datasets(), steps_per_epoch=STEPS_PER_EPOCH,epochs=20, callbacks=[lr_schedule])
#在测试集上运行并保存结果
model.save("flower_model.keras")
model = tf.keras.models.load_model("flower_model.keras")
test_ds = get_test_dataset(ordered=True)
test_images_ds = test_ds.map(lambda image, idnum: image)
probabilities = model.predict(test_images_ds)
predictions = np.argmax(probabilities, axis=-1)
test_ids_ds = test_ds.map(lambda image, idnum: idnum).unbatch()
test_ids = next(iter(test_ids_ds.batch(NUM_TEST_IMAGES))).numpy().astype('U') # all in one batch
np.savetxt('submission.csv', np.rec.fromarrays([test_ids, predictions]), fmt=['%s', '%d'], delimiter=',', header='id,label', comments='')
网站提交用的代码
这里自己改改就行了,把一些不必要的省掉,参数都调好了,因为跑的话要花时间,去看别人写的,也很简略,看不到什么思路,也没什么地方能改,基本大家做的都差不多
推荐阅读
下面这篇提高GPU利用率说的挺清楚
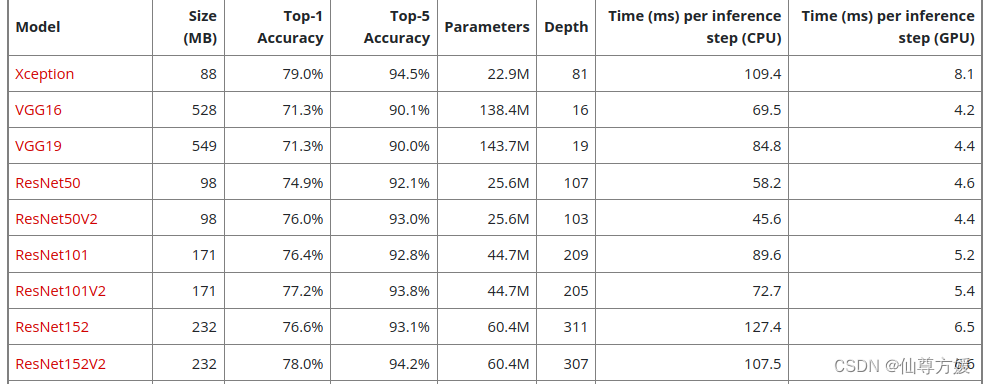
下面这个是其他系列的模型,可以尝试其他系列,但效果最好,大家都说是Res系列


 1143
1143


 被折叠的 条评论
为什么被折叠?
被折叠的 条评论
为什么被折叠?
 到【灌水乐园】发言


