


k210与stm32的串口通讯
1 k210串口的配置
###1.1 引脚映射
k210串口的配置是比较简单的,而且k210没 有固定的串口引脚,可以随便映射。但是在使用的时候还是要看一下引脚图,避免和其他功能发生冲突。
fm.register(24, fm.fpioa.UART1_TX, force=True)
fm.register(25, fm.fpioa.UART1_RX, force=True)
1.2 构造函数
uart = machine.UART(uart,baudrate,bits,parity,stop,timeout, read_buf_len)
uartUART 号,使用指定的 UART,可以通过machine.UART.按tab键来补全baudrate: UART 波特率bits: UART 数据宽度,支持5/6/7/8(默认的 REPL 使用的串口(UARTHS)只支持 8 位模式), 默认8parity: 奇偶校验位,支持None,machine.UART.PARITY_ODD,machine.UART.PARITY_EVEN(默认的 REPL 使用的串口(UARTHS)只支持 None), 默认Nonestop: 停止位, 支持1,1.5,2, 默认1timeout: 串口接收超时时间read_buf_len: 串口接收缓冲,串口通过中断来接收数据,如果缓冲满了,将自动停止数据接收
1.3 方法
init
这个方法可以用于初始化串口,但一般构建对象时就已经完成初始化了,所以,这个函数一般用于重新初始化。
uart.init(baudrate,bits,parity,stop,timeout, read_buf_len)
read
用于读取缓冲区中的数据,返回一个bytes类型的数据
uart.read(num)
num: 读取字节的数量,一般填入缓冲大小,如果缓冲中数据的数量没有num大,那么将只返回缓冲中剩余的数据
readline
用于读取串口缓冲数据的一行,返回一个bytes类型的数据
uart.readline(num)
num: 读取行的数量
write
用于使用串口发送数据
uart.write(buf)
buf: 需要发送到数据
1.4示例代码
接收数据,并且将接收到的数据发送出去
from machine import UART
from board import board_info
from fpioa_manager import fm

fm.register(24, fm.fpioa.UART1_TX, force=True)
fm.register(25, fm.fpioa.UART1_RX, force=True)
uart_A = UART(UART.UART1, 9600, 8, 0, 0, timeout=1000, read_buf_len=4096)

while(1):
    a = uart_A.read()
    if(a != None):
    	uart_A.write(a)
2 k210完整通讯流程
用于我们在通讯的过程中,经常需要收发多个数据,并且我们要告诉发送的对象,我们发送的数据是什么,这个时候就需要有个标志位,所以我们经常是以数据包的形式进行发送数据,具体的协议大家可以自己设定。
这里我们以0x2C,0x12,int(distance),0x5B为例
- 0x2C,0x12为帧头
- distance为发送的数据
- 0x5B为帧尾。
2.1 发送数据
def uart_send(distance):
    FH = bytearray([0x2C,0x12,int(distance),0x5B])
    uart_A.write(FH)
通过bytearray(),将数据打包成一个字节数据,并且发送。
这里有个注意点,因为python中没有Byte的类型,且串口的发送是8位发送,所以这里distance只能是8位数据,当然发送16位甚至32位的方法也是有的,后面估计会在openmv与stm32通讯部分提及,代码都一样的
2.2 接收数据
接收数据需要对数据包进行解码
如果我们边接收数据并且进行解码,很容易导致程序卡死,所以我们采用一次性接收完数据在进行解码。
####2.2.1 解码
RxState = 0                     #接收状态标志
uart_RxFlag = 0                 #接收完成标志位
Rx_data = 0                     #接收数据

#读取并解包数据
def uart_read(RxData):
    global RxState
    global pRxPacket
    global uart_RxFlag
    global Rx_data

    if (RxState == 0):
        if(RxData == b'\x2C'):              #接收到第一个帧头

            RxState = 1

    elif (RxState == 1):

        if(RxData == b'\x12'):              #接收到第二个帧头

            RxState = 2

    elif(RxState == 2):
        if(RxData != None):

            Rx_data = RxData
            #print(result)
            RxState = 3

    elif(RxState == 3):
        if(RxData == b'\x5B'):              #接收到帧尾

            RxState = 0
            uart_RxFlag = 1                 #表示接收完成,主函数可以读取数据了
- RxData是8位的数据
2.2.2 c语言和python数据类型的转换
#接收数据
def uart_continuous_read():

    data = uart_A.read()

    if data:
        data2 = ustruct.unpack('<BBBB',data)
        for i in range(4):
            data3 = data[i].to_bytes(1, 'big')
            #print(data3)
            #print(type(data3))
            uart_read(data3)
由于python中没有Byte类似,并且uart_A.read()返回的数据类型是int类型所以我们需要将int转换为8位的数据,我们可以使用 ustruct.unpack(fmt,data)实现该功能。
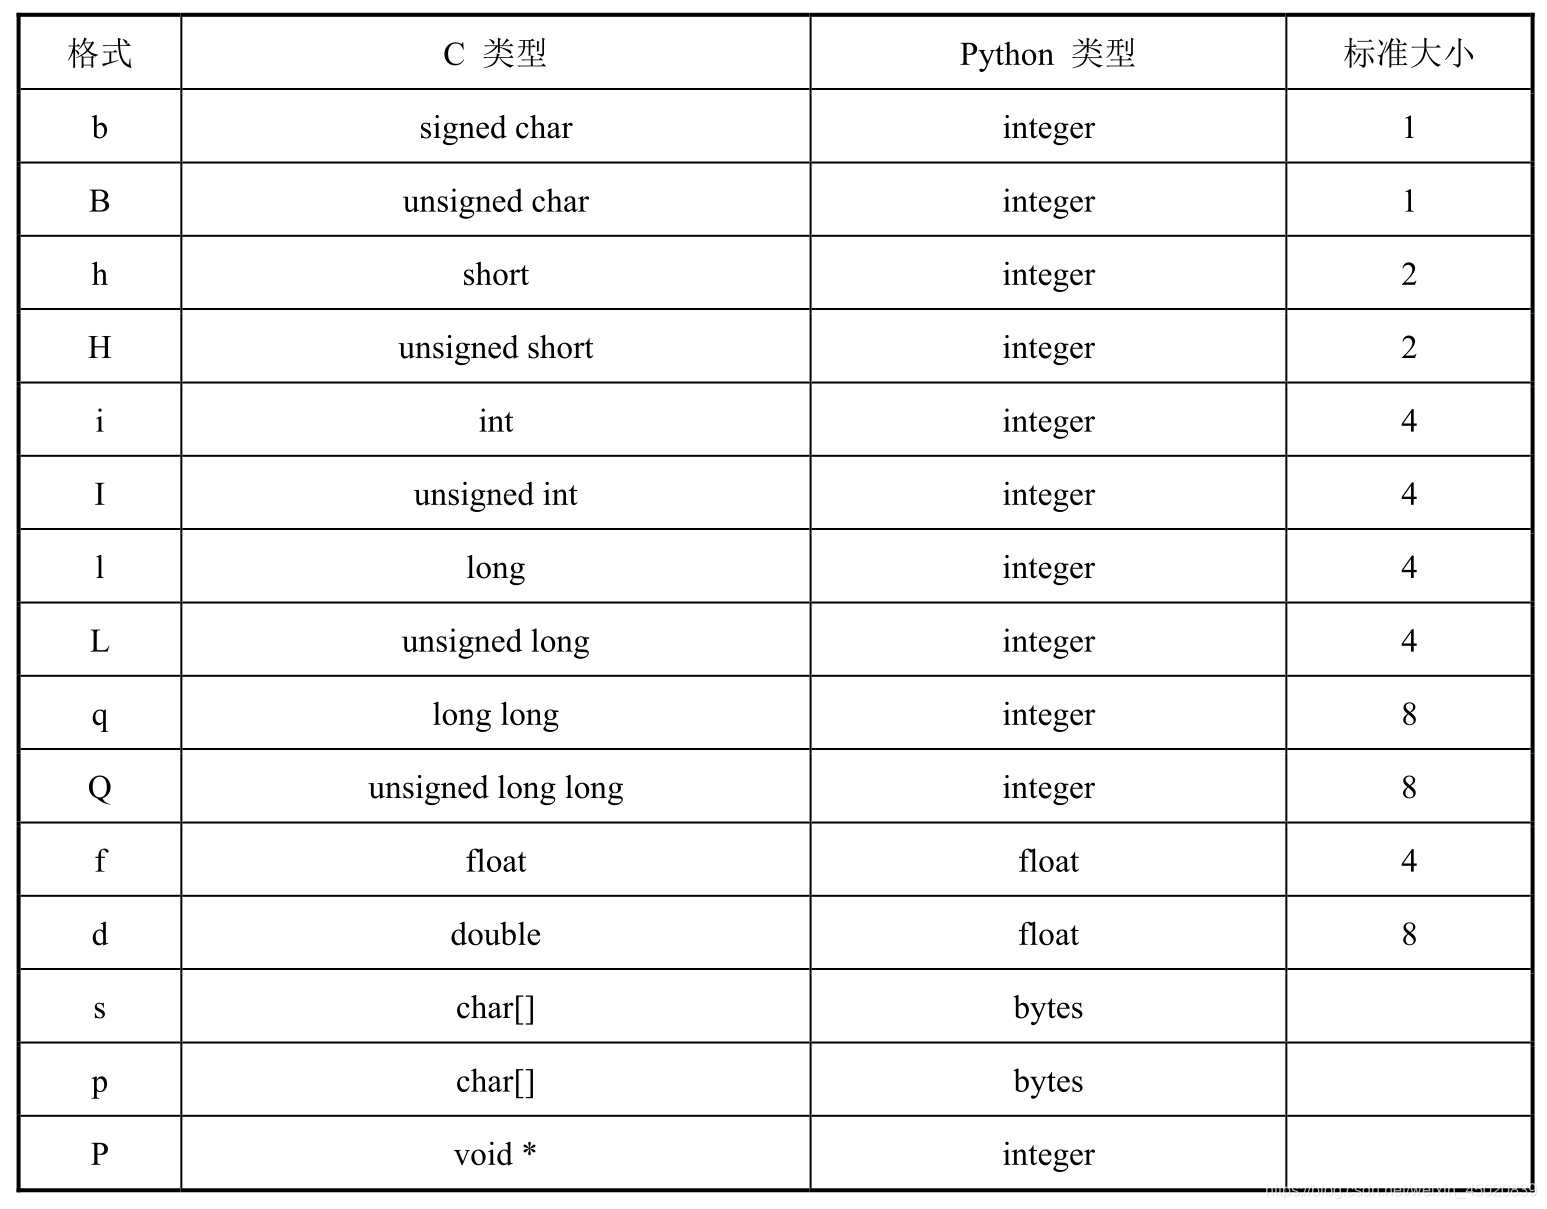
- 该函数的作用是,将data按照fmt的格式进行解压,返回值是解压后参数的元组。
例如 表示将data解压成4个unsigned int 类型,并且依次存入元组data2中
data2 = ustruct.unpack('<BBBB',data)
3 stm32收发数据
#include "stm32f10x.h"                  // Device header
#include <stdio.h>
#include <stdarg.h>
#include "OLED.h"
uint8_t Serial_RxPacket[100] = {0};				//"@MSG\r\n"
uint8_t Serial_RxFlag;

void Serial_Init(void)
{
	RCC_APB1PeriphClockCmd(RCC_APB1Periph_USART3, ENABLE);
	RCC_APB2PeriphClockCmd(RCC_APB2Periph_GPIOB, ENABLE);

	GPIO_InitTypeDef GPIO_InitStructure;
	GPIO_InitStructure.GPIO_Mode = GPIO_Mode_AF_PP;
	GPIO_InitStructure.GPIO_Pin = GPIO_Pin_10;
	GPIO_InitStructure.GPIO_Speed = GPIO_Speed_50MHz;
	GPIO_Init(GPIOB, &GPIO_InitStructure);

	GPIO_InitStructure.GPIO_Mode = GPIO_Mode_IPU;
	GPIO_InitStructure.GPIO_Pin = GPIO_Pin_11;
	GPIO_InitStructure.GPIO_Speed = GPIO_Speed_50MHz;
	GPIO_Init(GPIOB, &GPIO_InitStructure);

	USART_InitTypeDef USART_InitStructure;
	USART_InitStructure.USART_BaudRate = 9600;
	USART_InitStructure.USART_HardwareFlowControl = USART_HardwareFlowControl_None;
	USART_InitStructure.USART_Mode = USART_Mode_Tx | USART_Mode_Rx;
	USART_InitStructure.USART_Parity = USART_Parity_No;
	USART_InitStructure.USART_StopBits = USART_StopBits_1;
	USART_InitStructure.USART_WordLength = USART_WordLength_8b;
	USART_Init(USART3, &USART_InitStructure);

	USART_ITConfig(USART3, USART_IT_RXNE, ENABLE);

	NVIC_PriorityGroupConfig(NVIC_PriorityGroup_2);

	NVIC_InitTypeDef NVIC_InitStructure;
	NVIC_InitStructure.NVIC_IRQChannel = USART3_IRQn;
	NVIC_InitStructure.NVIC_IRQChannelCmd = ENABLE;
	NVIC_InitStructure.NVIC_IRQChannelPreemptionPriority = 1;
	NVIC_InitStructure.NVIC_IRQChannelSubPriority = 1;
	NVIC_Init(&NVIC_InitStructure);

	USART_ClearFlag(USART3, USART_FLAG_TC);
	USART_Cmd(USART3, ENABLE);
}


void Serial_SendByte(uint8_t Byte)
{
	USART_SendData(USART3, Byte);
	while (USART_GetFlagStatus(USART3, USART_FLAG_TXE) == RESET);
}

void Serial_Send(uint8_t Byte)
{
	Serial_SendByte(0x2C);
	Serial_SendByte(0X12);
	Serial_SendByte(Byte);
	Serial_SendByte(0X5B);
}

void Serial_SendArray(uint8_t *Array, uint16_t Length)
{
	uint16_t i;
	for (i = 0; i < Length; i ++)
	{
		Serial_SendByte(Array[i]);
	}
}

void Serial_SendString(char *String)
{
	uint8_t i;
	for (i = 0; String[i] != '\0'; i ++)
	{
		Serial_SendByte(String[i]);
	}
}


int fputc(int ch, FILE *f)
{
	Serial_SendByte(ch);
	return ch;
}

void Serial_Printf(char *format, ...)
{
	char String[100];
	va_list arg;
	va_start(arg, format);
	vsprintf(String, format, arg);
	va_end(arg);
	Serial_SendString(String);
}

void USART3_IRQHandler(void)
{

	static uint8_t RxState = 0;
	static uint8_t pRxPacket = 0;

	if(USART_GetITStatus(USART3, USART_IT_RXNE) != RESET)
	{
		uint8_t RxData = USART_ReceiveData(USART3);

		if(RxState == 0)
		{
			if(RxData == 0x2C) 			//½ÓÊÕµ½µÚÒ»¸ö°üÍ·
			{

				RxState = 1;
			}
		}
		else if(RxState == 1)
		{
			if(RxData == 0x12) 			//½ÓÊÕµ½µÚÒ»¸ö°üÍ·
			{
				RxState = 2;

				//Åжϻº´æÇøÊÇ·ñÒç³ö
				if(pRxPacket > 100)
				{
					pRxPacket = 0;
				}

			}
		}
		else if(RxState == 2)
		{
			Serial_RxPacket[pRxPacket] = RxData;
			pRxPacket++;
			if(pRxPacket >= 1)
			{

				RxState = 3;
				pRxPacket = 0;

			}
		}
		else if(RxState == 3)
		{
			if(RxData == 0x5B)
			{
				RxState = 0;

				//½ÓÊÕÍê³É£¬Ö÷º¯Êý¿ÉÒÔ¶ÔÊý¾Ý½øÐд¦Àí
				Serial_RxFlag = 1;
			}
		}

	}
	USART_ClearITPendingBit(USART3, USART_IT_RXNE);
}

uint8_t Serial_GetRxFlag(void)
{
	if (Serial_RxFlag == 1)
	{
		Serial_RxFlag = 0;
		return 1;
	}
	return 0;
}


 809
809


 被折叠的 条评论
为什么被折叠?
被折叠的 条评论
为什么被折叠?
 到【灌水乐园】发言


