python win32com 操作excel插入字段 word excel ppt 压缩包等文档

python EXCEL文档处理

代码作用

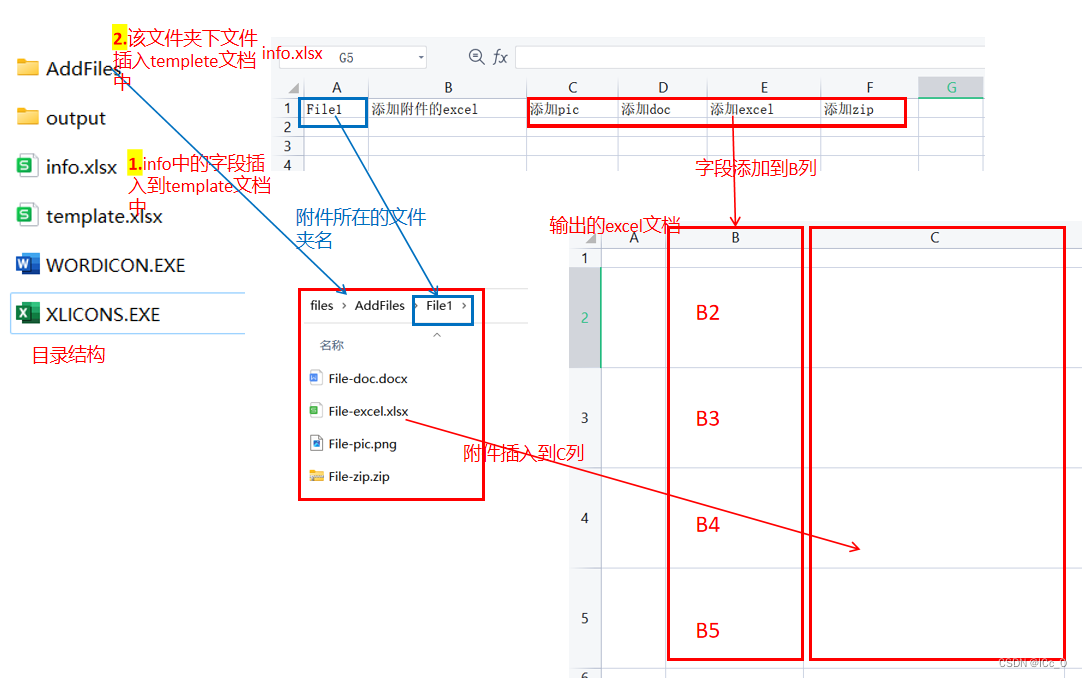
实现python 在excel指定位置写入字段,在指定位置插入word/excel/图片等文件
插入字段和附件

import sys, os
import win32com.client

baseDirPath = sys.path[0]   
print(baseDirPath)

info_file_path = baseDirPath + '\\files\\info.xlsx'
template_file_path = baseDirPath + '\\files\\template.xlsx'   
ICON_EXCEL = baseDirPath + '\\files\\WORDICON.EXE'   #EXCEL图标所在地址
ICON_WORD = baseDirPath + '\\files\\XLICONS.EXE'     #WORD图标所在地址

output_path = baseDirPath + '\\files\\output'
if not os.path.exists(output_path):
  os.makedirs(output_path)
  
rarType = ['rar', 'zip', '7z']
picType = ['jpg', 'png', 'bmp', 'jpeg']
excelType = ['xls', 'xlsx']
docType = ['doc','docx']

if __name__ == '__main__':

  #使用WPS,关闭WPS程序
  try:
    wps = win32com.client.gencache.EnsureDispatch('kwps.application')
  except:
    wps = win32com.client.gencache.EnsureDispatch('wps.application')
    
  try:
    wps.Quit
  except:
    pass
  
  excelApp = win32com.client.gencache.EnsureDispatch('Excel.Application')
  rel_wb = excelApp.Workbooks.Open(info_file_path)   #打开info.xlsx
  rel_ws = rel_wb.Worksheets(1)                      #excel第‘1’个sheet
  total_rows = rel_ws.UsedRange.Rows.Count
  total_cols = rel_ws.UsedRange.Columns.Count
  
  
  #打开模板excel
  temp_wb = excelApp.Workbooks.Open(template_file_path)   #打开模板文件
  temp_ws = temp_wb.Worksheets(1)
  print('temp_wb Excel open')
  ######插入字段  将info.xlsx中的字段写入到template.xlsx的B列
  temp_ws.Range('B2').Value = rel_ws.Cells(1, 'C').Value
  temp_ws.Range('B3').Value = rel_ws.Cells(1, 'D').Value
  temp_ws.Range('B4').Value = rel_ws.Cells(1, 'E').Value
  temp_ws.Range('B5').Value = rel_ws.Cells(1, 'F').Value
  
  ######插入附件
  #info.xlsx中'A1'信息为附件所在文件夹的名称
  insertFilePath = baseDirPath + '\\files\\AddFiles\\' + str(rel_ws.Cells(1, 'A').Value)
  #遍历所有待插入附件
  for root, dirs, files in os.walk(insertFilePath):
    for file in files:
      file_path = os.path.join(root, file)
      fType = file.split('.')[-1].lower()    #文件类型
      if '~$' in file:              #doc/excel 打开时的缓存文档
        continue
      if fType.lower() == 'pdf':    #暂无法导入pdf文档
        continue
      
      if fType in picType:          #图片类型 放在C2
        col = 'C'
        row = 2
        shape = temp_ws.Pictures().Insert(Filename = file_path)
        shape.Top = temp_ws.Cells(row, col).Top + 10
        shape.Left = temp_ws.Cells(row, col).Left + 10
        shape.Width = 50
      elif fType in rarType:        #压缩包类型 放在C5
        col = 'C'
        row = 5
        shape = temp_ws.Shapes.AddOLEObject(Filename = file_path, Link = False)
        shape.Top = temp_ws.Cells(row, col).Top + 10
        shape.Left = temp_ws.Cells(row, col).Left + 10
      elif fType in excelType:      #excel类型 放在C4
        icon_file_path = ICON_EXCEL
        add_file_name = file.split('.')[0]
        col = 'C'
        row = 4
        shape = temp_ws.Shapes.AddOLEObject(Filename = file_path, Link = False,
                  DisplayAsIcon = True, IconFileName = icon_file_path, IconIndex = 0, 
                  IconLabel = add_file_name)
        shape.Top = temp_ws.Cells(row, col).Top + 10
        shape.Left = temp_ws.Cells(row, col).Left + 10
      elif fType in docType:        #word类型 放在C3
        icon_file_path = ICON_WORD
        add_file_name = file.split('.')[0]
        col = 'C'
        row = 3
        shape = temp_ws.Shapes.AddOLEObject(Filename = file_path, Link = False,
                  DisplayAsIcon = True, IconFileName = icon_file_path, IconIndex = 0, 
                  IconLabel = add_file_name)
        shape.Top = temp_ws.Cells(row, col).Top + 10
        shape.Left = temp_ws.Cells(row, col).Left + 10
      
  excel_out_path = output_path + '\\outputExcel.xlsx'      
  temp_wb.SaveAs(excel_out_path)
  temp_wb.Close()
  excelApp.Application.Quit()
  print('finish--------------')

案例附件:
https://download.csdn.net/download/mjc1321/89064542

  • 14
    点赞
  • 2
    收藏
    觉得还不错? 一键收藏
  • 0
    评论
### 回答1: Python win32com可以用来操作Microsoft Word文档。通过win32com库,可以实现打开、编辑、保存、关闭Word文档操作。 具体步骤如下: 1. 导入win32com库 ```python import win32com.client as win32 ``` 2. 创建Word应用程序对象 ```python word = win32.Dispatch('Word.Application') ``` 3. 打开Word文档 ```python doc = word.Documents.Open('path/to/document.docx') ``` 4. 编辑文档内容 ```python doc.Content.Text = 'Hello, World!' ``` 5. 保存文档 ```python doc.Save() ``` 6. 关闭文档Word应用程序 ```python doc.Close() word.Quit() ``` 以上就是使用Python win32com操作Word文档的基本步骤。需要注意的是,win32com库只能在Windows系统上使用。 ### 回答2: Python在Windows环境下提供了一个名为win32com库,可以用来操作Microsoft Office中的各种应用程序(如WordExcel、PowerPoint等)。在本篇文章中,我们将关注在Python中如何使用win32com库来操作Microsoft Word。 步骤一:安装win32com库 在Python中使用win32com库需要先安装。最简单的方法就是使用pip,在命令提示符中运行如下命令即可: ```python pip install pywin32 ``` 步骤二:引入win32com库 安装完win32com库后,在Python文件中要使用Word操作函数,需要导入win32com.client。我们可以通过如下代码实现导入: ```python import win32com.client as win32 ``` 步骤三:操作Word文档Python中使用win32com操作Word文档,需要先打开一个Word instance,然后再获取要操作的具体文档。可以通过如下代码实现: ```python # 创建一个Word instance word = win32.Dispatch('Word.Application') # 隐藏Word界面 word.Visible = 0 # 打开一个文档 doc = word.Documents.Open('example.docx') ``` 我们成功创建了一个Word instance,并打开了一个名为"example.docx"的文档。 步骤四:操作Word文档内容 接下来,我们可以对文档中的内容进行更改,例如修改标题、插入图片等。具体操作步骤如下: 修改文档标题: ```python # 获取文档中的所有段落 paragraphs = doc.Paragraphs # 把第一段的文本内容进行修改 paragraphs(1).Range.Text = '新的文档标题' ``` 插入图片: ```python # 获取文档中的所有形状 shapes = doc.Shapes # 插入一张名为'example.png'的图片 shapes.AddPicture('example.png', LinkToFile=False, SaveWithDocument=True, Left=0, Top=0) ``` 步骤五:保存并关闭文档 当对文档进行修改后,我们需要对文档进行保存操作,并最终关闭Word instance。可以通过如下代码实现: ```python # 保存文档 doc.SaveAs(r'new_example.docx') # 关闭文档 doc.Close() # 关闭Word instance word.Quit() ``` 至此,我们完成了使用Pythonwin32com操作Word文档的整个流程。除了上述所写的几个例子,win32com库还提供了很多其他的函数和属性,可以实现更多更复杂的操作。 ### 回答3: Python是一种非常强大的编程语言,它不仅能够处理大量数据和算法,同时也能有效地操作诸如Word文档之类的常见应用程序,其中win32com是一个Python模块,可以被用来与Microsoft Office产品进行交互。这里我们重点介绍win32com库如何操作Word文档。 首先,需要确认已经安装了pywin32库,这可以通过在命令行窗口中输入“pip install pywin32”来实现安装。 接着,在Python中使用win32com模块,必须借助win32com.client模块来实现,示例代码如下: ```Python import win32com.client #创建Word文档的实例 wordApp = win32com.client.Dispatch('Word.Application') #隐藏Word应用程序 wordApp.Visible = False #打印输出Word应用程序版本号 print(wordApp.Version) #以只读方式打开一个Word文档 wordDoc = wordApp.Documents.Open('d:/test.docx',ReadOnly = True) #打印输出文档页数 print(wordDoc.ComputeStatistics(2)) #退出Word应用程序 wordApp.Quit() ``` 以上代码会启动Word应用程序,并初始化一个Document对象。可以使用该对象的可用方法和属性来查询文档内容和样式等信息。 接下来我们继续介绍如何在Word文档插入图片和表格。这里我们首先设定一个Word模板,包含一个表格和一个图片,该模板可以使用Word软件的页面布局功能创建。代码示例如下: ```Python from win32com.client import constants import os sourcePath = 'd:' templateFileName = 'report-template.docx' outputFileName = 'report.docx' #打开模板文件 templateFile = os.path.join(sourcePath,templateFileName) outputFile = os.path.join(sourcePath,outputFileName) wordApp = win32com.client.Dispatch('Word.Application') wordApp.Visible = False wordDoc = wordApp.Documents.Open(templateFile) #在模板的表格中插入数据 table = wordDoc.Tables(1) table.Rows[1].Cells[1].Range.Text = 'Date' table.Rows[1].Cells[2].Range.Text = 'Name' table.Rows[2].Cells[1].Range.Text = '8/1/2020' table.Rows[2].Cells[2].Range.Text = 'David' table.Rows[3].Cells[1].Range.Text = '8/2/2020' table.Rows[3].Cells[2].Range.Text = 'Mike' #将模板中的图片替换为指定图片 shapes = wordDoc.Shapes for shape in shapes: if shape.Type ==constants.msoPicture: imageFilePath = 'd:/test.png' shape.Delete() shape = shapes.AddPicture(FileName=imageFilePath, LinkToFile=False, SaveWithDocument=True, Left=0, Top=0, Width=100, Height =100) #保存并退出Word应用程序 wordDoc.SaveAs(outputFile) wordApp.Quit() ``` 这里使用“from win32com.client import constants”和“wordApp.Selection.InlineShapes.AddPicture(imageFilePath)”来实现图片插入功能。用“table.Rows[1].Cells[1].Range.Text = 'Date'”和“table.Rows[2].Cells[1].Range.Text = '8/1/2020'”等语句可以方便地在模板中正确的单元格位置添加表格数据。最后,使用wordDoc.SaveAs(outputFile)命令和退出命令wordApp.Quit()来保存和退出Word文档。 总之,通过win32com库的支持,Python可以轻松地完成Word文档的创建,插入文本和图片、修改样式等常见操作。可以根据具体需求和场景进一步扩展和优化代码。

“相关推荐”对你有帮助么?

  • 非常没帮助
  • 没帮助
  • 一般
  • 有帮助
  • 非常有帮助
提交
评论
添加红包

请填写红包祝福语或标题

红包个数最小为10个

红包金额最低5元

当前余额3.43前往充值 >
需支付:10.00
成就一亿技术人!
领取后你会自动成为博主和红包主的粉丝 规则
hope_wisdom
发出的红包
实付
使用余额支付
点击重新获取
扫码支付
钱包余额 0

抵扣说明:

1.余额是钱包充值的虚拟货币,按照1:1的比例进行支付金额的抵扣。
2.余额无法直接购买下载,可以购买VIP、付费专栏及课程。

余额充值