


概述
YOLO11 predict()返回Results对象,检测任务的主要数据包括原始图像、原图像尺寸、边界框、类别及其置信度、xywh(中心坐标、宽度和高度)及其归一化数据、xyxy(左上、右下坐标)及其归一化数据。其他任务的推理返回结果包含其特定的数据。
Results对象的属性
Results 对象的属性:
| 名称 | 类型 | 描述 |
|---|---|---|
orig_img | numpy.ndarray | 原始图像numpy array. |
orig_shape | tuple | 原始图像尺寸 (height, width) . |
boxes | Boxes, optional | Boxes 对象,包含所有检测到的边界框. |
masks | Masks, optional | Masks 对象,包含所有检测到的 masks. |
probs | Probs, optional | Probs 对象,包含所有分类任务的类别概率. |
keypoints | Keypoints, optional | Keypoints 对象,包含包含每个对象的检测关键点. |
obb | OBB, optional | OBB对象,包含定向边界框. |
speed | dict | 每幅图像的预处理、推理和后处理速度(ms). |
names | dict | 类索引映射到类名称. |
path | str | 图像文件的路径. |
save_dir | str, optional | 保持结果的目录. |
Results对象的方法
Results对于有以下方法:
| 方法 | 返回类型 | 说明 |
|---|---|---|
update() | None | 用新的检测数据(方框、遮罩、问题、Obb、关键点)更新结果对象。 |
cpu() | Results | 返回将所有张量移至CPU 内存的 Results 对象副本。 |
numpy() | Results | 返回将所有张量转换为 numpy 数组的 Results 对象副本。 |
cuda() | Results | 返回将所有张量移至GPU 内存的 Results 对象副本。 |
to() | Results | 返回将张量移动到指定设备和 dtype 的 Results 对象副本。 |
new() | Results | 创建一个具有相同图像、路径、名称和速度属性的新结果对象。 |
plot() | np.ndarray | 在输入的 RGB 图像上绘制检测结果,并返回带标注的图像。 |
show() | None | 显示带有推理结果标注的图像。 |
save() | str | 将带标注推理结果的图像保存到文件并返回文件名。 |
verbose() | str | 返回每个任务的日志字符串,详细说明检测和分类结果。 |
save_txt() | str | 将检测结果保存到文本文件,并返回保存文件的路径。 |
save_crop() | None | 将裁剪后的检测图像保存到指定目录。 |
summary() | List[Dict] | 将推理结果转换为可选归一化的摘要字典。 |
to_df() | DataFrame | 将检测结果转换为 Pandas DataFrame。 |
to_csv() | str | 将检测结果转换为 CSV 格式。 |
to_xml() | str | 将检测结果转换为 XML 格式。 |
to_html() | str | 将检测结果转换为 HTML 格式。 |
to_json() | str | 将检测结果转换为 JSON 格式。 |
to_sql() | None | 将检测结果转换为 SQL 兼容格式并保存到数据库。 |
Plot()方法
Plot()方法将检测到的对象(如边界框、遮罩、关键点和概率)叠加到原始图像上,从而实现预测的可视化。该方法以 NumPy 数组形式返回注释图像,便于显示或保存。
调用方法:
from PIL import Image

from ultralytics import YOLO

# Load a pretrained YOLO11n model
model = YOLO("yolo11n.pt")

# Run inference on 'bus.jpg'
results = model(["https://ultralytics.com/images/bus.jpg", "https://ultralytics.com/images/zidane.jpg"])  # results list

# Visualize the results
for i, r in enumerate(results):
    # Plot results image
    im_bgr = r.plot()  # BGR-order numpy array
    im_rgb = Image.fromarray(im_bgr[..., ::-1])  # BGR to RGB-order PIL image

    # Show results to screen (in supported environments)
    r.show()

    # Save results to disk
    r.save(filename=f"results{i}.jpg")
源码分析
我们来看ultralytics的源代码ultralytics\engine\results.py,
def plot(
        self,
        conf=True,
        line_width=None,
        font_size=None,
        font="Arial.ttf",
        pil=False,
        img=None,
        im_gpu=None,
        kpt_radius=5,
        kpt_line=True,
        labels=True,
        boxes=True,
        masks=True,
        probs=True,
        show=False,
        save=False,
        filename=None,
        color_mode="class",
        txt_color=(255, 255, 255),
    ):
参数:
| Name | Type | Description | Default |
|---|---|---|---|
conf | bool | 是否叠加置信度 | True |
line_width | `float | None` | 框的线宽。如果为None,则根据图像大小自动适应。 |
font_size | `float | None` | 文本大小. 如果为None, 则根据图像大小自动适应. |
font | str | 字体。可以使用系统已安装的字体。 | 'Arial.ttf' |
pil | bool | 是否以PIL Image返回. | False |
img | `ndarray | None` | 用于绘图的图像。如果为None,则使用原始图像 |
im_gpu | `Tensor | None` | GPU-加速图像,用于更快地绘制蒙版。 |
kpt_radius | int | 绘制关键点的半径 | 5 |
kpt_line | bool | 是否用线条连接关键点。 | True |
labels | bool | 是否绘制标签 | True |
boxes | bool | 是否绘制边界框. | True |
masks | bool | 是否叠加蒙版 | True |
probs | bool | 是否绘制分类概率 | True |
show | bool | 是否显示带标注的图像 | False |
save | bool | 是否保存带标注的图像 | False |
filename | `str | None` | 保存图像的文件名称 |
color_mode | bool | 指定颜色模式: ‘instance’ 或 ‘class’. 缺省 ‘class’. | 'class' |
txt_color | tuple[int, int, int] | 为分类任务指定叠加的文字颜色 | (255, 255, 255) |
继续看源码:
assert color_mode in {"instance", "class"}, f"Expected color_mode='instance' or 'class', not {color_mode}."
		#如果img为None,则使用原始图像,并且确认原始图像属于 PyTorch 的张量(Tensor)类型。把批次中的第一张图像从 PyTorch 张量格式转换为 NumPy 数组格式,并且完成通道顺序调整和数值范围缩放。
        if img is None and isinstance(self.orig_img, torch.Tensor):
            img = (self.orig_img[0].detach().permute(1, 2, 0).contiguous() * 255).to(torch.uint8).cpu().numpy()

        names = self.names
        is_obb = self.obb is not None
        pred_boxes, show_boxes = self.obb if is_obb else self.boxes, boxes
        pred_masks, show_masks = self.masks, masks
        pred_probs, show_probs = self.probs, probs
        #实例化Annotator类
        annotator = Annotator(
            deepcopy(self.orig_img if img is None else img),
            line_width,
            font_size,
            font,
            pil or (pred_probs is not None and show_probs),  # Classify tasks default to pil=True
            example=names,
        )

        # 绘制分割结果
        if pred_masks and show_masks:
            if im_gpu is None:
                img = LetterBox(pred_masks.shape[1:])(image=annotator.result())
                #将输入的图像(以 NumPy 数组形式存在)转换为 GPU 上的 PyTorch 张量,同时进行通道调整、归一化等操作
                im_gpu = (
                    torch.as_tensor(img, dtype=torch.float16, device=pred_masks.data.device)
                    .permute(2, 0, 1)
                    .flip(0)
                    .contiguous()
                    / 255
                )
            idx = (
                pred_boxes.id
                if pred_boxes.id is not None and color_mode == "instance"
                else pred_boxes.cls
                if pred_boxes and color_mode == "class"
                else reversed(range(len(pred_masks)))
            )
            annotator.masks(pred_masks.data, colors=[colors(x, True) for x in idx], im_gpu=im_gpu)

        # 绘制检测(detect)结果
        if pred_boxes is not None and show_boxes:
            for i, d in enumerate(reversed(pred_boxes)):
            	#从预测框对象中提取分类、置信度和 跟踪ID 信息,并进行类型转换与空值处理
                c, d_conf, id = int(d.cls), float(d.conf) if conf else None, None if d.id is None else int(d.id.item())
                name = ("" if id is None else f"id:{id} ") + names[c]
                label = (f"{name} {d_conf:.2f}" if conf else name) if labels else None
                #如果是OBB则使用四个顶点坐标,普通方框使用左上右下顶点坐标
                box = d.xyxyxyxy.reshape(-1, 4, 2).squeeze() if is_obb else d.xyxy.squeeze()
                annotator.box_label(
                    box,
                    label,
                    color=colors(  #依据颜色模式为检测或跟踪结果选择颜色,如果为class,则使用类别索引对应的颜色(系统预先定义),否则使用特定实例的颜色
                        c
                        if color_mode == "class"
                        else id
                        if id is not None
                        else i
                        if color_mode == "instance"
                        else None,
                        True,
                    ),
                    rotated=is_obb,
                )

        # 绘制分类结果
        if pred_probs is not None and show_probs:
            text = ",\n".join(f"{names[j] if names else j} {pred_probs.data[j]:.2f}" for j in pred_probs.top5)
            x = round(self.orig_shape[0] * 0.03)
            #在图像上叠加文字
            annotator.text([x, x], text, txt_color=txt_color)

        # 绘制姿态结果
        if self.keypoints is not None:
            for i, k in enumerate(reversed(self.keypoints.data)):
                annotator.kpts(
                    k,
                    self.orig_shape,
                    radius=kpt_radius,
                    kpt_line=kpt_line,
                    kpt_color=colors(i, True) if color_mode == "instance" else None,
                )

        # Show results
        if show:
            annotator.show(self.path)

        # Save results
        if save:
            annotator.save(filename)

        return annotator.im if pil else annotator.result()
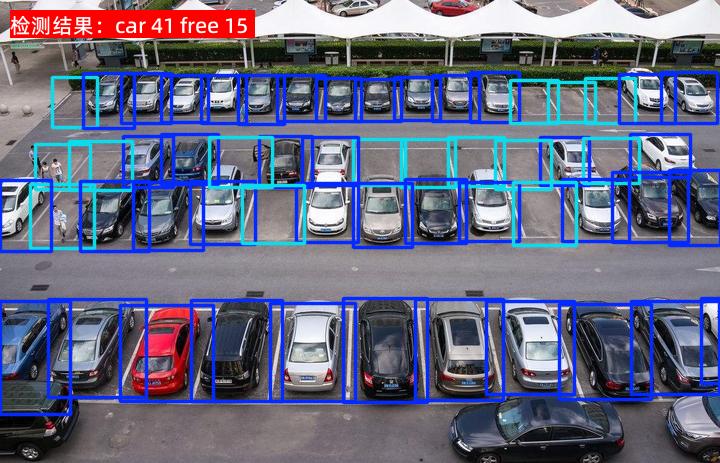
应用实例
在停车场检测应用中,可以自行定义图像叠加的内容和样式。
 results = model.predict(source=image_path, save_txt=True, save=False, exist_ok=True, imgsz=1280, conf=conf, iou=0.45,show_conf=False,show_labels=False,)

    # 初始化类别计数器(支持多图批量统计)
    class_counter = defaultdict(int)

    # 遍历每张图像的预测结果
    for result in results:
    # 跳过无检测结果的图像
        if not result.boxes:
            continue

        # 获取原始类别索引(Tensor -> numpy)
        cls_indices = result.boxes.cls.cpu().numpy().astype(int)

        # 过滤低置信度(可选,默认使用model.predict的conf参数)
        conf_mask = result.boxes.conf.cpu().numpy() > conf
        cls_indices = cls_indices[conf_mask]

        # 批量转换索引为类别名
        class_names = [model.names[idx] for idx in cls_indices]

        # 累加计数
        for name in class_names:
            class_counter[name] += 1

    res_str=''
    # 打印统计结果(按数量降序排列)
    #print("类别数量统计:")
    for cls_name, count in sorted(class_counter.items(), key=lambda x: -x[1]):
        #print(f"  {cls_name}: {count}个")
        res_str+=cls_name+' '+str(count)+' '

    #返回第一个图像的图像数组
    im_array = results[0].plot(conf=False,
                                    labels= False,
                                    txt_color=(255, 255, 255),
                                    )
    im = Image.fromarray(im_array[..., ::-1])
    annotator = Annotator(
            im,
            line_width=2,
            #font_size=20,
            font= 'AlibabaPuHuiTi-3-65-Medium.ttf',
            example='names',
        )
    annotator.text([10, 10], f'检测结果:{res_str}', txt_color=(255,0,0), box_style=True)

    #保存叠加后的图片
    if  not os.path.exists('runs/detect/predict'):
        os.makedirs('runs/detect/predict')
    new_img_path = f'runs/detect/predict/{os.path.basename(image_path)}'

    im.save(new_img_path)
在这段代码中,不使用model.predict(),使用plot()方法把边界框绘制到图像上,并且调用Annotator.text()叠加结果到图像的左上角。


 2506
2506

 被折叠的 条评论
为什么被折叠?
被折叠的 条评论
为什么被折叠?
 到【灌水乐园】发言


