


PCL结合QT5开发
前言
在上一篇PCL安装与使用 介绍PCL简单使用过程,那么想在QT5项目中使用PCL项目模块该如何做呢!
1. 安装QT5
在mac系统下使用brew安装:
brew install qt@5
在mac系统下自动安装到/usr/local/Caller下面,导出qt相关的环境变量如下:
QT_HOME=/usr/local/Cellar/qt@5/5.15.3
exportPATH=$PATH:$QT_HOME/bin
同理ubuntu下可通过apt命令来对qt5进行安装。
2. 构建环境
在上文中我们添加了PCL的基本环境,修改其CMakeLists.txt文件,填写一下内容:
cmake_minimum_required(VERSION 3.23)
project(pcl-demo)
set(CMAKE_INCLUDE_CURRENT_DIR ON)
set(CMAKE_CXX_STANDARD_REQUIRED ON)
set(CMAKE_AUTOMOC ON)
set(CMAKE_AUTORCC ON)

# 引入QT框架 保证QT可以被CMaka搜索得到
set(CMAKE_PREFIX_PATH /usr/local/Cellar/qt@5/5.15.3/lib/cmake)

# 找到包PCL,引入模块visualization,io等模块,注意visualization模块可以自动将QT包含尽量,
find_package(PCL 1.3 REQUIRED COMPONENTS common io visualization filters)
message(STATUS "PCL_DIR = ${PCL_DIR}")
message(STATUS "PCL_INCLUDE_DIRS = ${PCL_INCLUDE_DIRS}")
message(STATUS "PCL_LIBS = ${PCL_LIBRARIES}")
message(STATUS "PCL_LIBRARY_DIRS = ${PCL_LIBRARY_DIRS}")
message(STATUS "PCL_VERSION = ${PCL_VERSION}")
message(STATUS "PCL_COMPONENTS = ${PCL_COMMON_LIBRARIES}")

add_definitions(${PCL_DEFINITIONS})
link_directories(${PCL_LIBRARY_DIRS})
include_directories(${PCL_INCLUDE_DIRS})

# 引入glog 框架
find_package(glog 0.6.0 REQUIRED)

# 引入 GTest 测试框架
include_directories(gtest/include)
link_directories(lib/gtest)

include_directories(src/main src/main/qt)
# 设置库函数的版本为 C++14
set(CMAKE_CXX_STANDARD 14)
# 搜索源文件
FILE(GLOB SRC *.cpp src/test/*.cpp src/main/*.cpp src/main/qt/*.cpp)
message(File Name:"${SRC}")

add_executable(${PROJECT_NAME} ${SRC})
target_link_libraries(${PROJECT_NAME} ${PCL_LIBRARIES} libgtest.a glog::glog)
将CMakeLists.txt修改完成后,通过cmake . 命令来进行构建项目。
3. QT界面
新建pclview.ui 界面通过QT designer对页面进行一个设计。打开后可以进行组件化的设计。如图所示:
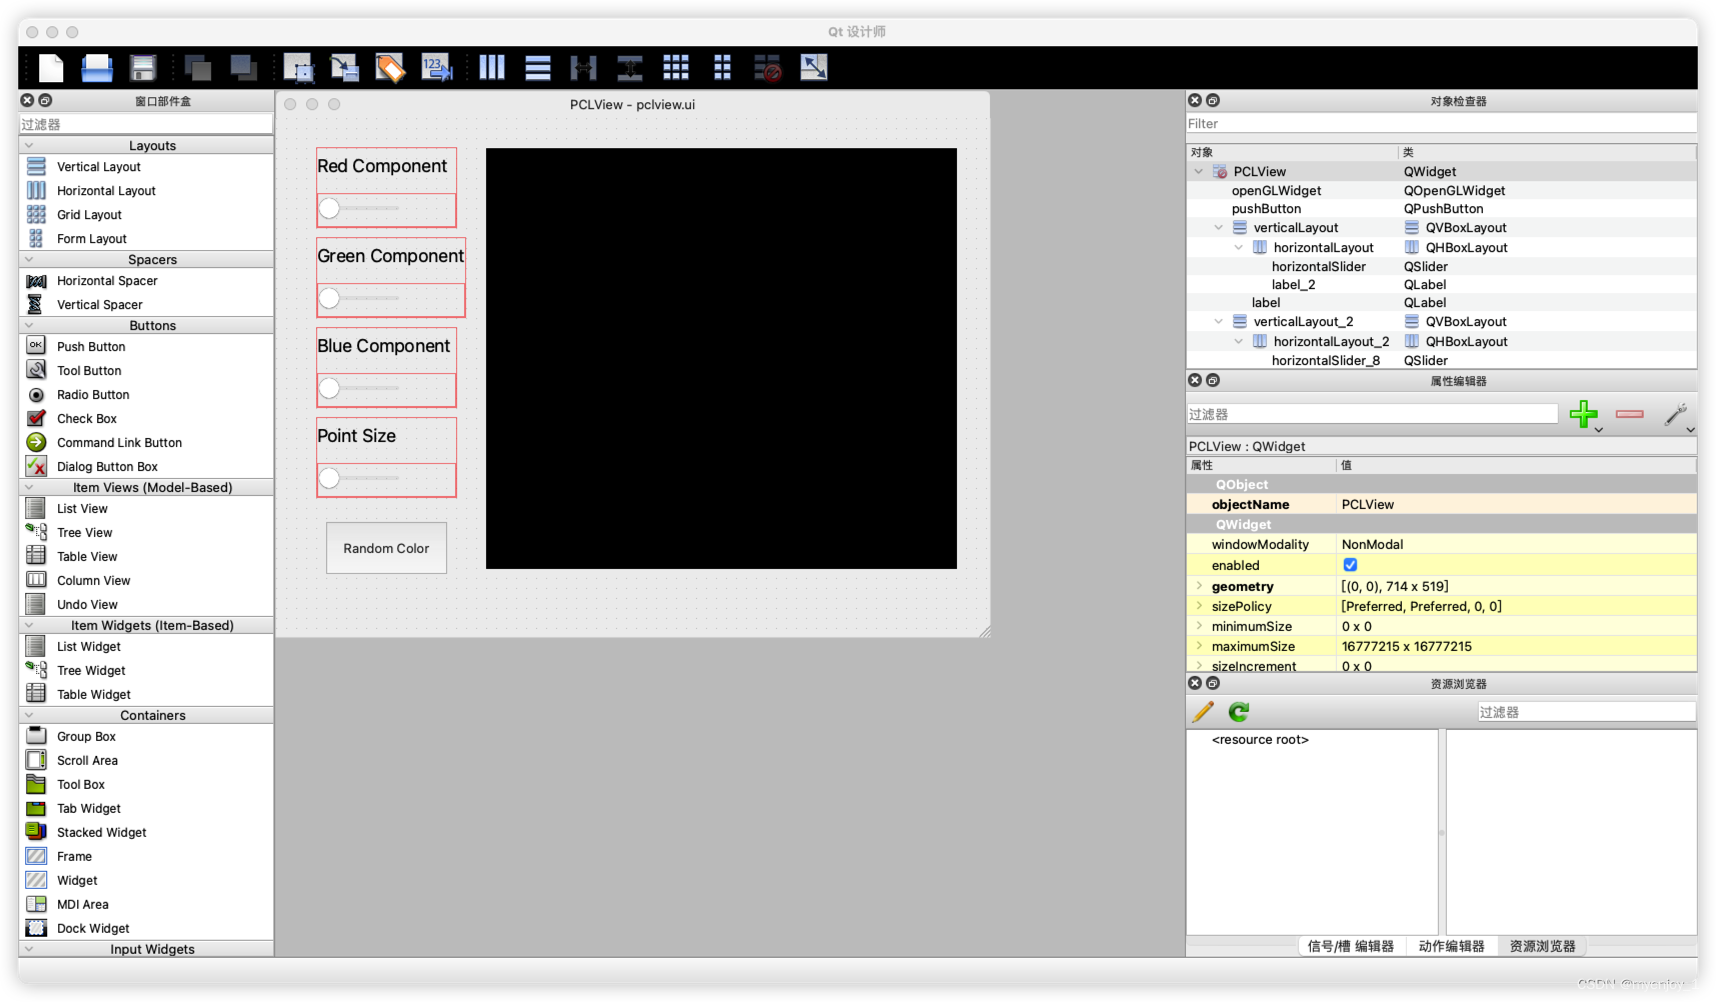
其他中间那一块是组件OpenGL Widget 组件,因为PCL也是通过OpenGL来进行绘画的。
在命令行里面执行命令:
uic pclview.ui -o PclViewer.h
其自动生成UI相关组件的代码。
4.创建界面窗口
在生成UI界面之后,我们可以通过组合的方式讲UI界面引入我们的逻辑处理中去,如下:
//
// Created by admin on 2023/1/30.
//

#ifndef PCL_DEMO_PCLVIEWER_H
#define PCL_DEMO_PCLVIEWER_H

#include <iostream>

// Qt
#include <QMainWindow>

#include <pcl/point_cloud.h>
#include <pcl/point_types.h>
#include <pcl/visualization/pcl_visualizer.h>

// Visualization Toolkit (VTK)
#include <vtkRenderWindow.h>
#include "UI_PclViewer.h"

typedef pcl::PointXYZRGBA PointT;
typedef pcl::PointCloud<PointT> PointCloudT;

namespace UI{
    class PclViewer:public QMainWindow{
    Q_OBJECT
    public:
        explicit PclViewer(QWidget * parent = nullptr);
        ~PclViewer() override;

        void refreshView();
    public Q_SLOTS:
        void randomButtonPressed();
        void loadFilePressed();

    private:
        Ui::PCLView *pclView;
        void connectSign();
    protected:
        pcl::visualization::PCLVisualizer::Ptr visualizer;
        PointCloudT ::Ptr pointCloud;
    };
}
#endif //PCL_DEMO_PCLVIEWER_H
这里我们新建了一个UI主窗口类,继承于QT的QMainWindow,因此这是个界面。然后在类中持有PointCloud的指针变量以及PCLVisualizer的指针变量,并且声明一些槽函数,用来处理一些点击事件。
以下为实现类:
//
// Created by admin on 2023/1/30.
//

#include "PclViewer.h"
#include "glog/logging.h"

#if VTK_MAJOR_VERSION > 8

#include <vtkGenericOpenGLRenderWindow.h>

#endif

#include <memory>
#include <QFileDialog>
#include <pcl/io/pcd_io.h>
#include <pcl/io/ply_io.h>
#include <pcl/filters/filter.h>


UI::PclViewer::PclViewer(QWidget *parent) : QMainWindow(parent) {
    this->pclView = new Ui::PCLView;
    pclView->setupUi(this);
    this->pointCloud = std::make_shared<PointCloudT>();

    this->pointCloud->resize(500);
    for (int i = 0; i < pointCloud->size(); ++i) {
        this->pointCloud->points[i].x = 1024 * rand() / (RAND_MAX + 1.0f);
        this->pointCloud->points[i].y = 1024* rand() /(RAND_MAX + 1.0f);
        this->pointCloud->points[i].z = 1024 * rand() / (RAND_MAX + 1.0f);
    }

#if VTK_MAJOR_VERSION > 8
    auto renderer = vtkSmartPointer<vtkRenderer>::New();
    auto renderWindow = vtkSmartPointer<vtkGenericOpenGLRenderWindow>::New();
    renderWindow->AddRenderer(renderer);
    this->visualizer = std::make_shared<pcl::visualization::PCLVisualizer>(renderer, renderWindow, "view", false);
    this->pclView->openGLWidget->setRenderWindow(this->visualizer->getRenderWindow());
    this->visualizer->setupInteractor(this->pclView->openGLWidget->interactor(), pclView->openGLWidget->renderWindow());
#else
    this->visualizer = std::make_shared<pcl::visualization::PCLVisualizer>("view",false);
    this->pclView->openGLWidget->setRenderWindow(this->visualizer->getRenderWindow());
    this->visualizer->setupInteractor(this->pclView->openGLWidget->interactor(),pclView->openGLWidget->renderWindow());
#endif
    pclView->openGLWidget->update();
    visualizer->addPointCloud(this->pointCloud);
    visualizer->resetCamera();
    this->connectSign();
    refreshView();
}

UI::PclViewer::~PclViewer() {
    delete this->pclView;
}

void UI::PclViewer::randomButtonPressed() {
    LOG(INFO) << "start click button";
}


void UI::PclViewer::connectSign() {
    connect(this->pclView->pushButton, SIGNAL(clicked(bool)), this, SLOT(randomButtonPressed()));
    connect(this->pclView->loadFileBtn, SIGNAL(clicked(bool)), this, SLOT(loadFilePressed()));

}

void UI::PclViewer::loadFilePressed() {
    QString filename = QFileDialog::getOpenFileName(this, tr("Open point cloud"), "/home/",
                                                    tr("Point cloud data (*.pcd *.ply)"));
    PCL_INFO("File chosen: %s\n", filename.toStdString().c_str());

    PointCloudT::Ptr cloud(new PointCloudT);
    if (filename.isEmpty()) return;

    int status = 0;
    if (filename.endsWith(".pcd", Qt::CaseInsensitive))
        status = pcl::io::loadPCDFile(filename.toStdString(), *cloud);
    else
        status = pcl::io::loadPLYFile(filename.toStdString(), *cloud);

    if (status != 0) {
        LOG(ERROR) << "Error reading point cloud";
        return;
    }

    if (cloud->is_dense) {
        pcl::copyPointCloud(*cloud, *this->pointCloud);
    } else {
        PCL_WARN("Cloud is not dense! Non finite points will be removed\n");
        std::vector<int> vec;
        pcl::removeNaNFromPointCloud(*cloud, *pointCloud, vec);
    }

    this->visualizer->updatePointCloud(this->pointCloud);
    this->visualizer->resetCamera();
    refreshView();
}

void UI::PclViewer::refreshView() {
#if VTK_MAJOR_VERSION > 8
    this->pclView->openGLWidget->renderWindow()->Render();
#else
    this->pclView->openGLWidget->update();
#endif
}
上述实现先将本类的指针进行初始话,由于VTK 8以上和VTK8以下的API的变动有些大,所以这里采用条件编译的方式,来区分VTK8的版本大小。
5.编译运行
在完成页面类后,按照一般QT程序的逻辑,将本界面引入到main函数里面,如下:
#include <pcl/common/io.h>
#include <pcl/io/pcd_io.h>
#include <pcl/visualization/cloud_viewer.h>

#include "PclViewer.h"
#include "QApplication"

int main(int argc, char **argv) {
    QSurfaceFormat::setDefaultFormat(QVTKOpenGLStereoWidget::defaultFormat());
    QApplication app(argc,argv);
    UI::PclViewer pclViewer;
    pclViewer.show();
    return QApplication::exec();
}
之后就是编译运行了,通过cmake,以及make命令来编译该项目。其运行为如下:
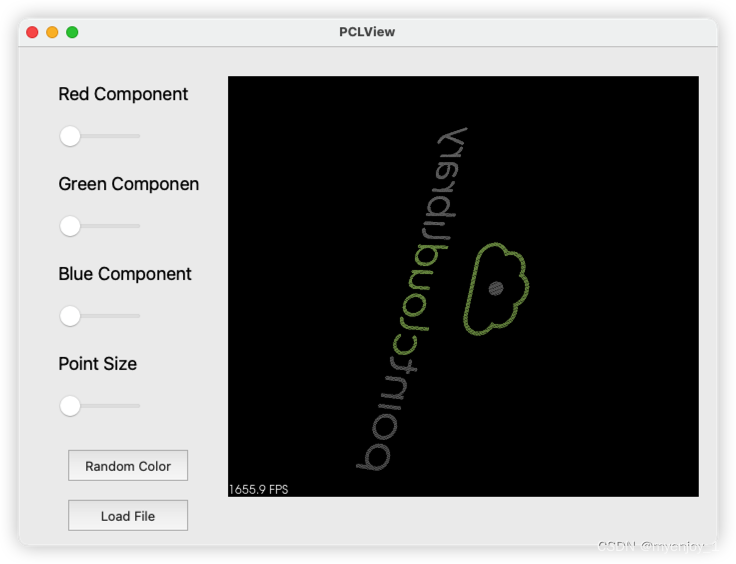
通过Load File按钮可以加载相关点云数据。


 2169
2169


 被折叠的 条评论
为什么被折叠?
被折叠的 条评论
为什么被折叠?
 到【灌水乐园】发言


