


DMA直接存储器存取
DMA简介
- DMA(Direct Memory Access) 直接存储器存取
- DMA可以提供外设和存储器或者存储器和存储器之间的高速数据传输, 无须CPU干涉, 节省了CPU的资源
- 12个独立可配置的通道: DAM1(7个通道), DAM2(5个通道)
- 每个通道都支持软件触发和特定的硬件触发
- STM32F103C8T6 DMA资源: DMA1(7个通道)
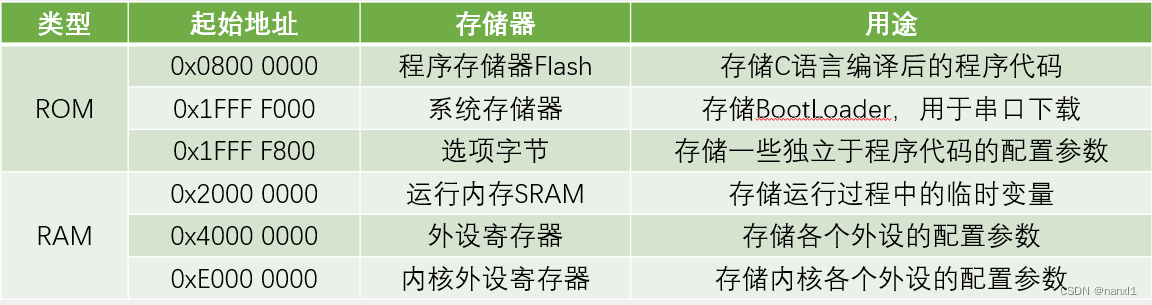
存储器映像
DMA框图
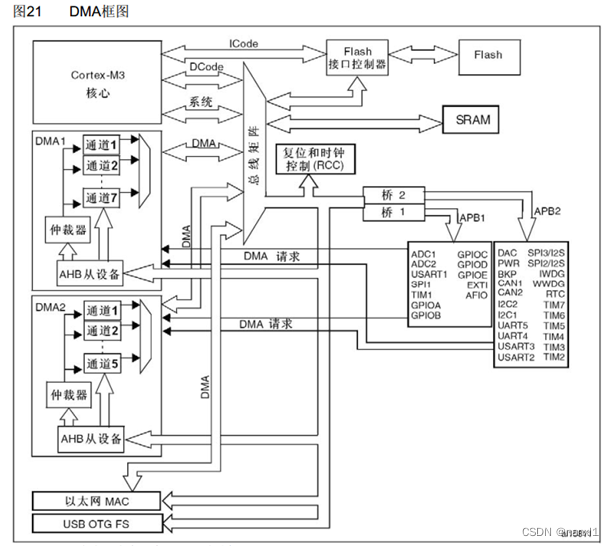
- CPU通过AHB对DMA进行配置
- DMA与CPU同时读取时, 会切断CPU的读取, 但会保留一半的带宽
- Flash存储器, 只能读, 不能写, DMA的数据的目标地址不能是Flash的地址
- DMA可以将数据从外设搬运到存储器
- DMA可以将数据从存储器搬运到存储器
DMA基本结构
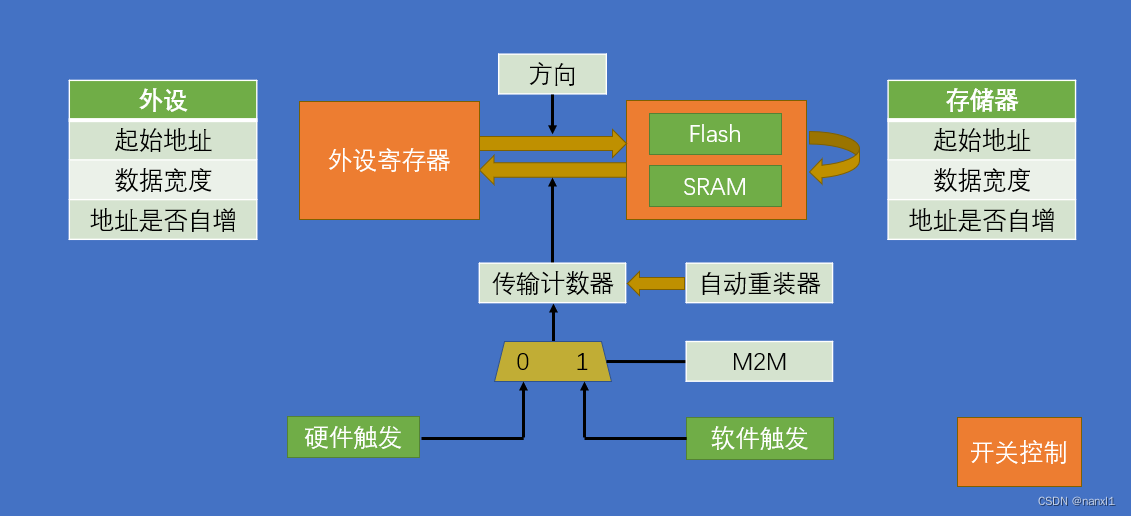
- DMA完成一次数据搬运后, 传输计数器中的值会减1, 若设置了自动重装器, 则计数器到0后会重装
- M2M配置是硬件触发还是软件触发
- 数据的搬运方向可以通过寄存器控制
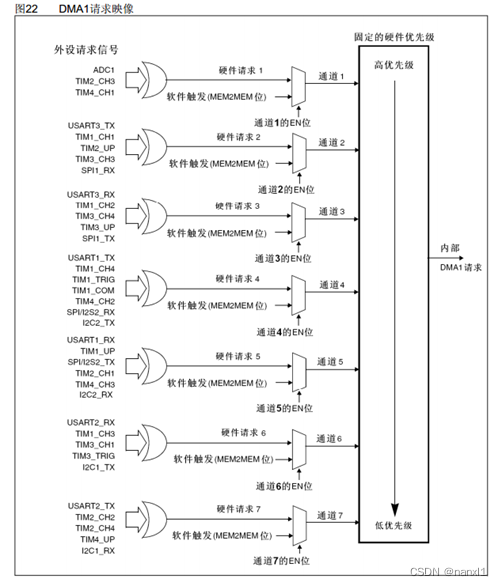
DMA请求
数据宽度与对齐
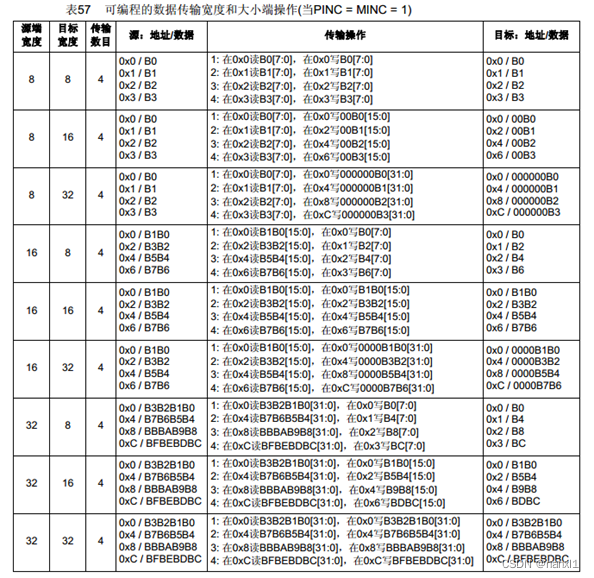
- 数据宽度有 字、半字、字节,分别是32位、16位和8位, 对应uint32_t、uint16_t和uint8_t
- 数据位比数据宽度少会高位补零
- 数据位比数据宽度多会丢弃高位
案例1: DMA数据转运
配置DMA
#include "stm32f10x.h"

uint16_t MyDMA_Size;

void MyDMA_Init(uint32_t MemoryBaseAddr, uint32_t PeripheralBaseAddr, uint16_t Size)
{
	// RCC使能时钟
	RCC_AHBPeriphClockCmd(RCC_AHBPeriph_DMA1, ENABLE);
	MyDMA_Size = Size;
	// 配置DMA
	DMA_InitTypeDef DMA_InitStructure;
	DMA_InitStructure.DMA_BufferSize=Size;  // 缓冲区大小, 传输计数器的值
	DMA_InitStructure.DMA_DIR=DMA_DIR_PeripheralDST;  // 传输方向
	DMA_InitStructure.DMA_M2M=DMA_M2M_Enable;  // 软件触发或硬件触发
	DMA_InitStructure.DMA_MemoryBaseAddr=MemoryBaseAddr;  // 存储器基地址
	DMA_InitStructure.DMA_MemoryDataSize=DMA_MemoryDataSize_HalfWord;  // 存储器传输数据大小
	DMA_InitStructure.DMA_MemoryInc=DMA_MemoryInc_Enable;  // 配置存储器地址是否自增
	DMA_InitStructure.DMA_Mode=DMA_Mode_Normal;  // 配置是否自动重装
	DMA_InitStructure.DMA_PeripheralBaseAddr=PeripheralBaseAddr;  // 外设基地址
	DMA_InitStructure.DMA_PeripheralDataSize=DMA_PeripheralDataSize_HalfWord;  // 外设传输数据大小
	DMA_InitStructure.DMA_PeripheralInc=DMA_PeripheralInc_Enable;  // 配置外设地址是否自增
	DMA_InitStructure.DMA_Priority=DMA_Priority_Low;  // 优先级
	DMA_Init(DMA1_Channel1, &DMA_InitStructure);

	DMA_Cmd(DMA1_Channel1, DISABLE);  // 先关闭
}
DMA_BufferSize
缓冲区大小, 即传输计数器的值, 可选的值为0~65535
uint32_t DMA_BufferSize;         /*!< Specifies the buffer size, in data unit, of the specified Channel.
                                        The data unit is equal to the configuration set in DMA_PeripheralDataSize
                                        or DMA_MemoryDataSize members depending in the transfer direction. */
DMA_DIR
该参数用来配置DMA运输方向, 是从站点A(Memory)到站点B(Periph)还是站点B到站点A, 位置是相对的
 uint32_t DMA_DIR;                /*!< Specifies if the peripheral is the source or destination.
                                        This parameter can be a value of @ref DMA_data_transfer_direction */
/** @defgroup DMA_data_transfer_direction
  * @{
  */

#define DMA_DIR_PeripheralDST              ((uint32_t)0x00000010)
#define DMA_DIR_PeripheralSRC              ((uint32_t)0x00000000)
DMA_M2M
其实配置的是软件触发还是硬件触发
uint32_t DMA_M2M;                /*!< Specifies if the DMAy Channelx will be used in memory-to-memory transfer.
                                        This parameter can be a value of @ref DMA_memory_to_memory */
/** @defgroup DMA_memory_to_memory
  * @{
  */

#define DMA_M2M_Enable                     ((uint32_t)0x00004000)
#define DMA_M2M_Disable                    ((uint32_t)0x00000000)
DMA_MemoryBaseAddr
存储器基地址
传入(uint32_t)(地址)
DMA_MemoryDataSize
存储器传输数据大小
uint32_t DMA_MemoryDataSize;     /*!< Specifies the Memory data width.
                                        This parameter can be a value of @ref DMA_memory_data_size */
/** @defgroup DMA_memory_data_size
  * @{
  */

#define DMA_MemoryDataSize_Byte            ((uint32_t)0x00000000)
#define DMA_MemoryDataSize_HalfWord        ((uint32_t)0x00000400)
#define DMA_MemoryDataSize_Word            ((uint32_t)0x00000800)
DMA_MemoryInc
配置存储器地址是否自增
uint32_t DMA_MemoryInc;          /*!< Specifies whether the memory address register is incremented or not.
                                        This parameter can be a value of @ref DMA_memory_incremented_mode */
/** @defgroup DMA_memory_incremented_mode
  * @{
  */

#define DMA_MemoryInc_Enable               ((uint32_t)0x00000080)
#define DMA_MemoryInc_Disable              ((uint32_t)0x00000000)
DMA_Mode
实际上配置的是自动重装器
uint32_t DMA_Mode;               /*!< Specifies the operation mode of the DMAy Channelx.
                                        This parameter can be a value of @ref DMA_circular_normal_mode.
                                        @note: The circular buffer mode cannot be used if the memory-to-memory
                                              data transfer is configured on the selected Channel */
/** @defgroup DMA_circular_normal_mode
  * @{
  */

#define DMA_Mode_Circular                  ((uint32_t)0x00000020)
#define DMA_Mode_Normal                    ((uint32_t)0x00000000)
DMA_PeripheralBaseAddr
外设基地址
传入(uint32_t)(地址)
DMA_PeripheralDataSize
外设传输数据大小
uint32_t DMA_PeripheralDataSize; /*!< Specifies the Peripheral data width.
                                        This parameter can be a value of @ref DMA_peripheral_data_size */
/** @defgroup DMA_peripheral_data_size
  * @{
  */

#define DMA_PeripheralDataSize_Byte        ((uint32_t)0x00000000)
#define DMA_PeripheralDataSize_HalfWord    ((uint32_t)0x00000100)
#define DMA_PeripheralDataSize_Word        ((uint32_t)0x00000200)
DMA_PeripheralInc
uint32_t DMA_PeripheralInc;      /*!< Specifies whether the Peripheral address register is incremented or not.
                                        This parameter can be a value of @ref DMA_peripheral_incremented_mode */
/** @defgroup DMA_peripheral_incremented_mode
  * @{
  */

#define DMA_PeripheralInc_Enable           ((uint32_t)0x00000040)
#define DMA_PeripheralInc_Disable          ((uint32_t)0x00000000)
配置外设地址是否自增
DMA_Priority
优先级
uint32_t DMA_Priority;           /*!< Specifies the software priority for the DMAy Channelx.
                                        This parameter can be a value of @ref DMA_priority_level */
/** @defgroup DMA_priority_level
  * @{
  */

#define DMA_Priority_VeryHigh              ((uint32_t)0x00003000)
#define DMA_Priority_High                  ((uint32_t)0x00002000)
#define DMA_Priority_Medium                ((uint32_t)0x00001000)
#define DMA_Priority_Low                   ((uint32_t)0x00000000)
整体代码
MyDMA.c
#include "stm32f10x.h"

uint16_t MyDMA_Size;

void MyDMA_Init(uint32_t MemoryBaseAddr, uint32_t PeripheralBaseAddr, uint16_t Size)
{
	// RCC使能时钟
	RCC_AHBPeriphClockCmd(RCC_AHBPeriph_DMA1, ENABLE);
	MyDMA_Size = Size;
	// 配置DMA
	DMA_InitTypeDef DMA_InitStructure;
	DMA_InitStructure.DMA_BufferSize=Size;  // 缓冲区大小, 传输计数器的值
	DMA_InitStructure.DMA_DIR=DMA_DIR_PeripheralDST;  // 传输方向
	DMA_InitStructure.DMA_M2M=DMA_M2M_Enable;  // 软件触发或硬件触发
	DMA_InitStructure.DMA_MemoryBaseAddr=MemoryBaseAddr;  // 存储器基地址
	DMA_InitStructure.DMA_MemoryDataSize=DMA_MemoryDataSize_HalfWord;  // 存储器传输数据大小
	DMA_InitStructure.DMA_MemoryInc=DMA_MemoryInc_Enable;  // 配置存储器地址是否自增
	DMA_InitStructure.DMA_Mode=DMA_Mode_Normal;  // 配置是否自动重装
	DMA_InitStructure.DMA_PeripheralBaseAddr=PeripheralBaseAddr;  // 外设基地址
	DMA_InitStructure.DMA_PeripheralDataSize=DMA_PeripheralDataSize_HalfWord;  // 外设传输数据大小
	DMA_InitStructure.DMA_PeripheralInc=DMA_PeripheralInc_Enable;  // 配置外设地址是否自增
	DMA_InitStructure.DMA_Priority=DMA_Priority_Low;  // 优先级
	DMA_Init(DMA1_Channel1, &DMA_InitStructure);

	DMA_Cmd(DMA1_Channel1, DISABLE);  // 先关闭
}

/*
调用转运一次数据
*/
void Data_Transfer(void)
{
	DMA_Cmd(DMA1_Channel1, DISABLE);
	DMA_SetCurrDataCounter(DMA1_Channel1, MyDMA_Size);
	DMA_Cmd(DMA1_Channel1, ENABLE);  // 开始转运

	while (DMA_GetFlagStatus(DMA1_FLAG_TC1) == RESET);  // 等待转运完成
	DMA_ClearFlag(DMA1_FLAG_TC1);  // 清除完成标志
}
main.c
#include "stm32f10x.h"
#include "delay.h"
#include "OLED.h"
#include "MyDMA.h"
uint16_t arrA[8] = {0x01, 0x02, 0x03, 0x04, 0x05, 0x06, 0x07, 0x08};
uint16_t arrB[8] = {0, 0, 0, 0, 0, 0, 0, 0};
// DMA数据转运 将数据从数组A转运到数组B
// 2023年3月26日13:38:02
int main(void)
{
	OLED_Init();
	MyDMA_Init((uint32_t)arrA, (uint32_t)arrB, 8);

	while(1)
	{
		// arrA
		OLED_ShowHexNum(1, 1, arrA[0], 2);
		OLED_ShowHexNum(1, 4, arrA[1], 2);
		OLED_ShowHexNum(1, 7, arrA[2], 2);
		OLED_ShowHexNum(1, 10,arrA[3], 2);
		Delay_ms(1000);
		OLED_ShowHexNum(2, 1, arrA[4], 2);
		OLED_ShowHexNum(2, 4, arrA[5], 2);
		OLED_ShowHexNum(2, 7, arrA[6], 2);
		OLED_ShowHexNum(2, 10,arrA[7], 2);
		Delay_ms(1000);
		// arrB[:4]
		Data_Transfer();
		OLED_ShowHexNum(3, 1, arrB[0], 2);
		OLED_ShowHexNum(3, 4, arrB[1], 2);
		OLED_ShowHexNum(3, 7, arrB[2], 2);
		OLED_ShowHexNum(3, 10,arrB[3], 2);
		Delay_ms(1000);
		// arrB[:4]
		OLED_ShowHexNum(4, 1, arrB[4], 2);
		OLED_ShowHexNum(4, 4, arrB[5], 2);
		OLED_ShowHexNum(4, 7, arrB[6], 2);
		OLED_ShowHexNum(4, 10,arrB[7], 2);
		// CPU搬运
		arrA[0] = arrB[5];
		arrA[1] = arrB[7];
		arrA[2] = arrB[3];
		arrA[3] = arrB[4];
		arrA[4] = arrB[2];
		arrA[5] = arrB[0];
		arrA[6] = arrB[1];
		arrA[7] = arrB[6];
	}
}
案例2: DMA+ADC多通道
整体代码:
ADC.c
#include "stm32f10x.h"
uint16_t AD_Value[4];
/*
初始化ADC
*/
void AD_Init(void)
{
	// RCC使能时钟
	RCC_APB2PeriphClockCmd(RCC_APB2Periph_GPIOA, ENABLE);
	RCC_APB2PeriphClockCmd(RCC_APB2Periph_ADC1, ENABLE);
	RCC_AHBPeriphClockCmd(RCC_AHBPeriph_DMA1, ENABLE);

	RCC_ADCCLKConfig(RCC_PCLK2_Div6);  // 12MHz
	// 配置GPIO口
	GPIO_InitTypeDef GPIO_InitStructure;
	GPIO_InitStructure.GPIO_Mode = GPIO_Mode_AIN;
	GPIO_InitStructure.GPIO_Speed = GPIO_Speed_50MHz;
	GPIO_InitStructure.GPIO_Pin = GPIO_Pin_0 | GPIO_Pin_1 | GPIO_Pin_2 | GPIO_Pin_3;
	GPIO_Init(GPIOA, &GPIO_InitStructure);
	// 配置规则通道
	ADC_RegularChannelConfig(ADC1, ADC_Channel_0, 1, ADC_SampleTime_55Cycles5);
	ADC_RegularChannelConfig(ADC1, ADC_Channel_1, 2, ADC_SampleTime_55Cycles5);
	ADC_RegularChannelConfig(ADC1, ADC_Channel_2, 3, ADC_SampleTime_55Cycles5);
	ADC_RegularChannelConfig(ADC1, ADC_Channel_3, 4, ADC_SampleTime_55Cycles5);
	// 配置ADC转换器
	ADC_InitTypeDef ADC_InitStructure;
	ADC_InitStructure.ADC_ContinuousConvMode = ENABLE;  // 单次转换或者连续转换
	ADC_InitStructure.ADC_DataAlign = ADC_DataAlign_Right;  // 数据对齐模式
	ADC_InitStructure.ADC_Mode = ADC_Mode_Independent;  // ADC模式, 单独还是交叉
	ADC_InitStructure.ADC_NbrOfChannel = 4;  // 扫描的通道数
	ADC_InitStructure.ADC_ScanConvMode = ENABLE;  // 扫描模式或者非扫描模式
	ADC_InitStructure.ADC_ExternalTrigConv = ADC_ExternalTrigConv_None;  // 触发控制 软件触发
	ADC_Init(ADC1, &ADC_InitStructure);

	// 配置DMA
	DMA_InitTypeDef DMA_InitStructure;
	DMA_InitStructure.DMA_PeripheralBaseAddr = (uint32_t)&ADC1->DR; // ADC的数据寄存器
	DMA_InitStructure.DMA_PeripheralDataSize = DMA_PeripheralDataSize_HalfWord;
	// 地址非自增, ADC可以理解为上菜的桌子只有一个
	DMA_InitStructure.DMA_PeripheralInc = DMA_PeripheralInc_Disable;
	DMA_InitStructure.DMA_MemoryBaseAddr = (uint32_t)AD_Value;  // 保存的地址
	DMA_InitStructure.DMA_MemoryDataSize = DMA_MemoryDataSize_HalfWord;
	DMA_InitStructure.DMA_MemoryInc = DMA_MemoryInc_Enable;  // 这里要自增
	DMA_InitStructure.DMA_DIR = DMA_DIR_PeripheralSRC;  // 转运方向
	DMA_InitStructure.DMA_BufferSize = 4;
	DMA_InitStructure.DMA_Mode = DMA_Mode_Circular;  // 自动重装
	DMA_InitStructure.DMA_M2M = DMA_M2M_Disable;	 // 硬件触发
	DMA_InitStructure.DMA_Priority = DMA_Priority_Medium;
	DMA_Init(DMA1_Channel1, &DMA_InitStructure);
	// 开启DMA
	DMA_Cmd(DMA1_Channel1, ENABLE);
	// 开启DMA搬运
	ADC_DMACmd(ADC1, ENABLE);
	// 开启ADC功能
	ADC_Cmd(ADC1, ENABLE);

	// ADC校准
	ADC_ResetCalibration(ADC1);
	while(ADC_GetResetCalibrationStatus(ADC1) == SET);  // 已初始化为零
	ADC_StartCalibration(ADC1);
	while (ADC_GetCalibrationStatus(ADC1) == SET);

	ADC_SoftwareStartConvCmd(ADC1, ENABLE);
}
ADC用多次转换+扫描模式, 用ADC_DMACmd()使ADC在转换完成后自动请求DMA搬运数据
配置DMA的方法与之前类似
不要忘记RCC使能DMA时钟以及调用DMA_Cmd(), 开启DMA
最后用软件触发开启ADC
main.c
#include "stm32f10x.h"
#include "delay.h"
#include "OLED.h"
#include "ADC.h"
// DMA+ADC多通道
// 2023年3月26日15:28:49

int main(void)
{
	OLED_Init();
	AD_Init();
	OLED_ShowString(1, 1, "AD0:");
	OLED_ShowString(2, 1, "AD1:");
	OLED_ShowString(3, 1, "AD2:");
	OLED_ShowString(4, 1, "AD3:");
	while(1)
	{
		OLED_ShowNum(1, 5, AD_Value[0], 4);
		OLED_ShowNum(2, 5, AD_Value[1], 4);
		OLED_ShowNum(3, 5, AD_Value[2], 4);
		OLED_ShowNum(4, 5, AD_Value[3], 4);

		Delay_ms(100);
	}
}
参考资料
【STM32入门教程-2023持续更新中】 https://www.bilibili.com/video/BV1th411z7sn/?p=24&share_source=copy_web&vd_source=ee06a25b3dfb2900ab707b01fdff6667


 1008
1008


 被折叠的 条评论
为什么被折叠?
被折叠的 条评论
为什么被折叠?
 到【灌水乐园】发言


