转载自:http://blog.csdn.net/csxiaoshui/article/details/51517203
简介
osgcamera这个示例向我们展示了在osg中如何使用多个相机和多个视口的方法,例子中提供了多窗口多相机以及窗口多相机的方式。
- case(osgGA::GUIEventAdapter::KEYUP):
- {
- if (ea.getKey()=='l')
- {
- osg::ref_ptr<osg::Node> model = osgDB::readNodeFile( _filenames[_position] );
- ++_position;
- if (_position>=_filenames.size()) _position = 0;
- if (model.valid())
- {
- viewer->setSceneData(model.get());
- }
- return true;
- }
- }
            case(osgGA::GUIEventAdapter::KEYUP):
            {
                if (ea.getKey()=='l')
                {
                    osg::ref_ptr<osg::Node> model = osgDB::readNodeFile( _filenames[_position] );
                    ++_position;
                    if (_position>=_filenames.size()) _position = 0;

                    if (model.valid())
                    {
                        viewer->setSceneData(model.get());
                    }

                    return true;
                }
            }
本例中还定义了EnableVBOVisitor这个访问器,它的主要作用是设置场景中Drawable(具体来说是Geometry几何体)的绘制方式是VBO的模式,关于VBO的一些介绍可以参考我的另一篇文章
《VA、VAO和VBO API备忘》 EnableVBOVisitor仅仅是将OSG默认的几何体绘制方式由显示列表修改为VBO的方式,并不是本例的核心内容。
本例中最关键的两个函数是singleWindowMultipleCameras和multipleWindowMultipleCameras,这两个函数分别实现了单窗口多相机和多窗口多相机的模式,下面我们详细看一下它们的实现:
在singleWindowMultipleCameras函数中,首先获取了当前使用的显示器的分辨率,据此创建了一个用来渲染场景的GraphicContext(其实就是渲染的窗口),之后创建了2个相机,并设置它们的视口大小,将相机设置为Slave相机。代码并不复杂,但是其中设置的内容可以细说一下。
- void singleWindowMultipleCameras(osgViewer::Viewer& viewer)
- {
- //获取屏幕分辨率
- osg::GraphicsContext::WindowingSystemInterface* wsi = osg::GraphicsContext::getWindowingSystemInterface();
- if (!wsi)
- {
- osg::notify(osg::NOTICE)<<"Error, no WindowSystemInterface available, cannot create windows."<<std::endl;
- return;
- }
- unsigned int width, height;
- wsi->getScreenResolution(osg::GraphicsContext::ScreenIdentifier(0), width, height);
- //创建渲染窗口
- osg::ref_ptr<osg::GraphicsContext::Traits> traits = new osg::GraphicsContext::Traits;
- traits->x = 0;
- traits->y = 0;
- traits->width = width;
- traits->height = height;
- traits->windowDecoration = true;
- traits->doubleBuffer = true;
- traits->sharedContext = 0;
- osg::ref_ptr<osg::GraphicsContext> gc = osg::GraphicsContext::createGraphicsContext(traits.get());
- if (gc.valid())
- {
- gc->setClearColor(osg::Vec4f(0.2f,0.2f,0.6f,1.0f));
- gc->setClearMask(GL_COLOR_BUFFER_BIT | GL_DEPTH_BUFFER_BIT);
- }
- else
- {
- osg::notify(osg::NOTICE)<<" GraphicsWindow has not been created successfully."<<std::endl;
- }
- unsigned int numCameras = 2;
- double aspectRatioScale = 1.0;
- //创建两个相机并添加到Viewer的Slave中
- for(unsigned int i=0; i<numCameras;++i)
- {
- osg::ref_ptr<osg::Camera> camera = new osg::Camera;
- camera->setGraphicsContext(gc.get());
- camera->setViewport(new osg::Viewport((i*width)/numCameras,(i*height)/numCameras, width/numCameras, height/numCameras));
- GLenum buffer = traits->doubleBuffer ? GL_BACK : GL_FRONT;
- camera->setDrawBuffer(buffer);
- camera->setReadBuffer(buffer);
- viewer.addSlave(camera.get(), osg::Matrixd(), osg::Matrixd::scale(aspectRatioScale,1.0,1.0));
- }
- }
void singleWindowMultipleCameras(osgViewer::Viewer& viewer)
{
	//获取屏幕分辨率
    osg::GraphicsContext::WindowingSystemInterface* wsi = osg::GraphicsContext::getWindowingSystemInterface();
    if (!wsi)
    {
        osg::notify(osg::NOTICE)<<"Error, no WindowSystemInterface available, cannot create windows."<<std::endl;
        return;
    }

    unsigned int width, height;
    wsi->getScreenResolution(osg::GraphicsContext::ScreenIdentifier(0), width, height);

	//创建渲染窗口
    osg::ref_ptr<osg::GraphicsContext::Traits> traits = new osg::GraphicsContext::Traits;
    traits->x = 0;
    traits->y = 0;
    traits->width = width;
    traits->height = height;
    traits->windowDecoration = true;
    traits->doubleBuffer = true;
    traits->sharedContext = 0;

    osg::ref_ptr<osg::GraphicsContext> gc = osg::GraphicsContext::createGraphicsContext(traits.get());
    if (gc.valid())
    {
        gc->setClearColor(osg::Vec4f(0.2f,0.2f,0.6f,1.0f));
        gc->setClearMask(GL_COLOR_BUFFER_BIT | GL_DEPTH_BUFFER_BIT);
    }
    else
    {
        osg::notify(osg::NOTICE)<<"  GraphicsWindow has not been created successfully."<<std::endl;
    }

    unsigned int numCameras = 2;
    double aspectRatioScale = 1.0;
	//创建两个相机并添加到Viewer的Slave中
    for(unsigned int i=0; i<numCameras;++i)
    {
        osg::ref_ptr<osg::Camera> camera = new osg::Camera;
        camera->setGraphicsContext(gc.get());
        camera->setViewport(new osg::Viewport((i*width)/numCameras,(i*height)/numCameras, width/numCameras, height/numCameras));
		GLenum buffer = traits->doubleBuffer ? GL_BACK : GL_FRONT;
		camera->setDrawBuffer(buffer);
		camera->setReadBuffer(buffer);

        viewer.addSlave(camera.get(), osg::Matrixd(), osg::Matrixd::scale(aspectRatioScale,1.0,1.0));
    }
}
在OSG中场景要想被渲染出来,它必须位于一个Camera节点之下,当我们使用osgViewer::Viewer调用
- viewer->setSceneData(node);
viewer->setSceneData(node);
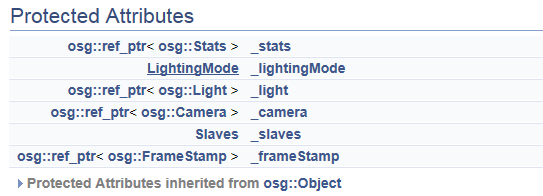
可以知道osgViewer::Viewer中除了包含主相机_camera之外,还包含了一个从相机的数组_slaves。事实上我们可以设置将场景添加到主相机或者从相机之中,它们都可以被渲染出来,这两者其实并没有什么本质上的不同,上文中的代码实际上并没有设置主相机,也就是说两个视口里面渲染的场景都来自于从相机。
在添加从相机时使用了下面的函数:
- bool addSlave (osg::Camera *camera, const osg::Matrix &projectionOffset, const osg::Matrix &viewOffset, bool useMastersSceneData=true)
bool addSlave (osg::Camera *camera, const osg::Matrix &projectionOffset, const osg::Matrix &viewOffset, bool useMastersSceneData=true)
下面我们接着看multipleWindowMultipleCameras的实现,这个函数包含两个参数:
- void multipleWindowMultipleCameras(osgViewer::Viewer& viewer, bool multipleScreens)
void multipleWindowMultipleCameras(osgViewer::Viewer& viewer, bool multipleScreens)
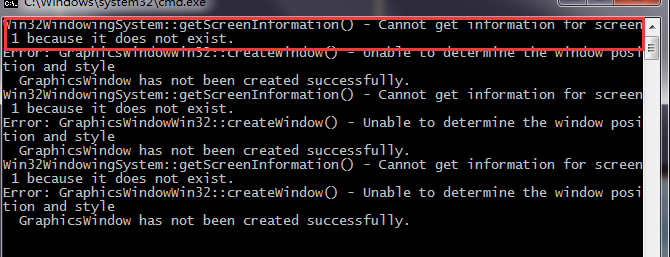
我自己的电脑只有一块显示屏,当我运行osgcamera的例子并使用命令行参数 -3时(也就是multipleScreens=true),得到的效果如下图所示,只有3个窗口,并且给出如下的输出结果:


可以知道另外3个窗口理应出现在第二块显示屏上,但是由于没有第二块显示屏幕,给出了出错的信息。


 6829
6829

 被折叠的 条评论
为什么被折叠?


