


本小节主要理解CEF的多进程模型,为后面的JavaScript与C++ 通信做一些知识储备,顺便再次梳理一下CEF的启动流程。
1.任务管理器观察多进程
CEF基于Chromium,是多进程模型。怎么理解多进程?启动一个Chrome浏览器,多打开几个网站,然后再打开资源管理器查看Chrome的进程,现在对任务管理器做一些调整,目的是查看每个进程所启动的命令行以及命令行所携带的参数。如下图:勾选 “PID”和“命令行”

此时可以看到Chrome浏览器开启的进程:

可以看到Chrome浏览器启动了多个进程,2852 这个进程的命令行后面并没有携带任何其它参数,它就是browser进程 ,而其它进程如 4296 这个进程携带了 --type=renderer ... 多个参数,它是 render进程
打开CEF的自带的cefsimple 应用也能看到多个进程的存在。那么这些进程是怎么启动的?都有哪些作用?
2.Chromium的进程分类
- browser 没有type参数时默认为browser进程
- renderer 渲染进程
- plugin 插件进程
- ppapi-broker
- ppapi
- sandbox-ipc
- utility
- zygote
- gpu-process
这里我们必须要理解的是 browser 进程 和 render进程
browser进程: 处理窗口创建、窗口绘制、网络交互以及大部分的主要逻辑。browser进程通常就是宿主进程。
render进程: 每个页面都是运行在自己的进程里,这些进程我们称之为render进程。render进程会在窗口中渲染出web页面(引用了CSS,JavaScript,图片等的HTML文件)。
需要注意的是,browser 进程中会进行窗口绘制,并不是指绘制HTML内容,而是承载网页内容的那个窗体壳,同样render进程也不是用来创建窗体的进程。
3.进程怎么启动
查看sefsimple示例程序的入口函数:
// ...其它省略
int exit_code = CefExecuteProcess(main_args, nullptr, sandbox_info);
  if (exit_code >= 0) {
    return exit_code;
}
// ...其它省略
CefRefPtr<CefCommandLine> command_line = CefCommandLine::CreateCommandLine();
command_line->InitFromString(::GetCommandLineW());
CefSettings settings;
settings.no_sandbox = true;
CefRefPtr<SimpleApp> app(new SimpleApp);
// 初始化CEF
CefInitialize(main_args, settings, app.get(), sandbox_info);
// 开启消息循环
CefRunMessageLoop();
// 释放CEF
 CefShutdown();
// ...其它省略
创建进程是用 CefExecuteProcess 函数创建的。这个函数在 libcef_dll_wrapper.cc 中,它内部又调用了cef_execute_process方法(libcef_dll.cc),cef_execute_process又调用了libcef/browser/context.cc文件内实现的CefExecuteProcess方法。源码中有这样一句代码:
int CefExecuteProcess(const CefMainArgs& args,
                      CefRefPtr<CefApp> application,
                      void* windows_sandbox_info) {
  base::CommandLine command_line(base::CommandLine::NO_PROGRAM);
  // 省略...
  // If no process type is specified then it represents the browser process and
  // we do nothing.
  std::string process_type =
      command_line.GetSwitchValueASCII(switches::kProcessType);
  if (process_type.empty())
    return -1;
  CefMainDelegate main_delegate(application);
  // Execute the secondary process.
  // 省略...
  content::ContentMainParams params(&main_delegate);
  params.instance = args.instance;
   // 省略...
  params.argc = args.argc;
  params.argv = const_cast<const char**>(args.argv);
  return content::ContentMain(params);
#endif
它分析了命令行参数,提取”type”参数,如果为空,说明是Browser进程,返回-1,sefsimple 入口函数继续向后执行,创建了 SimpleApp 它实现了CefApp 接口,给了我们控制CEF的入口,接着就进行了初始化。初始化完毕之后,回调了SimpleApp::OnContextInitialized() 方法,在这个方法中我们创建了 浏览器,并用到了 SimpleHandler 而它实现了 CefClient
如果”type”参数不为空,做一些判断,最后调用了content::ContentMain方法,创建子进程,直到这个方法结束,子进程才结束。
编译后的可执行文件为"sefsimple.exe", 在进程管理器中可以看到每个进程都是从 sefsimple.exe开始的,只不过是参数不同而已。
观察CefExecuteProcess 方法的第二个参数,它是一个CefApp 类型的,在我们自己的例子程序和sefsimple 中都传递了NULL,实际上它也可以为它传递一个 CefApp对象。
分析完这些,现在我们清楚了,Browser进程,需要CefApp(SimpleApp实现了这个接口)和CefClient(SimpleHandler实现了这个接口)。而Renderer进程只要CefApp。 前面我们自己编写的示例和sefsimple 都传递了NULL。
现在再打开示例程序cefclient的入口函数:
int RunMain(HINSTANCE hInstance, int nCmdShow) {
  // ...省略
  CefMainArgs main_args(hInstance);
  void* sandbox_info = nullptr;
  // Create a ClientApp of the correct type.
  CefRefPtr<CefApp> app;
  ClientApp::ProcessType process_type = ClientApp::GetProcessType(command_line);
  if (process_type == ClientApp::BrowserProcess)
    app = new ClientAppBrowser();
  else if (process_type == ClientApp::RendererProcess)
    app = new ClientAppRenderer();
  else if (process_type == ClientApp::OtherProcess)
    app = new ClientAppOther();
  // Execute the secondary process, if any.
  int exit_code = CefExecuteProcess(main_args, app, sandbox_info);
  if (exit_code >= 0)
    return exit_code;

  // ...省略

  return result;
}
这段代码上我们看到了这段代码根据 进程类型,创建了不同的CefApp,看看 ClientAppBrowser (创建browser进程用)和 ClientAppRenderer (创建render进程用) 有什么不一样的?
// client_app_browser.h
class ClientAppBrowser : public ClientApp, public CefBrowserProcessHandler {
  //...
}

// client_app_renderer.h
class ClientAppRenderer : public ClientApp, public CefRenderProcessHandler {
    //...
}
可以看到明显的:
browser进程 需要 CefApp和 CefClient, CefApp要提供CefBrowserProcessHandler 接口,
render进程 只需要 CefApp ,CefApp要提供 CefRenderProcessHandler 接口。
CefBrowserProcessHandler 接口用来处理 browser进程 的一些回调, CefRenderProcessHandler 接口用来处理 render进程 的一些回调。
我们自己的例子和 sefsimple 示例程序没有针对Render进程做特别处理,因为 CefApp 没有实现CefRenderProcessHandler 接口,所以会缺失一部分功能。当我们需要在JavaScript中调用 C++代码时,这就完成不了了。
4 单进程启动
我们在开发的时候,如果在多进程的情况下,调试将变得比较困难,有没有办法让我们开发的时候在单进程中运行?答案是为添加启动参数。
4.1 快捷方式上添加启动参数
我们前面开发的示例,Debug目录中为可执行文件创建一个快捷方式,然后为快捷方式添加启动参数==–single-process==

4.2 VisioStudio 2019中添加启动参数
在命令参数后面添加 –single-process

再次启动后,发现任务管理器中就只有一个进程了。

5 单一执行体与分离执行体
前面我们自己编写的例子,cefsimple 和cefclient 这两个例子都使用的是单一执行体。所谓单一执行体就是启动同一个 exe文件来分别创建不同的进程。(多进程)
当以单一执行体运行时,如我们自己的例子和cefsimple ,cefclient 它们都是先执行进程,然后再初始化的。
所谓分离执行体就是启动 browser进程 的是一个exe文件,而其它进程比如render进程 执行的是另外一个exe,它是先初始化,告诉 browser进程(主进程)分离的执行体是哪个exe文件,然后再执行子进程。当使用独立的子进程执行体时,我们需要2个分开的可执行工程和入口函数。
下面就看看如何开发分离执行体的应用。
5.1 分离执行体项目
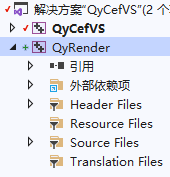
5.1.1 创建分离体项目
在原有的解决方案中再添加一个子项目,名称为QyRender,将来的分离执行体就是 QyRender.exe。 这个项目使用 QT Console Application ,因为它不会用到图形界面
添加项目配置include目录和lib引用


告诉操作系统使用Windows的方式运行这个exe,如果不设置这一步,当这个进程启动后,会弹出控制台窗口。

5.1.2 实现CefApp,CefRenderProcessHandler
我们说创建渲染进程的时候,为CefExecuteProcess 函数传递一个 CefApp,用于将来JavaScript与C++的通信,暂时这个类中什么也不做,先放在这里
// QyAppRender.h
#include <qobject.h>
#include "include/cef_app.h"

class QyAppRenderer :public CefApp, public CefRenderProcessHandler {
public:
	QyAppRenderer();

	//重写CefApp 中的GetRenderProcessHandler方法
	CefRefPtr<CefRenderProcessHandler> GetRenderProcessHandler() OVERRIDE{
		return this;
	}
	//实现 CefRenderProcessHandler 接口中的方法
	void OnBrowserCreated(CefRefPtr<CefBrowser> browser,
		CefRefPtr<CefDictionaryValue> extra_info) OVERRIDE;

private:
	// Include the default reference counting implementation.
	IMPLEMENT_REFCOUNTING(QyAppRenderer);
};

// QyAppRender.cpp
#include "QyAppRenderer.h"

/// <summary>
/// 构造方法空实现
/// </summary>
QyAppRenderer::QyAppRenderer() {

}
/// <summary>
/// 当CefBrowser对象已经创建的时候回调,将来JS与c++通信的时候会用到,现在只做空实现
/// </summary>
/// <param name="browser"></param>
/// <param name="extra_info"></param>
void QyAppRenderer::OnBrowserCreated(CefRefPtr<CefBrowser> browser,
	CefRefPtr<CefDictionaryValue> extra_info) {

}
5.1.3 分离体项目main函数
分离器项目的main函数很简单,拿到命令行参数,创建 CefApp (QyAppRenderer)后执行CefExecuteProcess即可
#include "include/cef_app.h"
#include "include/cef_command_line.h"
#include "QyAppRenderer.h"
int main(int argc, char *argv[])
{
    HINSTANCE hInstance = GetModuleHandle(nullptr);
    //构造命令行
    CefMainArgs main_args(hInstance);

    // Optional implementation of the CefApp interface.
    // 可选择性地实现CefApp接口
    CefRefPtr<QyAppRenderer> app(new QyAppRenderer);

    // Execute the sub-process logic. This will block until the sub-process should exit.
    // 执行子进程逻辑,此时会堵塞直到子进程退出。
    return CefExecuteProcess(main_args, app.get(),nullptr);
}
5.2 主项目main函数
在主项目的 main函数中,就不需要执行 CefExecuteProcess了,只需要在 CefSettings中配置执行体exe文件路径即可。主项目启动的就是browser 进行它只需要执行初始化cef和开始消息循环就完事了
#include "mainwindow.h"
#include <QtWidgets/QApplication>
#include "include/cef_command_line.h"
#include "include/cef_sandbox_win.h"
#include "cef/simple_app.h"
#include <qdebug.h>
int main(int argc, char *argv[])
{
    // Enable High-DPI support on Windows 7 or newer.
    CefEnableHighDPISupport();
    // 通过GetModuleHandle 获取 HINSTANCE
    HINSTANCE hInstance = GetModuleHandle(nullptr);

// 开启 QT 消息循环
    SimpleApp* cefApp=new SimpleApp;
    QApplication a(argc, argv);
    //CEF 命令行参数
    CefMainArgs main_args(hInstance);
    CefSettings settings;
    settings.no_sandbox = true;
    settings.multi_threaded_message_loop = true;

    //分离的执行体
    QString executerPath = QApplication::applicationDirPath().append("\\QyRender.exe");
    CefString(&settings.browser_subprocess_path).FromASCII(executerPath.toStdString().c_str());

    MainWindow w(cefApp, nullptr);
    w.show();
    CefRefPtr<SimpleApp> app(cefApp);
    // 初始化CEF
    CefInitialize(main_args, settings, app.get(), nullptr);
    int ret = a.exec();
    // Shut down CEF.
    CefShutdown();
    return ret;
}
这里的重点是 settings.browser_subprocess_path设置为执行体文件路径,去掉CefExecuteProcess 函数
5.3 编译整个解决方案
编译以后,会把可执行文件放入到解决方案的Debug目录中。
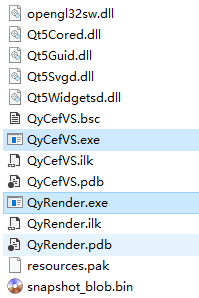
可以看到有两个可执行文件,现在启动 QyCefVS.exe, 查看进程:

注意分离的 QyRender虽然名字有个render,但是它是可以启动除了 browser 进程以外所有进程的。
代码请访问 GitHub qt_cef_07分支


 645
645


 被折叠的 条评论
为什么被折叠?
被折叠的 条评论
为什么被折叠?
 到【灌水乐园】发言


