


MCP 原理及 FastMCP 框架实践指南
MCP 原理及 FastMCP 框架实践指南
模型上下文协议 (MCP) 概述
模型上下文协议 (MCP) 是一种标准化的安全机制,旨在帮助大语言模型 (LLM) 应用程序暴露其数据和功能。您可以将 MCP 视为专为 LLM 交互而设计的 Web API。
MCP 服务器主要具备以下三种能力:
- 通过资源暴露数据:类似于 HTTP GET 请求,将信息加载到 LLM 的上下文中。
- 通过工具提供功能:类似于 HTTP POST/PUT 请求,允许 LLM 执行特定操作。
- 通过提示定义交互模式:提供可复用的提示模板,规范和引导 LLM 的交互行为。
MCP 相关资源
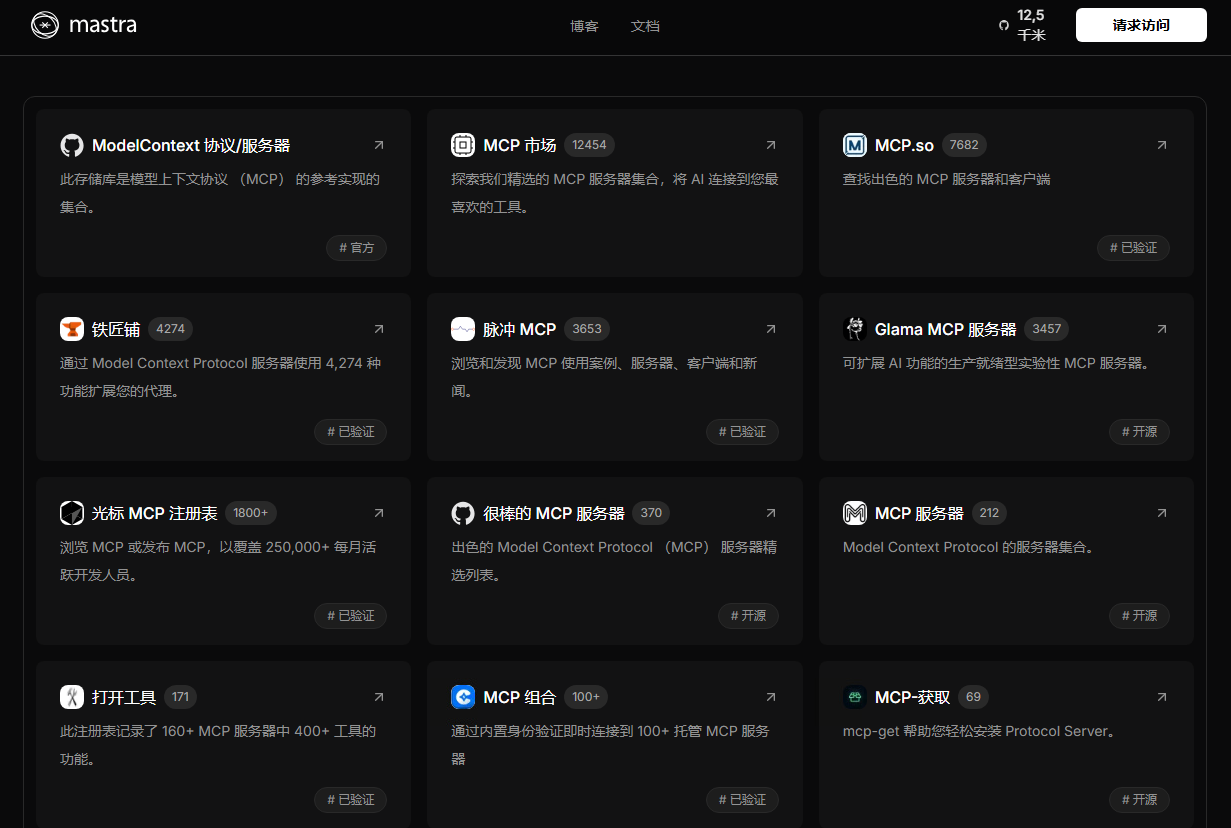
MCP 资源聚合
- MCP 服务器资源汇聚网站:https://mastra.ai/mcp-registry-registry
- 图片:
- 图片:
MCP 综述论文
- 双语版本链接:https://arxiv.org/html/2503.23278?_immersive_translate_auto_translate=1
- 总结:该论文偏重理论探讨,实际应用案例较少,内容与下文 FastMCP 框架介绍部分有较多重合。
主流 MCP 框架
目前,业界存在多种 MCP 框架的实现,各有特点:
- FastMCP 框架:
- 链接:https://github.com/jlowin/fastmcp
- 总结:文档详尽,易于上手,功能与官方实现相近。
- Anthropic 官方 Python SDK:
- 链接:https://github.com/modelcontextprotocol/python-sdk
- 总结:官方出品,稳定好用。
- OpenAI 智能体 SDK:
- LangChain MCP 适配器:
- 链接:https://github.com/langchain-ai/langchain-mcp-adapters
- 总结:功能与 FastMCP 类似,但需要与 LangChain 框架配合使用。
FastMCP 框架详解
FastMCP 简介
MCP 协议本身功能强大,但从头开始实现会涉及大量繁琐的样板代码,例如服务器搭建、协议处理、内容类型管理和错误处理等。FastMCP 框架通过提供高级、Pythonic 的接口,极大地简化了 MCP 服务器和客户端的开发过程,使开发者能够更专注于业务逻辑和工具的实现。在大多数情况下,仅需为函数添加装饰器即可完成开发。
FastMCP 的设计目标:
- 🚀 快速 (Fast):提供高级接口,显著减少代码量,提升开发效率。
- 🍀 简单 (Simple):极简的样板代码,轻松搭建 MCP 服务器。
- 🐍 Pythonic:符合 Python 开发者的编程习惯和风格。
- 🔍 完整 (Complete):致力于完整实现 MCP 协议的核心规范,同时支持服务器端和客户端的开发。
FastMCP 服务器
创建服务器
from fastmcp import FastMCP

# 创建基础服务器实例
mcp = FastMCP(name="MyAssistantServer")

# 添加交互说明的服务器实例
mcp_with_instructions = FastMCP(
    name="HelpfulAssistant",
    instructions="本服务器提供数据分析工具。调用 get_average() 可分析数值型数据。"
)
FastMCP 构造函数支持以下参数:
name(可选): 服务器的易懂名称,默认为 “FastMCP”。instructions(可选): 描述服务器的目的和用法,帮助客户端理解可用的功能。lifespan(可选): 异步上下文管理器函数,用于控制服务器启动和关闭时的逻辑。tags(可选): 服务器的标签集合。settings(可选): 额外的ServerSettings配置。
组件类型
-
工具 (Tool)
工具是客户端可以调用的函数,用于执行特定的动作或与外部系统交互。
@mcp.tool() def multiply(a: float, b: float) -> float: """返回两个数的乘积""" return a * b -
资源 (Resource)
资源用于暴露可供读取的数据源。
@mcp.resource("data://config") def get_config() -> dict: """提供应用配置""" return {"theme": "dark", "version": "1.0"} -
资源模板 (Resource Template)
参数化的资源,允许客户端根据需要请求特定的数据。服务器可以将数据库内容作为 LLM 交互的上下文素材开放给客户端读取。
@mcp.resource("users://{user_id}/profile") def get_user_profile(user_id: int) -> dict: """根据用户 ID 获取用户资料""" return {"id": user_id, "name": f"User {user_id}", "status": "active"}数据库示例:
import json # 假设以下函数已定义: # get_tables() -> list: 返回表列表 # get_database_schema() -> dict: 返回数据库结构 # get_table_constraints() -> dict: 返回表约束 # 表列表资源 @mcp.resource("mysql://tables") def get_tables_resource(): """获取所有表的列表作为资源。""" tables = get_tables() if isinstance(tables, dict) and "error" in tables: return json.dumps(tables) table_names = [table["TABLE_NAME"] for table in tables] return json.dumps(table_names, indent=2) # 数据库架构资源 @mcp.resource("mysql://schema") def get_schema_resource(): """获取数据库架构作为资源。""" schema = get_database_schema() return json.dumps(schema, indent=2) # 表约束资源 @mcp.resource("mysql://constraints") def get_constraints_resource(): """获取数据库约束作为资源。""" constraints = get_table_constraints() return json.dumps(constraints, indent=2) -
提示 (Prompt)
Prompt 是可复用的 LLM 消息模板,用于引导模型完成特定的任务。
@mcp.prompt()
def analyze_data(data_points: list[float]) -> str:
    """生成数值数据分析提示语"""
    formatted_data = ", ".join(str(point) for point in data_points)
    return f"请分析以下数据点:{formatted_data}"
传输机制
-
STDIO (标准输入输出,1 对 1)
- 每个会话启动一个独立的服务器进程。
- 通过标准输入/输出流进行通信。
- 客户端断开连接时,服务器进程自动终止。
- 适用于本地集成场景,例如 Claude Desktop,其中每个对话都拥有独立的服务器实例。
mcp.run(transport="stdio") -
SSE (服务器发送事件,多对 1)
- 服务器作为持久的 Web 服务持续运行。
- 支持多个客户端并发连接。
- 需要手动终止服务器进程。
- 适合远程访问服务。
# 基本运行
mcp.run(transport="sse")

# 指定主机、端口和日志级别
mcp.run(
    transport="sse",
    host="127.0.0.1",
    port=8888,
    log_level="debug"
)

# 或者在 FastMCP 构造函数中配置
mcp_configured = FastMCP(
    name="ConfiguredServer",
    port=8080,
    on_duplicate_tools="error" # 处理重复工具的策略
)
# app = mcp_configured.sse_app() # 获取 ASGI 应用实例
# uvicorn.run(app, host="0.0.0.0", port=8080) # 需配合 uvicorn 运行
FastMCP 客户端
FastMCP 客户端架构将协议逻辑 (Client) 与连接机制 (Transport) 进行了解耦:
- Client:负责发送 MCP 请求 (例如
tools/call、resources/read),接收响应并管理回调。 - Transport:负责与服务器建立并维护连接,支持 WebSockets、SSE、STDIO、本地内存等多种传输方式。
STDIO 客户端 (适合本地使用)
在子进程中运行基于 Python 的 MCP 服务器脚本:
import asyncio
from fastmcp import Client
from fastmcp.client.transports import PythonStdioTransport

# 假设 my_mcp_server.py 文件存在并包含 mcp.run()
server_script = "my_mcp_server.py"

# 方式一:自动推断传输方式
client_inferred = Client(server_script)

# 方式二:显式指定传输方式(例如指定 Python 版本、参数等)
transport_explicit = PythonStdioTransport(
    script_path=server_script,
    python_cmd="/usr/bin/python3.11",  # 可选,指定 Python 解释器路径
    # args=["--some-server-arg"],      # 可选,传递给服务器脚本的参数
    # env={"MY_VAR": "value"},         # 可选,设置环境变量
    # cwd="/path/to/run/in"           # 可选,设置工作目录
)
client_explicit = Client(transport_explicit)

async def use_stdio_client(client):
    async with client:
        tools = await client.list_tools()
        print(f"通过 Python STDIO 连接,发现工具: {tools}")

# 运行示例
# asyncio.run(use_stdio_client(client_inferred))
# asyncio.run(use_stdio_client(client_explicit))
SSE 客户端 (适合远程服务器)
通过 HTTPS 连接到暴露的 MCP 服务器,通常使用 mcp.run(transport="sse") 启动。
import asyncio
from fastmcp import Client
from fastmcp.client.transports import SSETransport

sse_url = "http://localhost:8000/sse" # 替换为实际的服务器 SSE URL

# 方式一:自动推断传输方式
client_inferred = Client(sse_url)

# 方式二:显式指定传输方式(例如添加自定义 Header)
headers = {"Authorization": "Bearer mytoken"} # 示例 Header
transport_explicit = SSETransport(url=sse_url, headers=headers)
client_explicit = Client(transport_explicit)

async def use_sse_client(client):
    async with client:
        tools = await client.list_tools()
        print(f"通过 SSE 连接,发现工具: {tools}")

# 运行示例
# asyncio.run(use_sse_client(client_inferred))
# asyncio.run(use_sse_client(client_explicit))
MCP 底层代码原理
MCP 架构图
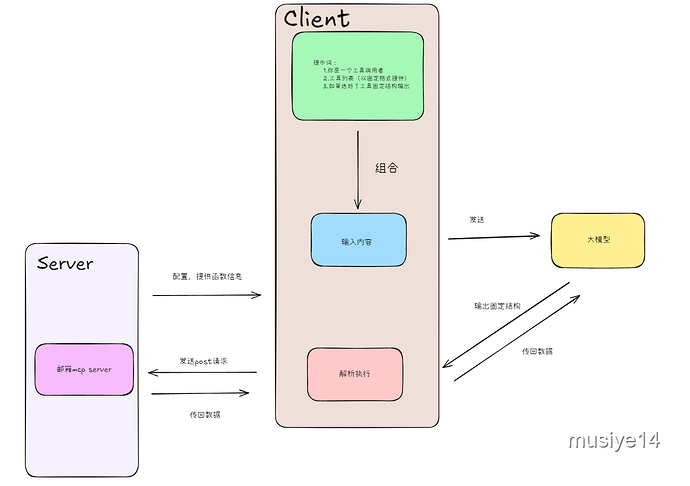
- Server (服务器):配置并提供函数信息,发送 POST 请求,传递数据。
- Client (客户端):
- 提示词 (Prompt):定义一个工具调用者,列出可用的工具及其描述和参数。
- 输入内容 (Input Content):用户的请求。
- 组合 (Combine):将提示词和用户输入组合。
- 发送 (Send):将组合后的内容发送给大模型。
- 解析执行 (Parse & Execute):接收大模型的输出,解析并执行相应的工具调用。
- 输出固定结构 (Output Fixed Structure):大模型根据指令输出特定格式的 JSON 对象。
- 传回数据 (Return Data):将工具执行结果或直接回复返回给用户。
- 大模型 (Large Model):接收组合内容,根据提示词和用户输入选择是否调用工具,并以指定格式输出结果。
原理代码片段
tools_description (工具描述)
Tool: [工具名称]
Description: [工具描述]
Arguments:
- param1: 参数1的描述 (required)
- param2: 参数2的描述
system_message (系统消息模板)
{
  "tools_description": "\nTool: [tool_name_1]\nDescription: [description_1]\nArguments:\n- arg1_1: (required)\n- arg1_2:\n\nTool: [tool_name_2]\n...",
  "system_message": "You are a helpful assistant with access to these tools:\n\n{tools_description}\nChoose the appropriate tool based on the user's question. If no tool is needed, reply directly.\n\nIMPORTANT: When you need to use a tool, you must ONLY respond with the exact JSON object format below, nothing else:\n{\n    \"tool\": \"tool-name\",\n    \"arguments\": {\n        \"argument-name\": \"value\"\n    }\n}\n\nAfter receiving a tool's response:\n1. Transform the raw data into a natural, conversational response\n2. Keep responses concise but informative\n3. Focus on the most relevant information\n4. Use appropriate context from the user's question\n5. Avoid simply repeating the raw data\n\nPlease use only the tools that are explicitly defined above.",
  "messages": [
    {
      "role": "system",
      "content": "{system_message_content_with_tools_description}"
    }
  ]
}
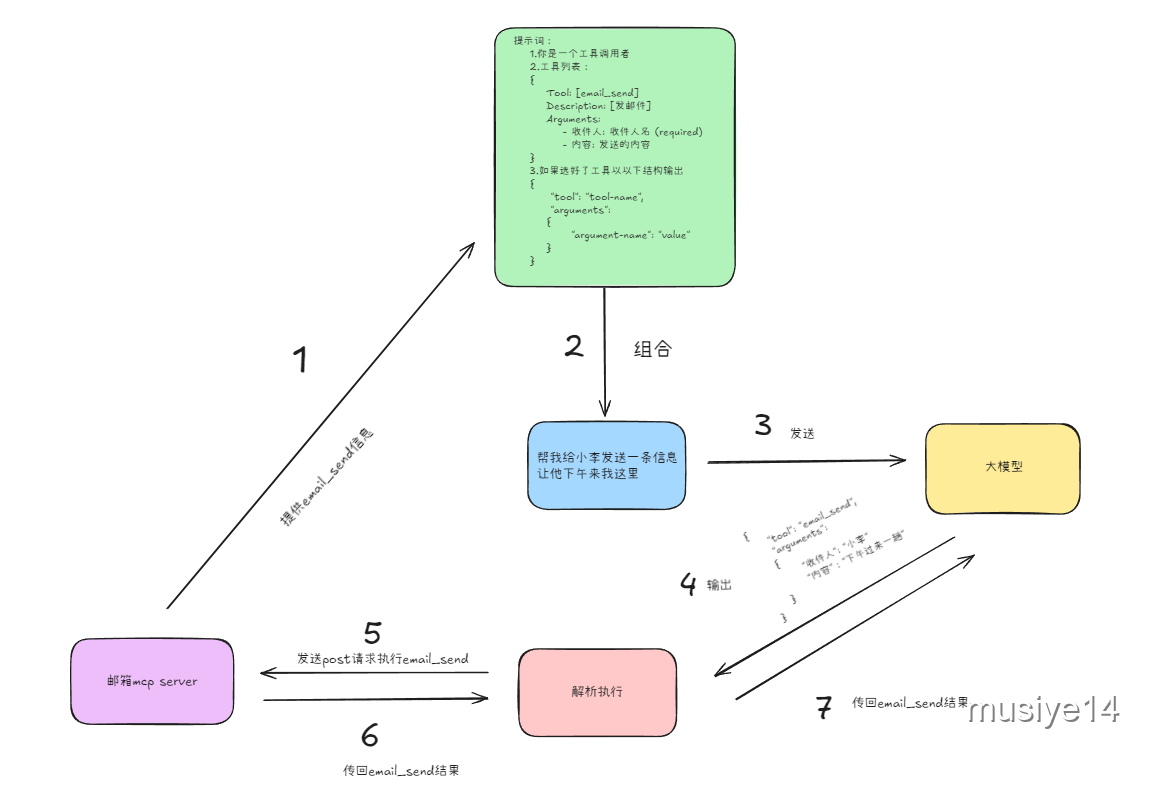
示例:给小李发消息
交互流程图
- 用户输入/系统提示 (Prompt for LLM):
1. 你是一个工具调用者 2. 工具列表: { Tool: [邮箱] Description: [发邮件] Arguments: - 收件人: 收件人名 (required) - 内容: 发送的内容 } 3. 如果选好了工具以以下结构输出 { "tool": "tool-name", "arguments": { "argument-name": "value" } } 帮我给小李发送一条信息让他下午来我这里 - 组合 (Combine): 将上述提示与用户信息组合。
- 发送 (Send to LLM): 将组合内容发送给大模型。
- LLM 输出 (LLM Output):
{ "tool": "email_send", "arguments": { "收件人": "小李", "内容": "下午过来一趟" } } - 解析并执行 (Parse & Execute): MCP Server 解析 LLM 输出,调用
email_send工具。 - 发送 Post 请求 (Send POST Request): 执行
email_send操作。 - 传回结果 (Return Result): 将
email_send的执行结果返回。
服务器日志示例
- 图中显示了服务器处理
ToolCallRequest和PingRequest的日志信息。

注意点
- 大语言模型 (LLM) 生成的内容具有一定的随机性。MCP 协议要求输出结果必须 100% 精确地遵循特定规范。
- 如果 LLM 的能力较弱,或者无法通过提示词被严格约束以按要求输出,那么 MCP 协议的实现将面临困难。
- 实践中观察到,Claude 系列模型在调用 MCP 工具方面表现更佳,这可能得益于其针对性的训练。
- OpenAI 早期提出的 Function Calling 功能,其本质实现逻辑与 MCP 相似。OpenAI 现已宣布支持 MCP,预示着 MCP 可能成为未来的主流协议。
- 近期谷歌提出的 A2A (Agent-to-Agent) 框架,其核心原理似乎也与 MCP 有共通之处。
Cherry Studio 接入 MCP 实践
启动服务端 (天气服务示例)
import asyncio
import uvicorn
import datetime
import sys
from typing import Dict, Any, Optional

from fastmcp import FastMCP # 更正:从 fastmcp 导入
# from mcp.server.stdio import stdio_server # 根据实际 FastMCP 版本调整或移除

# 创建MCP服务器实例
mcp = FastMCP("天气服务")

# 模拟天气数据库(实际应用中可以替换为API调用)
WEATHER_DATA = {
    "北京": {"温度": "15°C", "天气": "晴", "湿度": "45%", "风力": "3级"},
    "上海": {"温度": "18°C", "天气": "多云", "湿度": "65%", "风力": "2级"},
    "广州": {"温度": "26°C", "天气": "阵雨", "湿度": "80%", "风力": "2级"},
    "深圳": {"温度": "25°C", "天气": "多云", "湿度": "75%", "风力": "3级"},
    "杭州": {"温度": "17°C", "天气": "晴", "湿度": "55%", "风力": "2级"}
}

@mcp.tool()
def get_weather(location: str) -> Dict[str, Any]:
    """
    获取指定城市的今日天气信息
    参数:
    location: 需要查询天气的城市名称
    返回:
    包含温度、天气状况、湿度和风力的字典
    """
    if location in WEATHER_DATA:
        result = WEATHER_DATA[location].copy()
        result["日期"] = datetime.datetime.now().strftime("%Y-%m-%d")
        result["查询时间"] = datetime.datetime.now().strftime("%H:%M:%S")
        return result
    else:
        return {"错误": f"没有找到城市 {location} 的天气数据"}

@mcp.tool()
def list_cities() -> list:
    """
    列出所有可查询天气的城市
    返回:
    城市名称列表
    """
    return list(WEATHER_DATA.keys())

@mcp.resource("weather://{location}")
def weather_resource(location: str) -> str:
    """
    以资源形式提供天气数据
    参数:
    location: 城市名称
    返回:
    格式化的天气信息字符串
    """
    if location in WEATHER_DATA:
        weather = WEATHER_DATA[location]
        return f"{location}天气: {weather['天气']}, 温度: {weather['温度']}, 湿度: {weather['湿度']}, 风力: {weather['风力']}"
    return f"没有找到城市 {location} 的天气数据"

@mcp.prompt()
def weather_query(location: Optional[str] = None) -> str:
    """
    创建天气查询的提示模板
    参数:
    location: 可选的城市名称,如果不提供则请求模型查询一个城市
    返回:
    格式化的提示字符串
    """
    if location:
        return f"请帮我查询{location}的天气情况,并解释一下天气状况。"
    else:
        return "请帮我查询一个中国城市的天气情况,你可以使用list_cities工具获取可查询的城市列表。"

# 提供SSE和stdio两种运行方式
async def run_stdio():
    """使用stdio方式运行服务器"""
    # 根据 FastMCP 的 stdio 实现方式调整
    # 例如:
    # await mcp.run(transport="stdio")
    # 或如果 FastMCP 提供了更底层的 stream 处理:
    # async with stdio_server() as (read_stream, write_stream): # 假设 stdio_server 存在
    #     await mcp.run_streams(read_stream, write_stream)
    # 具体实现需参考 FastMCP 文档
    print("stdio 模式启动逻辑需要根据 FastMCP 版本进行适配")
    # 临时代替,实际应为 FastMCP 的 stdio 运行方式
    if hasattr(mcp, 'run_stdio_separately'): # 假设有这样的方法
        await mcp.run_stdio_separately()
    else:
        # Fallback or raise error if stdio direct run isn't straightforward
        print("stdio 模式启动逻辑未完全适配,请查阅 FastMCP 最新文档。")
        # 尝试使用通用的 run 方法(如果 FastMCP 支持)
        # await mcp.run(transport="stdio") # 这行在原始文档中是针对基础 mcp 实例的

if __name__ == "__main__":
    if len(sys.argv) > 1 and sys.argv[1] == "stdio":
        # 以stdio模式运行
        asyncio.run(run_stdio())
    else:
        #以SSE模式运行(默认)
        port = 9055
        app = mcp.sse_app() # FastMCP 提供 ASGI 应用
        uvicorn.run(app, port=port, host='0.0.0.0')
Cherry 客户端配置
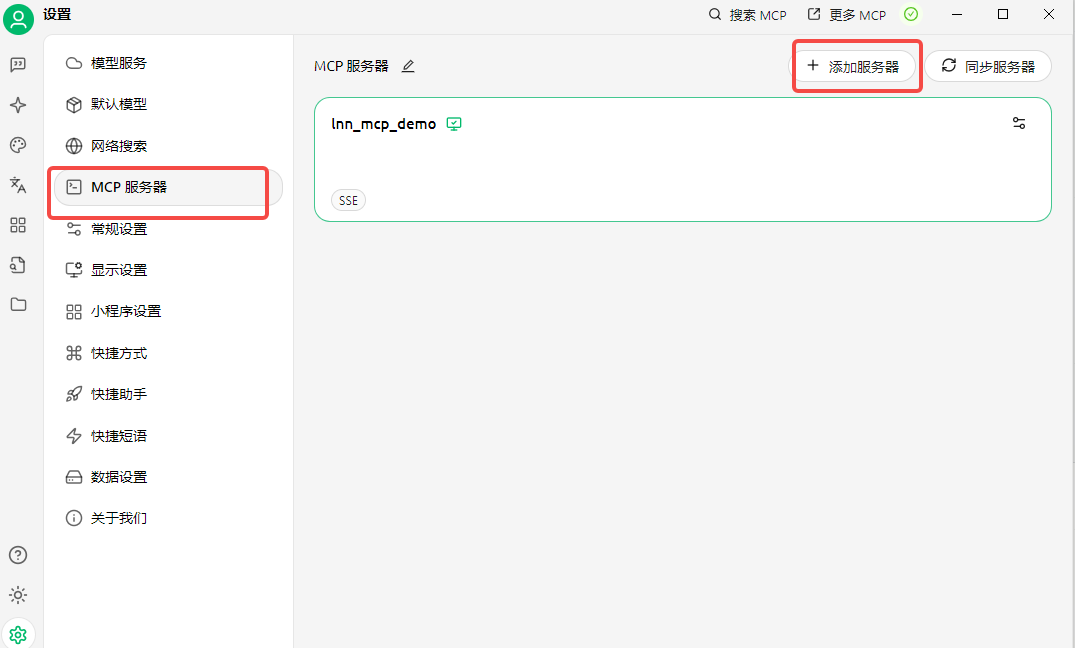
-
添加服务器
- 在 Cherry Studio 的设置中找到 “MCP 服务器” 选项。
- 点击 “+ 添加服务器”。
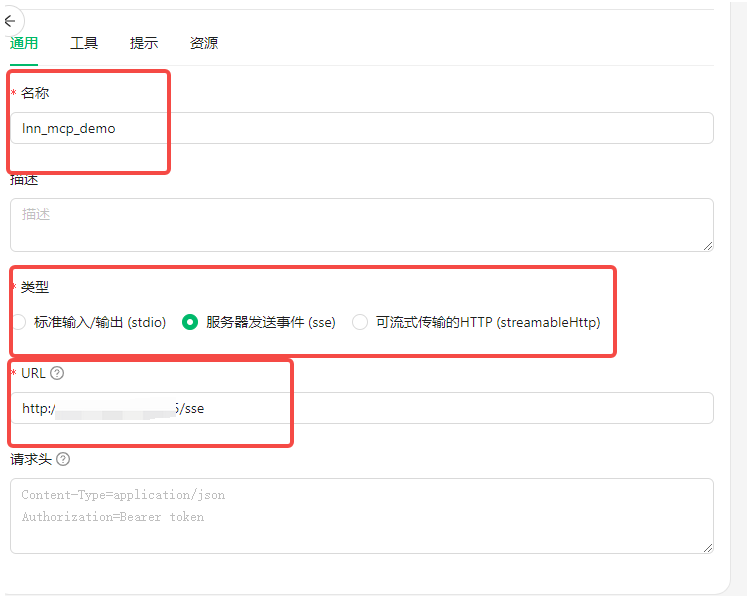
-
配置详情
- 通用 (General):
- 名称 (Name): 例如
lnn_mcp_demo - 描述 (Description): (可选)
- 类型 (Type): 选择 “服务器发送事件 (SSE)”
- URL: 输入 SSE 服务器的地址,例如
http://ip:9055/sse - 请求头 (Headers): (可选) 例如
Content-Type=application/json,Authorization=Bearer token
- 名称 (Name): 例如
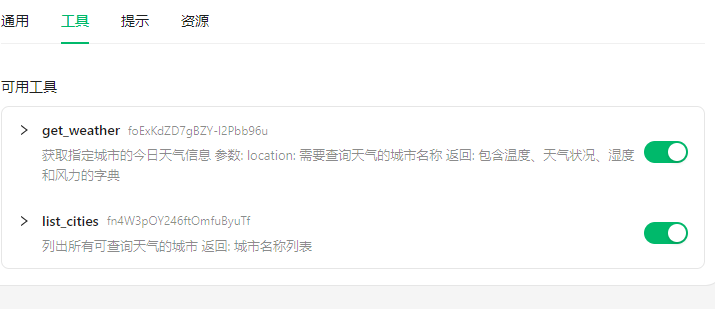
- 工具 (Tools): 配置后会自动列出可用的工具,如
get_weather和list_cities。 - 提示 (Prompts): (可选)
- 资源 (Resources): (可选)
- 通用 (General):
使用详情
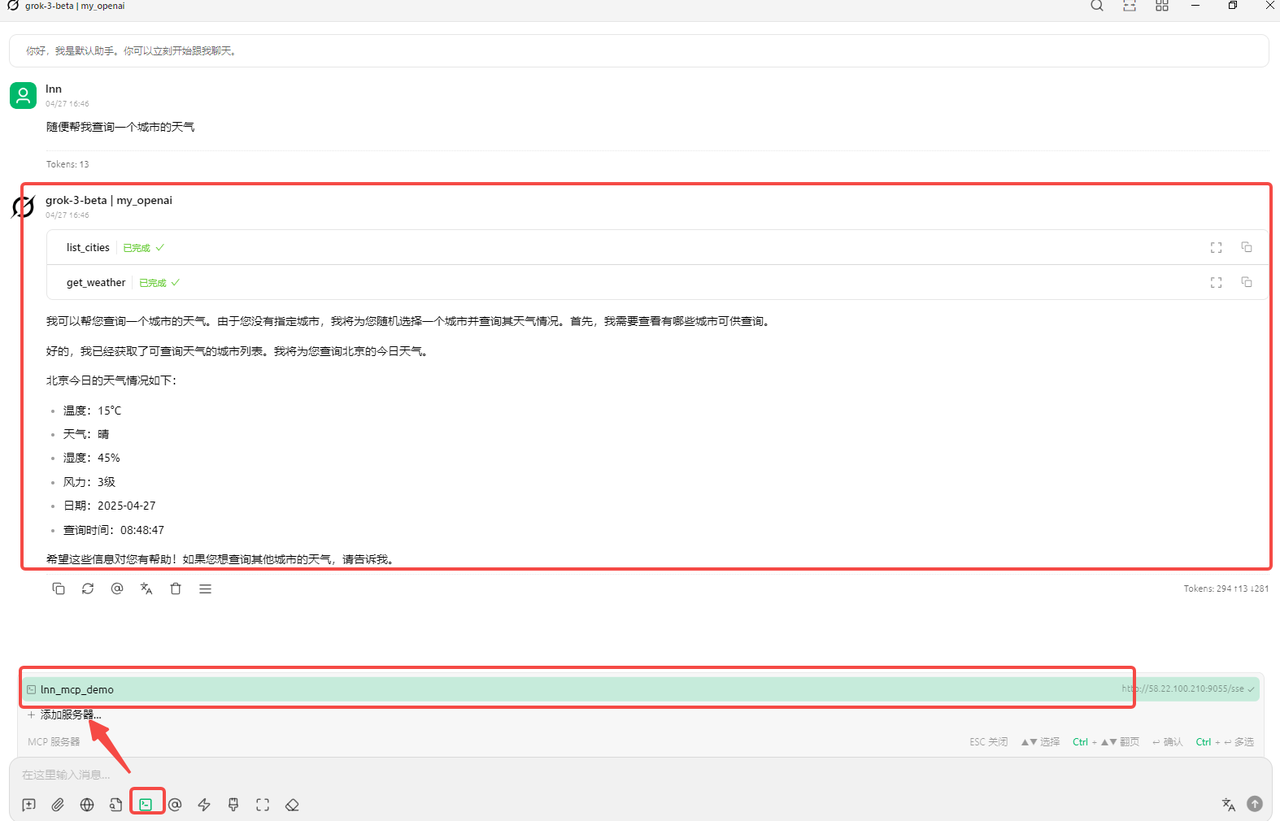
案例一:grok-3 (模型)
- 用户输入: “随便帮我查一个城市的天气”
- 模型行为:
- 调用
list_cities工具获取城市列表。 - 调用
get_weather工具查询其中一个城市 (例如北京) 的天气。 - 返回北京的天气信息。
- 调用
- 截图:

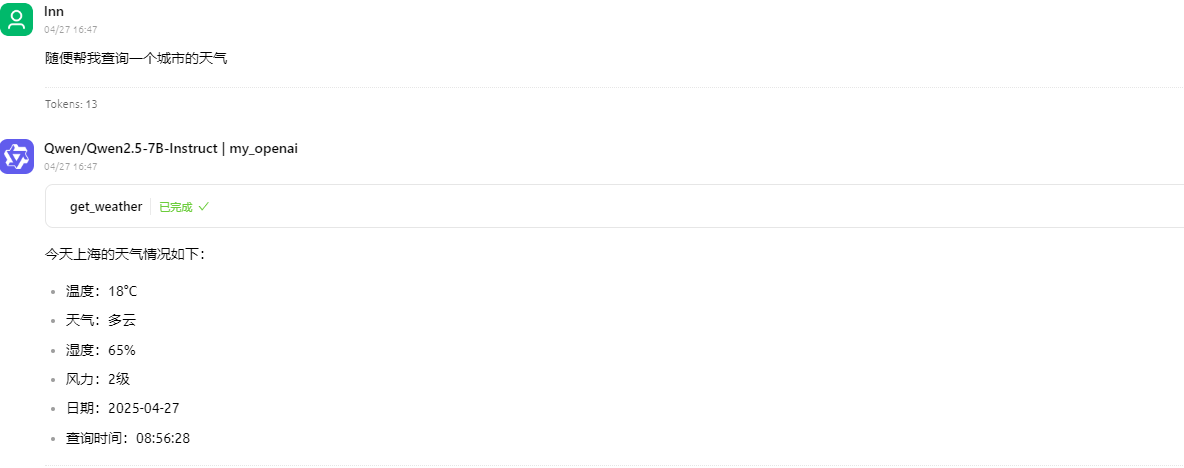
案例二:qwen2_7B (模型)
- 用户输入: “随便帮我查一个城市的天气”
- 模型行为: 直接调用
get_weather工具 (可能随机选择或默认选择一个城市,例如上海)。 - 截图:
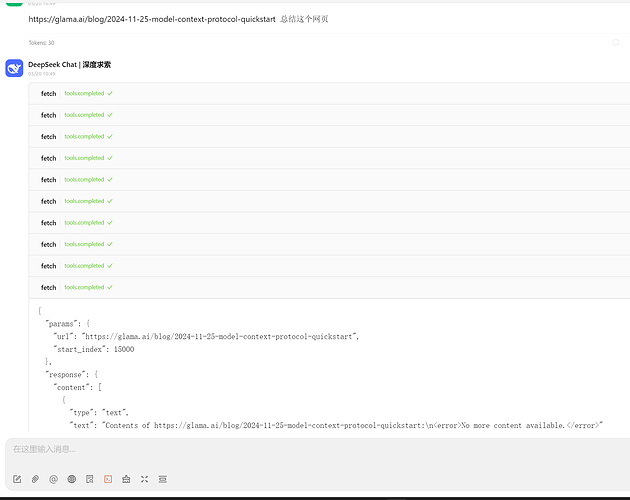
案例三:Deepseek-chat (模型)
- 问题: Function calling 不稳定,可能出现循环无限调用的情况。
- 截图:


 142
142

 被折叠的 条评论
为什么被折叠?
被折叠的 条评论
为什么被折叠?
 到【灌水乐园】发言


