


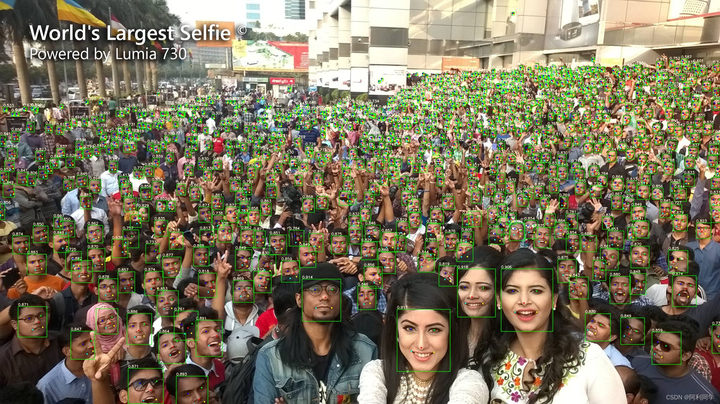
YOLOv8 脸部识别是一个基于YOLOv8算法的人脸检测项目,旨在实现快速、准确地检测图像和视频中的人脸。该项目是对YOLOv8算法的扩展和优化,专门用于人脸检测任务。
在这里插入图片描述
YOLOv8是一种基于深度学习的目标检测算法,通过将目标检测问题转化为一个回归问题,可以实现实时的目标检测。YOLOv8 Face项目在YOLOv8的基础上进行了改进,使其更加适用于人脸检测。以下是YOLOv8 Face项目的一些特点和关键技术:
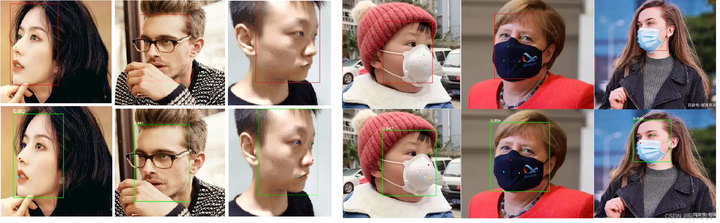
- 高准确性:YOLOv8 Face采用了一系列的优化策略,包括网络结构的设计、数据增强和训练技巧等,从而提高了模型的准确性。它能够精确地检测出各种不同姿态、光照和遮挡条件下的人脸。
- 实时性能:YOLOv8Face具有较高的实时性能,可以在实时图像和视频流中快速检测人脸。它采用了一种轻量级的网络结构和高效的推理算法,以实现实时的人脸检测。
- 多尺度检测:为了适应不同大小和尺度的人脸,YOLOv8 Face使用了多尺度检测技术。通过在不同尺度下进行检测,可以提高模型对小尺寸人脸的检测能力。
- 数据增强:YOLOv8 Face使用了各种数据增强技术,如随机裁剪、旋转和缩放等,以增加训练数据的多样性和丰富性。这有助于提高模型的泛化能力和鲁棒性。
- 高效推理:为了提高推理效率,YOLOv8 Face使用了一些优化技术,如模型压缩、量化和推理引擎的优化等。这使得模型可以在嵌入式设备和移动端实现快速的人脸检测。
在这里插入图片描述
代码运行
数据准备
- 下载WIDERFace数据集
- 从Google Drive下载注释文件
- 进入data文件夹
- 运行python3 train2yolo.py /path/to/original/widerface/train` [/path/to/save/widerface/train],将训练集转换为YOLOv5格式
- 运行python3 val2yolo.py /path/to/original/widerface [/path/to/save/widerface/val],将验证集转换为YOLOv5格式
训练
- 运行CUDA_VISIBLE_DEVICES=“0,1,2,3” python3 train.py --data data/widerface.yaml --cfg models/yolov5s.yaml --weights ‘pretrained models’,进行训练
WIDERFace评估
- 进入widerface_evaluate文件夹
- 运行python3 evaluation.py,进行评估
demo代码
运行下列demo示例,可以帮助我们推理出结果!!!!!!1
import argparse
import time
from pathlib import Path

import cv2
import torch
import torch.backends.cudnn as cudnn
from numpy import random

from models.experimental import attempt_load
from utils.datasets import LoadStreams, LoadImages
from utils.general import check_img_size, non_max_suppression, apply_classifier, scale_coords, xyxy2xywh, \
    strip_optimizer, set_logging, increment_path
from utils.plots import plot_one_box
from utils.torch_utils import select_device, load_classifier, time_synchronized


def detect(save_img=False):
    source, weights, view_img, save_txt, imgsz = opt.source, opt.weights, opt.view_img, opt.save_txt, opt.img_size
    print('weights: ', weights)
    webcam = source.isnumeric() or source.endswith('.txt') or source.lower().startswith(
        ('rtsp://', 'rtmp://', 'http://'))

    # Directories
    save_dir = Path(increment_path(Path(opt.project) / opt.name, exist_ok=opt.exist_ok))  # increment run
    (save_dir / 'labels' if save_txt else save_dir).mkdir(parents=True, exist_ok=True)  # make dir

    # Initialize
    set_logging()
    device = select_device(opt.device)
    half = device.type != 'cpu'  # half precision only supported on CUDA

    # Load model
    model = attempt_load(weights, map_location=device)  # load FP32 model
    imgsz = check_img_size(imgsz, s=model.stride.max())  # check img_size
    if half:
        model.half()  # to FP16

    # Second-stage classifier
    classify = False
    if classify:
        modelc = load_classifier(name='resnet101', n=2)  # initialize
        modelc.load_state_dict(torch.load('weights/resnet101.pt', map_location=device)['model']).to(device).eval()

    # Set Dataloader
    vid_path, vid_writer = None, None
    if webcam:
        view_img = True
        cudnn.benchmark = True  # set True to speed up constant image size inference
        dataset = LoadStreams(source, img_size=imgsz)
    else:
        save_img = True
        dataset = LoadImages(source, img_size=imgsz)

    # Get names and colors
    names = model.module.names if hasattr(model, 'module') else model.names
    colors = [[random.randint(0, 255) for _ in range(3)] for _ in names]

    # Run inference
    t0 = time.time()
    img = torch.zeros((1, 3, imgsz, imgsz), device=device)  # init img
    _ = model(img.half() if half else img) if device.type != 'cpu' else None  # run once
    for path, img, im0s, vid_cap in dataset:
        img = torch.from_numpy(img).to(device)
        img = img.half() if half else img.float()  # uint8 to fp16/32
        img /= 255.0  # 0 - 255 to 0.0 - 1.0
        if img.ndimension() == 3:
            img = img.unsqueeze(0)

        # Inference
        t1 = time_synchronized()
        pred = model(img, augment=opt.augment)[0]

        # Apply NMS
        pred = non_max_suppression(pred, opt.conf_thres, opt.iou_thres, classes=opt.classes, agnostic=opt.agnostic_nms)
        t2 = time_synchronized()

        # Apply Classifier
        if classify:
            pred = apply_classifier(pred, modelc, img, im0s)

        # Process detections
        for i, det in enumerate(pred):  # detections per image
            if webcam:  # batch_size >= 1
                p, s, im0, frame = path[i], '%g: ' % i, im0s[i].copy(), dataset.count
            else:
                p, s, im0, frame = path, '', im0s, getattr(dataset, 'frame', 0)

            p = Path(p)  # to Path
            save_path = str(save_dir / p.name)  # img.jpg
            txt_path = str(save_dir / 'labels' / p.stem) + ('' if dataset.mode == 'image' else f'_{frame}')  # img.txt
            s += '%gx%g ' % img.shape[2:]  # print string
            gn = torch.tensor(im0.shape)[[1, 0, 1, 0]]  # normalization gain whwh
            if len(det):
                # Rescale boxes from img_size to im0 size
                det[:, :4] = scale_coords(img.shape[2:], det[:, :4], im0.shape).round()

                # Print results
                for c in det[:, -1].unique():
                    n = (det[:, -1] == c).sum()  # detections per class
                    s += f'{n} {names[int(c)]}s, '  # add to string

                # Write results
                for *xyxy, conf, cls in reversed(det):
                    if save_txt:  # Write to file
                        xywh = (xyxy2xywh(torch.tensor(xyxy).view(1, 4)) / gn).view(-1).tolist()  # normalized xywh
                        line = (cls, *xywh, conf) if opt.save_conf else (cls, *xywh)  # label format
                        with open(txt_path + '.txt', 'a') as f:
                            f.write(('%g ' * len(line)).rstrip() % line + '\n')

                    if save_img or view_img:  # Add bbox to image
                        label = f'{names[int(cls)]} {conf:.2f}'
                        plot_one_box(xyxy, im0, label=label, color=colors[int(cls)], line_thickness=3)

            # Print time (inference + NMS)
            print(f'{s}Done. ({t2 - t1:.3f}s)')

            # Stream results
            if view_img:
                cv2.imshow(str(p), im0)
                if cv2.waitKey(1) == ord('q'):  # q to quit
                    raise StopIteration

            # Save results (image with detections)
            if save_img:
                if dataset.mode == 'image':
                    cv2.imwrite(save_path, im0)
                else:  # 'video'
                    if vid_path != save_path:  # new video
                        vid_path = save_path
                        if isinstance(vid_writer, cv2.VideoWriter):
                            vid_writer.release()  # release previous video writer

                        fourcc = 'mp4v'  # output video codec
                        fps = vid_cap.get(cv2.CAP_PROP_FPS)
                        w = int(vid_cap.get(cv2.CAP_PROP_FRAME_WIDTH))
                        h = int(vid_cap.get(cv2.CAP_PROP_FRAME_HEIGHT))
                        vid_writer = cv2.VideoWriter(save_path, cv2.VideoWriter_fourcc(*fourcc), fps, (w, h))
                    vid_writer.write(im0)

    if save_txt or save_img:
        s = f"\n{len(list(save_dir.glob('labels/*.txt')))} labels saved to {save_dir / 'labels'}" if save_txt else ''
        print(f"Results saved to {save_dir}{s}")

    print(f'Done. ({time.time() - t0:.3f}s)')


if __name__ == '__main__':
    parser = argparse.ArgumentParser()
    parser.add_argument('--weights', nargs='+', type=str, default='./weights/yolov5s.pt', help='model.pt path(s)')
    parser.add_argument('--source', type=str, default='data/images', help='source')  # file/folder, 0 for webcam
    parser.add_argument('--img-size', type=int, default=640, help='inference size (pixels)')
    parser.add_argument('--conf-thres', type=float, default=0.25, help='object confidence threshold')
    parser.add_argument('--iou-thres', type=float, default=0.45, help='IOU threshold for NMS')
    parser.add_argument('--device', default='', help='cuda device, i.e. 0 or 0,1,2,3 or cpu')
    parser.add_argument('--view-img', action='store_true', help='display results')
    parser.add_argument('--save-txt', action='store_true', help='save results to *.txt')
    parser.add_argument('--save-conf', action='store_true', help='save confidences in --save-txt labels')
    parser.add_argument('--classes', nargs='+', type=int, help='filter by class: --class 0, or --class 0 2 3')
    parser.add_argument('--agnostic-nms', action='store_true', help='class-agnostic NMS')
    parser.add_argument('--augment', action='store_true', help='augmented inference')
    parser.add_argument('--update', action='store_true', help='update all models')
    parser.add_argument('--project', default='runs/detect', help='save results to project/name')
    parser.add_argument('--name', default='exp', help='save results to project/name')
    parser.add_argument('--exist-ok', action='store_true', help='existing project/name ok, do not increment')
    opt = parser.parse_args()
    print(opt)

    with torch.no_grad():
        if opt.update:  # update all models (to fix SourceChangeWarning)
            for opt.weights in ['yolov5s.pt', 'yolov5m.pt', 'yolov5l.pt', 'yolov5x.pt']:
                detect()
                strip_optimizer(opt.weights)
        else:
            detect()

在这里插入图片描述
yolov5s.pt’, ‘yolov5m.pt’, ‘yolov5l.pt’, ‘yolov5x.pt’]:
detect()
strip_optimizer(opt.weights)
else:
detect()
总之,YOLOv8 Face项目是一个基于YOLOv8算法的人脸检测项目,具有高准确性、实时性能和多尺度检测等特点。它可以广泛应用于人脸识别、人脸表情分析、人脸属性识别等领域,为人脸相关的应用提供强大的支持。
计算机视觉、图像处理、毕业辅导、作业帮助、代码获取,远程协助,代码定制,私聊会回复!```


 2948
2948

 被折叠的 条评论
为什么被折叠?
被折叠的 条评论
为什么被折叠?
 到【灌水乐园】发言


