


前言
实验需要riscv仿真,网上没有针对m1的配置教程,故在此整理下。本人用的m1macbookpro,系统12.3。
参考到的链接:
https://github.com/AsahiLinux
https://risc-v-getting-started-guide.readthedocs.io/en/latest/linux-qemu.html
https://zhuanlan.zhihu.com/p/258394849
https://zhuanlan.zhihu.com/p/555398048
第一部分 m1双系统
安装asashi linux仅需一行命令,安装按照提示执行即可:
curl https://alx.sh | sh
第二部分 编译riscv工具链
安装依赖
$ sudo pacman -Syyu autoconf automake curl python3 libmpc mpfr gmp gawk base-devel bison flex texinfo gperf libtool patchutils bc zlib expat
下载工具链源码
$ git clone --recursive https://github.com/riscv/riscv-gnu-toolchain
$ cd riscv-gnu-toolchain
$ ./configure --prefix=/opt/riscv
$ make linux -j$(nproc)
之后在.zshrc中添加
export PATH="$PATH:/opt/riscv/bin"
export RISCV="/opt/riscv"
测试 toolchain 是否安装成功
$ riscv64-unknown-linux-gnu-gcc -v
第三部分 编译qemu和linux内核
下载源码
$ mkdir riscv64-linux
$ cd riscv64-linux
$ git clone https://github.com/qemu/qemu
$ git clone https://github.com/torvalds/linux
$ git clone https://git.busybox.net/busybox
编译qemu
$ cd qemu
$ git checkout v5.1.0
$ ./configure --target-list=riscv64-softmmu
$ make -j $(nproc)
$ sudo make install
这里会遇到一些类型转换和数组对齐报错,通过在报错的文件顶端添加#pragma GCC diagnostic ignored “-Wxx”可忽略这些错误,他们是编译器版本不同导致的,xx换成报的error即可。
编译linux
$ cd linux
$ git checkout v5.4.0
$ make ARCH=riscv CROSS_COMPILE=riscv64-unknown-linux-gnu- defconfig
$ make ARCH=riscv CROSS_COMPILE=riscv64-unknown-linux-gnu- -j $(nproc)
这里会遇到一个重定义报错,将其中一个作为实际变量,其他出现的地方添加extern可解决。
编译busybox
$ cd busybox
$ CROSS_COMPILE=riscv64-unknown-linux-gnu- make menuconfig
打开配置菜单后进入第一行的 “Settings”,在"Build Options"节中,选中 “Build static binary (no shared libs)”,设置好后退出保存配置
$ CROSS_COMPILE=riscv64-unknown-linux-gnu- make defconfig
$ CROSS_COMPILE=riscv64-unknown-linux-gnu- make -j $(nproc)
$ CROSS_COMPILE=riscv64-unknown-linux-gnu- make install
编译完后在目录下会有一个_install目录。
启动仿真
创建文件系统
$ cd riscv64-linux
$ qemu-img create rootfs.img  1g
$ mkfs.ext4 rootfs.img
$ mkdir rootfs
$ sudo mount -o loop rootfs.img  rootfs
$ cd rootfs
$ sudo cp -r ../busybox/_install/* .
$ sudo mkdir proc sys dev etc etc/init.d
创建init
$ cd etc/init.d/
$ sudo touch rcS
$ sudo vi rcS
编辑该文件内容如下:
#!/bin/sh
mount -t proc none /proc
mount -t sysfs none /sys
/sbin/mdev -s
增加权限:
$ sudo chmod +x rcS
最后解除mount
$ sudo umount rootfs
启动riscv64 linux
$ cd riscv64-linux
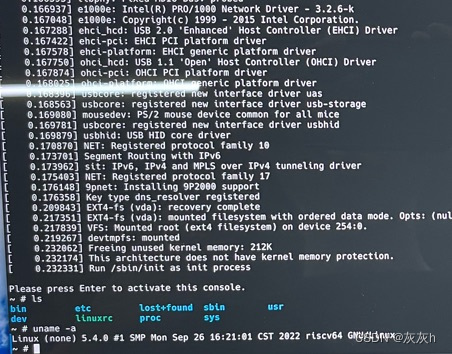
$ qemu-system-riscv64 -M virt -m 256M -nographic -kernel linux/arch/riscv/boot/Image -drive file=rootfs.img,format=raw,id=hd0 -device virtio-blk-device,drive=hd0 -append "root=/dev/vda rw console=ttyS0"
按回车后即可进入系统:


 4724
4724

 被折叠的 条评论
为什么被折叠?
被折叠的 条评论
为什么被折叠?
 到【灌水乐园】发言


