


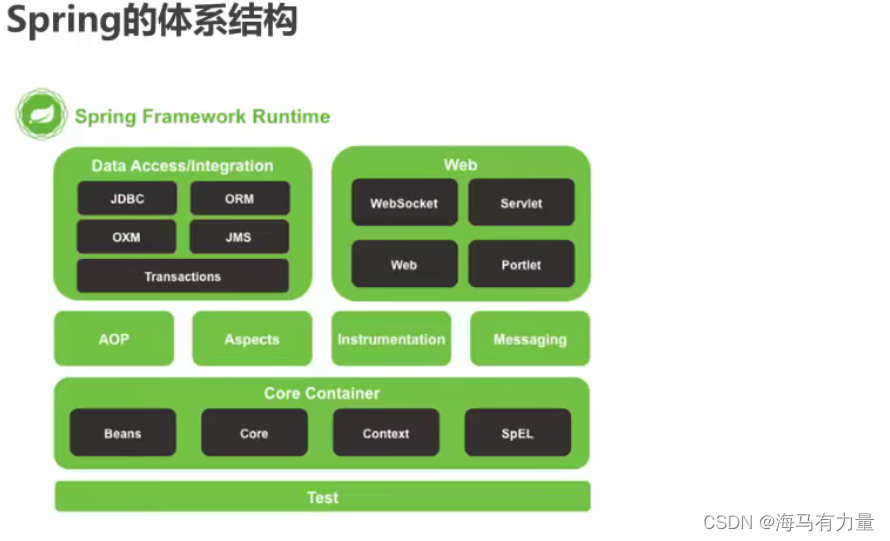
Spring是什么
Spring是分层的Java SE/EE应用full-stack轻量级开源框架,以IoC ( Inverse Of Control :反转控制)和AOP ( Aspect Oriented Programming :面向切面编程)为内核。
提供了展现层SpringMVC和持久层Spring JDBCTemplate以及业务层事务管理等众多的企业级应用技术,还能整合开源世界众多著名的第三方框架和类库,逐渐成为使用最多的Java EE企业应用开源框架。
Spring的开发步骤
①导入坐标
②创建Bean
③创建applicationContext.xml
④在配置文件中进行配置
⑤创建ApplicationContext对象getBean
Bean标签基本配置
用于配置对象交由Spring来创建。
默认情况下它调用的是类中的无参构造函数,如果没有无参构造函数则不能创建成功。
基本属性:
●id: Bean实例在Spring容器中的唯一标识
●class: Bean的全限定名称
<bean id="userDao" class="com.ithiema.dao.impl.UserDaoImpl" >
默认singleton
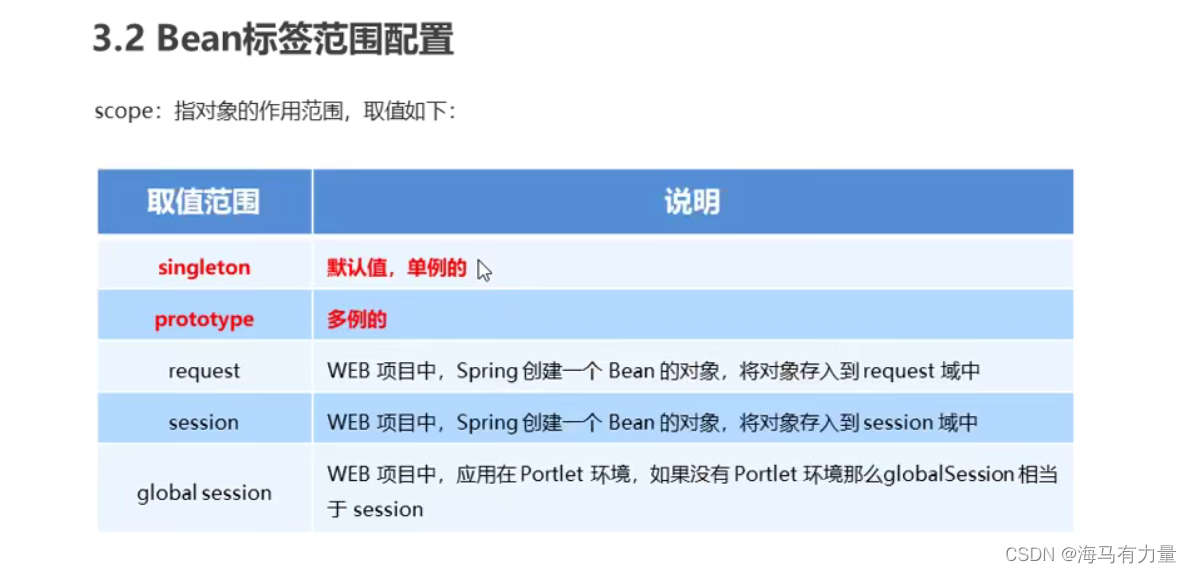
Bean标签范围配置
1)当scope的取值为singleton时
Bean的实例化个数: 1个
Bean的实例化时机:当Spring核心文件被加载时,实例化配置的Bean实例
Bean的生命周期:
●对象创建:当应用加载,创建容器时,对象就被创建了
●对象运行:只要容器在,对象- -直活着
●对象销毁:当应用卸载,销毁容器时,对象就被销毁了
2)当scope的取值为prototype时
Bean的实例化个数:多个
Bean的实例化时机:当调用getBean0方法时实例化Bean
●对象创建: 当使用对象时,创建新的对象实例
●对象运行:只要对象在使用中,就一-直活着
●对象销毁:当对象长时间不用时,被Java的垃圾回收器回收了
<bean id="userDao" class="com.ithiema.dao.impl.UserDaoImpl" scope="singleton"></bean>
Bean生命周期配置
●init-method:指定类中的初始化方法名称
●destroy-method:指定类中销毁方法名称
Dao层的实现类:
public class UserDaoImpl implements UserDao {
    public void init(){
        System.out.println("初始化中。。。");
    }

    public void destory(){
        System.out.println("销毁中。。。");
    }

    @Override
    public void save() {
        System.out.println("save running...");
    }
}
<bean id="userDao" class="com.ithiema.dao.impl.UserDaoImpl" init-method="init" factory-method="aspectOf"></bean>
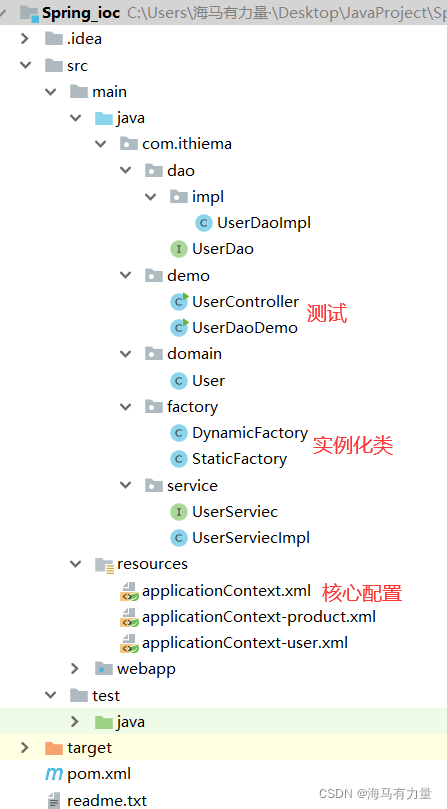
引入其他配置文件(分模块开发)
实际开发中,Spring的配置内容非常多,这就导致Spring配置很繁杂且体积很大,所以,可以将部分配置拆解到其他
配置文件中而在Spring主配置文件通过import标签进行加载
<import resource="applicationContext-xx . xml"/>
Spring容器加载properties文件
<context :property-placeholder location ="xK .properties"/>
<property name ="" value- ="${key}"/>
Spring的重点配置
bean标签
id属性:在容器中Bean实例的唯一标识, 允许重复
class属性:要实例化的Bean的全限定名
scope属性:Bean的作用范围,常用是Singleton (默认)和prototype
property标签:属性注入
name属性:属性名称
value属性:注入的普通属性值
ref属性:注入的对象引用值
list标签
map标签
properties标签
constructor-arg标签
import标签:导入其他的Spring的分文件
Bean实例化三种方式
●无参构造方法实例化
●厂静态方法实例化
●工厂实例方法实例化
    无参构造方法实例化
    <bean id="userDao" class="com.ithiema.dao.impl.UserDaoImpl" ></bean>

    厂静态方法实例化
    <bean id="userDao" class="com.ithiema.factory.StaticFactory" factory-method="getUserDao"></bean>

    工厂实例方法实例化
    <bean id="factory" class="com.ithiema.factory.DynamicFactory"></bean>
    <bean id="userDao" factory-bean="factory" factory-method="getUserDao"></bean>
Bean的依赖注入概念
依赖注入(Dependency Injection) :它是Spring框架核心I0C的具体实现。
在编写程序时,通过控制反转,把对象的创建交给了Spring,但是代码中不可能出现没有依赖的情况。
IOC解耦只是降低他们的依赖关系,但不会消除。例如:业务层仍会调用持久层的方法。
那这种业务层和持久层的依赖关系,在使用Spring之后,就让Spring来维护了。
简单的说,就是坐等框架把持久层对象传入业务层,而不用我们自己去获取。
怎么将UserDao怎样注入到UserService内部呢?
set方法注入
首先service层方法实现类要生成set方法:
public class UserServiecImpl implements UserServiec {
    private UserDao userDao;
    //set方法注入
    public void setUserDao(UserDao userDao) {
        this.userDao = userDao;
    }
    public void save() {
        userDao.save();
    }
}
然后配置xml文件:
    <bean id="userService" class="com.ithiema.service.UserServiecImpl">
        <property name="userDao" ref="userDao"/>
    </bean>
P命名空间注入本质也是set方法注入,但比起上述的set坊法注入更加方便,主要体现在配置文件中,如下:
首先,需要引入P命名空间:
xmlns:p ="http: //www. springfr amework.org/ schema/p"
其次,需要修改注入式:
    <!--set方法注入,p命名空间方式-->
    <bean id="userService" class="com.ithiema.service.UserServiecImpl" p:userDao-ref="userDao"/>
构造方法注入
首先service层方法实现类要生成含参(无参的也需要)的构造方法:
public class UserServiecImpl implements UserServiec {
    private UserDao userDao;
//    构造方法注入
    public UserServiecImpl(UserDao userDao) {
        this.userDao = userDao;
    }

    public UserServiecImpl() {}

    public void save() {
        userDao.save();
    }
}
然后配置xml文件:
	<bean id="userService" class="com.ithiema.service.UserServiecImpl">
	    <constructor-arg name="userDao" ref="userDao"></constructor-arg>
	</bean>
Bean的依赖注入的数据类型
注入数据的三种数据类型
普通数据类型
	<bean id="userDao" class="com.ithiema.dao.impl.UserDaoImpl" >
        <property name="username" value="zhangsan"/>
        <property name="age" value="18"/>
    </bean>
引用数据类型
依赖注入就是,将dao注入到service
集合数据类型
    private List<String> strList;
    private Map<String, User> userMap;
    private Properties properties;
<bean id="userDao" class="com.ithiema.dao.impl.UserDaoImpl" >
        <property name="strList">
            <list>
                <value>aaa</value>
                <value>bb</value>
                <value>ccc</value>
            </list>
        </property>
        <property name="userMap">
            <map>
                <entry key="u1" value-ref="user1"/>
                <entry key="u2" value-ref="user2"/>
            </map>
        </property>
        <property name="properties">
            <props>
                <prop key="p1">111</prop>
                <prop key="p2">222</prop>
            </props>
        </property>
    </bean>

    <bean id="user1" class="com.ithiema.domain.User">
        <property name="name" value="tom"/>
        <property name="age" value="18"/>
    </bean>

    <bean id="user2" class="com.ithiema.domain.User">
        <property name="name" value="jack"/>
        <property name="age" value="20"/>
    </bean>
Spring测试
Spring容器产生的数据源对象
 @Test
    //测试Spring容器产生的数据源对象
    public void test4() throws Exception{
        ApplicationContext app = new ClassPathXmlApplicationContext("applicationContext.xml");
        DataSource dataSource = app.getBean(DataSource.class);
        Connection connection = dataSource.getConnection();
        System.out.println(connection);
        connection.close();
    }
Spring集成Junit步骤
①导入spring集成Junit的坐标(spring-test)
②使用@Runwith注解替换原来的运行期
③使用@ContextConfiguration指定配置文件或配置类
④使用@Autowired注入需要测试的对象
⑤创建测试方法进行测试
@RunWith(SpringJUnit4ClassRunner.class)
//@ContextConfiguration("classpath:applicationContext.xml")
@ContextConfiguration(classes = {SpringConfiguration.class})
public class SpringJunitTest {

    @Autowired
    private UserService userService;

    @Autowired
    private DataSource dataSource;

    @Test
    public void test1(){
        System.out.println(dataSource);
        userService.save();
    }

}
Spring注解开发

Spring原始注解
注意:使用注解进行开发时,需要在applicationContext.xml中配置组件扫描, 作用是指定哪个包及其子包下的Bean需要进行扫描以便识别使用注解配置的类、字段和方法。
<!--注解的组件扫描- >
<context :component-scan base-package =" com.itheima"/>
实现类上加上@Component(“类名”)注解;
service层实现类中引用的dao方法需加上@Autowired @Qualifier(“类名”);
所有类上均可加@Component,为区分web层,service层,dao层,可用@Controller,@Service,@Repository区分。

//<bean id="userService" class="com.ithiema.service.impl.UserServiceImpl">
//@Component("userService")
@Service("userService")
@Scope("singleton")
public class UserServiceImpl implements UserService{

    @Value("${jdbc.driver}")
    private String str;

    // <property name="userDao" ref="userDao"/>
    //@Autowired   //按照数据类型从Spring容器中匹配
    //@Qualifier("userDao")   //按照id值从Spring容器中匹配,需与Autowired一起使用
    @Resource(name="userDao")
    private UserDao userDao;

//    使用xml配置注入,需写上;注解注入不需要
//    public void setUserDao(UserDao userDao) {
//        this.userDao = userDao;
//    }

    @Override
    public void save() {
        System.out.println(str);
        userDao.save();
    }

    @PostConstruct	//构造之后
    public void init(){
        System.out.println("Service对象的初始化方法");
    }

    @PreDestroy		//销毁之前
    public void destory(){
        System.out.println("Service对象销毁方法");
    }

}
Spring新注解
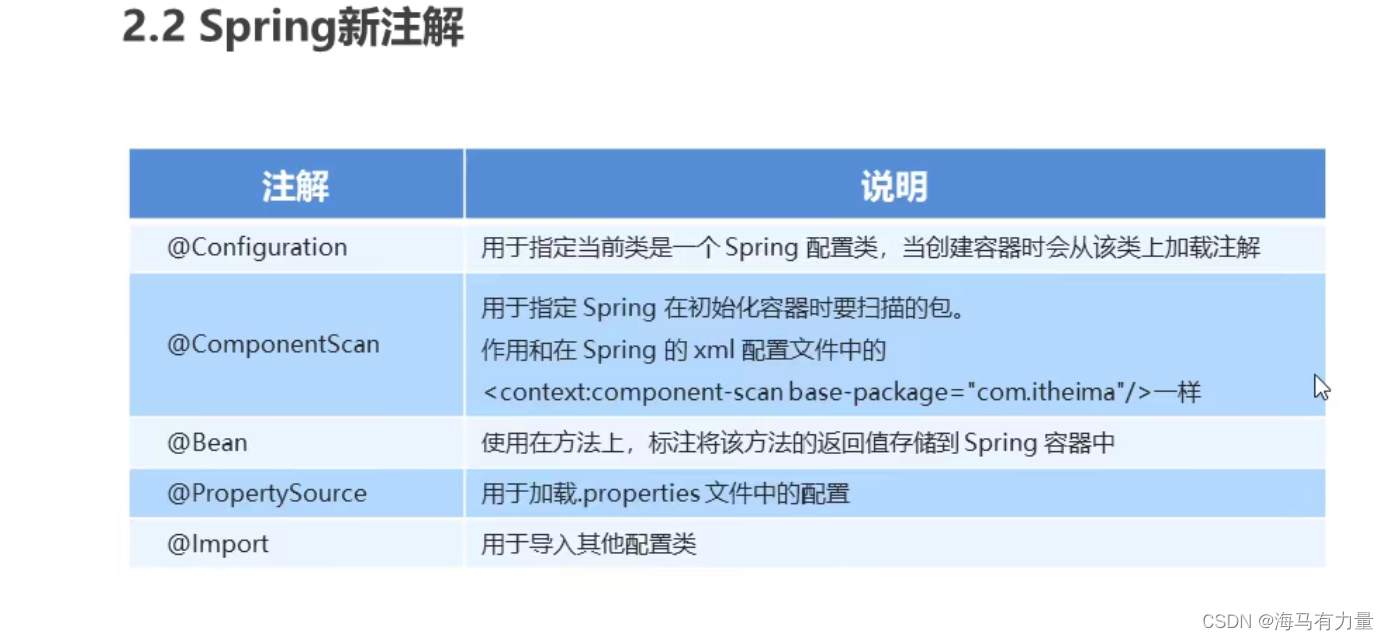
@Configuration
@ComponentScan("com.ithiema")
@Import({DataSourceConfiguration.class})
public class SpringConfiguration {
}
@PropertySource("classpath:jdbc.properties")
public class DataSourceConfiguration {

    @Value("${jdbc.driver}")
    private String driver;
    @Value("${jdbc.url}")
    private String url;
    @Value("${jdbc.username}")
    private String username;
    @Value("${jdbc.password}")
    private String password;

    @Bean("dataSource")
    public DataSource getDataSource(){
        DruidDataSource dataSource = new DruidDataSource();
        dataSource.setDriverClassName(driver);
        dataSource.setUrl(url);
        dataSource.setUsername(username);
        dataSource.setPassword(password);
        return dataSource;
    }
}
Spring集成web环境
web测试类
applicationContext:接口类型,代表应用上下文,可以通过其实例获得Spring容器中的Bean对象
getbean方法:其中,当参数的数据类型是字符串时,表示根据Bean的id从容器中获得Bean实例,返回是Object, 需要强转。当参数的数据类型是Class类型时,表示根据类型从容器中匹配Bean实例,当容器中相同类型的Bean有多个时,则此方法会报错。
public class UserController {

    public static void main(String[] args) {
        ClassPathXmlApplicationContext app = new ClassPathXmlApplicationContext("applicationContext.xml");
        UserService userService = app.getBean(UserService.class);
        userService.save();
        app.close();
    }

}
Spring集成web环境步骤
ApplicationContext应用上下文获取方式应用.上下文对象是通过new ClasspathxmlApplicationContext(spring配置文件)方式获取的,但是每次从容器中获得Bean时都要编写new ClasspathXmlApplicationContext(spring配置文件) ,这样的弊端是配置文件加载多次,应用上下文对象创建3次。
在Web项目中,可以使用ServletContextListener监听Web应用的启动,我们可以在Web应用启动时,就加载Spring的配置文件,创建应用上下文对象ApplicationContext,在将其存储到最大的域servletContext域中,这样就可以在任意位置从域中获得应用上下文ApplicationContext对象了。
spring集成web环境步骤:
1、导入spring-web的jar包;
2、web.xml配置ContextLoaderListener监听器;
3、使用WebApplicationContextUtils获得应用上下文。
  <!--全局初始化参数-->
  <context-param>
    <param-name>contextConfigLocation</param-name>
    <param-value>classpath:applicationContext.xml</param-value>
  </context-param>
  <!--配置监听器-->
  <listener>
    <listener-class>org.springframework.web.context.ContextLoaderListener</listener-class>
  </listener>
public class ContextLoaderListener implements ServletContextListener {
    public void contextInitialized(ServletContextEvent servletContextEvent){

        ServletContext servletContext = servletContextEvent.getServletContext();
        String contextConfigLocation = servletContext.getInitParameter("contextConfigLocation");
        ClassPathXmlApplicationContext app = new ClassPathXmlApplicationContext(contextConfigLocation);
        //将Spring的上下文对象存储到ServletContext域中
        servletContext.setAttribute("app",app);
        System.out.println("Spring容器创建完毕。。。");
    }

    public void context(ServletContextEvent servletContextEvent){}
}
public class UserServlet extends HttpServlet {
    @Override
    protected void doGet(HttpServletRequest req, HttpServletResponse resp) throws ServletException, IOException {
        ServletContext servletContext = this.getServletContext();
        //ApplicationContext app = (ApplicationContext) servletContext.getAttribute("app");
        WebApplicationContext app = WebApplicationContextUtils.getWebApplicationContext(servletContext);
        UserService userServiec = app.getBean(UserService.class);
        userServiec.save();
    }
}
JdbcTemplate
JdbcTemplate概述
它是spring框架中提供的一个对象,是对原始繁琐的Jdbc API对象的简单封装。spring框架为我们提供了很多的操作
模板类。例如:操作关系型数据的JdbcTemplate和HibernateTemplate, 操作nosq数据库的RedisTemplate, 操
作消息队列的JmsTemplate等等。
JdbcTemplate开发步骤
①导入spring-jdbc和spring-tx坐标
②创建数据库表和实体
③创建JdbcTemplate对象
④执行数据库操作
	@Test
    //调试jdbcTemplate开发步骤
    public void test1() throws PropertyVetoException {
        //创建数据源对象
        ComboPooledDataSource dataSource = new ComboPooledDataSource();
        dataSource.setDriverClass("com.mysql.jdbc.Driver");
        dataSource.setJdbcUrl("jdbc:mysql://localhost:3306/order");
        dataSource.setUser("root");
        dataSource.setPassword("123");

        JdbcTemplate jdbcTemplate = new JdbcTemplate();
        jdbcTemplate.setDataSource(dataSource);
        int row = jdbcTemplate.update("insert into account values (?,?)","tom",5000);
        System.out.println(row);
    }
Spring产生JdbcTemplate对象
我们可以将JdbcTemplate的创建权交给Spring,将数据源DataSource的创建权也交给Spring,在Spring容器内部将数据源DataSource注入到JdbcTemplate模版对象中,配置如下:
	<context:property-placeholder location="classpath:jdbc.properties"/>

    <bean id="dataSource" class="com.mchange.v2.c3p0.ComboPooledDataSource">
        <property name="driverClass" value="${jdbc.driver}"/>
        <property name="jdbcUrl" value="${jdbc.url}"/>
        <property name="user" value="${jdbc.username}"/>
        <property name="password" value="${jdbc.password}"/>
    </bean>

    <bean id="jdbcTemplate" class="org.springframework.jdbc.core.JdbcTemplate">
        <property name="dataSource" ref="dataSource"/>
    </bean>
	@Test
    //调试spring产生的jdbcTemplate对象
    public void test2() throws PropertyVetoException {
        ClassPathXmlApplicationContext app = new ClassPathXmlApplicationContext("applicationContext.xml");
        JdbcTemplate jdbcTemplate = app.getBean(JdbcTemplate.class);
        int row = jdbcTemplate.update("insert into account values (?,?)","jack",500);
        System.out.println(row);
    }
@RunWith(SpringJUnit4ClassRunner.class)
@ContextConfiguration("classpath:applicationContext.xml")
public class JdbcTemplateCRUDTest {

    @Autowired
    private JdbcTemplate jdbcTemplate;

    @Test
    public void testUpdate(){
        jdbcTemplate.update("update account set money=? where name=?",100,"tom");
    }

    @Test
    public void testDelete(){
        jdbcTemplate.update("delete from account where name=?","tom");
    }
}

	@Test
    public void testQueryAll(){
        List<Account> accountList = jdbcTemplate.query("select * from account", new BeanPropertyRowMapper<Account>(Account.class));
        System.out.println(accountList);
    }

    @Test
    public void testQueryOne(){
        Account account = jdbcTemplate.queryForObject("select * from account where name=?", new BeanPropertyRowMapper<Account>(Account.class),"jack");
        System.out.println(account);
    }

    @Test
    public void testQueryCount(){
        Long count = jdbcTemplate.queryForObject("select count(*) from account ",Long.class);
        System.out.println(count);
    }
知识要点
①导入spring-jdbc和spring-tx坐标
②创建数据库表和实体
③创建JdbcTemplate对象
JdbcTemplate j dbcTemplate = new JdbcTemplate () ;
jdbcTemplate . setDataSource (dataSource) ;
④执行数据库操作
更新操作:
jdbcTemplate. update (sq1, params )
查询操作:
jdbcTemplate . query (sql , Mapper, params )
jdbcTemplate . queryFor0bj ect (sq1, Mapper, params)
Spring的AOP简介
1.1什么是AOP
AOP为Aspect Oriented Programming的缩写,意思为面向切面编程,是通过预编译方式和运行期动态代理
实现程序功能的统-维护的一种技术。
AOP是0OP的延续,是软件开发中的一个热点,也是Spring框架中的一个重要内容,是函数式编程的一种衍
生范型。利用AOP可以对业务逻辑的各个部分进行隔离,从而使得业务逻辑各部分之间的耦合度降低,提高程序
的可重用性,同时提高了开发的效率。
1.2 AOP的作用及其优势
●作用:在程序运行期间,在不修改源码的情况下对方法进行功能增强
●优势: 减少重复代码,提高开发效率,并且便于维护
1.3 AOP的底层实现
实际上,AOP的底层是通过Spring提供的的动态代理技术实现的。在运行期间,Spring通过 动态代理技术动态
的生成代理对象,代理对象方法执行时进行增强功能的介入,在去调用目标对象的方法,从而完成功能的增强。
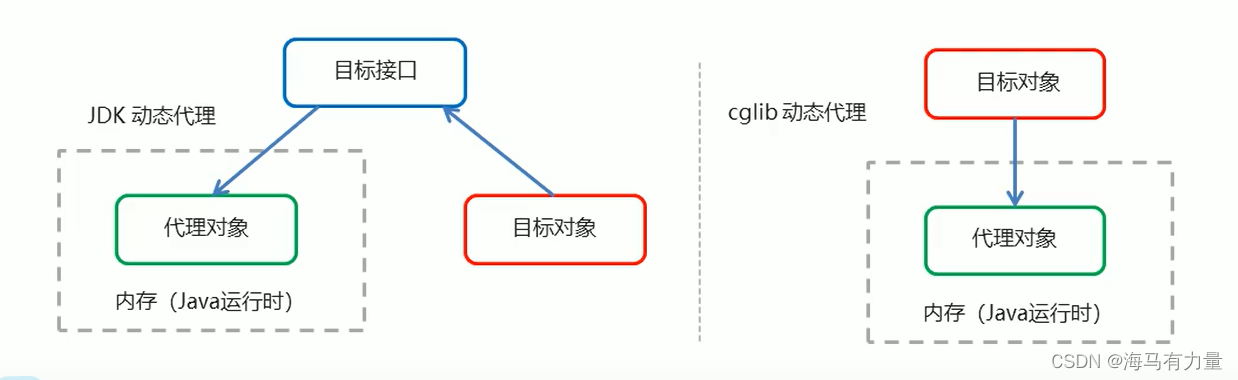
1.4 AOP的动态代理技术
常用的动态代理技术
●JDK 代理:基于接口的动态代理技术
public class ProxyTest {

    public static void main(String[] args) {

        //目标对象
        final Target target = new Target();
        //增强对象
        final Advice advice = new Advice();

        //返回值 就是动态生成的代理对象
        TargetInterface proxy = (TargetInterface) Proxy.newProxyInstance(
                target.getClass().getClassLoader(), //目标对象的类加载器
                target.getClass().getInterfaces(),  //目标对象相同的接口字节码数组
                new InvocationHandler() {
                    //调用代理对象的任何方法 实质执行的都是invoke方法
                    public Object invoke(Object proxy, Method method, Object[] args) throws Throwable {
                        advice.before();  //前置增强
                        Object invoke = method.invoke(target, args); //执行目标方法
                        advice.after();   //后置增强
                        return invoke;
                    }
                }
        );

        //调用代理对象的方法
        proxy.save();

    }

}
●cglib代理: 基于父类的动态代理技术
public class ProxyTest {

    public static void main(final String[] args) {

        //目标对象
        final Target target = new Target();
        //增强对象
        final Advice advice = new Advice();

        //返回值 就是动态生成的代理对象  基于cglib
        //创建增强器
        Enhancer enhancer = new Enhancer();
        设置父类(目标)
        enhancer.setSuperclass(Target.class);
        //设置回调
        enhancer.setCallback(new MethodInterceptor() {
            @Override
            public Object intercept(Object o, Method method, Object[] objects, MethodProxy methodProxy) throws Throwable {
                advice.before();
                Object invoke = method.invoke(target, args);
                advice.after();
                return invoke;
            }
        });

        //调用代理对象
        Target proxy = (Target) enhancer.create();
        proxy.save();
    }

}
1.5 AOP开发明确的事项
1.需要编写的内容
●编写核心业务代码(目标类的目标方法)
●编写切面类,切面类中有通知(增强功能方法)
●在配置文件中,配置织入关系,即将哪些通知与哪些连接点进行结合
2. AOP技术实现的内容
Spring框架监控切入点方法的执行。- -旦监控到切入点方法被运行,使用代理机制,动态创建目标对象的
代理对象,根据通知类别,在代理对象的对应位置,将通知对应的功能织入,完成完整的代码逻辑运行。
1.6知识要点
●aop: 面向切面编程
●aop底层实现:基于JDK的动态代理和基于Cglib的动态代理
●aop的重点概念:
Pointcut (切入点) :被增强的方法
Advice (通知/增强) :封装增强业务逻辑的方法
Aspect (切面) :切点+通知
Weaving (织入) :将切点与通知结合的过程
●开发明确事项:
谁是切点(切点表达式配置)
谁是通知(切面类中的增强方法)
将切点和通知进行织入配置
基于XML的AOP开发
快速入门
①导入AOP相关坐标(spring-context,aspectjweaver)
②创建目标接口和目标类(内部有切点)
③创建切面类(内部有增强方法)
④将目标类和切面类的对象创建权交给spring
⑤在applicationContextxml中配置织入关系
⑥测试代码
<!--目标对象-->
<bean id="target" class="com.aynu.aop.Target"/>

<!--切面对象-->
<bean id="MyAspect" class="com.aynu.aop.MyAspect"/>

<!--配置织入:告诉Spring哪些方法(切点)需要增强(前置,后置)-->
<aop:config>
    <!--声明切面-->
    <aop:aspect ref="MyAspect">
        <!--切面:切点+通知-->
        <aop:before method="before" pointcut="execution(public void com.aynu.aop.Target.save())"/>
    </aop:aspect>
</aop:config>
XML配置AOP详解
1.切点表达式的写法
表达式语法:
execution([修饰符]返回值类型包名.类名.方法名(参数))
●访问修饰符可以省略
返回值类型、包名、方法名可以使用星号*代表任意
●包名与类名之间一 个点.代表当前包下的类,两个点…表示当前包及其子包下的类
●参数列表可以使用两个点 . . 表示任意个数,任意类型的参数列表
例如:
execution(public void com.theima.aop.Target.method() )
execution(void com.itheima.aop. Target.*(..))
execution(* com.itheima.aop.*.*(..))
execution(* com.itheima.aop..*.*(. .) )
execution(* *..*.*(..) )
aop包下的任意类的任意方法
<aop:before method="before" pointcut="execution(* com.aynu.aop.*.*(..))"/>
通知的类型
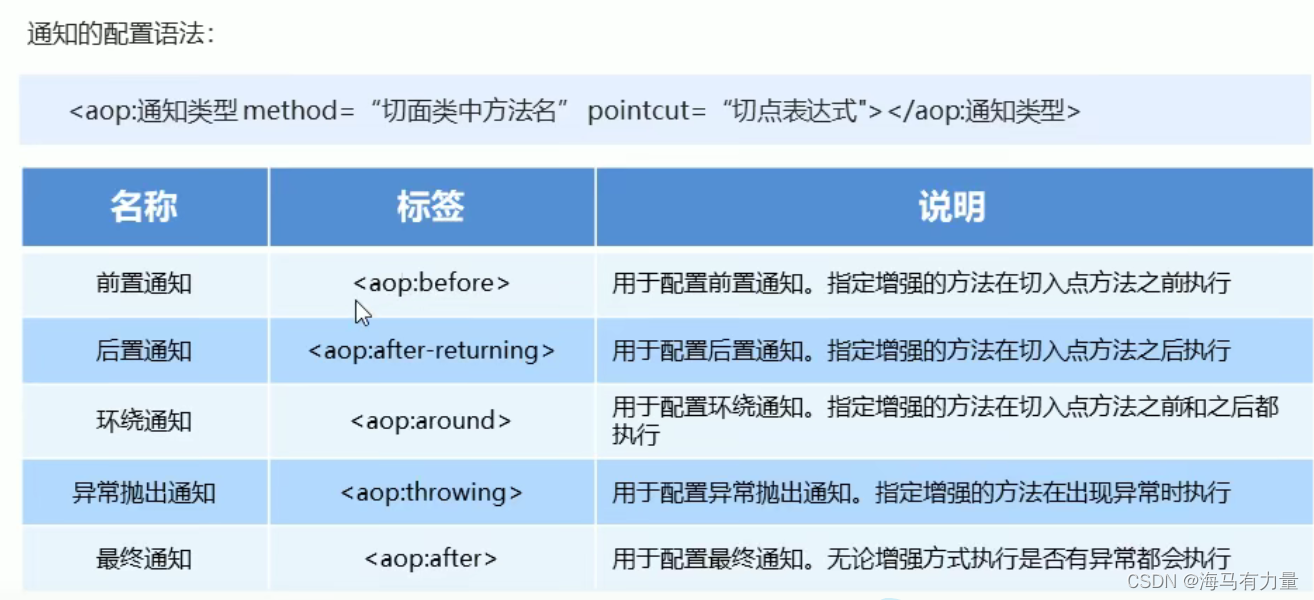
  <!--配置织入:告诉Spring哪些方法(切点)需要增强(前置,后置)-->
    <aop:config>
        <!--声明切面-->
        <aop:aspect ref="MyAspect">
            <!--切面:切点+通知-->
            <!--<aop:before method="before" pointcut="execution(public void com.aynu.aop.Target.save())"/>-->
            <!--<aop:before method="before" pointcut="execution(* com.aynu.aop.*.*(..))"/>-->
            <!--<aop:after-returning method="afterrunning" pointcut="execution(* com.aynu.aop.*.*(..))"/>-->
            <aop:around method="around" pointcut="execution(* com.aynu.aop.*.*(..))"/>
            <aop:after-throwing method="afterthrowing" pointcut="execution(* com.aynu.aop.*.*(..))"/>
            <aop:after method="after" pointcut="execution(* com.aynu.aop.*.*(..))"/>
        </aop:aspect>
    </aop:config>
public class MyAspect {

    public void before(){
        System.out.println("before advance...");
    }

    public void afterrunning(){
        System.out.println("afterrunning advance...");
    }

    //ProceedingJoinPoint:正在执行的连接点==切入点
    public Object around(ProceedingJoinPoint pjp) throws Throwable {
        System.out.println("before around...");
        final Object proceed = pjp.proceed();
        System.out.println("after around...");
        return proceed;
    }

    public void afterthrowing(){
        System.out.println("afterthrowing...");
    }

    public void after(){
        System.out.println("after running...");
    }
}
切点表达式的抽取
当多个增强的切点表达式相同时,可以将切点表达式进行抽取,在增强中使用pointcut- ref属性代替pointcut属性来引用抽
取后的切点表达式。
<aop:config>
        <!--声明切面-->
        <aop:aspect ref="MyAspect">
            <!--抽取切点表达式-->
            <aop:pointcut id="myPointCut" expression="execution(* com.aynu.aop.*.*(..))"/>
            <aop:around method="around" pointcut-ref="myPointCut"/>
        </aop:aspect>
    </aop:config>
基于xml的声明事务控制
什么是声明式事务控制
Spring的声明式事务顾名思义就是采用声明的方式来处理事务。这里所说的声明,就是指在配置文件中声明,用在Spring配置文件中声明式的处理事务来代替代码式的处理事务。声明式事务处理的作用
●事务管理不侵入开发的组件。 具体来说,业务逻辑对象就不会意识到正在事务管理之中,事实地应该如此,因为事务管理是属于系统层面的服务,而不是业务逻辑的一部分,如果想要改变事务管理策划的话,也只需要在定义文件中重新配置即可
●在不需要事务管理的时候, 只要在设定文件上修改一下, 即可移去事务管理服务,无需改变代码重新编译,这样维护起来极其方便。注意: Spring 声明式事务控制底层就是AOP。
声明式事务控制的配置要点:
●平台事务管理器配置
●事务通知的配置
●事务aop织入的配置
 <!--配置平台事务管理-->
<bean id="transactionManager" class="org.springframework.jdbc.datasource.DataSourceTransactionManager">
    <property name="dataSource" ref="dataSource"/>
</bean>

<!--通知 事务的增强-->
<tx:advice id="myAdvice" transaction-manager="transactionManager">
    <tx:attributes>
        <tx:method name="*"/>
        <tx:method name="transfer" isolation="DEFAULT" propagation="REQUIRED" timeout="-1" read-only="false"/>
    </tx:attributes>
</tx:advice>

<!--配置事务的aop织入-->
<aop:config>
    <aop:advisor advice-ref="myAdvice" pointcut="execution(* com.itheima.service.*.*(..))"/>
</aop:config>
其中,< tx:method> 代表切点方法的事务参数的配置,例如:
<tx :method name=“transfer” isolation=“REPEATABLE READ” propagation= =“REQUIRED” timeout= ="-1” read-only=“false”/>
●name:切点方法名称
●isolation;事务的隔离级别
●propogation: 事务的传播行为
●timeQut:超时时间
●read-only: 是否只读
基于注解的声明事务控制
注解配置声明式事务控制解析
①使佣@Transactional在需要进行事务控制的类或是方法上修饰,注解可用的属性同xml配置方式,例如
隔离级别、传播行为等。
②注解使用在类上,那么该类下的所有方法都使用同一套注解参数配置。
③使用在方法上,不同的方法可以采用不同的事务参数配置。
@Service("accountService")
@Transactional
public class AccountServiceImpl implements AccountService {

    @Autowired
    private AccountDao accountDao;

    @Transactional(isolation = Isolation.DEFAULT,propagation = Propagation.REQUIRED,timeout = -1,readOnly = false)
    public void transfer(String outMan, String inMan, double money) {
        accountDao.out(outMan,money);
        int i=1/0;
        accountDao.in(inMan,money);
    }
}
 <context:component-scan base-package="com.itheima"/>
<!--配置平台事务管理-->
<bean id="transactionManager" class="org.springframework.jdbc.datasource.DataSourceTransactionManager">
    <property name="dataSource" ref="dataSource"/>
</bean>

<!--事务的注解驱动-->
<tx:annotation-driven transaction-manager="transactionManager"/>
注解声明式事务控制的配置要点
●平台事务管理器配置(xm1方式)
●事务通知的配置(@Transact iona i注解配置)
●事务注解驱动的配置<tx: annotation-driven/>
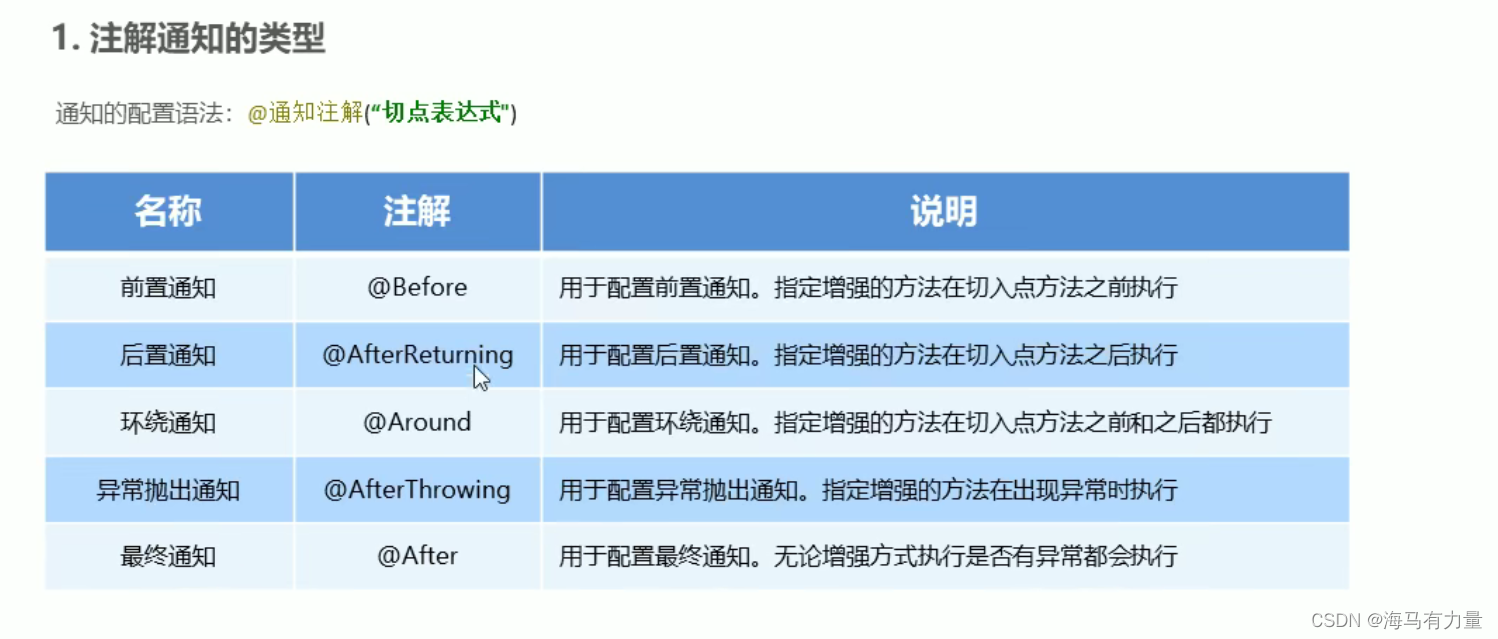
基于注解的AOP开发
快速入门
基于注解的aop开发步骤:
①创建目标接口和目标类(内部有切点)
②创建切面类(内部有增强方法,使用@Aspect标注切面类
使用@通知注解标注通知方法)
③将目标类和切面类的对象创建权交给spring
④在切面类中使用注解配置织入关系
⑤在配置文件中开启组件扫描和AOP的自动代理()
⑥测试
@Component("myAspect")
@Aspect //告诉Spring框架这是一个切面类
public class MyAspect {
    //配置前置通知
    @Before("execution(* com.aynu.anno.*.*(..))")
    public void before(){
        System.out.println("before advance...");
    }
}
    <!--注解扫描-->
    <context:component-scan base-package="com.aynu.anno"/>

    <!--aop自动代理-->
    <aop:aspectj-autoproxy/>
注解的通知类型
切点表达式的抽取
同xml配置aop-样,我们可以将切点表达式抽取。抽取方式是在切面内定义方法,在该方法上使用@Pointcut
注解定义切点表达式,然后在在增强注解中进行引用。具体如下:
public class MyAspect {
    @AfterReturning("myPoint()")
    public void afterrunning(){
        System.out.println("afterrunning advance...");
    }

    @After("MyAspect.myPoint()")
    public void after(){
        System.out.println("after running...");
    }
    @Pointcut("execution(* com.aynu.anno.*.*(..))")
    public void myPoint(){}
}


 289
289


 被折叠的 条评论
为什么被折叠?
被折叠的 条评论
为什么被折叠?
 到【灌水乐园】发言


