


 本文介绍了一款用于优化九宫格图片面积的Python工具,通过裁剪连续相同行(列),仅保留必要的行(列),从而缩小图片面积,特别适用于Unity中使用的九宫图片。
博客迁移
个人博客站点,欢迎访问,www.jiingfengji.tech
Python工具之一:九宫格图片极致裁剪
工具用途
在读到文章(https://blog.uwa4d.com/archives/PSD4UGUI.html)时,文章中提到“e.通过设定参数即可自动生成九宫图片,优化九宫图片面积”,引发的思考:如何优化九宫图片面积?九宫图片作为拉伸图片使用,拉伸区域越小越能缩小图片面积,达到优化的目的。进一步找到文章(https://gameinstitute.qq.com/community/detail/103423)
文章中提到下图

将连续相同的行(列)裁剪掉,只保留一行(列)即可,依次达到九宫图片面积缩小的目的。
(ps:讲道理,图片处理软件里应该能精准控制裁剪的,为啥要程序写工具来做这件事?美术表示我不会…)
本文中并没有写的上文中那么详细,我的最终目的是给Unity中使用的九宫图片做裁剪,因此文章中有部分内容跟Unity沾边,不过不影响工具的使用,工具使用Python开发。
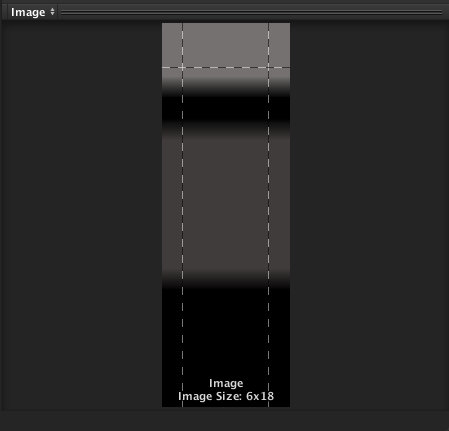
如下图:Unity中两纯色像素之间有颜色过渡,因此工具没有将图片的连续相同行(列)裁剪到只保留一行(列),而是三行(列)。
开发思考
(1)如何加载、保存、读写一个image,本工具使用OpenCV2
(2)如何判断图片的两行(列)是否完全相同
(3)如何计算出图片的最佳九宫区域
(4)如何裁剪九宫区域
裁剪结果
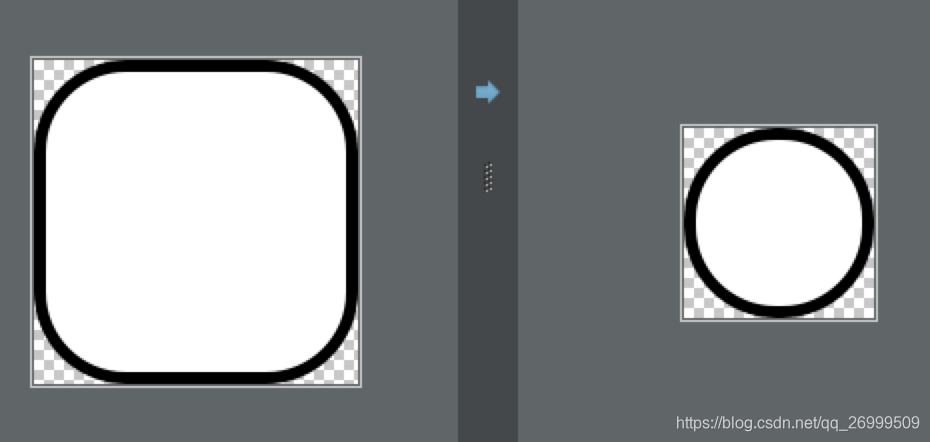
看起来很像变成了一个圆形,其实四条边上有三行(列)像素是九宫区域
代码介绍
# 比较两行是否相等
# 相等返回true,否则返回false
def equal_row_pixel(img,row1,row2):
    height = img.shape[0]        #将tuple中的元素取出,赋值给height,width,channels
    width = img.shape[1]
    channels = img.shape[2]
    if(row1 < 0 or row1 >= height):
    	return False
    if(row2 < 0 or row2 >= height):
    	return False
    for col in range(width):
        for channel in range(channels):
            if(img[row1][col][channel] != img[row2][col][channel]):
                return False
    return True
# 比较两列是否相等
# 相等返回true,否则返回false
def equal_col_pixel(img,col1,col2):
    height = img.shape[0]        #将tuple中的元素取出,赋值给height,width,channels
    width = img.shape[1]
    channels = img.shape[2]
    if(col1 < 0 or col1 >= width):
        	return False
    if(col2 < 0 or col2 >= width):
    	return False
    for row in range(height):
        for channel in range(channels):
            if(img[row][col1][channel] != img[row][col2][channel]):
                return False
    return True
# 横向是否可以处理九宫
# img:图片
# continuous_col_num:连续的列数,大于等于这个值判定为横向可以九宫处理
def horizontal_slice(img,continuous_col_num):
    cur_begin_col_index = 0
    cur_end_col_index = 0
    slice_begin_col_index = 0
    slice_end_col_index = 0
    height = img.shape[0]
    width = img.shape[1]
    channels = img.shape[2]
    for col in range(width):
        if(col < width - 1):
            if(equal_col_pixel(img,col,col+1) == False):
                # begin与end指向不是同一列时,判断连续列数是否满足九宫条件
                if((cur_begin_col_index != cur_end_col_index) and (cur_end_col_index - cur_begin_col_index >= continuous_col_num) and (cur_end_col_index - cur_begin_col_index > slice_end_col_index - slice_begin_col_index)):
                    # 已经达到了连续列数,满足九宫条件
                    slice_begin_col_index = cur_begin_col_index
                    slice_end_col_index = cur_end_col_index
                cur_begin_col_index = col + 1
                cur_end_col_index = col + 1
            else:
                # 相等,end后移一位
                cur_end_col_index = col + 1
    if(slice_end_col_index - slice_begin_col_index >= continuous_col_num):
        return True,slice_begin_col_index,slice_end_col_index
    else:
        return False,0,0
# 纵向是否可以处理九宫
def vertical_slice(img,continuous_row_num):
    cur_begin_row_index = 0
    cur_end_row_index = 0
    slice_begin_row_index = 0
    slice_end_row_index = 0
    height = img.shape[0]
    width = img.shape[1]
    channels = img.shape[2]
    for row in range(height):
        if(row < height - 1):
            if(equal_row_pixel(img,row,row+1) == False):
                if((cur_begin_row_index != cur_end_row_index) and (cur_end_row_index - cur_begin_row_index >= continuous_row_num) and (cur_end_row_index - cur_begin_row_index > slice_end_row_index - slice_begin_row_index)):
                    slice_begin_row_index = cur_begin_row_index
                    slice_end_row_index = cur_end_row_index
                cur_begin_row_index = row + 1
                cur_end_row_index = row + 1
            else:
                cur_end_row_index = row + 1
    if(slice_end_row_index - slice_begin_row_index >= continuous_row_num):
        return True,slice_begin_row_index,slice_end_row_index
    else:
        return False,0,0
完整代码
#!/usr/bin/python
# -*- coding: UTF-8 -*-

import cv2
from PIL import Image
import numpy as np
import os
import tkFileDialog
import Tkinter
import tkMessageBox

# 比较两行是否相等
# 相等返回true,否则返回false
def equal_row_pixel(img,row1,row2):
    height = img.shape[0]        #将tuple中的元素取出,赋值给height,width,channels
    width = img.shape[1]
    channels = img.shape[2]
    if(row1 < 0 or row1 >= height):
    	return False
    if(row2 < 0 or row2 >= height):
    	return False
    for col in range(width):
        for channel in range(channels):
            if(img[row1][col][channel] != img[row2][col][channel]):
                return False
    return True

# 比较两列是否相等
# 相等返回true,否则返回false
def equal_col_pixel(img,col1,col2):
    height = img.shape[0]        #将tuple中的元素取出,赋值给height,width,channels
    width = img.shape[1]
    channels = img.shape[2]
    if(col1 < 0 or col1 >= width):
        	return False
    if(col2 < 0 or col2 >= width):
    	return False
    for row in range(height):
        for channel in range(channels):
            if(img[row][col1][channel] != img[row][col2][channel]):
                return False
    return True


# 横向是否可以处理九宫
# img:图片
# continuous_col_num:连续的列数,大于等于这个值判定为横向可以九宫处理
def horizontal_slice(img,continuous_col_num):
    cur_begin_col_index = 0
    cur_end_col_index = 0
    slice_begin_col_index = 0
    slice_end_col_index = 0
    height = img.shape[0]
    width = img.shape[1]
    channels = img.shape[2]
    for col in range(width):
        if(col < width - 1):
            if(equal_col_pixel(img,col,col+1) == False):
                # begin与end指向不是同一列时,判断连续列数是否满足九宫条件
                if((cur_begin_col_index != cur_end_col_index) and (cur_end_col_index - cur_begin_col_index >= continuous_col_num) and (cur_end_col_index - cur_begin_col_index > slice_end_col_index - slice_begin_col_index)):
                    # 已经达到了连续列数,满足九宫条件
                    slice_begin_col_index = cur_begin_col_index
                    slice_end_col_index = cur_end_col_index
                cur_begin_col_index = col + 1
                cur_end_col_index = col + 1
            else:
                # 相等,end后移一位
                cur_end_col_index = col + 1
    if(slice_end_col_index - slice_begin_col_index >= continuous_col_num):
        return True,slice_begin_col_index,slice_end_col_index
    else:
        return False,0,0

# 纵向是否可以处理九宫
def vertical_slice(img,continuous_row_num):
    cur_begin_row_index = 0
    cur_end_row_index = 0
    slice_begin_row_index = 0
    slice_end_row_index = 0
    height = img.shape[0]
    width = img.shape[1]
    channels = img.shape[2]
    for row in range(height):
        if(row < height - 1):
            if(equal_row_pixel(img,row,row+1) == False):
                if((cur_begin_row_index != cur_end_row_index) and (cur_end_row_index - cur_begin_row_index >= continuous_row_num) and (cur_end_row_index - cur_begin_row_index > slice_end_row_index - slice_begin_row_index)):
                    slice_begin_row_index = cur_begin_row_index
                    slice_end_row_index = cur_end_row_index
                cur_begin_row_index = row + 1
                cur_end_row_index = row + 1
            else:
                cur_end_row_index = row + 1
    if(slice_end_row_index - slice_begin_row_index >= continuous_row_num):
        return True,slice_begin_row_index,slice_end_row_index
    else:
        return False,0,0

# 标记Sprite的九宫区域
def tag_image_slice_area(img,slice_row_begin,slice_row_end,slice_col_begin,slice_col_end,color):
    height = img.shape[0]
    width = img.shape[1]
    channels = img.shape[2]
    for row in range(height):    #遍历每一行
        for col in range(width): #遍历每一列
            if((row >= slice_row_begin and row <= slice_row_end and slice_row_begin != slice_row_end) or (col >= slice_col_begin and col <= slice_col_end and slice_col_begin != slice_col_end)):
                alter_image_pixel_color(img,row,col,color)
    return img


# 修改img指定像素的颜色
# img:修改的img
# row:行索引
# col:列索引
# color:颜色rgb数组
def alter_image_pixel_color(img,row,col,color):
    img.itemset((row, col, 0), color[0])
    img.itemset((row, col, 1), color[1])
    img.itemset((row, col, 2), color[2])

# 九宫区域裁剪
def tailor_image_slice_area(img,slice_row_begin,slice_row_end,slice_col_begin,slice_col_end):
    height = img.shape[0]
    width = img.shape[1]
    new_width = width - (slice_col_end - slice_col_begin)
    new_height = height - (slice_row_end - slice_row_begin)
    target = np.zeros(shape=(new_height,new_width,img.shape[2]), dtype=np.uint8)

    # img[0:4,0:3] 第0行-第4行,第0列到第3列的交叉区域

    # 左上
    roiImg = img[0:slice_row_begin,0:slice_col_begin]
    target[0:slice_row_begin,0:slice_col_begin] = roiImg

    # 右上
    roiImg = img[0:slice_row_begin,slice_col_end:width]
    target[0:slice_row_begin,slice_col_begin:new_width] = roiImg

    # 左下
    roiImg = img[slice_row_end:height,0:slice_col_begin]
    target[slice_row_begin:new_height,0:slice_col_begin] = roiImg

    # 右下
    roiImg = img[slice_row_end:height,slice_col_end:width]
    target[slice_row_begin:new_height,slice_col_begin:new_width] = roiImg

    return target

def load_sprite():
    continuous_row_num_input_str = continuous_row_num_input.get() #获取文本框内容
    continuous_col_num_input_str = continuous_col_num_input.get()
    continuous_row_num = 0
    continuous_col_num = 0
    try:
        if continuous_row_num_input_str != "":
            continuous_row_num = float(continuous_row_num_input_str)
        if continuous_col_num_input_str != "":
            continuous_col_num = float(continuous_col_num_input_str)
    except ValueError:
        tkMessageBox.showinfo( "Error", "无效的线宽输入")
        return
    if continuous_row_num <= 0 or continuous_col_num <= 0:
        tkMessageBox.showinfo( "Error", "无效的线宽输入")
        return

    fname = tkFileDialog.askopenfilename(title=u"选择文件")
    img1 = cv2.imread(fname,cv2.IMREAD_UNCHANGED)
    a1,b1,c1 = horizontal_slice(img1,continuous_col_num)
    a2,b2,c2 = vertical_slice(img1,continuous_row_num)

    # 九宫区域保留在3像素的宽高
    b1 = b1 + 1
    c1 = c1 - 1
    b2 = b2 + 1
    c2 = c2 - 1
    if toggle_tailor_hor.get() == 0:
        b1 = 0
        c1 = 0
    if toggle_tailor_ver.get() == 0:
        b2 = 0
        c2 = 0
    new_sprite = tailor_image_slice_area(img1,b2,c2,b1,c1)
    cv2.imwrite(fname, new_sprite)
    print(fname)

root = Tkinter.Tk()
root.geometry('400x300')
root.title("Sprite九宫区域极致裁剪修改器")

frame = Tkinter.Frame(root)
frame.pack()

toggle_tailor_hor = Tkinter.IntVar()
toggle_tailor_ver = Tkinter.IntVar()

Tkinter.Checkbutton(root, text = "是否横向九宫处理", variable = toggle_tailor_hor,onvalue = 1, offvalue = 0).pack()
Tkinter.Checkbutton(root, text = "是否纵向九宫迷宫", variable = toggle_tailor_ver,onvalue = 1, offvalue = 0).pack()

Tkinter.Label(frame, text="横向最小连续列数").pack()
continuous_row_num_input = Tkinter.Entry(frame)
continuous_row_num_input.pack()

Tkinter.Label(frame, text="纵向最小连续行数").pack()
continuous_col_num_input = Tkinter.Entry(frame)
continuous_col_num_input.pack()

load_sprite_button = Tkinter.Button(root, text="加载Sprite文件并修改",command=load_sprite)
load_sprite_button.pack()

root.mainloop()
工具界面
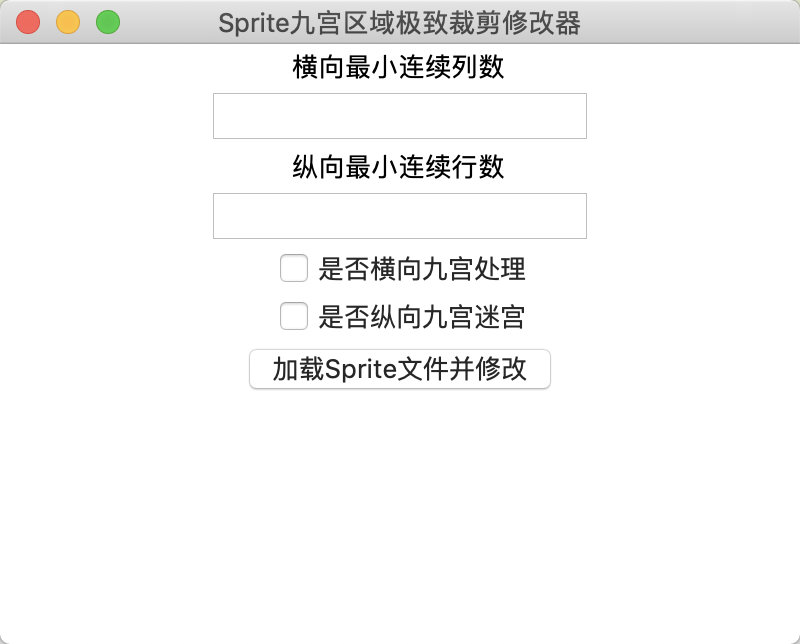
点击按钮”加载Sprite文件并修改“后,打开文件框选中要处理的图片后进行处理,覆盖原图片,可以根据自己的需要进行修改。
以上知识分享,如有错误,欢迎指出,共同学习,共同进步。
最近在用hexo 和 github page搭 个人博客,地址如下:
http://www.jingfengji.tech/
欢迎大家关注。
最近的一些博客 还是会更新在 CSDN这边,后续以自己个人的博客站点会主。


 被折叠的 条评论
为什么被折叠?
被折叠的 条评论
为什么被折叠?
 到【灌水乐园】发言


