


开发板:imx6ull-alientek-emmc,正点原子的min板子
- 困惑了好久,第一次搞通,记录一下,希望之后能知其所以然
目录
一、交叉编译环境
1.选择交叉编译器
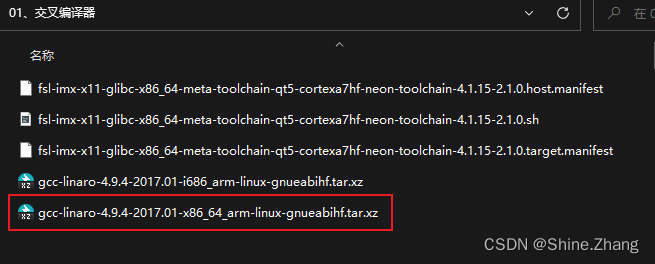
如图,我的ubuntu系统是64位的

因此选择正点原子提供的64位交叉编译器
2.解压
拷贝到/usr/local/arm/,位置不重要,爱拷贝哪里拷贝哪里,我是看视频了所以拷到了这里;
3.配置环境变量
vim ~/.bashrc
添加
export ARCH=arm
export CROSS_COMPILE=arm-linux-gnueabihf-
export PATH=/usr/local/arm/gcc-linaro-4.9.4-2017.01-x86_64_arm-linux-gnueabihf/bin:$PATH
source ~/.bashrc
此时遇到一个问题,即root用户交叉编译失败,普通用户没问题,输入sudo arm-按下tab键可以补全。
解决:由于普通用户的~目录下.bashrc配置了,切重启设备后生效了,但root用户的 ~/.bashrc未生效。
在终端中输入
sudo -s # 之后会发现切换为了root用户,并且字体颜色也变了
vim ~/.bashrc # 确认一下上面添加的环境变量在不,应该是在的
source ~/.bashrc
然后就可以使用交叉编译器编译后在开发板上运行测试
root@ubuntu16:~/Desktop/test# arm-linux-gnueabihf-gcc hello_drv_test.c
//挂载到开发板,运行./a.out,获得预期结果
二、内核编译
为了实现在开发板上运行第一个驱动模块,开始了内核编译
1.获得内核源码压缩包,并解压
正点原子提供了

拷贝到ubuntu虚拟机中,新建文件夹linux4.1.15,解压
tar -xjvf file.tar.bz2 //解压 tar.bz2
2.配置
下面这句话,作为小白,有点小疑问,我上面不是配置好了环境吗?
#使用Yocto SDK里的GCC 5.3.0交叉编译器编译出厂Linux源码,可不用指定ARCH等,直接执行Make
开始配置
# 1.编译前先清除
make distclean
# 2.把下载的内核还原到初始状态(清除掉.o文件,清除掉一些在make之后生成的备份文件,甚至还清除了.config配置文件)
make mrproper
3.编译
# 3.配置defconfig文件,从linux4.1.15/arch/arm/configs找到对应的配置
# 官方给的make imx_v7_defconfig -j 16
# 我的开发板是imx6ull-alientek-emmc,而且虚拟机是给的双核配置,因此这个需要改成下面的
make imx_alientek_emmc_defconfig -j 2

# 4. 图像化配置,这里我使用的默认,啥也没改
make menuconfig
# 5. 编译zImage 镜像,完成后会生成arch/arm/boot/zImage
make zImage -j2
# 6. 编译设备树,完成后会生成很多,包括本设备对应的arch/arm/boot/dts/imx6ull-alientek-emmc.dtb
make dtbs
# 7. 编译模块
make modules
上面完事后就可以测试编译驱动程序了
4.安装内核和模块到开发板上,后续有时间再补充
# 8.执行以下命令安装模块,把模块安装在当前目录下的tmp目录中
mkdir tmp
make ARCH=arm INSTALL_MOD_PATH=./tmp modules_install
# 安装内核和模块到开发板上 后续有时间再补充
5.测试编译驱动模块
在内核源码的同级目录下新建文件夹test

新建三个文件
驱动代码:hello_drv.c
#include <linux/module.h>

#include <linux/fs.h>
#include <linux/errno.h>
#include <linux/miscdevice.h>
#include <linux/kernel.h>
#include <linux/major.h>
#include <linux/mutex.h>
#include <linux/proc_fs.h>
#include <linux/seq_file.h>
#include <linux/stat.h>
#include <linux/init.h>
#include <linux/device.h>
#include <linux/tty.h>
#include <linux/kmod.h>
#include <linux/gfp.h>

/* 1. 确定主设备号                                                                 */
static int major = 0;
static char kernel_buf[1024];
static struct class *hello_class;


#define MIN(a, b) (a < b ? a : b)

/* 3. 实现对应的open/read/write等函数,填入file_operations结构体                   */
static ssize_t hello_drv_read (struct file *file, char __user *buf, size_t size, loff_t *offset)
{
	int err;
	printk("%s %s line %d\n", __FILE__, __FUNCTION__, __LINE__);
	err = copy_to_user(buf, kernel_buf, MIN(1024, size));
	return MIN(1024, size);
}

static ssize_t hello_drv_write (struct file *file, const char __user *buf, size_t size, loff_t *offset)
{
	int err;
	printk("%s %s line %d\n", __FILE__, __FUNCTION__, __LINE__);
	err = copy_from_user(kernel_buf, buf, MIN(1024, size));
	return MIN(1024, size);
}

static int hello_drv_open (struct inode *node, struct file *file)
{
	printk("%s %s line %d\n", __FILE__, __FUNCTION__, __LINE__);
	return 0;
}

static int hello_drv_close (struct inode *node, struct file *file)
{
	printk("%s %s line %d\n", __FILE__, __FUNCTION__, __LINE__);
	return 0;
}

/* 2. 定义自己的file_operations结构体                                              */
static struct file_operations hello_drv = {
	.owner	 = THIS_MODULE,
	.open    = hello_drv_open,
	.read    = hello_drv_read,
	.write   = hello_drv_write,
	.release = hello_drv_close,
};

/* 4. 把file_operations结构体告诉内核:注册驱动程序                                */
/* 5. 谁来注册驱动程序啊?得有一个入口函数:安装驱动程序时,就会去调用这个入口函数 */
static int __init hello_init(void)
{
	int err;

	printk("%s %s line %d\n", __FILE__, __FUNCTION__, __LINE__);
	major = register_chrdev(0, "hello", &hello_drv);  /* /dev/hello */


	hello_class = class_create(THIS_MODULE, "hello_class");
	err = PTR_ERR(hello_class);
	if (IS_ERR(hello_class)) {
		printk("%s %s line %d\n", __FILE__, __FUNCTION__, __LINE__);
		unregister_chrdev(major, "hello");
		return -1;
	}

	device_create(hello_class, NULL, MKDEV(major, 0), NULL, "hello"); /* /dev/hello */

	return 0;
}

/* 6. 有入口函数就应该有出口函数:卸载驱动程序时,就会去调用这个出口函数           */
static void __exit hello_exit(void)
{
	printk("%s %s line %d\n", __FILE__, __FUNCTION__, __LINE__);
	device_destroy(hello_class, MKDEV(major, 0));
	class_destroy(hello_class);
	unregister_chrdev(major, "hello");
}


/* 7. 其他完善:提供设备信息,自动创建设备节点                                     */

module_init(hello_init);
module_exit(hello_exit);

MODULE_LICENSE("GPL");
应用测试代码:hello_drv_test.c
#include <sys/types.h>
#include <sys/stat.h>
#include <fcntl.h>
#include <unistd.h>
#include <stdio.h>
#include <string.h>

/*
 * ./hello_drv_test -w abc
 * ./hello_drv_test -r
 */
int main(int argc, char **argv)
{
	int fd;
	char buf[1024];
	int len;

	/* 1. 判断参数 */
	if (argc < 2)
	{
		printf("Usage: %s -w <string>\n", argv[0]);
		printf("       %s -r\n", argv[0]);
		return -1;
	}

	/* 2. 打开文件 */
	fd = open("/dev/hello", O_RDWR);
	if (fd == -1)
	{
		printf("can not open file /dev/hello\n");
		return -1;
	}

	/* 3. 写文件或读文件 */
	if ((0 == strcmp(argv[1], "-w")) && (argc == 3))
	{
		len = strlen(argv[2]) + 1;
		len = len < 1024 ? len : 1024;
		write(fd, argv[2], len);
	}
	else
	{
		len = read(fd, buf, 1024);
		buf[1023] = '\0';
		printf("APP read : %s\n", buf);
	}

	close(fd);

	return 0;
}
Makefile文件
注意修改KERN_DIR 为自己刚刚编译好的源码目录
# 1. 使用不同的开发板内核时, 一定要修改KERN_DIR
# 2. KERN_DIR中的内核要事先配置、编译, 为了能编译内核, 要先设置下列环境变量:
# 2.1 ARCH,          比如: export ARCH=arm64
# 2.2 CROSS_COMPILE, 比如: export CROSS_COMPILE=aarch64-linux-gnu-
# 2.3 PATH,          比如: export PATH=$PATH:/home/book/100ask_roc-rk3399-pc/ToolChain-6.3.1/gcc-linaro-6.3.1-2017.05-x86_64_aarch64-linux-gnu/bin
# 注意: 不同的开发板不同的编译器上述3个环境变量不一定相同,
#       请参考各开发板的高级用户使用手册

KERN_DIR = /home/alientek/Desktop/linux4.1.15

all:
	make -C $(KERN_DIR) M=`pwd` modules
	$(CROSS_COMPILE)gcc -o hello_drv_test hello_drv_test.c

clean:
	make -C $(KERN_DIR) M=`pwd` modules clean
	rm -rf modules.order
	rm -f hello_drv_test

obj-m	+= hello_drv.o
make all 生成驱动模块文件 hello_drv.ko和可执行应用hello_drv_test
root@ubuntu16:~/Desktop/test# make all
make -C /home/alientek/Desktop/linux4.1.15 M=`pwd` modules
make[1]: Entering directory '/home/alientek/Desktop/linux4.1.15'
  CC [M]  /home/alientek/Desktop/test/hello_drv.o
  Building modules, stage 2.
  MODPOST 1 modules
  CC      /home/alientek/Desktop/test/hello_drv.mod.o
  LD [M]  /home/alientek/Desktop/test/hello_drv.ko
make[1]: Leaving directory '/home/alientek/Desktop/linux4.1.15'
arm-linux-gnueabihf-gcc -o hello_drv_test hello_drv_test.c
将此两个文件挂载至开发板,进行测试
[root@ATK-IMX6U:~/nfs]# ./hello_drv_test
Usage: ./hello_drv_test -w <string>
       ./hello_drv_test -r
[root@ATK-IMX6U:~/nfs]# lsmod
Module                  Size  Used by
mx6s_capture           14992  0
ov5640_camera          29002  0
[root@ATK-IMX6U:~/nfs]# insmod hello_drv.ko
[ 7553.195432] /home/alientek/Desktop/test/hello_drv.c hello_init line 70
[root@ATK-IMX6U:~/nfs]# lsmod
Module                  Size  Used by
hello_drv               3230  0
mx6s_capture           14992  0
ov5640_camera          29002  0
[root@ATK-IMX6U:~/nfs]# ./hello_drv_test -w nihao
[ 7572.899668] /home/alientek/Desktop/test/hello_drv.c hello_drv_open line 45
[ 7572.906779] /home/alientek/Desktop/test/hello_drv.c hello_drv_write line 38
[ 7572.914680] /home/alientek/Desktop/test/hello_drv.c hello_drv_close line 51
[root@ATK-IMX6U:~/nfs]# ./hello_drv_test -r
[ 7584.479640] /home/alientek/Desktop/test/hello_drv.c hello_drv_open line 45
[ 7584.486745] /home/alientek/Desktop/test/hello_drv.c hello_drv_read line 30
APP read : nihao[ 7584.495155] /home/alientek/Desktop/test/hello_drv.c hello_drv_close line 51


 908
908


 被折叠的 条评论
为什么被折叠?
被折叠的 条评论
为什么被折叠?
 到【灌水乐园】发言


