Android开发高级进阶
第二章学习
Service的跨进程开发
概要:
Service的跨进程通信主要由两种Android提供的方法进行,一个是AIDL,通过创建一个AIDL文件来完成,另一个是利用Messenger,发送Message来实现
参考:
http://blog.csdn.net/lmj623565791/article/details/38461079
http://blog.csdn.net/lmj623565791/article/details/47017485
什么是进程
打个比方,打开Windows的任务管理器,默认就显示了正在电脑上运行的进程,甚至你会看到多标签浏览器会产生多个进程,他们基本上都是资源独立存在而运行着的,其中一个未响应并不会导致其他进程的崩溃。
为什么要使用多进程
首要原因是为了稳定,而第二个原因是扩充App的可用内存,因为Android为每一个进程都设置了内存上限,超越了就会Out Of Memory。
先创建一个新工程,叫做Demo,包名为com.einsteinford.demo。创建时包含一个空的MainActivity,暂时不删除它。
AIDL
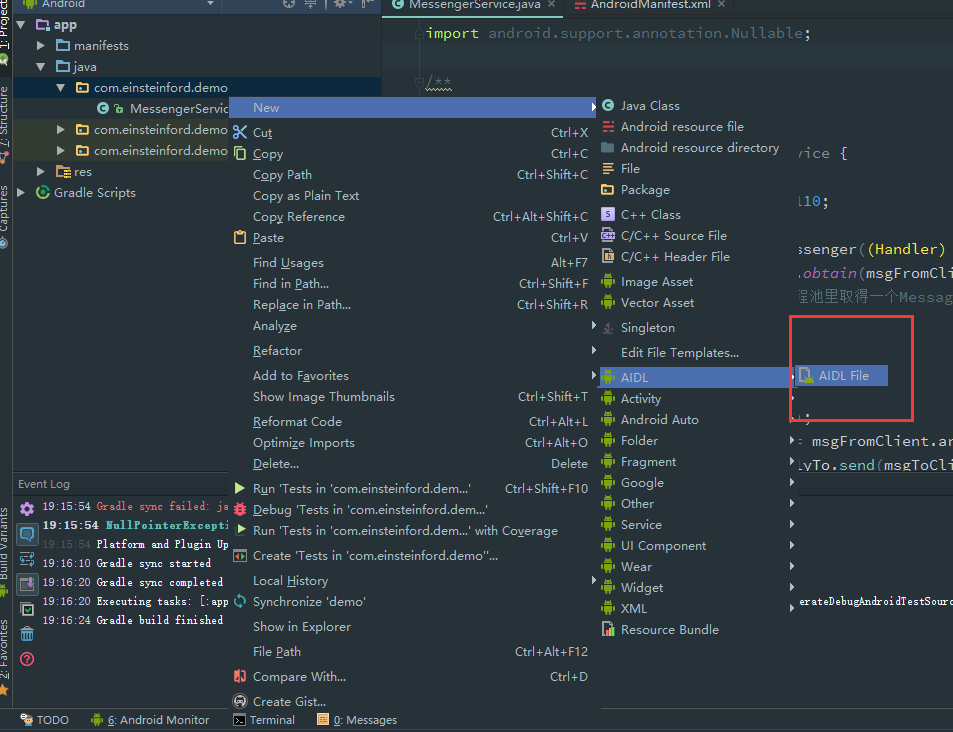
在Android Studio中使用AIDL并不困难,分为以下几步进行
1.新建AIDL文件
新建好的文件内容为
package com.einsteinford.demo;
interface IMyAidlInterface {
/**
* Demonstrates some basic types that you can use as parameters
* and return values in AIDL.
*/
void basicTypes(int anInt, long aLong, boolean aBoolean, float aFloat,double aDouble, String aString);
}
basicTypes就是一个默认给出的抽象方法范例,括号内表示Aidl支持的基本数据类型。
2.自定义内部方法
interface IMyAidlInterface {
    boolean createPerson(String name,int age);
}
然后按F9进行Make Project操作,此时,在下图目录中的位置会自动新建一个IMyAidlInterface的Java文件,
package com.einsteinford.demo;

public interface IMyAidlInterface extends android.os.IInterface
{...}
关于其中的代码,上文中的链接会有较为详细的讲述,笔者水平有限,不便赘述,只需记得上述2个文件的包名。
3.在一个Service中新建此类
    private IMyAidlInterface.Stub mBinder = new IMyAidlInterface.Stub() {
        @Override
        public boolean createPerson(String name, int age) throws RemoteException {
            Log.i("new Person","名字:"+name+" 年龄:"+age);
            return true;
        }
    };

    @Nullable
    @Override
    public IBinder onBind(Intent intent) {
        return mBinder;
    }
重写我之前定义的抽象方法,并在Service 的 onBind中返回此实例。自此,其它绑定服务的进程里便可通过mBinder调用其中的方法了。
4.别忘了在AndroidManifest中注册
<service
            android:name=".MessengerService"
            android:enabled="true"
            android:exported="true">
            <intent-filter>
                <action android:name="com.einsteinford.demo.service"/>
                <category android:name="android.intent.category.DEFAULT"/>
            </intent-filter>
        </service>
5.在其它应用中调用create方法
这方法研究了挺久,不过,最终还是成功啦~
退出Project,在Android Studio里新建一个应用,取名PrecessDemo,包名是com.einsteinford.precessdemo。
为了能在新的App中正常实例化IMyAidlInterface,必须将之前在Service中创建的那两个文件拷贝到新建的App的文件夹中,如下图。
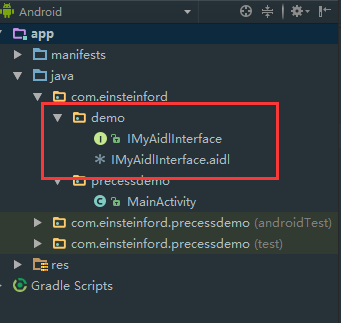
文件目录跟Service的App包名保持一致。
此时,可以正常在MainActivity中编写代码了
package com.einsteinford.precessdemo;

import com.einsteinford.demo.IMyAidlInterface;


public class MainActivity extends AppCompatActivity implements View.OnClickListener {

    private IMyAidlInterface mIMyAidlInterface;

    ServiceConnection mConnection = new ServiceConnection() {
        @Override
        public void onServiceConnected(ComponentName name, IBinder service) {
            mIMyAidlInterface = IMyAidlInterface.Stub.asInterface(service);
            Log.i("new process", "onServiceConnected: ");
        }

        @Override
        public void onServiceDisconnected(ComponentName name) {
            mIMyAidlInterface = null;
        }
    };
    public Button mBtnBind;
    public Button mBtnCreate;
    public Button mBtnUnbind;
    public Intent mServiceIntent;

    @Override
    protected void onCreate(Bundle savedInstanceState) {
        super.onCreate(savedInstanceState);
        setContentView(R.layout.activity_main);

        mBtnBind = (Button) findViewById(R.id.btn_bind);
        mBtnBind.setOnClickListener(this);
        mBtnCreate = (Button) findViewById(R.id.btn_create);
        mBtnCreate.setOnClickListener(this);
        mBtnUnbind = (Button) findViewById(R.id.btn_unbind);
        mBtnUnbind.setOnClickListener(this);

        mServiceIntent = new Intent();
        mServiceIntent.setAction("com.einsteinford.demo.service");
        mServiceIntent.setPackage("com.einsteinford.demo");
    }

    @Override
    public void onClick(View v) {
        try {
            switch (v.getId()) {
                case R.id.btn_bind:
                    bindService(mServiceIntent, mConnection, Context.BIND_AUTO_CREATE);
                    break;
                case R.id.btn_create:
                    boolean b = mIMyAidlInterface.createPerson("阿三", 25);
                    Log.i("new process", "创建结果: " + b);
                    break;
                case R.id.btn_unbind:
                    unbindService(mConnection);
                    break;
            }
        } catch (Exception e) {
            e.printStackTrace();
        }
    }
}
- 1
- 2
- 3
- 4
- 5
- 6
- 7
- 8
- 9
- 10
- 11
- 12
- 13
- 14
- 15
- 16
- 17
- 18
- 19
- 20
- 21
- 22
- 23
- 24
- 25
- 26
- 27
- 28
- 29
- 30
- 31
- 32
- 33
- 34
- 35
- 36
- 37
- 38
- 39
- 40
- 41
- 42
- 43
- 44
- 45
- 46
- 47
- 48
- 49
- 50
- 51
- 52
- 53
- 54
- 55
- 56
- 57
- 58
- 59
- 60
- 61
- 62
- 63
还有布局文件,放了3个按钮,分别用于“绑定服务”,“调用服务内方法”以及“解绑服务”。
<?xml version="1.0" encoding="utf-8"?>
<RelativeLayout
    xmlns:android="http://schemas.android.com/apk/res/android"
    xmlns:tools="http://schemas.android.com/tools"
    android:layout_width="match_parent"
    android:layout_height="match_parent"
    android:paddingBottom="@dimen/activity_vertical_margin"
    android:paddingLeft="@dimen/activity_horizontal_margin"
    android:paddingRight="@dimen/activity_horizontal_margin"
    android:paddingTop="@dimen/activity_vertical_margin"
    tools:context="com.einsteinford.precessdemo.MainActivity">

    <Button
        android:layout_width="wrap_content"
        android:layout_height="wrap_content"
        android:text="Bind Service"
        android:id="@+id/btn_bind"
        android:layout_marginTop="62dp"
        android:layout_alignParentTop="true"
        android:layout_centerHorizontal="true"/>

    <Button
        android:layout_width="wrap_content"
        android:layout_height="wrap_content"
        android:text="create"
        android:id="@+id/btn_create"
        android:layout_below="@+id/btn_bind"
        android:layout_centerHorizontal="true"
        android:layout_marginTop="37dp"/>

    <Button
        android:layout_width="wrap_content"
        android:layout_height="wrap_content"
        android:text="unbind"
        android:id="@+id/btn_unbind"
        android:layout_centerVertical="true"
        android:layout_centerHorizontal="true"/>
</RelativeLayout>
- 1
- 2
- 3
- 4
- 5
- 6
- 7
- 8
- 9
- 10
- 11
- 12
- 13
- 14
- 15
- 16
- 17
- 18
- 19
- 20
- 21
- 22
- 23
- 24
- 25
- 26
- 27
- 28
- 29
- 30
- 31
- 32
- 33
- 34
- 35
- 36
- 37
- 38
- 39
- 1
- 2
- 3
- 4
- 5
- 6
- 7
- 8
- 9
- 10
- 11
- 12
- 13
- 14
- 15
- 16
- 17
- 18
- 19
- 20
- 21
- 22
- 23
- 24
- 25
- 26
- 27
- 28
- 29
- 30
- 31
- 32
- 33
- 34
- 35
- 36
- 37
- 38
- 39
这些代码就跟普通的没什么区别,只不过如今使用隐式Intent调用Service,必须添加包名Intent.setPackage(),这下,在新应用内依次点击3个按钮,便会显示出下图的效果了
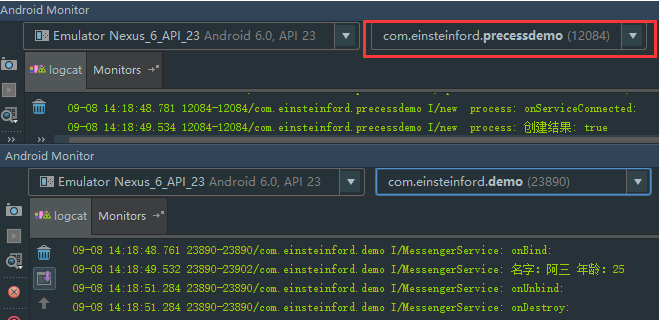
Service中创建了Activity传入的人物,Activity也取得了创建成功的返回值。
至此,成功完成跨App间的AIDL方式通信,下次再写Messenger的方式。
-完-


 635
635


 被折叠的 条评论
为什么被折叠?
被折叠的 条评论
为什么被折叠?
 到【灌水乐园】发言


