


题目:Point Density-Aware Voxels for LiDAR 3D Object Detection
论文地址:https://arxiv.org/abs/2203.05662
代码地址:https://github.com/TRAILab/PDV
文章目录
1.环境准备
- Ubuntu18.04
- RTX 3090Ti
- python 3.8
- pytorch 1.8.0
- CUDA 11.1
- CUDNN 8.0.5
2.安装环境
2.1 创建conda环境
python版本很重要,spconv2要求python版本 >= 3.6 < 3.9, PCDet要求python版本 >=3.8, 所以选择3.8。
1 | conda create -n pdv python=3.8     #创建pdv虚拟环境
1 | conda activate pdv                 #激活环境
2.2 安装pytorch
根据网上说的,3090Ti需要的最低的CUDA版本必须是CUDA11.1,所以选择对应版本。
conda install pytorch==1.8.0 torchvision==0.9.0 torchaudio==0.8.0 cudatoolkit=11.1 -c pytorch -c conda-forge
python          # 进入python环境
import torch
torch.cuda.is_available()   # 如果返回true,则说明pytorch安装成功
2.3 spconv1.2.1安装
为了避免后面安装出错,先安装spconv
# cd 先进入PDV文件,执行
git clone -b v1.2.1 https://github.com/traveller59/spconv.git --recursive
# 进入spconv
cd spconv/
有时候下载不成功,可以直接下载spconv1.2.1,并且删除third_party中的三个cutlass、mp11、pybind11空文件夹,直接下载对应压缩文件,解压后并放到third_party文件夹下。
sudo apt-get install libboost-all-dev
#或者
sudo apt-get install aptitude
sudo aptitude install libboost-all-dev
#####
python setup.py bdist_wheel
cd dist/
pip install spconv-1.2.1-cp38-cp38-linux_x86_64.whl
验证spconv是否安装成功,无报错即可。
python
import spconv
2.4 安装依赖包
注:记得删除requirements.txt文件里的torch==1.7.1,因为之前的pytorch安装的是1.8.0的版本,不知道运行代码时会不会出现问题。
pip install -r requirements.txt
2.5 安装pcdet
# cd切换至setup.py所在的文件夹下
python setup.py develop
# 验证是否安装成功pcdet,不报错说明安装成功
python
import pcdt
3.PDV模型训练及测试
3.1 训练模型
cd tools/
# 单卡训练
python train.py --cfg_file cfgs/kitti_models/pdv.yaml
# 若要指定batch_size和epochs等参数,用以下代码
python train.py --cfg_file ./cfgs/kitti_models/pdv.yaml  --batch_size 4 --epochs 50

# 多卡训练
CUDA_VISIBLE_DEVICES=5,6,7 python -m torch.distributed.launch --nproc_per_node=3 tools/train.py --cfg_file tools/cfgs/kitti_models/pdv.yaml --launcher pytorch
sh scripts/dist_train.sh 8 --cfg_file tools/cfgs/kitti_models/pdv.yaml
3.3 运行demo.py
3.3.1 安装工具mayavi
首先,安装可视化工具mayavi
pip install mayavi
# 不报错说明安装成功
python
import mayavi
最后,运行demo.py,使用cd tools/切换至tools文件夹:
python demo.py --cfg_file cfgs/kitti_models/pdv.yaml --ckpt ../output/kitti_models/pdv/default/ckpt/checkpoint_epoch_80.pth --data_path ../data/kitti/training/velodyne/000000.bin
注意:这一步出错比较多,Debug部分有详细说明。
3.3.2 tensorBoard可视化
查看损失函数图像
pip install tensorboardX
pip install tensorflow
然后在../output/kitti_models/pdv/default/tensorboard(也就是events.out.tfevents.文件夹下)打开终端激活pdv的虚拟环境,输入:
cd output/kitti_models/pdv/default/
tensorboard --logdir tensorboard/
# 或者
tensorboard --logdir=/home/..../output/kitti_models/pdv/default/tensorboard
打开浏览器输入http://localhost:6006/,查看训练过程中的损失函数可视化。
3.3 测试
运行test.py脚本验证模型在测试集上的性能
cd tools
python test.py --cfg_file cfgs/kitti_models/pdv.yaml --batch_size 4 --ckpt ../output/kitti_models/pdv/default/ckpt/checkpoint_epoch_79.pth
batch_size可根据自己的需要调整。
4. Debug记录
4.1 数据预处理
生成数据pkl文件和gt_database文件时,
python -m pcdet.datasets.kitti.kitti_dataset create_kitti_infos tools/cfgs/dataset_configs/kitti_dataset.yaml
报错信息:
dataset_cfg = EasyDict(yaml.load(open(sys.argv[2])))
TypeError: load() missing 1 required positional argument: 'Loader'
报错原因: yaml 5.1版本后不再使用 yaml.load(file),而是是使用 yaml.load(file,Loader = yaml.FullLoader),
将dataset_cfg = EasyDict(yaml.load(open(args.cfg_file)))
修改为:
dataset_cfg = EasyDict(yaml.load(open(args.cfg_file),Loader = yaml.FullLoader))
或者修改后为:
with open(sys.argv[2],"r") as f:
            dataset_cfg = EasyDict(yaml.load(f,Loader=yaml.FullLoader))
# 这里要注意缩进,是四个空格,建议不要用tab键可能会出现问题。
4.2 PDV训练过程
4.2.1 完整报错信息
TypeError: Descriptors cannot be created directly.
If this call came from a _pb2.py file, your generated code is out of date and must be regenerated with protoc >= 3.19.0.
If you cannot immediately regenerate your protos, some other possible workarounds are:
 1. Downgrade the protobuf package to 3.20.x or lower.
 2. Set PROTOCOL_BUFFERS_PYTHON_IMPLEMENTATION=python (but this will use pure-Python parsing and will be much slower).
解决办法:网上说要将protobuf更换成较低的版本,首先使用pip uninstall protobuf卸载现有的protobuf,使用pip install protobuf 3.19.0报错,改为protobuf 3.20.0后代码成功运行。
pip uninstall protobuf
pip install -i https://pypi.tuna.tsinghua.edu.cn/simple protobuf==3.20.0
4.2.2 运行demo.py报错
错误1:
WARNING: Imported VTK version (9.3) does not match the one used
         to build the TVTK classes (9.2). This may cause problems.
         Please rebuild TVTK.
解决办法:卸载高版本的vtk,再安装正确的版本
pip uninstall vtk==9.3
pip install vtk==9.2.2 -i https://pypi.tuna.tsinghua.edu.cn/simple/
注意:运行pip install vtk==9.2 -i https://pypi.tuna.tsinghua.edu.cn/simple/也会报错,直接具体到小版本号后正确安装。
错误2:
  File "demo.py", line 83, in main
    model.load_params_from_file(filename=args.ckpt, logger=logger, to_cpu=True)
  File "/home/teng/projects/PDV/pcdet/models/detectors/detector3d_template.py", line 335, in load_params_from_file
    raise FileNotFoundError
FileNotFoundError
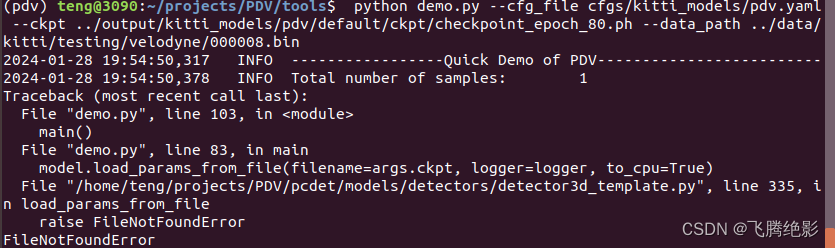
此处一般都是路径有问题,或者参数配置上有问题,仔细检查后错误即可排除。
错误3:
提示没有安装可视化界面:
raise ImportError(msg)
ImportError: Could not import backend for traitsui.  Make sure you
        have a suitable UI toolkit like PyQt/PySide or wxPython
        installed.

通过pip进行安装:
pip install pyqt5
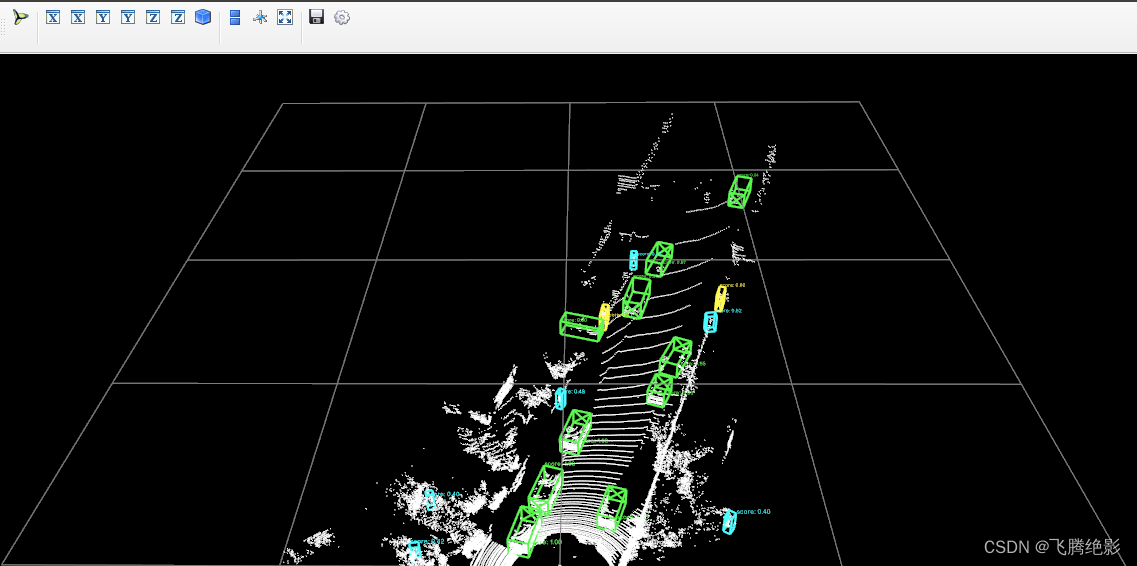
完成后再运行demo.py,
python demo.py --cfg_file cfgs/kitti_models/pdv.yaml --ckpt ../output/kitti_models/pdv/default/ckpt/checkpoint_epoch_80.pth --data_path ../data/kitti/training/velodyne/000008.bin
运行成功,并显示3D可视化界面。
4.2.2 其他报错
ERROR: pip's dependency resolver does not currently take into account all the packages that are installed. This behaviour is the source of the following dependency conflicts.
matplotlib 3.7.4 requires numpy<2,>=1.20, but you have numpy 1.18.5 which is incompatible.
pandas 2.0.3 requires numpy>=1.20.3; python_version < "3.10", but you have numpy 1.18.5 which is incompatible.
注意:由于本代码需要安装numpy==1.18.5,所以考虑降低另外两个包的版,卸载原来的版本,安装新版本。
pip uninstall pandas  # 卸载旧版本
pip install pandas==1.3.4 -i https://pypi.tuna.tsinghua.edu.cn/simple
pip uninstall matplotlib  # 卸载旧版本
pip install matplotlib==3.5.0 -i https://pypi.tuna.tsinghua.edu.cn/simple
参考:
https://blog.csdn.net/zyw2002/article/details/127447756
https://huaweicloud.csdn.net/63560fb8d3efff3090b59551.html
https://blog.csdn.net/weixin_43678195/article/details/117352908


 2174
2174


 被折叠的 条评论
为什么被折叠?
被折叠的 条评论
为什么被折叠?
 到【灌水乐园】发言


