


前言
码上1024了,给大家分享一个UE5的脚本小功能,UE5中Sequence动态Key功能,这样我们就可以根据我们的数据动态更新了,非常实用,适合刚入门或者小白,接下来我就把整个过程分享给大家。
过程
- 新建一个工程,添加好我们自己的Map后,在Edit -> Editor Preference中搜索Python,对Enable Content Browser Integration 进行勾选

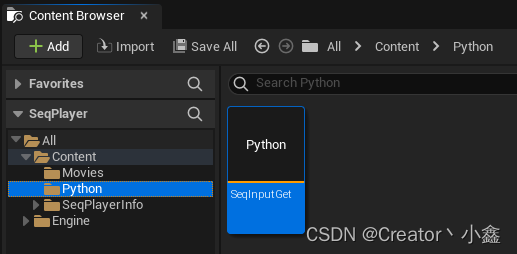
- 在根目录Content中创建Python文件夹,因为这一步是官方操作只有放在这个文件中的Python脚本才会显示在我们的工程中,可以直接新建文本,把我们后面的内容粘贴进去修改后缀为.py即可,然后点击Tools -> Execute Python Scipt 导入我们的python脚本就可以了,导入完成后如果没看到我们的python脚本,重启下工程。
- 双击我们导入的脚本即可对其进行编辑和修改,修改完直接保存即可
- 整个脚本如下,直接看注释就可以,处理过程非常简单,我们在使用的过程中检查好自己的json路径json名称以及Sequence路径即可。
#连接虚幻API库 import unreal,json,os def JsonGetData(filename): # 读取/项目目录/JsonFile中的JSON文件数据存入json_data root_path = unreal.SystemLibrary.get_project_directory() + 'Content/SeqPlayerInfo/Json/' final_path = root_path + filename + '.json' fp = open(final_path, 'r', encoding='utf-8') json_str = fp.read() json_data = json.loads(json_str) unreal.log("=== INFO: Json Get OK ===") return json_data def Seqcreate(): json_path = JsonGetData("dict_out") # 获取资产工具 asset_tools = unreal.AssetToolsHelpers.get_asset_tools() # 在根内容文件夹中创建一个名为LevelSequenceName的关卡序列 level_sequence = unreal.AssetTools.create_asset(asset_tools, asset_name=json_path["seqname"], package_path="/Game/SeqPlayerInfo/LevelSequence/", asset_class=unreal.LevelSequence, factory=unreal.LevelSequenceFactoryNew()) # 创建一个帧率对象并设置为所需的fps数值 frame_rate = unreal.FrameRate(numerator=json_path["frametime"], denominator=1) # 设置显示速率 level_sequence.set_display_rate(frame_rate) # 将播放范围设置为20-200 level_sequence.set_playback_start(json_path["starttimestamp"]) level_sequence.set_playback_end(json_path["endtimestamp"]) # 获取Actor子系统以抓取选定的Actor actor_system = unreal.get_editor_subsystem(unreal.EditorActorSubsystem) # 获取选定的Actor actor = actor_system.get_selected_level_actors()[0] # 将Actor作为可拥有物添加到关卡中 actor_binding = level_sequence.add_possessable(actor) # 将camera_component作为可拥有物添加到Actor中 com_binding = level_sequence.add_possessable(actor.camera_component) # 刷新以直观地查看添加的新绑定 unreal.LevelSequenceEditorBlueprintLibrary.refresh_current_level_sequence() # 使用绑定将轨迹添加到Sequencer(由轨迹类型指定) transform_track = actor_binding.add_track(unreal.MovieScene3DTransformTrack) # 使用绑定浮点型Track到轨迹中(由轨迹类型指定) movie_scene_track = com_binding.add_track(unreal.MovieSceneFloatTrack) #将浮点类型转换为PropertyTrack,因为无法直接创建 fov_track = unreal.MovieScenePropertyTrack.cast(movie_scene_track) #设置我们Property名称和地址我这里需要的是fov,所以是Fov名称和地址 fov_track.set_property_name_and_path("FieldOfView","FieldOfView") # 将分段添加到轨迹以便能够设置范围、参数或属性 transform_section = transform_track.add_section() fov_section = fov_track.add_section() transform_section.set_start_frame_seconds(json_path["starttimestamp"]) transform_section.set_end_frame_seconds(json_path["endtimestamp"]) fov_section.set_start_frame_seconds(json_path["starttimestamp"]) fov_section.set_end_frame_seconds(json_path["endtimestamp"]) # 获取位置的xyz通道 channel_fov = fov_section.get_channels()[0] channel_location_x = transform_section.get_channels()[0] channel_location_y = transform_section.get_channels()[1] channel_location_z = transform_section.get_channels()[2] # 获取旋转xyz的关键帧 channel_rotation_x = transform_section.get_channels()[3] channel_rotation_y = transform_section.get_channels()[4] channel_rotation_z = transform_section.get_channels()[5] links = json_path["links"] for index in range(0, len(links)): new_time0 = unreal.FrameNumber(value=index) channel_fov.add_key(new_time0, float(json_path["fov"]), 0.0) channel_location_x.add_key(new_time0, float(links[index]["location_x"]), 0.0) channel_location_y.add_key(new_time0, float(links[index]["location_y"]), 0.0) channel_location_z.add_key(new_time0, float(links[index]["location_z"]), 0.0) channel_rotation_x.add_key(new_time0, float(links[index]["rotation_x"]), 0.0) channel_rotation_y.add_key(new_time0, float(links[index]["rotation_y"]), 0.0) channel_rotation_z.add_key(new_time0, float(links[index]["rotation_z"]), 0.0) unreal.EditorAssetLibrary.save_loaded_asset(level_sequence, False) # 刷新以直观地查看新增的轨迹和分段 unreal.LevelSequenceEditorBlueprintLibrary.refresh_current_level_sequence() unreal.log("=== INFO: Seq Create Completed Please check the file===") if __name__ == '__main__': Seqcreate() - 如果是没有json数据的情况下,我们把link那部分换成静态数据即可
#value为当前帧数 new_time0 = unreal.FrameNumber(value = 0) channel_location_x.add_key(new_time0, 213, 0.0) channel_location_y.add_key(new_time0, 324, 0.0) channel_location_z.add_key(new_time0, 543, 0.0) channel_rotation_x.add_key(new_time0, 0, 0.0) channel_rotation_y.add_key(new_time0, 0, 0.0) channel_rotation_z.add_key(new_time0, 0, 0.0) new_time1 = unreal.FrameNumber(value = 1) channel_location_x.add_key(new_time1, 228, 0.0) channel_location_y.add_key(new_time1, 335, 0.0) channel_location_z.add_key(new_time1, 668, 0.0) channel_rotation_x.add_key(new_time1, 0, 0.0) channel_rotation_y.add_key(new_time1, 0, 0.0) channel_rotation_z.add_key(new_time1, 0, 0.0) - Json格式如下,也可以根据自己的需求修改
{ "starttimestamp": 0, "endtimestamp": 1, "frametime": 60, "seqname": "VideoPlayerSeqDemo", "fov": "60.7178", "links": [ { "location_x": "-213", "location_y": "-213", "location_z": "-213", "rotation_x": "0", "rotation_y": "0", "rotation_z": "0" }, { "location_x": "-213", "location_y": "-213", "location_z": "-213", "rotation_x": "0", "rotation_y": "0", "rotation_z": "0" } } - 修改以及保存后,在Outliner中先点击我们场景中要Key帧的物体,UE 鼠标右键点击导入的脚本,点击Run,即可运行我们的脚本,我们在路径下查看Sequence是否被创建,如果未在我们的路径下检测到创建的Sequence,在脚本中检查自己的Sequence路径和输出中查看报错信息。

结语
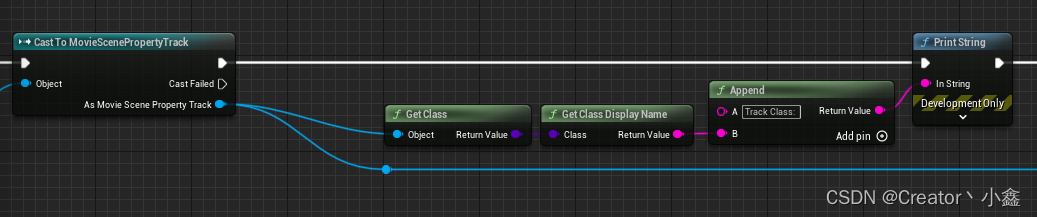
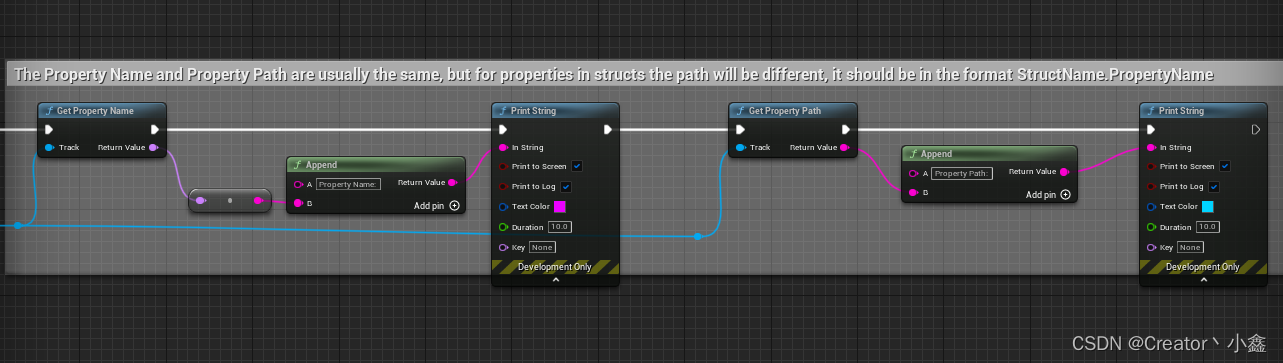
这样我们就可以通过ython脚本自动给我们想要的物体根据数据添加关键帧了。因为有时候我们无法获取到指定的Trackl需要对其进行类型转换,那么在这个过程中,名称和地址就需要进行设置了,为了防止在获取的过程中填写错误可以先打印一下,蓝图如下。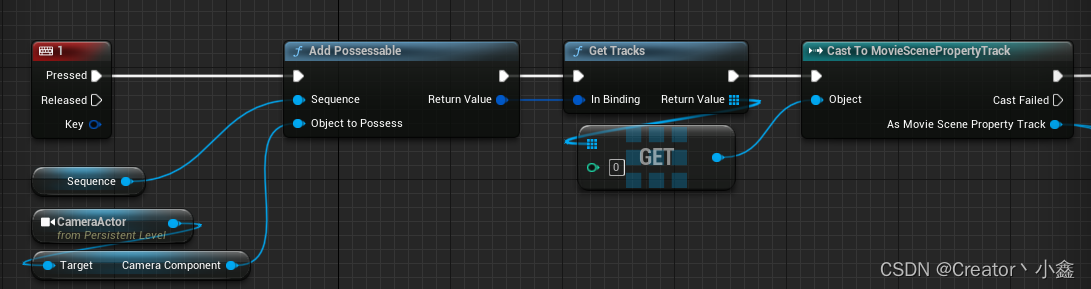


 2797
2797


 被折叠的 条评论
为什么被折叠?
被折叠的 条评论
为什么被折叠?
 到【灌水乐园】发言


