


ProGAN的结构
ProGAN也是用于图像生成的一种生成对抗网络。在原始GAN 以及一些GAN变体中,都是对搭建好的整个网络(包括生成器和判别器)直接进行训练。而ProGAN的独特之处在于采用了逐步增长的方式,如下图所示:
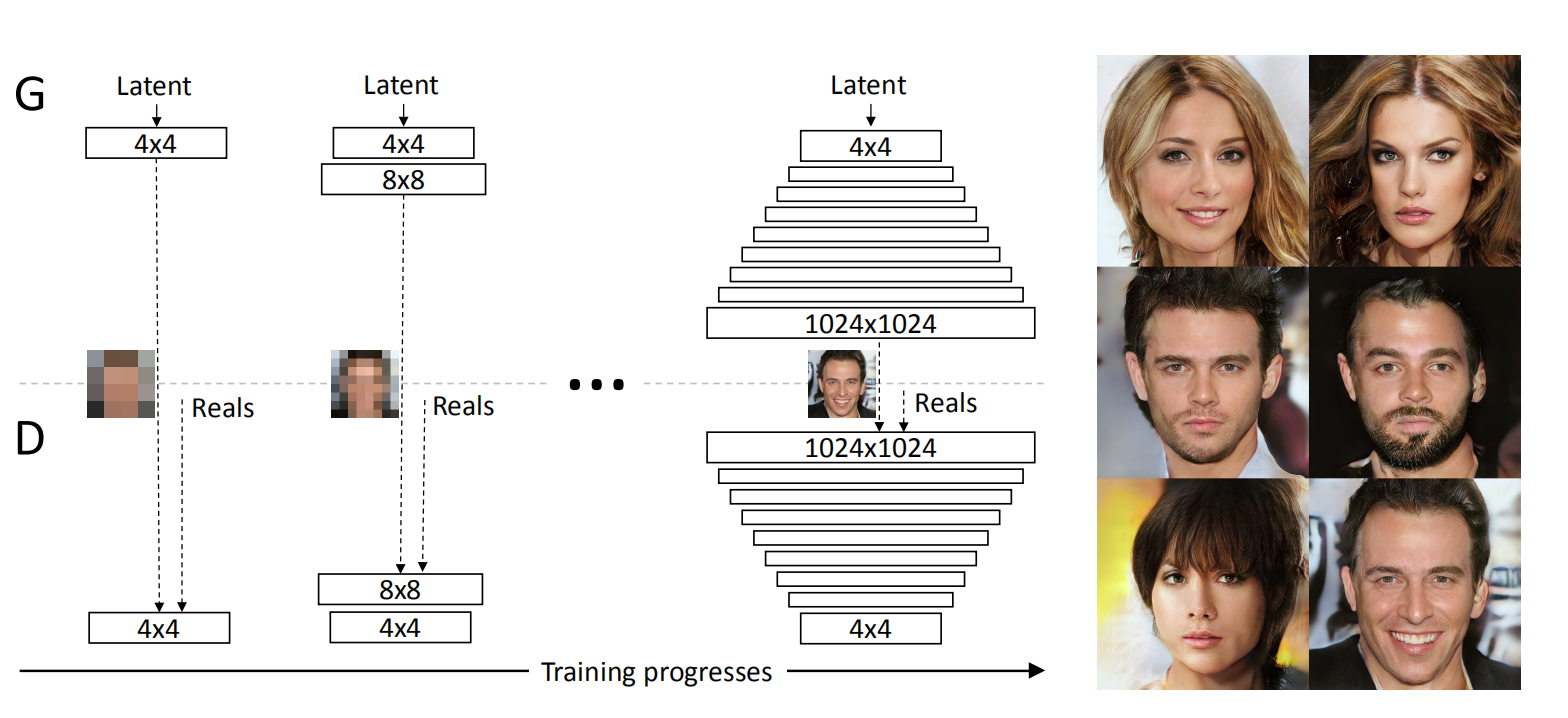
具体来说,生成器最开始只有一层,用于生成分辨较低的图像,比如图中的44;此时判别器也只有一层,将生成的44的图片和真实的4*4的图片一起输入到判别器进行,得到输出结果。训练若干轮次。
接下来,给生成器加一层,使得其生成的图像分辨率可以高一些,比如图中的88;此时也给判别器加一层,将生成的88的图片和真实的8*8的图片一起输入到判别器,得到输出结果。训练若干轮次。
一直重复上述过程,直到生成器生成的图像分辨率达到指定大小。
从上述描述可以看出,对于每一个特定层数的网络来说,其训练过程和原始GAN以及一些GAN变体的训练过程是一样的。ProGAN的精髓就在于它的网络(生成器和判别器)是逐步增长的。
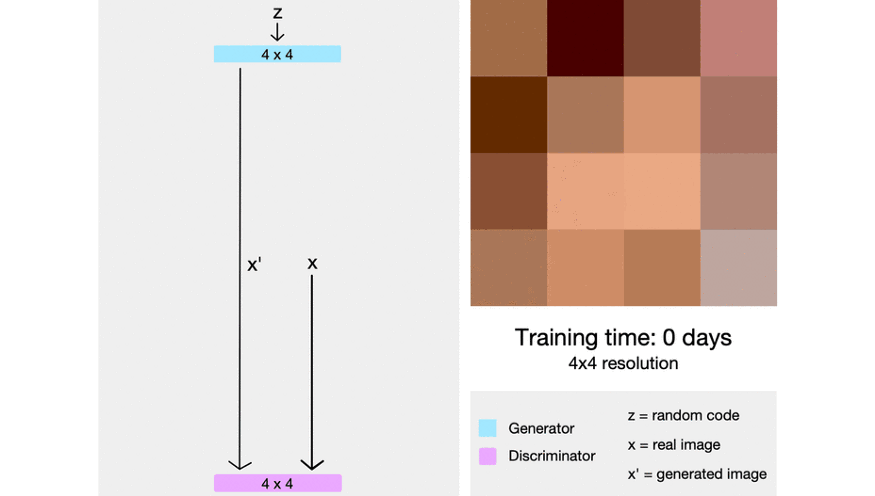
下面这张动态图演示了上述文字描述的过程:
本文首发于微信公众号:南极Python,更多有关GAN的有趣教程请在微信端查看

ProGAN的细节描述
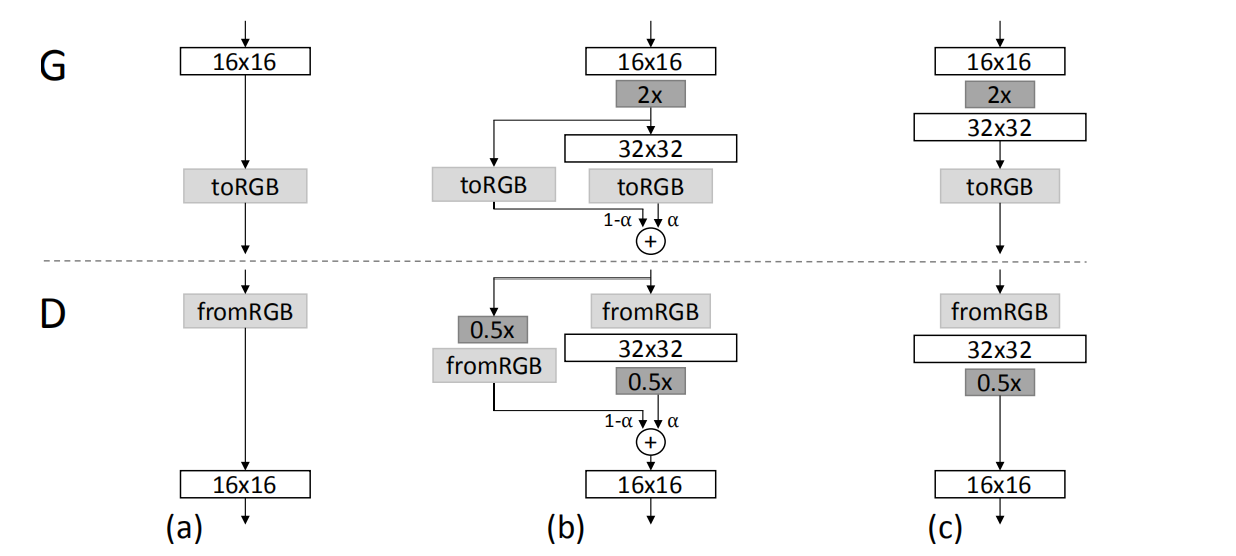
淡入
我们已经说过,生成器和判别器的训练不是一蹴而就的,而是逐步增长的。而且,对于训练好的网络层,当新的层来临时,并不能直接把新的层接在训练好的层后面,而是采用淡入(fade in)的方式:
将已经训练好的层组成的网络记作,新加入层后的网络记作
,则
与
之间通过如下公式进行融合,这就完成了fade in。 $
$
论文中的这张图很好的体现了上述过程:
像素归一化
ProGAN并没有采用BN,而是使用了下面的归一化方式:

其中,是特征图个数,
是归一化之前的像素值,
是归一化后的像素值。
小批量标准偏差
对于每一个batch,计算第0个维度(batch_size维度)上的标准差,然后将其结果与原来的batch在第1个维度(特征图个数维度)上做一个concatenate。比如原来的一个batch的shape是$[5,3,112,112]$,通过上述步骤得到的结果的新维度是$[5,4,112,112]$。
均衡学习率
为了使得生成器与判别器能够"公平竞争",对网络层的权重做了一个缩放。
用PyTorch实现ProGAN
ProGAN的生成器和判别器结构如下:
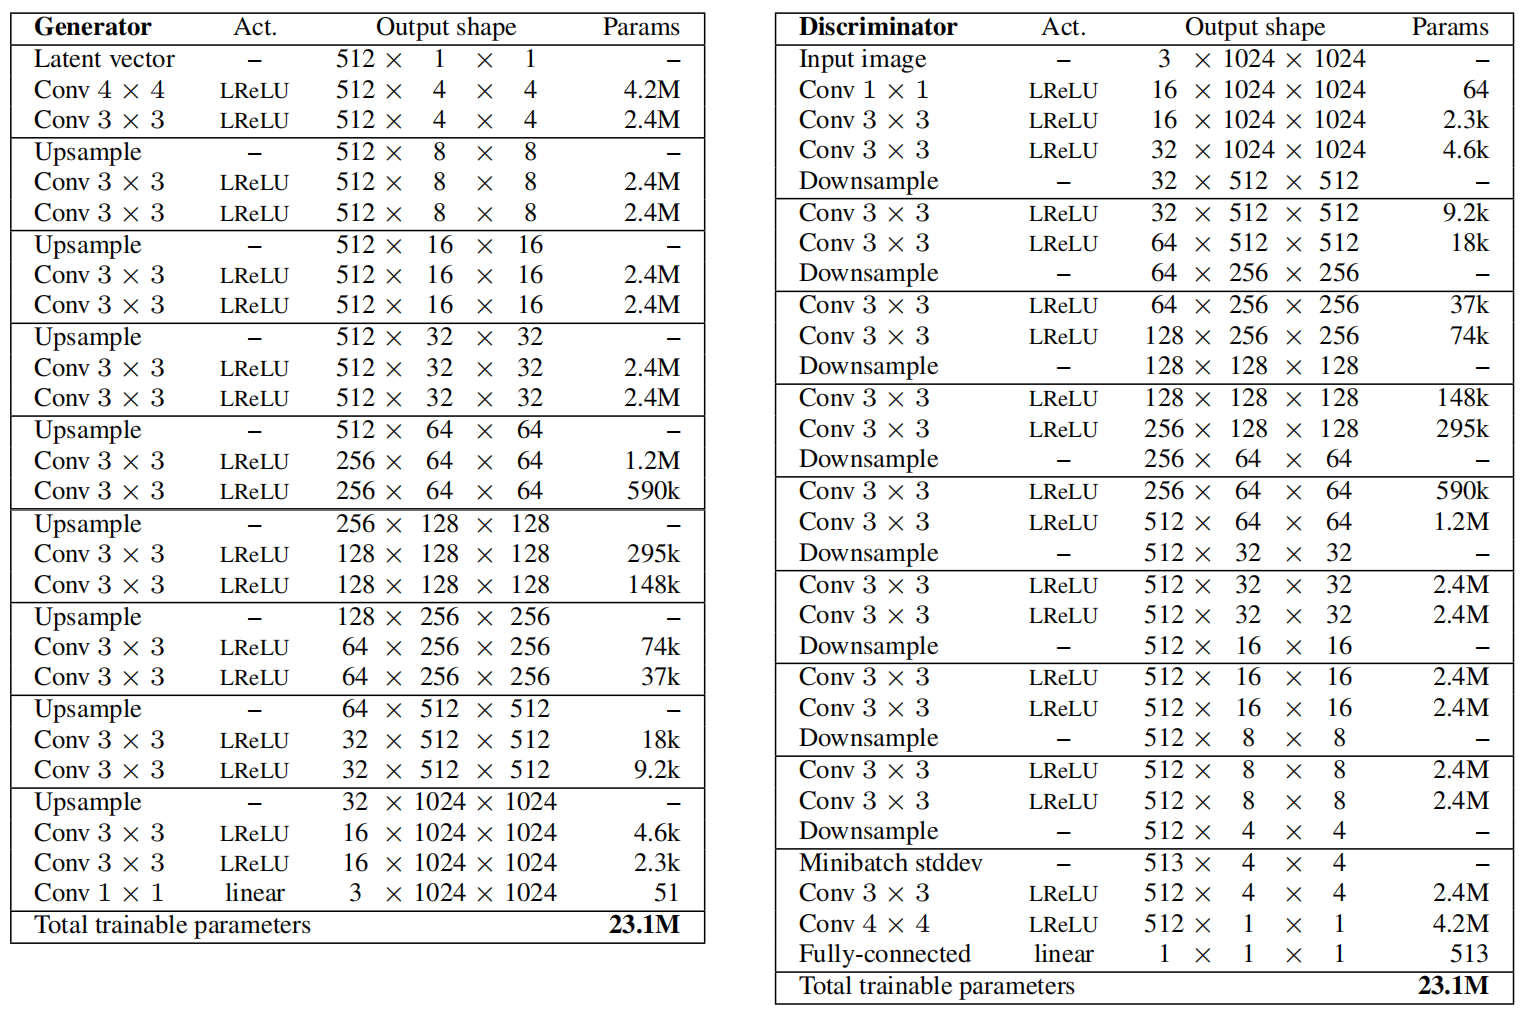
可以看出,无论是生成器还是判别器,主体部分都是由卷积层的堆叠加上采样(for 生成器)或下采样(for 判别器)组成的。
需要明确的是,这里的卷积不会改变特征图的尺寸,上采样通过最近邻插值实现,下采样通过平均池化实现。
当对特征图进行上采样时,可能需要减少输出特征图个数,这里通过factors进行控制:
factors = [1, 1, 1, 1, 1/2, 1/4, 1/4, 1/8, 1/16]
取值为1表示输出特征图个数不变。
导入所需库
import torch
import torch.nn as nn
import torch.nn.functional as F
from math import log2
import torchvision
import torch.optim as optim
import torchvision.datasets as datasets
import torchvision.transforms as transforms
from torch.utils.data import DataLoader
from torch.utils.tensorboard import SummaryWriter
from tqdm import tqdm
import time
网络必要组件
像素归一化
class PixelNorm(nn.Module):
def __init__(self):
super(PixelNorm, self).__init__()
self.epsilon = 1e-8
def forward(self, x):
#print('分母:',torch.sqrt(torch.mean(x ** 2, dim=1, keepdim=True)).shape)#torch.Size([5, 1, 112, 112])
#在通道维度(dim=1)上做
return x / torch.sqrt(
torch.mean(x ** 2, dim=1, keepdim=True) + self.epsilon
)
自定义卷积层
这里实现了均衡学习率的功能,但作者偷了个懒,仅仅是对卷积层做:
#经过这个卷积层,特征图尺寸不变,只改变特征图个数
class WSConv2d(nn.Module):
def __init__(
self, in_channels, out_channels, kernel_size=3, stride=1, padding=1, gain=2
):
super(WSConv2d, self).__init__()
self.conv = nn.Conv2d(
in_channels, out_channels, kernel_size, stride, padding
)
self.scale = (gain / (self.conv.weight[0].numel())) ** 0.5 # 一个数
# initialize conv layer
nn.init.normal_(self.conv.weight)
nn.init.zeros_(self.conv.bias)
def forward(self, x):
#print('self.scale:',self.scale)# 一个数
return self.conv(x * self.scale)
使用自定义的卷积层组成一个卷积块
网络结构图中,"连续两次卷积"这个动作将被重复使用多次,因此把它们写在一起,构造一个卷积块,方便调用。
#同样也不会改变特征尺寸,只是改变特征图个数 class ConvBlock(nn.Module): def __init__(self, in_channels, out_channels, use_pixelnorm=True): super(ConvBlock, self).__init__() self.use_pn = use_pixelnorm self.conv1 = WSConv2d(in_channels, out_channels) self.conv2 = WSConv2d(out_channels, out_channels) self.leaky = nn.LeakyReLU(0.2) self.pn = PixelNorm() def forward(self, x): x = self.leaky(self.conv1(x)) x = self.pn(x) if self.use_pn else x x = self.leaky(self.conv2(x)) x = self.pn(x) if self.use_pn else x return x
生成器和判别器网络搭建
假设已经定义好了生成器和判别器,做一个测试,如下:
if __name__ == "__main__":
    import time
    Z_DIM = 100
    IN_CHANNELS = 16
    img_size = 512
    num_steps = int(log2(img_size / 4))
    x = torch.randn((5, Z_DIM, 1, 1))
    gen = Generator(Z_DIM, IN_CHANNELS, img_size=img_size)
    disc = Discriminator(img_size, Z_DIM, IN_CHANNELS)
    #print(gen)#prog_blocks和rgb_layers各8层
    #print(disc)#prog_blocks和rgb_layer各8层
    start = time.time()
    with torch.autograd.profiler.profile(use_cuda=True) as prof:
        z = gen(x, alpha=0.5, steps=num_steps)
        print('z:',z.shape)
    #print(prof)
    gen_time = time.time()-start
    t = time.time()
    out = disc(z, 0.01, num_steps)
    disc_time = time.time()-t
    print(gen_time, disc_time)
    #print(disc(z, 0.01, num_steps).shape)
现在来构造生成器和判别器,下面的代码中显示的维度信息是上面代码测试的结果。
生成器
class Generator(nn.Module):
def __init__(self, z_dim, in_channels, img_size, img_channels=3):
super(Generator, self).__init__()
self.prog_blocks, self.rgb_layers = nn.ModuleList([]), nn.ModuleList([])
#初始的x是[512,100,1,1]
# initial takes 1x1 -> 4x4
self.initial = nn.Sequential(
nn.ConvTranspose2d(z_dim, in_channels, 4, 1, 0),
nn.LeakyReLU(0.2),
PixelNorm(),
)
# Create progression blocks and rgb layers
channels = in_channels#16
# we need to double img for log2(img_size/4) and
# +1 in loop for initial 4x4
#log2(512/4)=7,7+1=8
for idx in range(int(log2(img_size/4)) + 1):
conv_in = channels# 16
#特征图个数缩小的倍数:factors[idx]
conv_out = int(in_channels*factors[idx])#16
#prog_blocks不改变特征图尺寸
self.prog_blocks.append(ConvBlock(conv_in, conv_out))
# rgb_layer就是把channel映射为3
#这里的kernel_size=1,是1*1卷积,也不会改变特征图尺寸
self.rgb_layers.append(WSConv2d(conv_out, img_channels, kernel_size=1, stride=1, padding=0))
channels = conv_out
def fade_in(self, alpha, upscaled, generated):
#assert 0 <= alpha <= 1, "Alpha not between 0 and 1"
#assert upscaled.shape == generated.shape
return torch.tanh(alpha * generated + (1 - alpha) * upscaled)
def forward(self, x, alpha, steps):
#print('x:',x.shape)#torch.Size([5, 100, 1, 1])
upscaled = self.initial(x)#只有这一步用了转置卷积进行上采样,后面的上采样都是用的插值
#print('upscaled:',upscaled.shape)# torch.Size([5, 16, 4, 4])
out = self.prog_blocks[0](upscaled)#特征图尺寸不变
#print(self.prog_blocks)
#print('out1:',out.shape)#torch.Size([5, 16, 4, 4])
#如果当前是第一层,那么无需fade_in,直接to_rgb图像:channel=3,over~
if steps == 0:
return self.rgb_layers[0](out)
#多次grow
for step in range(1, steps+1):
#插值进行上采样,特征图尺寸变大2倍
upscaled = F.interpolate(out, scale_factor=2, mode="nearest")
#print('upscaled in for loop:',upscaled.shape)
out = self.prog_blocks[step](upscaled)
#print('out in for loop:',out.shape)
#print('out after:',out.shape)#torch.Size([5, 2, 512, 512])
# The number of channels in upscale will stay the same, while
# out which has moved through prog_blocks might change. To ensure
# we can convert both to rgb we use different rgb_layers
# (steps-1) and steps for upscaled, out respectively
final_upscaled = self.rgb_layers[steps - 1](upscaled)#倒数第二层
#print('final_upscaled:',final_upscaled.shape)#torch.Size([5, 3, 512, 512])
final_out = self.rgb_layers[steps](out)#最后一层
#print('final_out:',final_out.shape)#torch.Size([5, 3, 512, 512])
return self.fade_in(alpha, final_upscaled, final_out)#做fade_in
在__init__里面定义了prog_blocks和rgb_layers,它们是包含多个层的nn.ModuleList。
在forward里面,如果step为0,代表当前层是第一层,那么无需进行fade in,直接返回当前输出即可。当第一层构建好以后,当新层到来时,就需要执行fade in了,不过在此之前,需要先多次执行上采样+两次卷积 这一操作。
判别器
class Discriminator(nn.Module):
def __init__(self, img_size, z_dim, in_channels, img_channels=3):
super(Discriminator, self).__init__()
self.prog_blocks, self.rgb_layers = nn.ModuleList([]), nn.ModuleList([])
# Create progression blocks and rgb layers
channels = in_channels#16
for idx in range(int(log2(img_size/4)) + 1):
#输入的特征图个数在缩小,缩小的倍数:factors[idx]
conv_in = int(in_channels * factors[idx])
conv_out = channels#16
self.rgb_layers.append(WSConv2d(img_channels, conv_in, kernel_size=1, stride=1, padding=0))
self.prog_blocks.append(ConvBlock(conv_in, conv_out, use_pixelnorm=False))
#输出特征图个数也缩小
channels = conv_in
self.avg_pool = nn.AvgPool2d(kernel_size=2, stride=2)
# +1 to in_channels because we concatenate from minibatch std
self.conv = WSConv2d(in_channels + 1, z_dim, kernel_size=4, stride=1, padding=0)
self.linear = nn.Linear(z_dim, 1)
def fade_in(self, alpha, downscaled, out):
"""Used to fade in downscaled using avgpooling and output from CNN"""
#assert 0 <= alpha <= 1, "Alpha needs to be between [0, 1]"
#assert downscaled.shape == out.shape
return alpha * out + (1 - alpha) * downscaled
def minibatch_std(self, x):
batch_statistics = (
torch.std(x, dim=0)
.mean()
.repeat(x.shape[0], 1, x.shape[2], x.shape[3])
)
return torch.cat([x, batch_statistics], dim=1)
def forward(self, x, alpha, steps):
out = self.rgb_layers[steps](x) # convert from rgb as initial step
#print('out from rgb as initial step:',out.shape)#torch.Size([5, 2, 512, 512])
#如果是第一层,那么无需做fade_in,直接输出shape为[5,1],本层完成
if steps == 0: # i.e, image is 4x4
out = self.minibatch_std(out)
out = self.conv(out)
return self.linear(out.view(-1, out.shape[1]))
#如果不是第一层的话,就需要做fade_in
# index steps which has the "reverse" fade_in
downscaled = self.rgb_layers[steps - 1](self.avg_pool(x))#前一层
#print('downscaled:',downscaled.shape)#torch.Size([5, 4, 256, 256])
out = self.avg_pool(self.prog_blocks[steps](out))#最后一层
#print('out after avg_pool:',out.shape)#torch.Size([5, 4, 256, 256])
#进行fade_in
out = self.fade_in(alpha, downscaled, out)
#print('out after fade_in:',out.shape)#
#后续操作主要是做下采样,将out映射到判别结果的格式
#跟生成器正好倒过来,主要是prog_blocks,
#刚开始特征图个数是少的,后来逐渐变多
for step in range(steps - 1, 0, -1):
#通过平均池化进行下采样,特征图尺寸在减小
downscaled = self.avg_pool(out)
#下采样结果放入prog_block
out = self.prog_blocks[step](downscaled)
#print('out bef:',out.shape)#torch.Size([5, 16, 4, 4])
#该操作会使得channel维度加一
out = self.minibatch_std(out)
#print('out after minibatch_std:',out.shape)#torch.Size([5, 17, 4, 4])
out = self.conv(out)
#print('out after conv:',out.shape)#torch.Size([5, 100, 1, 1])
#print(out.view(-1, out.shape[1]).shape)#[5,100]
#print(self.linear(out.view(-1, out.shape[1])).shape)#torch.Size([5, 1])
return self.linear(out.view(-1, out.shape[1]))
判别器跟生成器的代码类似,只不过在训练的后期,生成器是通过减少输出特征图的数量来增大输出特征图的尺寸,而判别器正好相反。
tensorboard可视化+WGAN-GP
在训练时,ProGAN采用了WGAN-GP的损失函数,这个在之前的文章中已经有过实现(传送门)。
import torch
import torchvision
import torch.nn as nn
# Print losses occasionally and print to tensorboard
def plot_to_tensorboard(
writer, loss_critic, loss_gen, real, fake, tensorboard_step
):
writer.add_scalar("Loss Critic", loss_critic, global_step=tensorboard_step)
with torch.no_grad():
# take out (up to) 32 examples
img_grid_real = torchvision.utils.make_grid(real[:8], normalize=True)
img_grid_fake = torchvision.utils.make_grid(fake[:8], normalize=True)
writer.add_image("Real", img_grid_real, global_step=tensorboard_step)
writer.add_image("Fake", img_grid_fake, global_step=tensorboard_step)
def gradient_penalty(critic, real, fake, alpha, train_step, device="cpu"):
BATCH_SIZE, C, H, W = real.shape
beta = torch.rand((BATCH_SIZE, 1, 1, 1)).repeat(1, C, H, W).to(device)
interpolated_images = real * beta + fake * (1 - beta)
# Calculate critic scores
mixed_scores = critic(interpolated_images, alpha, train_step)
# Take the gradient of the scores with respect to the images
gradient = torch.autograd.grad(
inputs=interpolated_images,
outputs=mixed_scores,
grad_outputs=torch.ones_like(mixed_scores),
create_graph=True,
retain_graph=True,
)[0]
gradient = gradient.view(gradient.shape[0], -1)
gradient_norm = gradient.norm(2, dim=1)
gradient_penalty = torch.mean((gradient_norm - 1) ** 2)
return gradient_penalty
def save_checkpoint(state, filename="celeba_wgan_gp.pth.tar"):
print("=> Saving checkpoint")
torch.save(state, filename)
def load_checkpoint(checkpoint, gen, disc, opt_gen=None, opt_disc=None):
print("=> Loading checkpoint")
gen.load_state_dict(checkpoint['gen'])
disc.load_state_dict(checkpoint['critic'])
if opt_gen != None and opt_disc != None:
opt_gen.load_state_dict(checkpoint['opt_gen'])
opt_disc.load_state_dict(checkpoint['opt_critic'])
超参数设置
刚开始时,图像分辨率很低,所以可以将batch_size 设置的大一些,而随着训练的进行,图像分辨率越来越大,为了显存不至于溢出,batch_size 需要设置的小一些。所以这里用了一个列表来存储不同setp下的batch_size.
同时,为了节省时间,这里并没有采用和论文中一致的生成图像分辨率,而是生成较低的128*128的图片。
torch.backends.cudnn.benchmarks = True torch.manual_seed(0) device = "cuda" if torch.cuda.is_available() else "cpu" LEARNING_RATE = 1e-4 BATCH_SIZES = [128, 128, 64, 16, 8, 4, 2, 2, 1] IMAGE_SIZE = 128 CHANNELS_IMG = 3 Z_DIM = 128 IN_CHANNELS = 128 CRITIC_ITERATIONS = 1 LAMBDA_GP = 10 NUM_STEPS = int(log2(IMAGE_SIZE / 4)) + 1 #PROGRESSIVE_EPOCHS = [2 ** i for i in range(int(log2(IMAGE_SIZE / 4) + 1))] PROGRESSIVE_EPOCHS = [8 for i in range(int(log2(IMAGE_SIZE / 4) + 1))] fixed_noise = torch.randn(8, Z_DIM, 1, 1).to(device) NUM_WORKERS = 4
定义数据加载器
image_size与step有关,即与当前网络的层结构有关。在网络逐层增长的过程中,image_size随着step的变化而变化:$image_size=4*2^{step}$. 这样,在不同的step中,真实数据集的图像分辨率是在变化的。
这样做的原因还是在于ProGAN的逐层增长。我们说过,ProGAN的生成器和判别器是逐层加上去的,每加一层,都要进行一次类似原始GAN的训练过程,这就需要判别器的输入必须同时有特定分辨率下的生成图像和真实图像,生成图像可以由生成器生成,但特定分辨率的真实图像是没有的。为了解决这一问题,作者直接将训练集的图像resize到特定分辨率大小。
#image_size是变化的,16, 8, 4, 2, 2, 1
#为了得到指定分辨率大小的真实图像,作者直接做resize
def get_loader(image_size):
transform = transforms.Compose(
[
transforms.Resize((image_size, image_size)),
transforms.ToTensor(),
transforms.Normalize(
[0.5 for _ in range(CHANNELS_IMG)],
[0.5 for _ in range(CHANNELS_IMG)],
),
]
)
#batch_size由大变小:128,128,64,...,2,1
batch_size = BATCH_SIZES[int(log2(image_size/4))]
print('batch_size:',batch_size)# 16,会变化的
dataset = datasets.ImageFolder(root="D:\celeba", transform=transform)
loader = DataLoader(dataset, batch_size=batch_size, shuffle=True, num_workers=NUM_WORKERS, pin_memory=True)
return loader, dataset
定义训练函数
和WGAN-GP中的训练函数基本一致(传送门)
def train_fn(
critic,
gen,
loader,
dataset,
step,
alpha,
opt_critic,
opt_gen,
tensorboard_step,
writer,
):
start = time.time()
total_time = 0
training = tqdm(loader, leave=True)
for batch_idx, (real, _) in enumerate(training):
real = real.to(device)
#print('real:',real.shape)#torch.Size([128, 3, 4, 4])
cur_batch_size = real.shape[0]
model_start = time.time()
# Train Critic: max E[critic(real)] - E[critic(fake)]
# which is equivalent to minimizing the negative of the expression
for _ in range(CRITIC_ITERATIONS):
critic.zero_grad()
noise = torch.randn(cur_batch_size, Z_DIM, 1, 1).to(device)
fake = gen(noise, alpha, step)
#print('fake:',fake.shape)#torch.Size([128, 3, 4, 4])
critic_real = critic(real, alpha, step).reshape(-1)
critic_fake = critic(fake, alpha, step).reshape(-1)
gp = gradient_penalty(critic, real, fake, alpha, step, device=device)
loss_critic = (
-(torch.mean(critic_real) - torch.mean(critic_fake))
+ LAMBDA_GP * gp
)
loss_critic.backward(retain_graph=True)
opt_critic.step()
# Train Generator: max E[critic(gen_fake)] <-> min -E[critic(gen_fake)]
gen.zero_grad()
fake = gen(noise, alpha, step)
gen_fake = critic(fake, alpha, step).reshape(-1)
loss_gen = -torch.mean(gen_fake)
loss_gen.backward()
opt_gen.step()
# Update alpha and ensure less than 1
alpha += cur_batch_size / (
(PROGRESSIVE_EPOCHS[step]*0.5) * len(dataset) # - step
)
alpha = min(alpha, 1)
total_time += time.time()-model_start
if batch_idx % 300 == 0:
with torch.no_grad():
fixed_fakes = gen(fixed_noise, alpha, step)
plot_to_tensorboard(
writer, loss_critic, loss_gen, real, fixed_fakes, tensorboard_step
)
tensorboard_step += 1
print(f'Fraction spent on model training: {total_time/(time.time()-start)}')
return tensorboard_step, alpha
开始训练
def main():
# initialize gen and disc, note: discriminator should be called critic,
# according to WGAN paper (since it no longer outputs between [0, 1])
gen = Generator(Z_DIM, IN_CHANNELS, img_size=IMAGE_SIZE, img_channels=CHANNELS_IMG).to(device)
critic = Discriminator(IMAGE_SIZE, Z_DIM, IN_CHANNELS, img_channels=CHANNELS_IMG).to(device)
# initializate optimizer
opt_gen = optim.Adam(gen.parameters(), lr=LEARNING_RATE, betas=(0.0, 0.99))
opt_critic = optim.Adam(critic.parameters(), lr=LEARNING_RATE, betas=(0.0, 0.99))
# for tensorboard plotting
writer = SummaryWriter(f"logs/gan")
#load_checkpoint(torch.load("celeba_wgan_gp.pth.tar"), gen, critic)
gen.train()
critic.train()
tensorboard_step = 0
#若干step,每一个step都训练若干个epoch:PROGRESSIVE_EPOCHS[step]
for step, num_epochs in enumerate(PROGRESSIVE_EPOCHS):
#print('df:',PROGRESSIVE_EPOCHS)#[8, 8, 8, 8, 8, 8]
alpha = 0.01
#这里我们从4*4分辨率开始逐步生成
"""
if step < 3:
continue
if step == 4:
print(f"Img size is: {4*2**step}")
"""
#image_size是变化的
loader, dataset = get_loader(4 * 2 ** step)
#每个step都要训练若干个epoch,这相当于训练一次原始GAN
for epoch in range(num_epochs):
print(f"Epoch [{epoch+1}/{num_epochs}]")
tensorboard_step, alpha = train_fn(
critic,
gen,
loader,
dataset,
step,
alpha,
opt_critic,
opt_gen,
tensorboard_step,
writer,
)
checkpoint = {'gen': gen.state_dict(),
'critic': critic.state_dict(),
'opt_gen': opt_gen.state_dict(),
'opt_critic': opt_critic.state_dict()}
save_checkpoint(checkpoint)
if __name__ == "__main__":
main()
刚开始的前几次迭代中,生成的是一堆噪声(图中第一行,Fake)


又经过若干次迭代后,得到如下结果

可以看出,此时生成的图片(图中第一行,Fake)已经具备了人像的基本轮廓。
此时的模型还没有训练完毕,不过我还是把它停下了,因为我的小破笔记本的温度已经可以煎鸡蛋了。
本文首发于微信公众号:南极Python,更多有关GAN的有趣教程请在微信端查看


 5818
5818

 被折叠的 条评论
为什么被折叠?
被折叠的 条评论
为什么被折叠?
 到【灌水乐园】发言


