


文章目录
libQGLViewer的编译和使用
1 前言
测试环境:
- Windows 10
- Qt Creator
- libQGLViewer-2.9.1
2 libQGLViewer开发环境搭建
2.1 Qt Creator的下载安装
其实VS也是可以开发的,但是这里我们使用Qt Creator
参考教程:WIndows下搭建Qt开发环境 – Qt 、Qt Creater 安装、配置。
2.2 libQGLViewer的下载编译
源码下载地址:GillesDebunne/libQGLViewer。
http://www.libqglviewer.com 这个网站不知道为啥突然访问不了了,所幸我们可以直接去项目的Github创库下载源码。
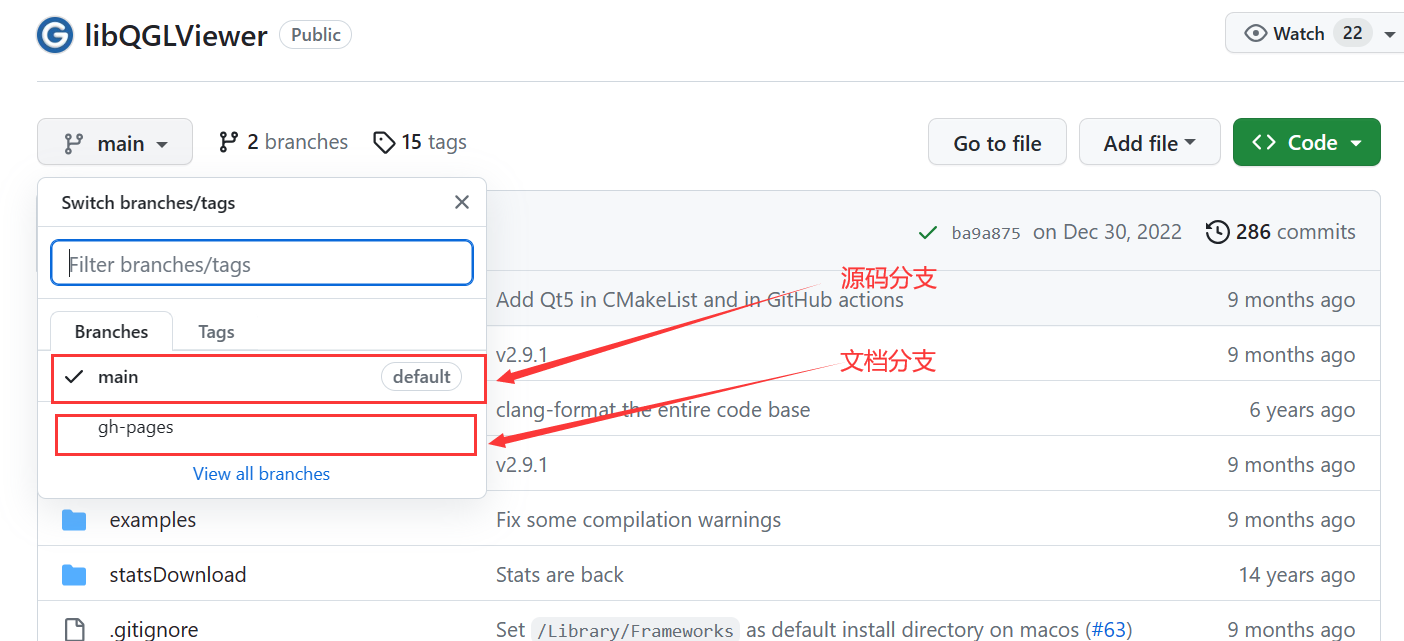
这里需要提一下,项目源码分支里的文档(
doc文件夹)是不全的,完整的文档把gh-pages分支下载下来,然后把内容合并进doc文件夹。
使用Qt Creator打开libQGLViewer/QGLViewer/QGLViewer.pro加载项目。

然后点击左下角的小榔头,完成构建。构建成功得到两个dll文件:QGLViewer2.dll和QGLViewerd2.dll。

接下来,将这两个动态库复制到C:\Windows\System32下。完成。
当然,构建过程可不是一帆风顺的(挨了一锤子)。我遇到了如下错误:

去翻阅github仓库的issues,果不其然,有人也遇到了同样的问题(Compiling issues in Qt5.12.12 Ubuntu20.04 · Issue #72)。下面一位大佬给出的解决方案如下:
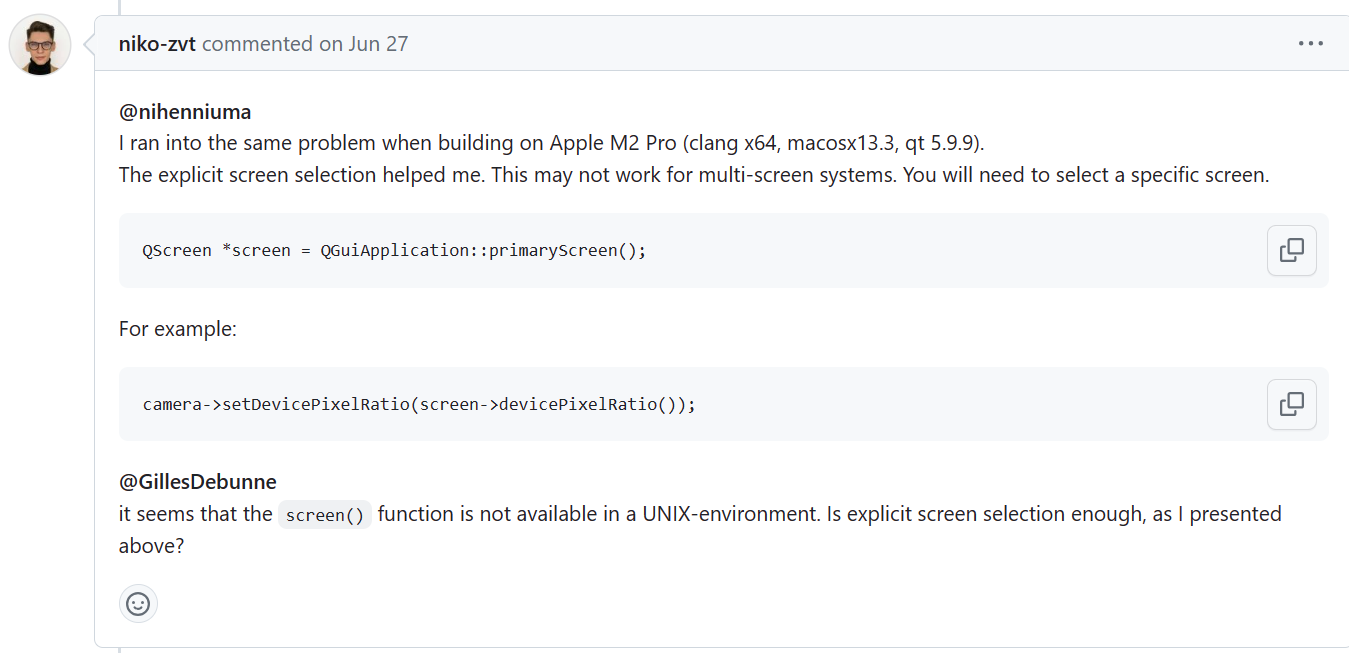
大概意思是该版本的代码在遇到多屏显示系统时我们需要手动选择一个具体的屏幕。我还特意翻看了2.8.0版本的源码,发现在2.8.0版本中该部分代码未引入QScreen头文件,这也是2.8.0版本不会报这个错误的原因。
根据上面的解决方法,我们修改qglviewer.cpp和saveSnapshot.cpp两个源文件中涉及到调用screen()函数的部分:
void QGLViewer::setCamera(Camera *const camera) {
  if (!camera)
    return;

  QScreen *screen = QGuiApplication::primaryScreen();

  // Disconnect current camera from this viewer.
  disconnect(this->camera()->frame(), SIGNAL(manipulated()), this,
             SLOT(update()));
  disconnect(this->camera()->frame(), SIGNAL(spun()), this, SLOT(update()));
  //disconnect(screen(), SIGNAL(physicalDotsPerInchChanged(qreal)), this->camera(), SLOT(setDevicePixelRatio(qreal)));
  disconnect(screen, SIGNAL(physicalDotsPerInchChanged(qreal)), this->camera(), SLOT(setDevicePixelRatio(qreal)));
  connectAllCameraKFIInterpolatedSignals(false);

  camera_ = camera;

  camera->setSceneRadius(sceneRadius());
  camera->setSceneCenter(sceneCenter());
  camera->setScreenWidthAndHeight(width(), height());
  // camera->setDevicePixelRatio(screen()->devicePixelRatio());
  camera->setDevicePixelRatio(screen->devicePixelRatio());

  // Connect camera frame to this viewer.
  connect(camera->frame(), SIGNAL(manipulated()), SLOT(update()));
  connect(camera->frame(), SIGNAL(spun()), SLOT(update()));
  // connect(screen(), SIGNAL(physicalDotsPerInchChanged(qreal)), camera, SLOT(setDevicePixelRatio(qreal)));
  connect(screen, SIGNAL(physicalDotsPerInchChanged(qreal)), camera, SLOT(setDevicePixelRatio(qreal)));
  connectAllCameraKFIInterpolatedSignals();

  previousCameraZClippingCoefficient_ = this->camera()->zClippingCoefficient();
}
bool QGLViewer::saveImageSnapshot(const QString &fileName) {

  static ImageInterface *imageInterface = nullptr;
  QScreen *screen = QGuiApplication::primaryScreen();
  //qreal devicePixelRatio = screen()->devicePixelRatio();
  qreal devicePixelRatio = screen->devicePixelRatio();
  qreal dipWidth = devicePixelRatio * width();
  qreal dipHeight = devicePixelRatio * height();
  ...
接下来再次构建就没有问题了。
2.3 安装Qt Designer 的QGLViewer控件插件(可选)
使用Qt Creator打开libQGLViewer/designerPlugin/designerPlugin.pro载入项目,使用小榔头构建项目,注意这里需要切换到release下进行构建。

构建完成,在libQGLViewer/build-designerPlugin-Desktop_Qt_5_13_1_MinGW_64_bit-Release/release目录下会生成qglviewerplugin.dll动态库文件。
接下来,将这个动态库文件复制到 $QTDIR\plugins\designer目录下。

然后按照官方教程,还需要把QGLViewer2.dll复制到$QTDir\bin目录下。

接着双击打开$QTDir\bin目录下的designer.exe程序进入Qt Designer界面。发现插件安装成功。

2.3 关于Qt Designer 的QGLViewer控件插件的一些问题
上面安装的插件只能在$QTDir\bin目录下的designer.exe程序中才能使用,也就是说无法在Qt Creator内的designer中使用。
具体原因参见:https://blog.csdn.net/weixin_43207311/article/details/121704484。
解决方法大致就是:从Qt Creator的帮助”About Qt Creator"中查看自己的版本,只需要把对应版本的插件库复到“xxx\Tools\QtCreator\bin\plugins\designer”下,再刷新一下就ok了。
因为查到是MSVC 2017, 32 bit编译的,而我编译器只安装了MinGW64,所以就麻烦自己一点,难得搞了。
3 在自己的项目中调用
按道理来说,现在我们使用Qt Creator随便打开libQGLViewer/examples目录下的示例项目中的.pro,加载示例,然后都可以完美运行看到效果。
但是现在我们想新建一个项目,并将libQGLViewer作为第三方库导入我们自己的项目。
首先,为了方便管理库文件,我们先在libQGLViewer目录下新建include和lib文件夹。整理完成后,两个文件夹的结构如下:
├─include
│  └─QGLViewer
│      │  camera.cpp
│      │  camera.h
│      │  config.h
│      │  constraint.cpp
│      │  constraint.h
│      │  domUtils.h
│      │  frame.cpp
│      │  frame.h
│      │  keyFrameInterpolator.cpp
│      │  keyFrameInterpolator.h
│      │  manipulatedCameraFrame.cpp
│      │  manipulatedCameraFrame.h
│      │  manipulatedFrame.cpp
│      │  manipulatedFrame.h
│      │  mouseGrabber.cpp
│      │  mouseGrabber.h
│      │  qglviewer.cpp
│      │  qglviewer.h
│      │  quaternion.cpp
│      │  quaternion.h
│      │  saveSnapshot.cpp
│      │  vec.cpp
│      │  vec.h
│      │
│      └─VRender
│              AxisAlignedBox.h
│              BackFaceCullingOptimizer.cpp
│              BSPSortMethod.cpp
│              EPSExporter.cpp
│              Exporter.cpp
│              Exporter.h
│              FIGExporter.cpp
│              gpc.cpp
│              gpc.h
│              NVector3.cpp
│              NVector3.h
│              Optimizer.h
│              ParserGL.cpp
│              ParserGL.h
│              Primitive.cpp
│              Primitive.h
│              PrimitivePositioning.cpp
│              PrimitivePositioning.h
│              SortMethod.h
│              TopologicalSortMethod.cpp
│              Types.h
│              Vector2.cpp
│              Vector2.h
│              Vector3.cpp
│              Vector3.h
│              VisibilityOptimizer.cpp
│              VRender.cpp
│              VRender.h
│
└─lib
       libQGLViewer2.a
       libQGLViewerd2.a
       QGLViewer2.dll
       QGLViewerd2.dll
我们了方便测试,我们直接复制libQGLViewer/examples/drawLight文件夹到随便一个路径,然后使用Creator打开其中的.pro加载项目。这时我们直接运行肯定会报错,接下来我们修改drawLight.pro文件:
TEMPLATE = app
TARGET   = drawLight
QT *= xml opengl widgets gui
CONFIG += qt opengl thread

# The following define makes your compiler emit warnings if you use
# any Qt feature that has been marked deprecated (the exact warnings
# depend on your compiler). Please consult the documentation of the
# deprecated API in order to know how to port your code away from it.
DEFINES += QT_DEPRECATED_WARNINGS

INCLUDEPATH += G:/MSTIFIY/local/libQGLViewer/include # 修改为include文件夹路径

LIB_DIR = G:/MSTIFIY/local/libQGLViewer/lib # 修改为lib文件夹路径
win32 {
        # Seems to be needed for Visual Studio with Intel compiler
        DEFINES *= WIN32

        # Use native OpenGL drivers with Qt5.5
        # No longer implicit since the ANGLE driver is now an alternative
        LIBS += -lopengl32 -lglu32

        isEmpty( QGLVIEWER_STATIC ) {
                CONFIG(debug, debug|release) {
                        LIBS *= -L$${LIB_DIR} -lQGLViewerd2
                } else {
                        LIBS *= -L$${LIB_DIR} -lQGLViewer2
                }
        } else {
                DEFINES *= QGLVIEWER_STATIC
                CONFIG(debug, debug|release) {
                        LIBS *= $${LIB_DIR}/libQGLViewerd2.a
                } else {
                        LIBS *= $${LIB_DIR}/libQGLViewer2.a
                }
        }
}

HEADERS  = drawLight.h
SOURCES  = drawLight.cpp main.cpp
记得修改INCLUDEPAT和LIB_DIR两个变量。
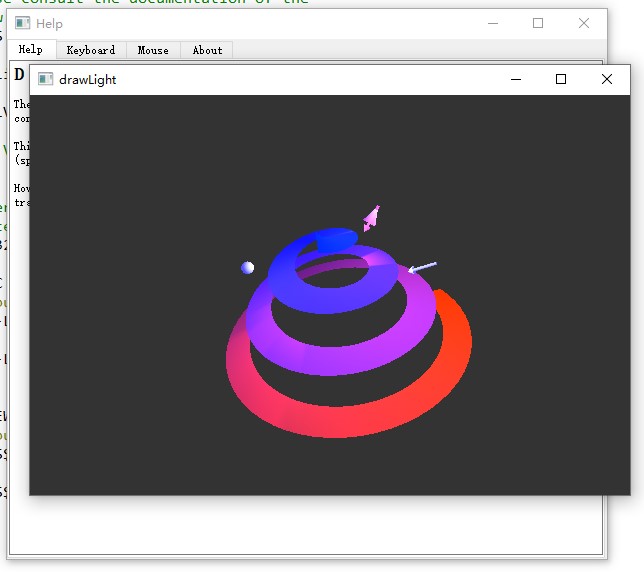
这时,点击运行,出现如下结果,运行成功!
4 总结
昨天捣鼓了一白天,头都大了,晚上回去23:00倒头就睡。今早清醒后,换了台电脑从头再来,果然成功了,还是挺有成就感的。呜呜呜,配环境真是一件麻烦的事。


 1157
1157


 被折叠的 条评论
为什么被折叠?
被折叠的 条评论
为什么被折叠?
 到【灌水乐园】发言


