


Ubuntu Linux虚拟机安装好caffe之后,下面讲述如何调用caffe框架,以及参数检查、模型转化等,并对手写字进行了预测识别。
本文以海思\Hi3519 V101R001C01SPC001\01.software\pc\IVE_CLIB\HiIVE_PC_V2.1.0.4\HiIVE_PC_V2.1.0.4\tools下的《HiIVE工具使用指南》为基础,在mnist手写字预测段落参考了深度学习框架Caffe学习笔记(6)-测试自己的手写数字图片这篇博客,受益良多
一、 参数检查和模型转化工具安装
1.1将工具包中的 hi_comm_ive.h、 hi_ive.h、 hi_type.h、 ive_tool_caffe.h 拷贝到 caffe 主目录的 include 目录
1.2将工具包的 libive_tool_caffe.a、 libive_tool_caffe.so 拷贝到任意在环境变量中的目录下,如/usr/lib 目录
1.3将工具包中的 ive_tool_caffe.cpp 拷贝到 caffe 主目录下的 tools 目录中
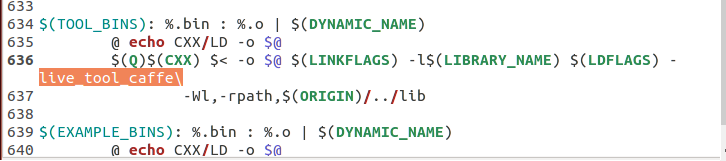
1.4进入 caffe 主目录,修改 Makefile:找到“$(TOOL_BINS): ”,在编译命令中中添加依赖库“-live_tool_caffe”并保存
1.5在 caffe 主目录,输入 sudo make –j,生成 ive_tool_caffe 可执行文件

ls build/tools/ | grep -i “ive”

二、caffe模型的训练----mnist手写字识别为例
2.1数据准备
-
在data/下新建char_rec,并将准备好的test_data和train_data放置底下,命名方式如下“x_x.jpg"

-
新建 list_files.sh

输入以下内容
bash
#!/bin/bash
dir=`pwd`
name=${dir##*/}
echo "$name"
find train_data | grep -E "jpg|bmp" | sort | awk -F "/" '{print $0 " " $2 }' > ${name}_train.txt
echo "Gen ${name}_train.txt success..."
find test_data | grep -E "jpg|bmp" | sort | awk -F "/" '{print $0 " " $2 }' > ${name}_test.txt
echo "Gen ${name}_test.txt success..."
- chmod 777 list_files.sh
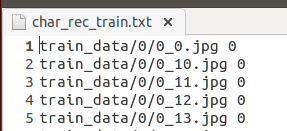
- sudo ./list_files.sh,生成一个图片清单txt文件(如下图所示,char_rec_train包含即要训练(测试)的图片所在的路径和对应的类别)。


- sudo cp …/…/examples/imagenet/create_imagenet.sh ./create_char_rec.sh
- sudo gedit create_char_rec.sh,修改为以下内容(主要是调用了build/tools/convert_imageset文件,将生成的图片清单txt转为LMDB格式)
#!/usr/bin/env sh
# Create the char_rec lmdb inputs
# N.B. set the path to the char_rec train + test data dirs
FOLDER=char_rec
DATA=data/$FOLDER
TOOLS=build/tools

TRAIN_DATA_ROOT=$DATA/
TEST_DATA_ROOT=$DATA/

TRAIN_NAME=${FOLDER}_train
TEST_NAME=${FOLDER}_test

BACKEND="lmdb"
# Set RESIZE=true to resize the images to 28x28. Leave as false if images have already been resized using another tool.
#RESIZE=false
RESIZE=true
if $RESIZE; then
  RESIZE_HEIGHT=28
  RESIZE_WIDTH=28
else
  RESIZE_HEIGHT=0
  RESIZE_WIDTH=0
fi

echo "Creating train ${BACKEND}..."

rm -rf $DATA/${TRAIN_NAME}_${BACKEND}
rm -rf $DATA/${TEST_NAME}_${BACKEND}

GLOG_logtostderr=1 $TOOLS/convert_imageset \
   -resize_height=$RESIZE_HEIGHT \
   -resize_width=$RESIZE_WIDTH \
   -gray=true \
   -shuffle \
   -backend=${BACKEND} \
   $TRAIN_DATA_ROOT \
   $DATA/${TRAIN_NAME}.txt \
   $DATA/${TRAIN_NAME}_${BACKEND} \
echo "Creating val ${BACKEND}..."
GLOG_logtostderr=1 $TOOLS/convert_imageset \
   -resize_height=$RESIZE_HEIGHT \
   -resize_width=$RESIZE_WIDTH \
   -gray=true \
   -shuffle \
   -backend=${BACKEND} \
   $TEST_DATA_ROOT \
   $DATA/${TEST_NAME}.txt \
   $DATA/${TEST_NAME}_${BACKEND}
echo "Done."
- 退回到 Caffe 主目录输入 sudo ./data/char_rec/create_char_rec.sh生成 lmdb 数据


- Caffe 中已经为用户写好获取 mnist 数据以及生成 LMDB 数据的脚本,进入 Caffe
主目录,执行脚本。
sudo ./data/mnist/get_mnist.sh
sudo ./examples/mnist/create_mnist.sh


2.2配置网络并训练
- 修改并保存训练参数 examples/mnsit/lenet_solver.prototxt:
# The train/test net protocol buffer definition
#设置深度网络模型(下一点会详细解释网络的每一层)。每一个模型就是一个net,需要在一个专门的配置文件中对net进行配置,每个net由许多的layer所组成
net: "examples/mnist/lenet_train_test.prototxt"
# test_iter specifies how many forward passes the test should carry out.
# In the case of MNIST, we have test batch size 100 and 100 test iterations, covering the full 10,000 testing images.(假设我们设置batch_size为100,则需要迭代100次才能将10000个数据全部执行完。因此test_iter设置为100。执行完一次全部数据,称之为一个epoch)
test_iter: 100
# Carry out testing every 500 training iterations.每训练500次才进行一次测试
test_interval: 500
# The base learning rate, momentum and the weight decay of the network.
base_lr: 0.01
momentum: 0.9 #上一次梯度更新的权重
weight_decay: 0.0005 #权重衰减项,防止过拟合
# The learning rate policy
lr_policy: "inv"
gamma: 0.0001
power: 0.75
# Display every 100 iterations
display: 100 #每训练100次,在屏幕上显示一次。如果设置为0,则不显示
# The maximum number of iterations
max_iter: 10000
# snapshot intermediate results快照。将训练出来的model和solver状态进行保存,snapshot用于设置训练多少次后进行保存,默认为0,不保存。snapshot_prefix设置保存路径
snapshot: 5000
snapshot_prefix: "examples/mnist/lenet"
# solver mode: CPU or GPU
solver_mode: CPU
- 修改并保存网络配置 lenet_train_test.prototxt(“//”后的汉字是本文对prototxt文件的注释,实际使用可删去)
//输入层定义,name可以随意取
name: "LeNet"
layer {
  name: "mnist"
  type: "Data"
  top: "data" #每一层用bottom来输入数据,用top来输出数据。如果只有top没有bottom,则此层只有输出,没有输入。反之亦然。如果有多个 top或多个bottom,表示有多个blobs数据的输入和输出,在数据层中,至少有一个命名为data的top。如果有第二个top,一般命名为label。 这种(data,label)配对是分类模型所必需的
  top: "label"
  #一般训练的时候和测试的时候,模型的层是不一样的。该层(layer)是属于训练阶段的层,还是属于测试阶段的层,需要用include来指定。如果没有include参数,则表示该层既在训练模型中,又在测试模型中,此处即表示该数据层为训练层
  include {
    phase: TRAIN
  }
  #Transformations: 数据的预处理,可以将数据变换到定义的范围内。如设置scale为0.00390625,实际上就是1/255, 即将输入数据由0-255归一化到0-1之间
  transform_param {
    scale: 0.00390625
  }
  data_param {
    source: "examples/mnist/mnist_train_lmdb"
    batch_size: 64 #每次处理64个数据
    backend: LMDB #默认为LevelDB数据
  }
}
layer {
  name: "mnist"
  type: "Data"
  top: "data"
  top: "label"
  include {
    phase: TEST
  }
  transform_param {
    scale: 0.00390625
  }
  data_param {
    source: "examples/mnist/mnist_test_lmdb"
    batch_size: 100
    backend: LMDB
  }
}
layer {
  name: "conv1"
  type: "Convolution"
  bottom: "data"
  top: "conv1"
  param {
    lr_mult: 1 #学习率的系数,最终的学习率是这个数乘以solver.prototxt配置文件中的base_lr。如果有两个lr_mult, 则第一个表示权值的学习率,第二个表示偏置项的学习率。一般偏置项的学习率是权值学习率的两倍
  }
  param {
    lr_mult: 2
  }
  convolution_param {
    num_output: 15
    kernel_size: 3 #如果卷积核的长和宽不等,需要用kernel_h和kernel_w分别设定
    stride: 1
    weight_filler {
      type: "xavier" #权值初始化。 默认为constant,值全为0,很多时候我们用xavier算法来进行初始化,也可以设置为gaussian
    }
    bias_filler {
      type: "constant"
    }
  }
}
layer {
  name: "pool1"
  type: "Pooling"
  bottom: "conv1"
  top: "pool1"
  pooling_param {
  pool: MAX #目前可用的方法有MAX, AVE, 或STOCHASTIC
  kernel_size: 2
  stride: 2
  }
}
layer {
  name: "conv2"
  type: "Convolution"
  bottom: "pool1"
  top: "conv2"
  param {
    lr_mult: 1
  }
  param {
    lr_mult: 2
  }
  convolution_param {
    num_output: 25
    kernel_size: 3
    stride: 1
    weight_filler {
      type: "xavier"
    }
    bias_filler {
      type: "constant"
    }
  }
}
layer {
  name: "pool2"
  type: "Pooling"
  bottom: "conv2"
  top: "pool2"
  pooling_param {
    pool: MAX
    kernel_size: 2
    stride: 2
  }
}
layer {
  name: "ip1"
  type: "InnerProduct"
  bottom: "pool2"
  top: "ip1"
  param {
    lr_mult: 1
  }
  param {
    lr_mult: 2
  }
  inner_product_param {
    num_output: 200
    weight_filler {
      type: "xavier"
    }
    bias_filler {
      type: "constant"
    }
  }
}
layer {
  name: "relu1"
  type: "ReLU"
  bottom: "ip1"
  top: "ip1" #RELU层支持in-place计算,这意味着bottom和top相同(输出和输入相同)以避免内存的消耗
}
layer {
  name: "ip2"
  type: "InnerProduct"
  bottom: "ip1"
  top: "ip2"
  param {
    lr_mult: 1
  }
  param {
    lr_mult: 2
  }
  inner_product_param {
    num_output: 10
    weight_filler {
      type: "xavier"
    }
    bias_filler {
      type: "constant"
    }
  }
}
layer {
  name: "accuracy"
  type: "Accuracy"
  bottom: "ip2"
  bottom: "label"
  top: "accuracy"
  include {
    phase: TEST
  }
}
#softmax-loss layer输出loss值
layer {
  name: "loss"
  type: "SoftmaxWithLoss"
  bottom: "ip2"
  bottom: "label"
  top: "loss"
}
3. 使用工具进行网络配置检查
sudo ./build/tools/ive_tool_caffe 0 28 28 1 examples/mnist/lenet_train_test.prototxt

4. 训练
在 Caffe 主目录下,输入 sudo ./build/tools/caffe train –solver examples/mnist/lenet_solver.prototxt,训练完成会提示“Optimization Done”,


5. 网络和模型参数检查以及转化
在 Caffe 主目录下,输入
./build/tools/ive_tool_caffe 1 28 28 1 examples/mnist/lenet_train_test.prototxt examples/mnist/lenet_iter_10000.caffemodel examples/mnist/lenet_iter_10000.bin
网络和模型参数检查以及转化成功会返回提示“successfull”。同时在 examples/mnsit
目录下也会多出 lenet_iter_10000.bin 的文件

三、测试模型准确率及预测手写字
3.1网络准确率测试
sudo ./build/tools/caffe test -model examples/mnist/lenet_train_test.prototxt -weights examples/mnist/lenet_iter_10000.caffemodel -iterations 100

3.2手写字的预测
此处参考了深度学习框架Caffe学习笔记(6)-测试自己的手写数字图片
- build/examples/cpp_classification/classification.bin的使用
$ ./build/examples/cpp_classification/classification.bin
Usage: ./build/examples/cpp_classification/classification.bin
deploy.prototxt    // 模型描述文件
network.caffemodel // 模型权值文件
mean.binaryproto   // 图像均值文件
labels.txt         // 图像类别标签信息
img.jpg            // 输入待分类图像
- 图像均值文件
Caffe框架为我们提供了一个计算均值的文件compute_image_mean.cpp
sudo ./build/tools/compute_image_mean examples/mnist/mnist_train_lmdb examples/mnist/mean.binaryproto

- 标签文件
自己建一个txt文件,输入0-9,每行一个数字 - 权值描述文件
训练好后examples/mnist/目录下就会会有lenet_iter_10000.caffemodel,即权值描述文件 - 模型描述文件
将lenet_train_test.prototxt复制一份修改如下
// 将训练和测试用的mnist层删除,添加以下层
name: "LeNet"
layer {
  name: "data"
  type: "Input"
  top: "data"
  input_param { shape: { dim: 1 dim: 1 dim: 28 dim: 28 } }
}
......
// 中间的模型不改动,省略
......
// 将accuracy层和loss层删除,添加以下层
layer {
  name: "prob"
  type: "Softmax"
  bottom: "ip2"
  top: "prob"
}
完成上诉几个文件的建立后输入
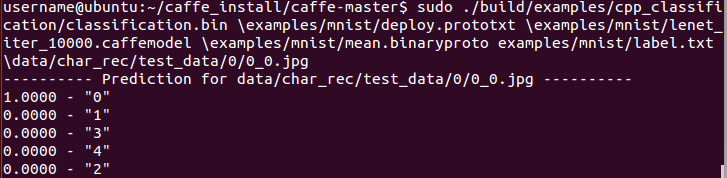
sudo ./build/examples/cpp_classification/classification.bin \examples/mnist/deploy.prototxt \examples/mnist/lenet_iter_10000.caffemodel \examples/mnist/mean.binaryproto examples/mnist/label.txt \data/char_rec/test_data/0/0_0.jpg
预测结果如下
四、总结
训练的caffe框架主要包括三个文件:
1、solver文件(lenet_solver.prototxt)
主要包含了迭代次数,是否用GPU,多少次迭代暂存一次训练所得参数,动量项,权重衰减(即正则化参数),基本的learning rate,多少次迭代打印一次loss,以及网络结构描述文件(即model文件)存储位置等

2、model文件(lenet_train_test.prototxt),网络的结构,即有多少层,数据层、卷积层、池化层等

3、weights文件(lenet_iter_10000.caffemode),这个文件无法直接打开,主要是网络结果对应的权重
参考博客
深度学习框架Caffe学习笔记(6)-测试自己的手写数字图片
Caffe学习系列(2):数据层及参数
caffe三种文件类别


 1225
1225


 被折叠的 条评论
为什么被折叠?
被折叠的 条评论
为什么被折叠?
 到【灌水乐园】发言


