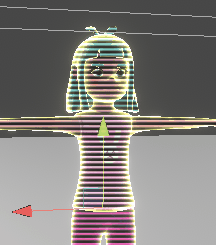
[UnityShader]使用shader产生全息投影的效果

在这里插入图片描述结果图
以上效果用shadergraph同样也可以实现,因为这个渲染里面只存在一个pass。

全息投影技术重点在于模型要产生不依赖与模型uv的纹理效果。
计算顶点在屏幕中的位置是个不错的选择。
使用ComputeScreenPos(i.vertex);函数可以获得顶点在屏幕中的坐标,以这个坐标来采样,产生的效果就相当于当前的屏幕盖了一张纹理图。同时,如果想要产生随视角变化的纹理,可以考虑使用模型在世界空间中的坐标的两个值来做uv坐标,这同样是脱离模型uv的。
为了让效果更加生动,采用了_Time来进行uv平移,注意这里的_Time使用,要用原来的值加上_Time的某一维,而不能直接用_Time否则每个顶点的y坐标采样会是一样的。
以下为shader代码:其中我们用了一张贴图来产生纹理,还有张噪波贴图用来模拟随机数,产生全息不稳定 的效果。

Shader "Unlit/ghost"
{
    Properties
    {
        _MainTex ("Texture", 2D) = "white" {}
        _LightTex("动画纹理",2D)="white"{}
        _NoiseTex("噪波",2D)="white"{}
        [HDR]_BorderColor("边缘色",Color)=(1,1,1,1)
        _Alpha("透明度",Range(0,1))=0
        _Speed("速度",Range(0,15))=1
        _FresnelPower("菲涅尔POWER",Range(0,8))=5
        _Cutout("裁剪阈值",Range(0,1.1))=0.1

    }
    SubShader
    {
        Tags{"Rendertype"="transparent"  "ignoreprojector"="true" "queue"="transparent"}
        pass{
            ZWrite on
            ColorMask 0
        }
        
        pass{
            Blend srcalpha oneminussrcalpha
            CGPROGRAM
            #pragma vertex vert
            #pragma fragment frag
            #include "Lighting.cginc"
            #include "UnityCG.cginc"
            sampler2D _MainTex;
            sampler2D _NoiseTex;
            float4 _NoiseTex_ST;
            float4 _BorderColor;
            float _Alpha;
            float4 _MainTex_ST;
            float _Cutout;
            float _Speed;

            float _FresnelPower;
            sampler2D _LightTex;
            float4 _LightTex_ST;
                struct appdata
            {
                float4 vertex : POSITION;
                float3 normal:NORMAL;
                float2 uv:TEXCOORD0;
            };

            struct v2f
            {
                float2 uv:TEXCOORD0;
                float4 vertex : POSITION;
                float3 viewDir:TEXCOORD2;
                float3 worldNormal:TEXCOORD1;
  
            };

            v2f vert (appdata v)
            {
                v2f o;
                o.uv=TRANSFORM_TEX(v.uv,_MainTex);
                o.worldNormal=normalize(UnityObjectToWorldNormal(v.normal));
                o.viewDir=ObjSpaceViewDir(v.vertex);

                o.vertex=UnityObjectToClipPos(v.vertex);

                return o;
            }

            fixed4 frag (v2f i) : SV_Target
            {
                float2 srcpos=ComputeScreenPos(i.vertex);
                i.viewDir=normalize(i.viewDir);
                srcpos.y+=_Time.w*_Speed;
                srcpos=TRANSFORM_TEX(srcpos,_LightTex);
                float random=tex2D(_NoiseTex,fixed2(_Time.w,_Time.w));
                float4 scrcol=tex2D(_LightTex,srcpos);
                float fresnel=pow(saturate(1-dot(i.viewDir,i.worldNormal)),_FresnelPower);
                float4 col=tex2D(_MainTex,i.uv);
                clip(scrcol-_Cutout);
                return fixed4(col.xyz*random*(scrcol),_Alpha*random)+fixed4(fresnel*_BorderColor.xyz,0);
            }
            ENDCG
        }                                                                                                                                           
    }
    Fallback "Specular"
}

  • 2
    点赞
  • 21
    收藏
    觉得还不错? 一键收藏
  • 1
    评论
实现全息投影效果Unity Shader可以分为以下几个步骤: 1. 在场景中创建一个Plane作为投影面,将其设置为不渲染,并且禁用光照。 2. 在Shader中定义一个包含纹理和透明度的材质,用于渲染全息投影。 3. 使用Shader中的顶点着色器将投影面上的顶点位置转换为世界空间中的位置。 4. 在片段着色器中,使用透明度值来控制投影的强度。可以使用噪声纹理来模拟全息投影的扭曲效果。 5. 为了增加真实感,可以在场景中添加适当的光源和阴影。可以使用Unity内置的光源或者自定义的光源。 以下是一个简单的Unity全息投影Shader示例: ``` Shader "Custom/Hologram" { Properties { _MainTex ("Texture", 2D) = "white" {} _Color ("Color", Color) = (1,1,1,1) _Distortion ("Distortion", Range(0.0, 1.0)) = 0.1 } SubShader { Tags {"Queue"="Transparent" "RenderType"="Opaque"} LOD 100 Pass { CGPROGRAM #pragma vertex vert #pragma fragment frag #include "UnityCG.cginc" struct appdata { float4 vertex : POSITION; }; struct v2f { float4 vertex : SV_POSITION; float2 uv : TEXCOORD0; }; sampler2D _MainTex; float4 _MainTex_ST; float4 _Color; float _Distortion; v2f vert (appdata v) { v2f o; o.vertex = UnityObjectToClipPos(v.vertex); o.uv = TRANSFORM_TEX(v.vertex.xy, _MainTex); return o; } fixed4 frag (v2f i) : SV_Target { float4 color = tex2D(_MainTex, i.uv) * _Color; float distance = length(i.vertex); float distortion = _Distortion * (1.0 / distance); float2 distortionUV = i.uv + (distortion * tex2D(_MainTex, i.uv * 10.0).rg - distortion * 0.5); float4 distortionColor = tex2D(_MainTex, distortionUV) * _Color; color = lerp(color, distortionColor, 0.5); color.a = pow(color.a, 2.0); return color; } ENDCG } } FallBack "Diffuse" } ``` 在这个Shader中,我们使用了一个包含纹理和透明度的材质,通过顶点着色器将投影面上的顶点位置转换为世界空间中的位置,然后在片段着色器中使用透明度值来控制投影的强度,并使用噪声纹理来模拟全息投影的扭曲效果。最后,我们使用lerp函数将原始颜色和扭曲颜色混合在一起,并使用pow函数来调整透明度的强度。

“相关推荐”对你有帮助么?

  • 非常没帮助
  • 没帮助
  • 一般
  • 有帮助
  • 非常有帮助
提交
评论 1
添加红包

请填写红包祝福语或标题

红包个数最小为10个

红包金额最低5元

当前余额3.43前往充值 >
需支付:10.00
成就一亿技术人!
领取后你会自动成为博主和红包主的粉丝 规则
hope_wisdom
发出的红包
实付
使用余额支付
点击重新获取
扫码支付
钱包余额 0

抵扣说明:

1.余额是钱包充值的虚拟货币,按照1:1的比例进行支付金额的抵扣。
2.余额无法直接购买下载,可以购买VIP、付费专栏及课程。

余额充值