


参考自Linux系统下配置并开启远程Jupyter lab访问
通常情况下,我们使用Linux系统的服务器作为远程工具来运行python程序,完成相关的项目开发和科研任务。对于一般的工作者,使用Pycharm进行远程的服务器连接和配置就可以进行本地项目远程化运行。此外,我们日常工作中难免会使用到Jupyter工具来进行流程化的项目工作,尤其在进行机器学习和深度学习的时候。Jupyter工具能够便于我们分模块检查程序问题,进行高效的调优工作。
因此,在我们拥有Linux服务器的情况下,我们考虑在服务器端开启Jupyter Lab。通过远程网页进行访问,实现终端用户远程使用服务器下的Jupyer工具进行项目的开发。
Jupyter Lab 安装
我们首先更新一下pip,使用pip来安装Jupyter lab。其中安装pip的源可以根据自己需要进行调整。
pip install -i https://pypi.mirrors.ustc.edu.cn/simple --upgrade pip
然后我们使用pip来更新安装Jupyter Lab。在实践中,我们发现如果直接安装后和进入Jupyter lab会出现提示:
- ’ExtensionManager’ object has no attribute ‘_extensions’
- ‘ERROR: Cannot uninstall ‘terminado’. It is a distutils installed project and thus wecannot accurately determine which files belong to it which would lead to only a partial uninstall’
为了避免上面这个问题,经过寻找我们需要按照如下顺序进行安装:
pip install nbclassic==0.2.8
pip install terminado --upgrade --ignore-installed terminado
pip install --upgrade jupyterlab
Jupyter Lab卸载
jupyter lab clean --all
pip3 install jupyterlab --force-reinstall
Jupyter Lab 配置
更新安装完成之后,我们对Jupyter Lab进行远程访问的配置,才能实现远程登录访问。首先生成配置文件:
jupyter lab --generate-config
# jupyter notebook --generate-config
随后我们进入ipython:
In[1]:from jupyter_server.auth import passwd
In [2]: passwd()
Enter password:
Verify password:
Out[2]: '**************************************'
In [3]:
目的是生成一个密码的哈希值,马上需要用,上面输入的密码可以自己任意取,将生成的这一段哈希值先复制了保存在。
然后用vim编辑器打开刚才生的配置文件:
vi .jupyter/jupyter_lab_config.py
打开后 按i进入编辑模式,直接在文件开头输入以下内容:
c.ServerApp.ip='*'  # 表示所有ip皆可访问
c.ServerApp.password = '******************************'  # 前面生成的密码哈希值
c.LabServerApp.open_browser = False  #  禁止打开浏览器
c.ServerApp.port =8888  # 随便指定一个端口,默认为8888
c.ServerApp.allow_remote_access = True # 允许远程访问
c.ServerApp.root_dir = '/home/cw/'   # Linux用/home/cw/,windows用D:\\codepath\\,windows的话得用双\\,否则会报错
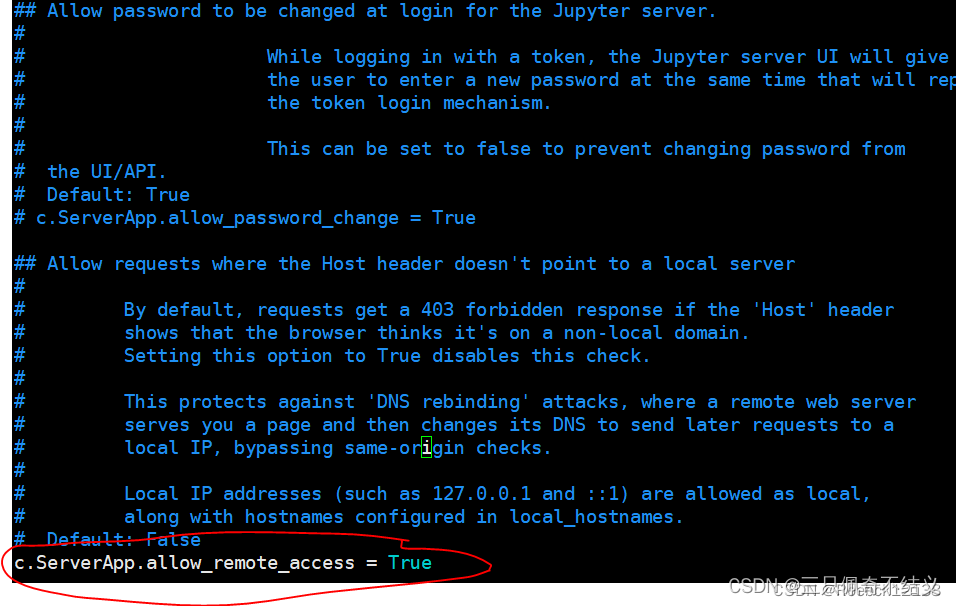
需要注意的是:我们需要在配置文件中找到它自带的这一行(大概在500多行的位置)将其激活并设置为True。虽然这个和前面在文件开头添加的配置内容相同,但是仍然需要进行一下处理才可以正常运行。
c.ServerApp.allow_remote_access = True
使用:wq保存配置好的文件并退出。
在同一个文件夹下有一个叫
jupyter_notebook_config.py的文件,记得也要修改里面的参数(复制以下部分即可),注意里面也有ServerApp的参数,这不是写错了,就是这样写的,否则会报错。
c.ServerApp.ip='*'  # 表示所有ip皆可访问
c.ServerApp.password = 'argon2:$argon2id$v=19$m=10240,t=10,p=8$rcGzNR6+NIBAldYLnkmLPg$kZ2piVi9mc2GgSdjLXcnsqxnx+6ts95wqhiyLw4WsrA'  # 前面生成的密码哈希值
c.NotebookApp.open_browser = False  #  禁止打开浏览器
c.NotebookApp.port =8899  # 随便指定一个端口,默认为8888
c.NotebookApp.allow_remote_access = True # 允许远程访问

# c.ServerApp.notebook_dir = '~/'   # 得用双\\,否则会报错
# c.ServerApp.root_dir = '/home/dacim/jupyternotebook'  #设置Notebook启动进入的目录
# c.ServerApp.use_redirect_file = False
# c.ServerApp.allow_origin = '*'
关闭防火墙
随后我们对服务器的防火墙端口进行配置,如果这个端口没有被打开或者被防火墙允许访问,我们依然是无法实现远程访问的。我们输入如下命令来打开防火墙对应端口并保存相应配置:(Windows系统不需要进行这部分的配置)
firewall-cmd --permanent --zone=public --add-port=8888/tcp
firewall-cmd --reload

# 或者
sudo ufw disable

下载nodejs,npm
sudo apt-get install nodejs
sudo apt-get install npm
最后在终端输入jupyter lab build,没有问题就说明已经安装成功了。
Jupyter Lab远程登录
在终端中输入jupyter lab(或者用nohup jupyter lab --allow-root &,其中# nohup表示ssh终端断开后仍然运行;&表示允许后台运行)启动jupyter lab 服务。看到如下显示则表明jupyter被正常运行。

我们在自己的终端上打开网页,输入服务器的IP地址 + 访问短口:IP:port。输入之前设置的密码之后就可以正常进入了。这里的ip在linux中可以借助ifconfig -a查看,在最开始那一大部分,如inet 172.30.154.173,端口为上面设置好的8888。
到此,我们就完成了Jupyter Lab的服务器端配置,实现了本地终端登录的工作。
ubuntu开机自动启动jupyter lab
- 首先查看安装目录
whereis jupyter-lab
jupyter-lab: /home/cw/anaconda3/bin/jupyter-lab
- 添加
jupyter.service到/etc/systemd/system/目录
$ sudo vim /lib/systemd/system/jupyter.service
# 将下面代码中的User改成自己的用户名并复制到打开的文件中
--------------------------------------------------------------------------------
[Unit]
Description=jupyter lab
After=network.target
[Service]
Type=simple
# 这里填用户名,下同
User=cw
EnvironmentFile=/home/cw/anaconda3/bin/jupyter-lab  #jupyter-lab的安装目录
ExecStart=/home/cw/anaconda3/bin/jupyter-lab
ExecStop=/usr/bin/pkill /home/cw/anaconda3/bin/jupyter-lab
KillMode=process
Restart=on-failure
RestartSec=30s
[Install]
WantedBy=multi-user.target
- 设置开机自启动
sudo systemctl daemon-reload
sudo systemctl enable jupyter.service
sudo systemctl start jupyter.service
- 补充
#移除jupyter服务
sudo systemctl disable jupyter.service
#重启jupyter服务
sudo systemctl restart jupyter.service
#停止jupyter服务
sudo systemctl stop jupyter.service
报错:Could not determine jupyterlab build status without nodejs
对于Windows:
I ran into a similar issue this morning and ended up here. The diagnostic message appears to be harmless:
[W 07:35:51.998 LabApp] Could not determine jupyterlab build status without nodejs
However, the way I resolved it for my configuration (Windows 10, Anaconda distribution of Python 3.7) was to download NodeJS from the source. Choose the LTS (Long Term Support) version of Node.js rather than the “Current with the latest features” edition.
Next, ensure the node executable is in the search path. On Windows, hold the Windows key and Break. Click on Advanced System Settings -> Environment Variables -> System Variables. Double click PATH to edit. Click OK until you’re out.(一般下载完自动就有了,为C:\Users\user\AppData\Roaming\npm)
Next, activate the environment and then run conda: conda install -c conda-forge nodejs
In a new command window, run:
jupyter lab
对于Linux like ubuntu:
- 先下载
nodejs和npm
# 下载
sudo apt install nodejs
sudo apt install npm

# 查看下载的版本
node -v
npm -v
- 在相关python环境里下载
nodejs
conda install -c conda-forge nodejs
报错: “无法加载文件C:\XXX\WindowsPowerShell\profile.ps1"的问题
解决办法:
1.win10左下角点击logo,找到Windows Powershell,右击,然后以管理员身份打开.
2.打开后,输入:
get-ExecutionPolicy # 查看系统执行策略状态
set-executionpolicy remotesigned # 修改执行策略状态,输入Y
3.之后,关闭Windows Powershell即可。
4.此外,关闭VScode,然后重新打开VScode,然后在终端就可以正常输入脚本执行操作了。
报错:无法识别conda.exe
& : The term 'C:\Users\PC\anaconda3\Scripts\conda.exe' is not recognized as the name of a cmdlet, function, script file, or o
perable program. Check the spelling of the name, or if a path was included, verify that the path is correct and try again.
At C:\Users\PC\Documents\WindowsPowerShell\profile.ps1:4 char:4
+ (& "C:\Users\PC\anaconda3\Scripts\conda.exe" "shell.powershell" "hook ...
+    ~~~~~~~~~~~~~~~~~~~~~~~~~~~~~~~~~~~~~~~~~
    + CategoryInfo          : ObjectNotFound: (C:\Users\PC\anaconda3\Scripts\conda.exe:String) [], CommandNotFoundException
    + FullyQualifiedErrorId : CommandNotFoundException
找到profile.ps1文件,修改里面的conda.exe的路径为conda.exe的安装路径即可,我的路径为"D:\coding\anaconda\Scripts\conda.exe"


 2925
2925

 被折叠的 条评论
为什么被折叠?
被折叠的 条评论
为什么被折叠?
 到【灌水乐园】发言


