


LISA代码详解
文章标题:LISA: Reasoning Segmentation via Large Language Model
LISA利用大语言模型和SAM实现了推理分割,其代码在:LISA,模型结构如下: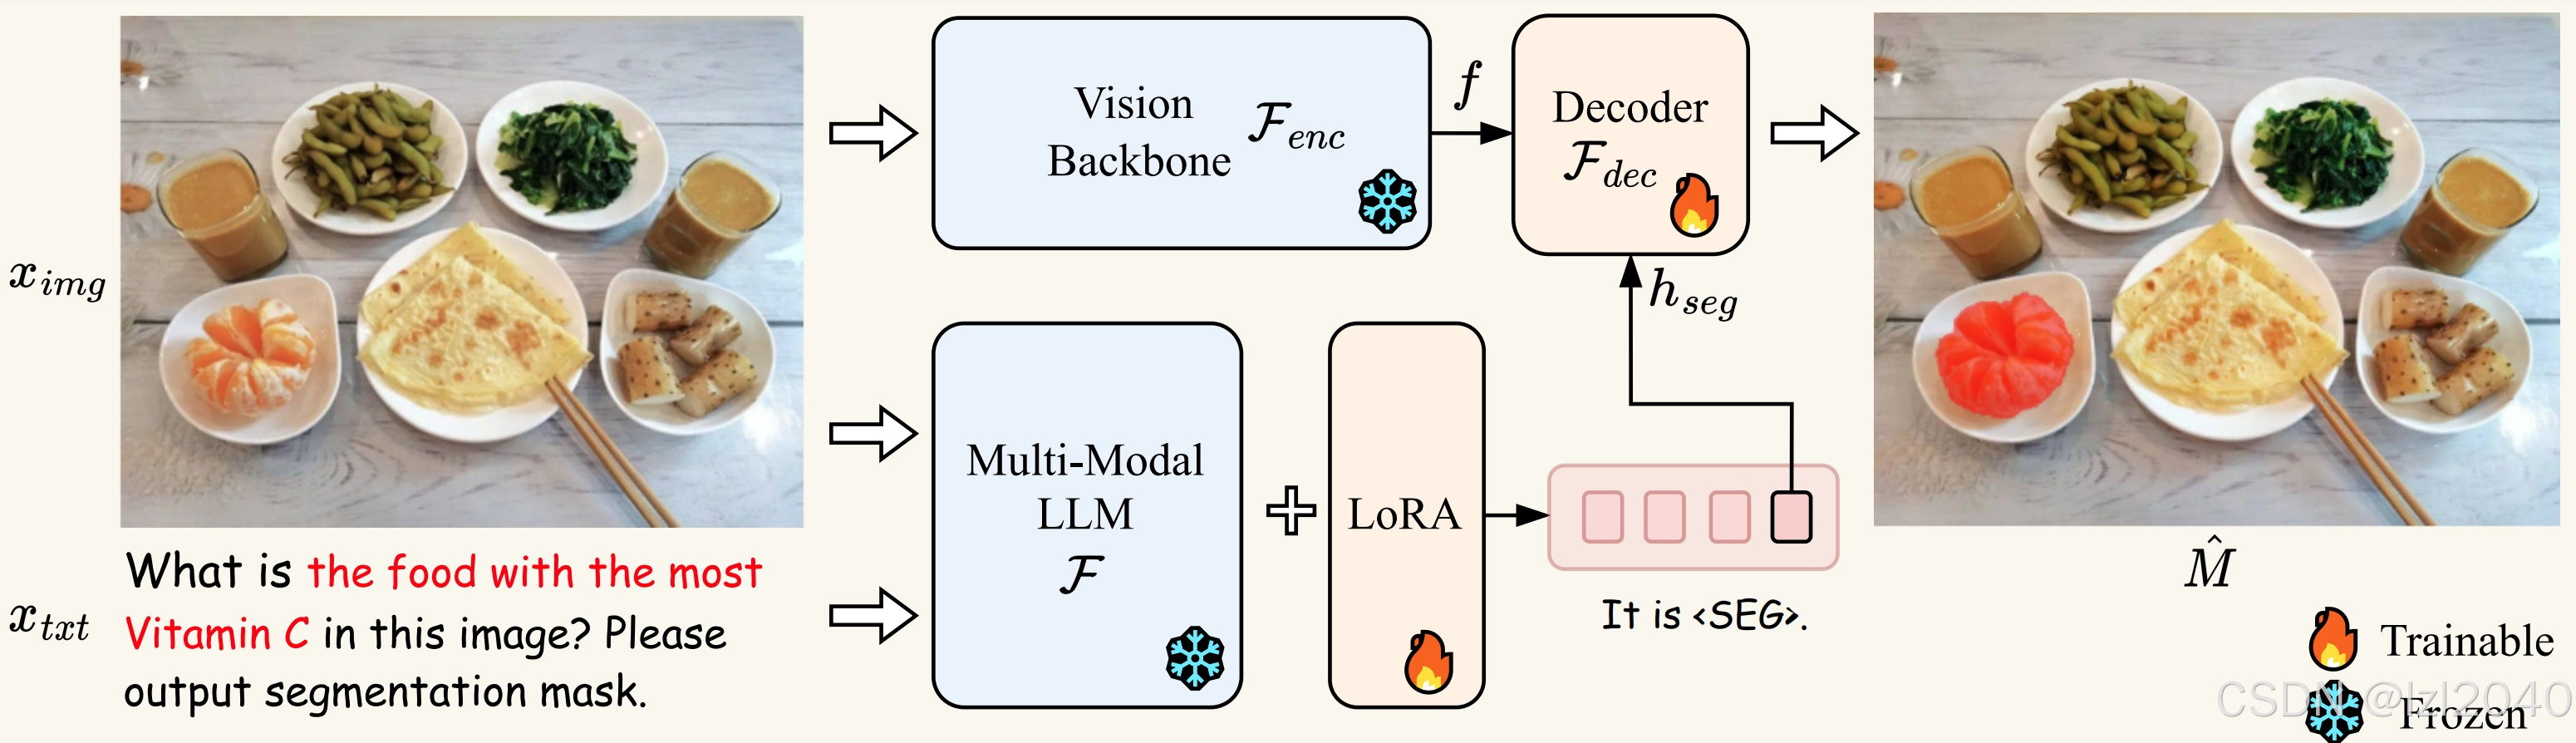
在train_ds.py文件中,最开始的时候就将<SEG>加入到tokenizer中:
# 32004
args.seg_token_idx = tokenizer("[SEG]", add_special_tokens=False).input_ids[0]
数据部分
utils/refer_seg_dataset.py
在utils/refer_seg_dataset.py文件中,构建了conversion模板,包含question和answer,各自的模板为,在utils/utils.py中:
DEFAULT_IMAGE_TOKEN = "<image>"
DEFAULT_IMAGE_PATCH_TOKEN = "<im_patch>"
DEFAULT_IM_START_TOKEN = "<im_start>"
DEFAULT_IM_END_TOKEN = "<im_end>"
SHORT_QUESTION_LIST = [
    DEFAULT_IMAGE_TOKEN + "\n" + "Can you segment the {class_name} in this image?",
    DEFAULT_IMAGE_TOKEN + "\n" + "Please segment the {class_name} in this image.",
    DEFAULT_IMAGE_TOKEN
    + "\n"
    + "What is {class_name} in this image? Please respond with segmentation mask.",
    DEFAULT_IMAGE_TOKEN
    + "\n"
    + "What is {class_name} in this image? Please output segmentation mask.",
]
ANSWER_LIST = [
    "It is [SEG].",
    "Sure, [SEG].",
    "Sure, it is [SEG].",
    "Sure, the segmentation result is [SEG].",
    "[SEG].",
]
同时,对于同一张图片,它会采样num_classes_per_sample个描述,因此生成的conversation是多个。对于这个的处理在后面的collate_fn有体现。
utils/dataset.py
然后在utils/dataset.py文件的collate_fn函数中,对得到的数据又进行了一次处理,首先是对conversation进行了处理,将其中的DEFAULT_IMAGE_TOKEN替换了:
replace_token = DEFAULT_IMAGE_TOKEN
replace_token = (
    DEFAULT_IM_START_TOKEN + replace_token + DEFAULT_IM_END_TOKEN
)
conversation_list[i] = conversation_list[i].replace(
    DEFAULT_IMAGE_TOKEN, replace_token
)
然后conversation变成了如下这种形式:
A chat between a curious human and an artificial intelligence assistant. The assistant gives helpful, detailed, and polite answers to the human's questions. USER: <im_start><image><im_end>
What is wessels in this image? Please output segmentation mask. ASSISTANT: Sure, [SEG].</s>
然后对conversation进行tokenizer,并对其中的<image>标签进行处理:
input_ids = [
        tokenizer_image_token(prompt, tokenizer, return_tensors="pt")
        for prompt in conversation_list
    ]
tokenizer_image_token函数将初始的文本和<image>标签分开tokenize,并进行区分处理,如下:
prompt_chunks = [tokenizer(chunk).input_ids for chunk in prompt.split("<image>")]
# 分隔
def insert_separator(X, sep):
    return [ele for sublist in zip(X, [sep] * len(X)) for ele in sublist][:-1]
for x in insert_separator(prompt_chunks, [image_token_index] * (offset + 1)):
    input_ids.extend(x[offset:])
其中image_token_index默认是-200,注意tokenizer处理文本时可能会在最开始加一个start token,值为:tokenizer.bos_token_id,这里是2,代码中也进行了处理,得到的input_ids是这样子:
[2, 319, 13563, 1546, 263, 12758, 5199, 322, 385, 23116, 21082, 20255, 29889, 450, 20255, 4076, 8444, 29892, 13173, 29892, 322, 1248, 568, 6089, 304, 278, 5199, 29915, 29879, 5155, 29889, 3148, 1001, 29901, 32002, -200, 32003, 3529, 10768, 278, 2215, 17354, 29735, 297, 445, 1967, 29889, 319, 1799, 9047, 13566, 29901, 29871]
其中-200就是image token index。
然后就是将input_ids中每个batch元素的长度pad为其中最长的一个:
input_ids = torch.nn.utils.rnn.pad_sequence(
        input_ids, batch_first=True, padding_value=tokenizer.pad_token_id
    )
并得到attention_masks,表示哪些是pad的,没有pad的部分为True:
attention_masks = input_ids.ne(tokenizer.pad_token_id)
接着是设计targets,它基于input_ids,然后对其中的内容进行了修改,原则是只关注回答部分的内容,前面的提问内容和回答之后的内容都不关注:
target[cur_len : cur_len + instruction_len] = IGNORE_INDEX # 只关注回答部分的内容
其中instruction_len就是提问部分内容的长度。
然后是其中的offset,因为一张图片有多个描述,因此使用它来进行划分,offset的获得如下:
images_list.append(images) # images就是1张
cnt += len(conversations) # 长度对应num_classes_per_sample=3
offset_list.append(cnt)
最终如果打印长度,会发现长度不一样。
# 2 6,因为一张图片的一个目标有三个描述
print(len(images_list), len(conversation_list))
这个offset在LISAForCausalLM的forward函数中用到了,如下:
images_clip_list = []
for i in range(len(offset) - 1):
    # 哪个范围的描述都是同一张图片
    start_i, end_i = offset[i], offset[i + 1]
    # repeat图像数据
    images_clip_i = (
        images_clip[i]
        .unsqueeze(0)
        .expand(end_i - start_i, -1, -1, -1)
        .contiguous()
    )
    images_clip_list.append(images_clip_i)
images_clip = torch.cat(images_clip_list, dim=0)
Model部分
模型的继承关系是:LISAForCausalLM继承LlavaLlamaForCausalLM,它又继承LlavaMetaForCausalLM,这里有一个核心函数prepare_inputs_labels_for_multimodal,它将图像和文本token拼接在一起,然后输给大模型。
prepare_inputs_labels_for_multimodal函数
它首先是判断有没有图像输入,没有的话直接返回
如果有图像数据,则提取图像的特征:
# [5, 256, 4096]
image_features = self.encode_images(images)
然后将input_ids里面占位符为**的用提取的图像特征代替,是在embedding过程中拼接的。的位置获取:**
image_token_indices = torch.where(cur_input_ids == IMAGE_TOKEN_INDEX)[0]
image_token_start = image_token_indices[0]
要注意它有不同的拼接方式,这里以mm_use_im_start_end为例,就是两边有开始和结束token,它的拼接方式为:
# cur_image_features: [256, 4096] cur_input_ids: [66]
cur_new_input_embeds.append(
    self.get_model().embed_tokens(cur_input_ids[:image_token_start])
)
# print(cur_new_input_embeds[-1].shape) # torch.Size([35, 4096])
cur_new_input_embeds.append(cur_image_features)
# embed image结束符
cur_new_input_embeds.append(
    self.get_model().embed_tokens(
        cur_input_ids[image_token_start + 1 : image_token_start + 2]
    )
)
其中self.get_model()实际就是self.model = LlavaLlamaModel(config),embed_tokens继承自LlamaModel,具体为:
self.embed_tokens = nn.Embedding(config.vocab_size, config.hidden_size, self.padding_idx)
实际上就是embedding。
得到cur_new_input_embeds后,labels也会更新,如下:
cur_new_labels.append(cur_labels[:image_token_start])
cur_new_labels.append(
    torch.full(
        (cur_image_features.shape[0],),
        IGNORE_INDEX,
        device=labels.device,
        dtype=labels.dtype,
    )
) # image token部分都是IGNORE_INDEX
cur_new_labels.append(
    cur_labels[image_token_start + 1 : image_token_start + 2]
) # 这里是<image>后面的一个
cur_labels = cur_labels[image_token_start + 2 :] # 针对多图输入,为下一个<image>位置做准备
在input_ids里面可能含有多个,因此它需要对labels和input_ids来更新:
cur_input_ids = cur_input_ids[image_token_start + 2 :]
这里就是往后继续从cur_input_ids找IMAGE_TOKEN_INDEX,直到所有的都被处理完。
如果最后cur_input_ids还有剩余,则继续进行embedding:
cur_new_input_embeds.append(
    self.get_model().embed_tokens(cur_input_ids)
)
然后就是拼接在一起:
cur_new_input_embeds = [
    x.to(device=self.device) for x in cur_new_input_embeds
]
# [327, 4096]
cur_new_input_embeds = torch.cat(cur_new_input_embeds, dim=0)
new_input_embeds.append(cur_new_input_embeds) # 添加到列表
注意这个只是一个batch的。为了保证所有batch的元素的维度一致,还需要对其进行pad,然后再拼接:
for cur_new_embed in new_input_embeds:
    cur_new_embed = torch.cat(
        (
            cur_new_embed,
            # 0填充,主要是序列长度可能不一样
            torch.zeros(
                (max_len - cur_new_embed.shape[0], cur_new_embed.shape[1]),
                dtype=cur_new_embed.dtype,
                device=cur_new_embed.device,
            ),
        ),
        dim=0,
    )
    new_input_embeds_align.append(cur_new_embed)
new_input_embeds = torch.stack(new_input_embeds_align, dim=0)
同理,labels也要pad,具体可以看代码。
attention_mask也需要pad,因为序列长度增加了图片序列的长度,而之前图像部分只占这个token的长度:
for cur_attention_mask, cur_new_labels, cur_new_labels_align in zip(
                    attention_mask, _new_labels, new_labels
                ):
    # 将image部分填充为True
    new_attn_mask_pad_left = torch.full(
        (cur_new_labels.shape[0] - labels.shape[1],),
        True,
        dtype=attention_mask.dtype,
        device=attention_mask.device,
    )
    # 将pad部分填充为false
    new_attn_mask_pad_right = torch.full(
        (cur_new_labels_align.shape[0] - cur_new_labels.shape[0],),
        False,
        dtype=attention_mask.dtype,
        device=attention_mask.device,
    )
    # 然后拼接
    cur_new_attention_mask = torch.cat(
        (
            new_attn_mask_pad_left,
            cur_attention_mask,
            new_attn_mask_pad_right,
        ),
        dim=0,
    )
    new_attention_mask.append(cur_new_attention_mask)
attention_mask = torch.stack(new_attention_mask, dim=0)
函数的返回值如下:
return None, attention_mask, past_key_values, new_input_embeds, new_labels
调用它的位置在**LlavaLlamaForCausalLM**的forward函数中,如下:
(
    input_ids,
    attention_mask,
    past_key_values,
    inputs_embeds,
    labels,
) = self.prepare_inputs_labels_for_multimodal(
    input_ids, attention_mask, past_key_values, labels, images
)
可以看到最终返回的input_ids是None,这个input_ids最终会输入给self.model,所以它是没啥作用的,如下:
outputs = self.model(
    input_ids=input_ids,
    attention_mask=attention_mask,
    past_key_values=past_key_values,
    inputs_embeds=inputs_embeds,
    use_cache=use_cache,
    output_attentions=output_attentions,
    output_hidden_states=output_hidden_states,
    return_dict=return_dict,
)
hidden_states = outputs[0]
if self.training:
    output_hidden_states = outputs.hidden_states
else:
    output_hidden_states = hidden_states

return CausalLMOutputWithPast(
    loss=loss,
    logits=logits,
    past_key_values=outputs.past_key_values,
    hidden_states=output_hidden_states,  # outputs.hidden_states,
    attentions=outputs.attentions,
)
其中的self.model最终调用的是LlamaModel的forward函数,返回的值真正有用的是hidden_states。
LlamaModel
它由很多decoder layer组成:
self.layers = nn.ModuleList([LlamaDecoderLayer(config) for _ in range(config.num_hidden_layers)])
LLamaDecoderLayer的结构如下:
class LlamaDecoderLayer(nn.Module):
    def __init__(self, config: LlamaConfig):
        super().__init__()
        self.hidden_size = config.hidden_size
        self.self_attn = LlamaAttention(config=config)
        self.mlp = LlamaMLP(config)
        self.input_layernorm = LlamaRMSNorm(config.hidden_size, eps=config.rms_norm_eps)
        self.post_attention_layernorm = LlamaRMSNorm(config.hidden_size, eps=config.rms_norm_eps)
实际上就是一个self-attention,然后它的输出为:
outputs = (hidden_states,) # hidden_states是attention的输出

if output_attentions:
    outputs += (self_attn_weights,) # 注意力权重

if use_cache:
    outputs += (present_key_value,) # kv cache

return outputs
真正输入到每个decoder layer的其实是inputs_embeds,这里简化写一下:
hidden_states = inputs_embeds # 初始的hidden_states
all_hidden_states = () if output_hidden_states else None # 存放每层的hidden_states
for idx, decoder_layer in enumerate(self.layers):
    if output_hidden_states:
        all_hidden_states += (hidden_states,)
    layer_outputs = torch.utils.checkpoint.checkpoint(
        create_custom_forward(decoder_layer),
        hidden_states,
        attention_mask,
        position_ids,
        None,
    )
    hidden_states = layer_outputs[0] # 每一层的输出
然后self.model最终的输出是:
return BaseModelOutputWithPast(
    last_hidden_state=hidden_states,
    past_key_values=next_cache, # kv cache
    hidden_states=all_hidden_states,
    attentions=all_self_attns, # 注意力权重
)
LISAForCausalLM
在forward函数中,得到大模型的输出代码为:
output = super().forward(
    images=images_clip,
    attention_mask=attention_masks,
    input_ids=input_ids,
    labels=labels,
    output_hidden_states=True,
)
output_hidden_states = output.hidden_states # 这个是all_hidden_states,所有层的
注意这个output_hidden_states是最开始的输入+所有transformer层的输出,长度为层数+1,这里33,然后里面的每个元素的维度是 B × L × C B \times L \times C B×L×C,其中L是序列长度,为文本长度+图像序列长度。
然后就是利用hidden_states生成输入到SAM中的embeddings,实际上就是对最后的输出进行映射:
hidden_states = []
# 33 torch.Size([5, 328, 4096])
# print(len(output_hidden_states), output_hidden_states[-1].shape)
assert len(self.model.text_hidden_fcs) == 1
# 对最后大模型的输出进行映射
hidden_states.append(self.model.text_hidden_fcs[0](output_hidden_states[-1]))
# print(hidden_states[-1].shape) # [5, 335, 256]
last_hidden_state = torch.stack(hidden_states, dim=-1).sum(dim=-1)
# print(last_hidden_state.shape) # [5, 335, 256]
# 选择SEG token对应的embedding
pred_embeddings = last_hidden_state[seg_token_mask]
接着回过头看seg_token_mask的生成。
# 在文本id里面找seg_token_idx,为了对准SEG的位置
# https://github.com/dvlab-research/LISA/issues/71
seg_token_mask = input_ids[:, 1:] == self.seg_token_idx
# 然后弥补了第一个,并放在后面,用False代替
seg_token_mask = torch.cat(
    [
        seg_token_mask,
        torch.zeros((seg_token_mask.shape[0], 1)).bool().cuda(),
    ],
    dim=1,
)
# 然后把image所占的位置设置为false,它占255个
seg_token_mask = torch.cat(
    [torch.zeros((seg_token_mask.shape[0], 255)).bool().cuda(), seg_token_mask],
    dim=1,
)
这个最终得到的seg_token_mask的维度是B * L,这里的L和hidden_states的序列长度是一致的。
然后因为LISA在取数据时一张图片是对应多个描述的,因此要把属于一个目标的embedding给分开,也是要利用offset,具体为:
seg_token_counts = seg_token_mask.int().sum(-1)  # [bs, ]
print(seg_token_counts) # [1, 1, 1, 1, 1]
seg_token_offset = seg_token_counts.cumsum(-1)
# offset从0开始
seg_token_offset = torch.cat(
    [torch.zeros(1).long().cuda(), seg_token_offset], dim=0
)
# print(offset) # [0, 2, 5]
seg_token_offset = seg_token_offset[offset]
pred_embeddings_ = []
for i in range(len(seg_token_offset) - 1):
    start_i, end_i = seg_token_offset[i], seg_token_offset[i + 1]
    pred_embeddings_.append(pred_embeddings[start_i:end_i])
pred_embeddings = pred_embeddings_
最后将pred_embeddings分别输入给SAM就行,这个embedding作为sparse embedding。


 950
950

 被折叠的 条评论
为什么被折叠?
被折叠的 条评论
为什么被折叠?
 到【灌水乐园】发言


