


文章目录
安装anaconda
1.下载并安装anaconda
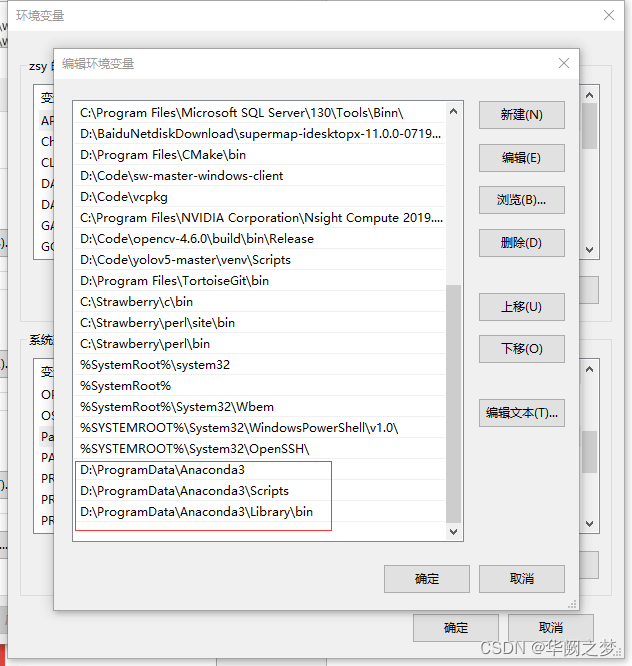
2.配置环境变量
//进入主环境
conda activate base
如果不行于是,尝试 conda init ,重置conda ,关闭shell,重新打开并尝试conda activate base ,成功启动base环境!
//创建环境
conda create -n env1
//删除环境
conda remove --name env1 --all
//激活环境
conda activate env1
//安装包
conda create -n env1 python=3.7
//安装jupyter安装
pip install jupyter
启动 Jupyter notebook
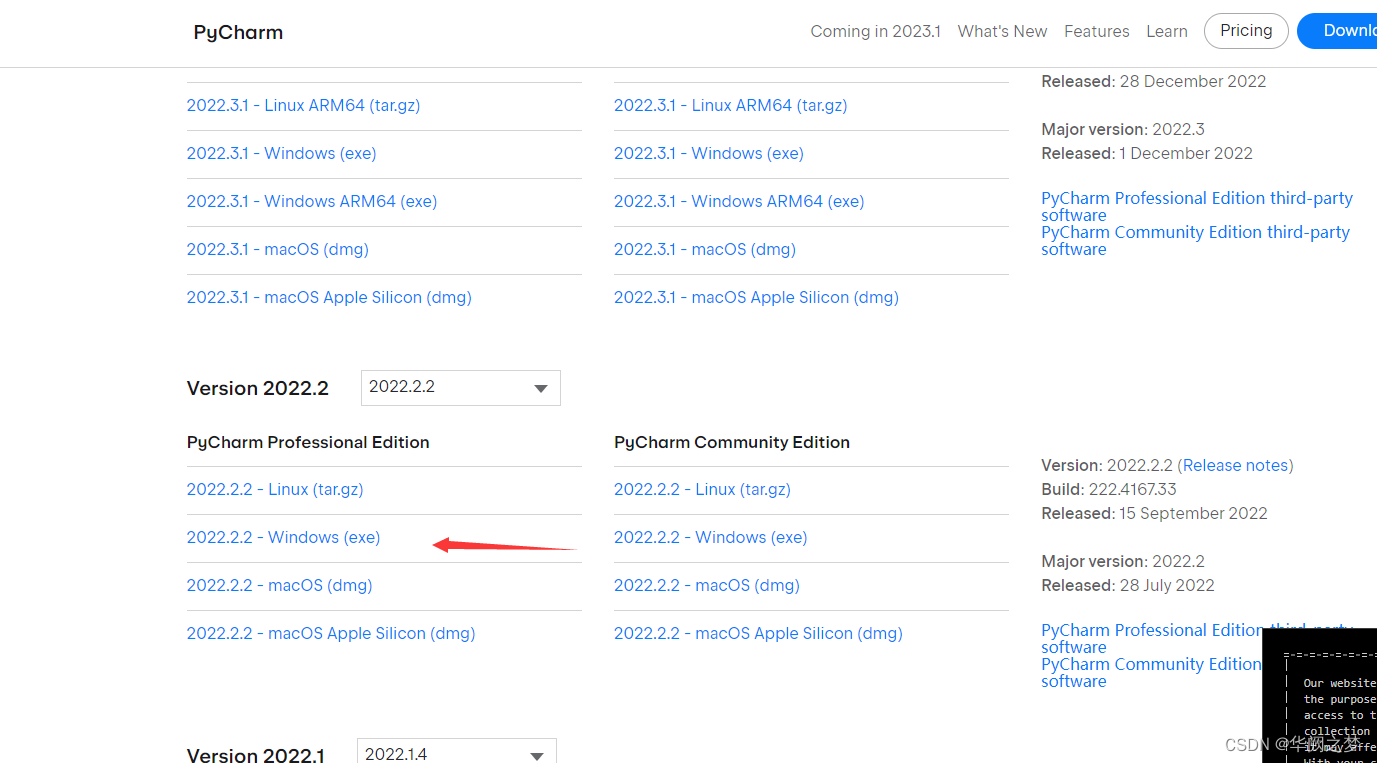
安装pycharm
安装cuda
打开cmd,输入 :nvidia-smi
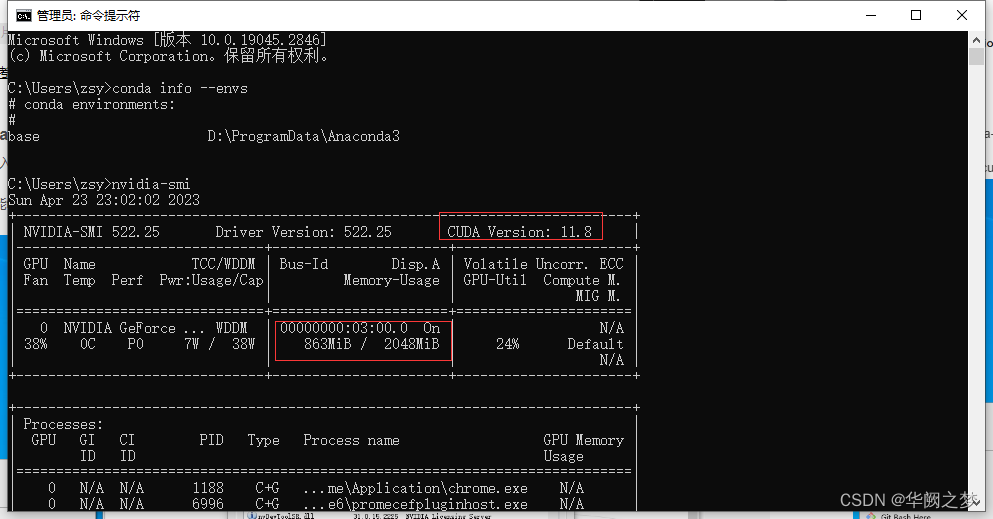
可以看到红框里的是电脑支持的最高版本的cuda,我们在官网进行下载时,下载该版本及以下的即可(建议下载该版本以下)
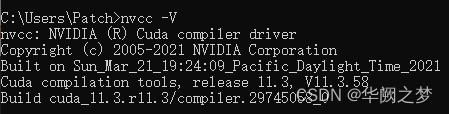
//校验cuda是否安装成功
nvcc -V
CUDA v10.0的卸载
添加清华镜像源
直接打开cmd输入一下命令
conda config --add channels https://mirrors.tuna.tsinghua.edu.cn/anaconda/pkgs/free/
conda config --add channels https://mirrors.tuna.tsinghua.edu.cn/anaconda/pkgs/main/
conda config --add channels https://mirrors.tuna.tsinghua.edu.cn/anaconda/cloud//pytorch/
conda config --add channels https://mirrors.tuna.tsinghua.edu.cn/anaconda/cloud/conda-forge/
conda config --set show_channel_urls yes
查看本地镜像源
conda config --show channels
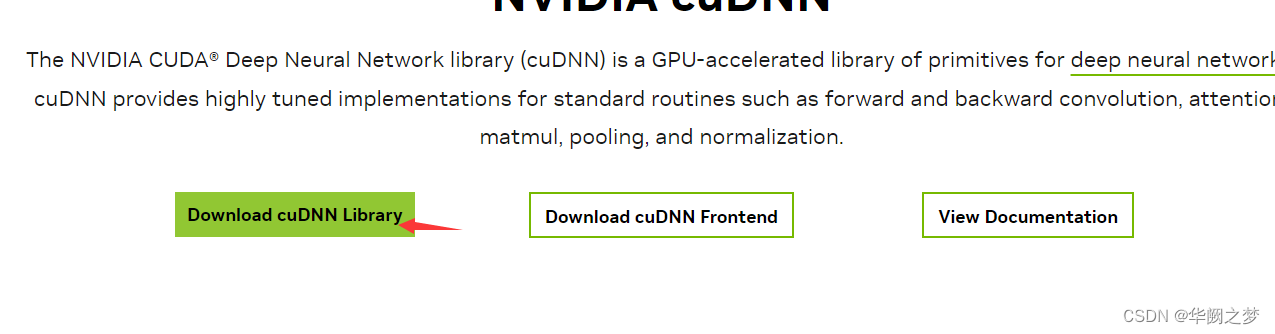
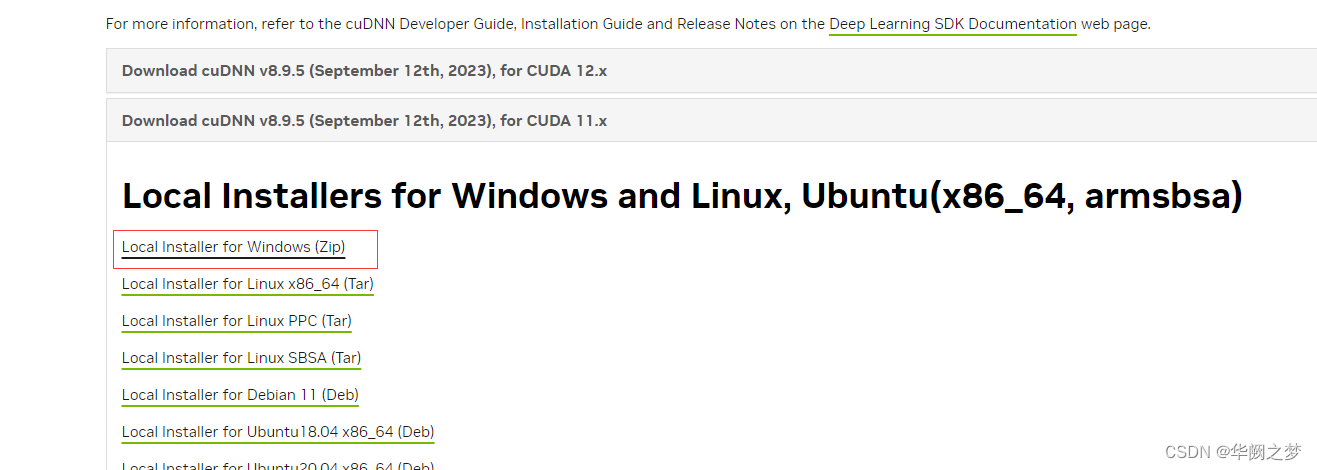
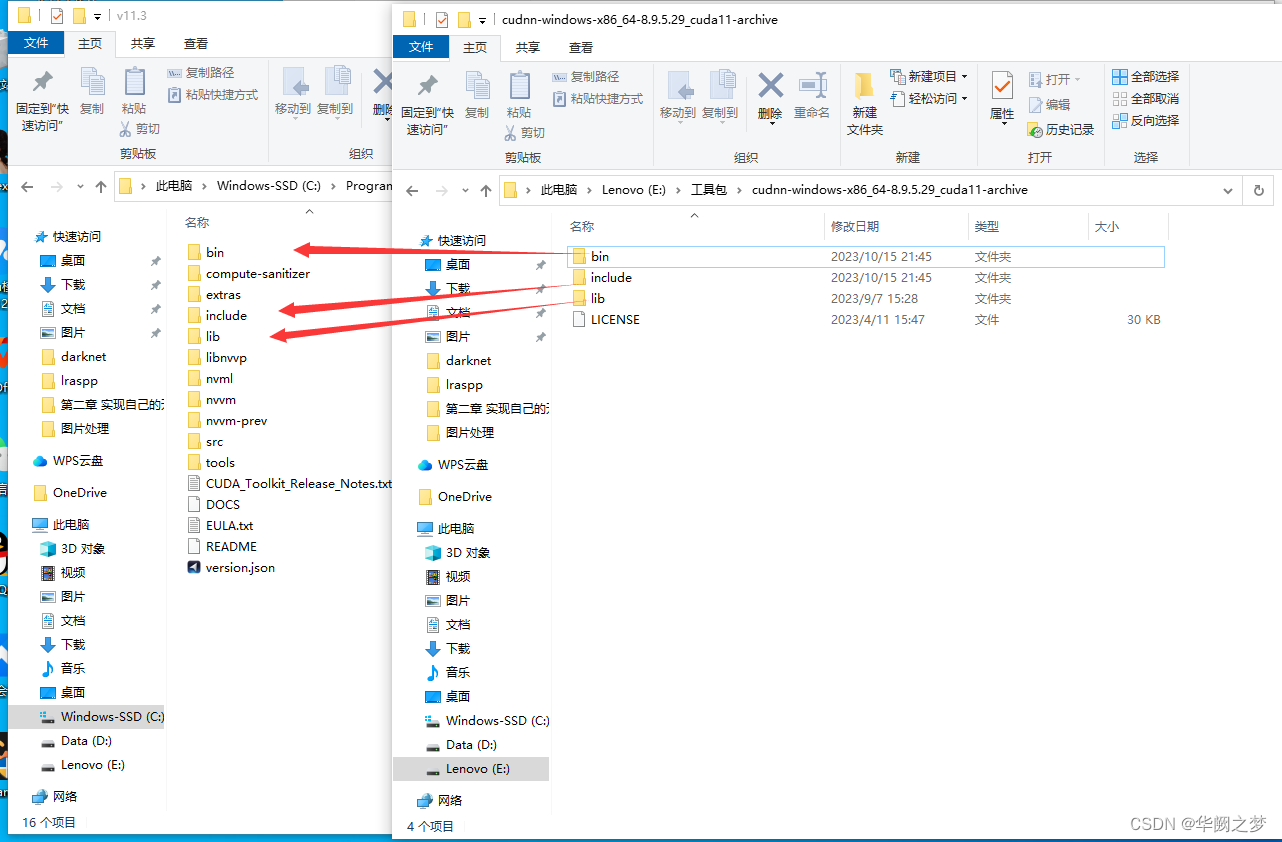
安装CUDNN
安装pytorch
//查看已有的环境
conda info --envs
//创建环境
conda create -n env1
//激活环境
conda activate env1
查看安装版本
一定要根据cuda版本号安装pytorch版本,不然后续崩溃死你。
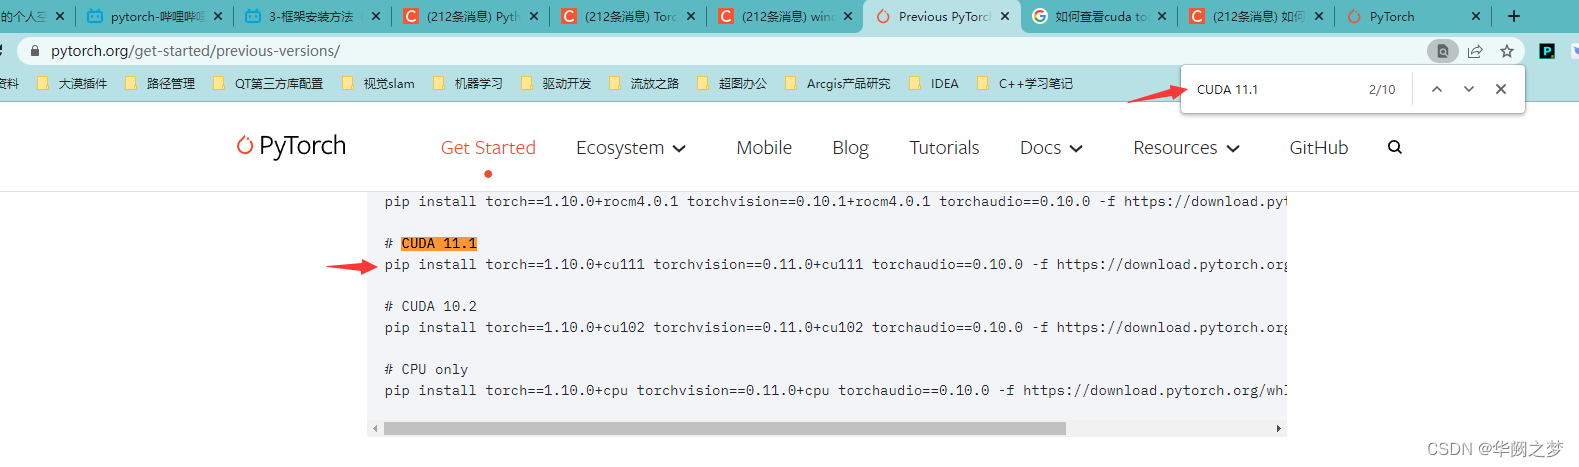
注意:这里我尝试了很多个才发现下面这个可以安装,建议安装不上就多环一个或者自己想办法离线安装百度
pip install torch==1.12.1+cu113 torchvision==0.13.1+cu113 torchaudio==0.12.1 --extra-index-url https://download.pytorch.org/whl/cu113
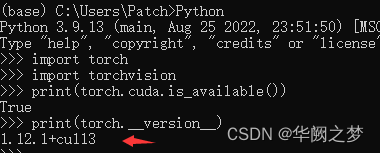
//一下代码逐行输入校验当前gpu环境是否可用
conda activate base
Python
import torch
import torchvision
print(torch.cuda.is_available())
print(torch.__version__)
//卸载Pytorch
pip uninstall torch
//安装numpy
conda install numpy
//安装cv
pip install opencv-python
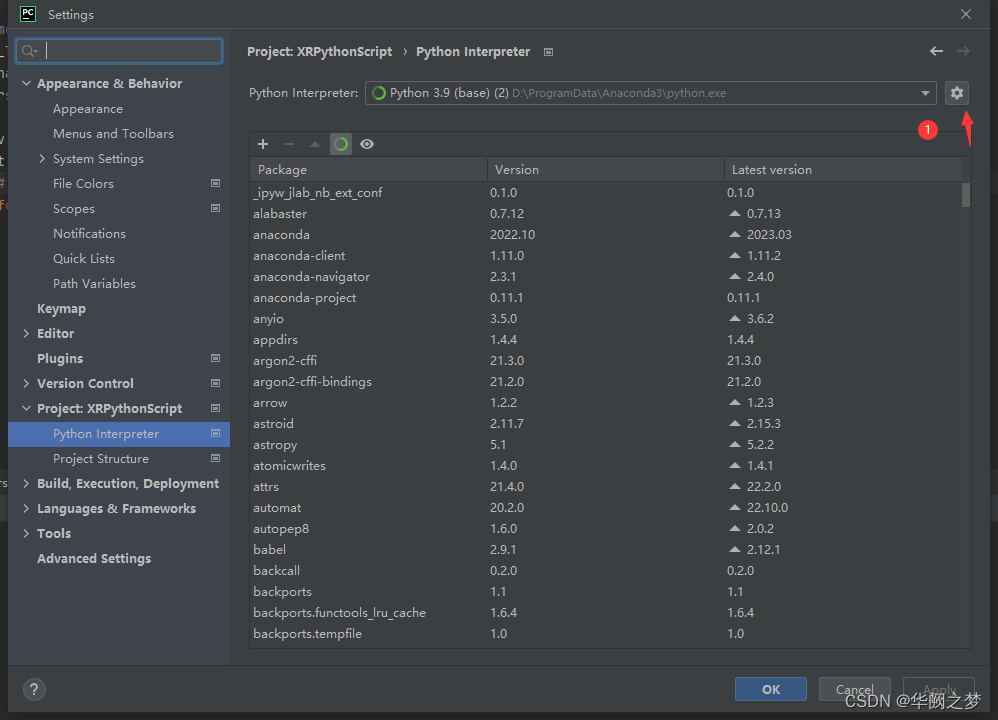
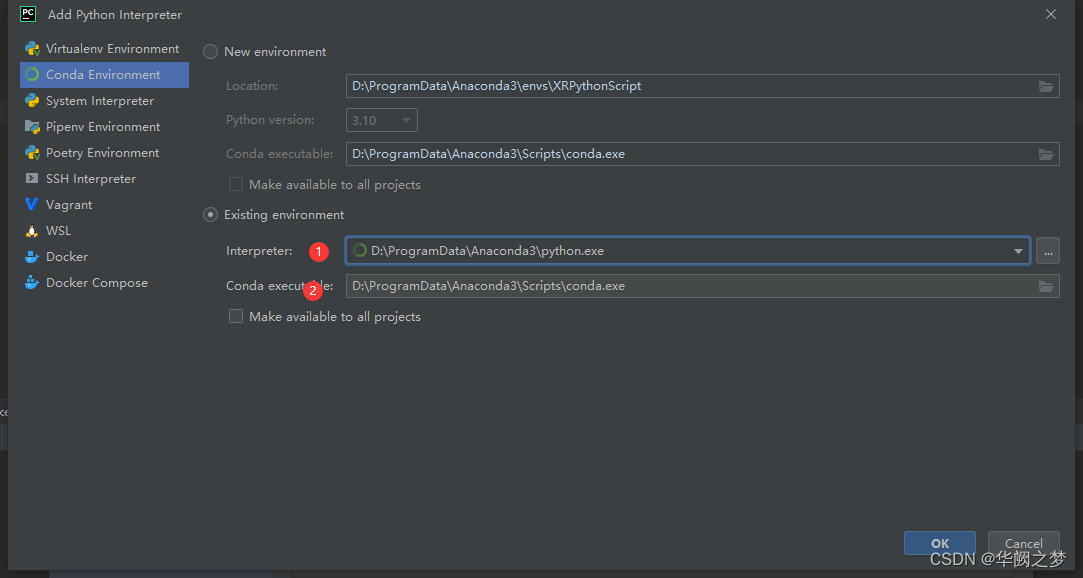
设置PyCharm使用Anaconda的环境
解决pytorch在pycharm不能自动补全代码方法
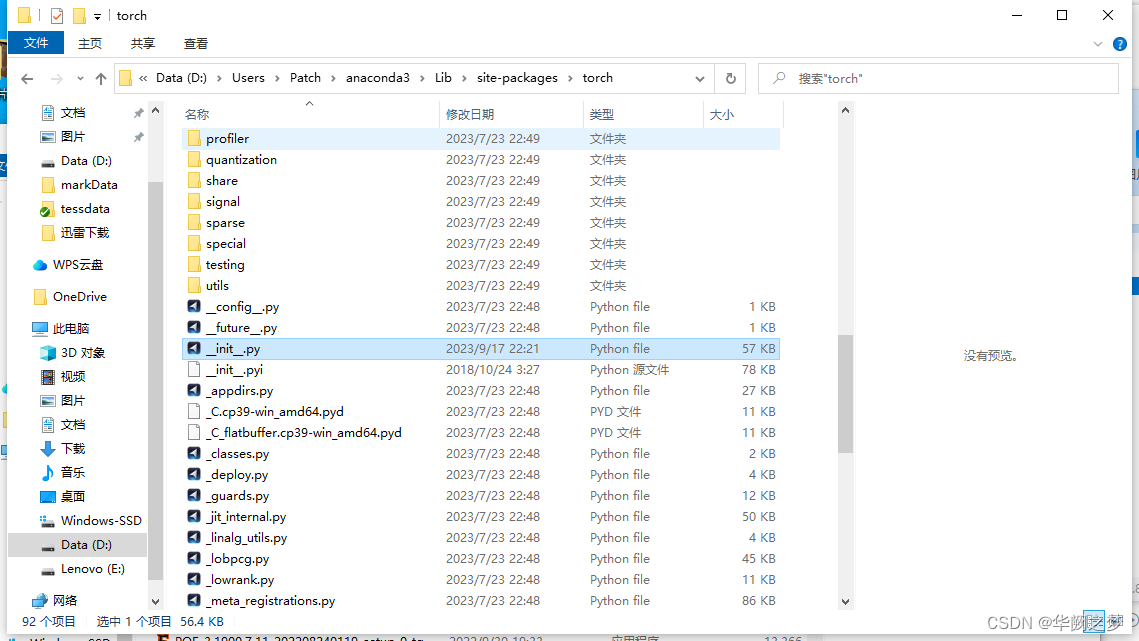
方法很简单,就是将上文提到的__init__.pyi文件复制到torch文件夹下。
init.pyi 文件下载链接:https://files.cnblogs.com/files/FengZeng666/pyi.zip
对于我的项目具体的路径是D:\Users\Patch\anaconda3\Lib\site-packages\torch,注意不要复制错位置。参考图如下:
参考文章一
参考文章二
示例演示
# step1 导入所需要的包
import torch
import torch.nn as nn
import torchvision.datasets as dsets
import torchvision.transforms as transforms
import torch.optim as optim
from torch.utils.data import DataLoader

# step2 定义device
device = "cuda" if torch.cuda.is_available() else "cpu"

# step3 参数设置(学习率,训练轮数,批大小)
learning_rate = 0.1
training_epochs = 10
batch_size = 16

# step4 Dataset & DataLoader设置数据集和数据加载器

trans = transforms.Compose([
    transforms.Resize((224, 224)),
    transforms.ToTensor()
])
# DataSet设置数据集
cifar10_train = dsets.CIFAR10(root="cifar10_data", train=True, transform=trans, download=True)
cifar10_test = dsets.CIFAR10(root="cifar10_data", train=False, transform=trans, download=True)

# dataloader设置数据加载器
train_loader = DataLoader(dataset=cifar10_train, batch_size=batch_size, shuffle=True, drop_last=True)
test_loader = DataLoader(dataset=cifar10_test, batch_size=batch_size, shuffle=False, drop_last=False)


# step5 model定义层
def make_layers(cfg):
    in_channel = 32
    layers = []

    for v in cfg:
        t, out_channel, n, stride = v
        # 编写深度可分离卷积DSC layer
        for i in range(n):
            if i != 0:
                stride = 1
            conv_pointwise1 = nn.Conv2d(in_channel,
                                        in_channel * t,
                                        kernel_size=1,
                                        stride=1,
                                        padding=0)
            conv_depthwise = nn.Conv2d(in_channel * t,
                                       in_channel * t,
                                       kernel_size=3,
                                       groups=in_channel * t,
                                       stride=stride,
                                       padding=1)
            conv_pointwise2 = nn.Conv2d(in_channel * t,
                                        out_channel,
                                        kernel_size=1,
                                        stride=1,
                                        padding=0)
            # 增加层之后的批量标准化和激活
            layers.append([conv_pointwise1, nn.BatchNorm2d(in_channel * t), nn.ReLU6(),
                           conv_depthwise, nn.BatchNorm2d(in_channel * t), nn.ReLU6(),
                           conv_pointwise2, nn.BatchNorm2d(out_channel)])
            in_channel = out_channel
    return layers


# 定义网络
class Mobilenet(nn.Module):
    def __init__(self, features, stride_list, num_classes=10):
        super(Mobilenet, self).__init__()

        # conv2d
        self.layer1 = nn.Sequential(
            nn.Conv2d(3, 32, kernel_size=3, stride=2, padding=1),
            nn.BatchNorm2d(32),
        )
        # 第一层卷积输入通道为3,输出通道为32,卷积核为3,步长为2,填充为1

        # bottleneck
        self.bottle_necks = []
        for layer in features:
            self.bottle_necks.append(nn.Sequential(*layer).cuda())
        # 论文中共17个bottleneck

        # last conv2d
        self.layer2 = nn.Sequential(
            nn.Conv2d(320, 1280, kernel_size=1, stride=1, padding=0),
            nn.BatchNorm2d(1280),
            nn.AvgPool2d(7, 7),
        )
        # 论文中的最后一个卷积和一个平均池化

        # classfier
        self.fc = nn.Linear(1280, num_classes)

    def forward(self, x):
        # layer1
        out = self.layer1(x)

        # bottlr_neck
        for i in range(len(self.bottle_necks)):
            new = self.bottle_necks[i](out)
            if stride_list[i] == 1:  # skip connection
                if out.shape[1] != new.shape[1]:
                    out = Downsample(out.shape[1], new.shape[1]).cuda()(out)
                new += out
            out = new

        # layer2
        # print("size",out.size())
        out = self.layer2(out)
        # fc
        out = out.view(out.size(0), -1)
        out = self.fc(out)

        return out


# 当stride=2时,执行下采样
class Downsample(nn.Module):
    def __init__(self, in_channel, out_channel):
        super(Downsample, self).__init__()
        self.layer = nn.Sequential(
            nn.Conv2d(in_channel, out_channel, kernel_size=1),
            nn.BatchNorm2d(out_channel),
        )

    def forward(self, x):
        out = self.layer(x)
        return out


#   expansion factor扩展因子t,输出通道数c,重复次数n,步长s
cfg = {'mobilenetv2': [(1, 16, 1, 1),
                       (6, 24, 2, 2),
                       (6, 32, 3, 2),
                       (6, 64, 4, 2),
                       (6, 96, 3, 1),
                       (6, 160, 3, 2),
                       (6, 320, 1, 1)]}

bottleneck = make_layers(cfg["mobilenetv2"])

stride_list = [1,
               2, 1,
               2, 1, 1,
               2, 1, 1, 1,
               1, 1, 1,
               2, 1, 1,
               1]
model = Mobilenet(bottleneck, stride_list, num_classes=10).to(device)
model.cuda()
target = torch.Tensor(2, 3, 224, 224).to(device)
# 不能删掉batch_size

after_target = model(target)
print(after_target.shape)
print(after_target)

# step6 optim&loss优化器和函数
criterion = nn.CrossEntropyLoss().to(device)
optimizer = optim.Adam(model.parameters(), lr=learning_rate)

# step7 train训练
model.train()
iteration = len(train_loader)

for epoch in range(training_epochs):
    loss = 0.0
    acc_correct = 0.0

    for idx, sample in enumerate(train_loader):
        optimizer.zero_grad()
        X, Y = sample
        X = X.to(device)
        Y = Y.to(device)

        # foeward,backward,optim
        hypothesis = model(X)
        cost = criterion(hypothesis, Y)
        cost.backward()
        optimizer.step()

        # calculate
        loss += cost.item()
        correct = (torch.argmax(hypothesis, dim=1) == Y).float()
        acc_correct += correct.sum()
    acc_correct /= (batch_size * iteration)
    loss /= iteration
    print("[Epoch:{:04d}],loss:{:.2f},acc:{:.2f}%".format(epoch, loss, acc_correct * 100))

# step8 test测试
with torch.no_grad():
    model.eval()
    accuracy = 0
    loss = 0
    for idx, sample in enumerate(test_loader):
        X, Y = sample
        X = X.to(device)
        Y = Y.to(device)

        hypothesis = model(X)
        cost = criterion(hypothesis, Y)

        # calculate
        loss += cost.item()
        accuracy = (torch.argmax(hypothesis, dim=1) == Y).sum().float()

    acc_correct /= len(test_loader)
    accuracy /= (batch_size * len(test_loader))
    print("[test]loss:{:.4f},acc:{:.4f}%".format(loss / 1000, acc_correct * 1000))
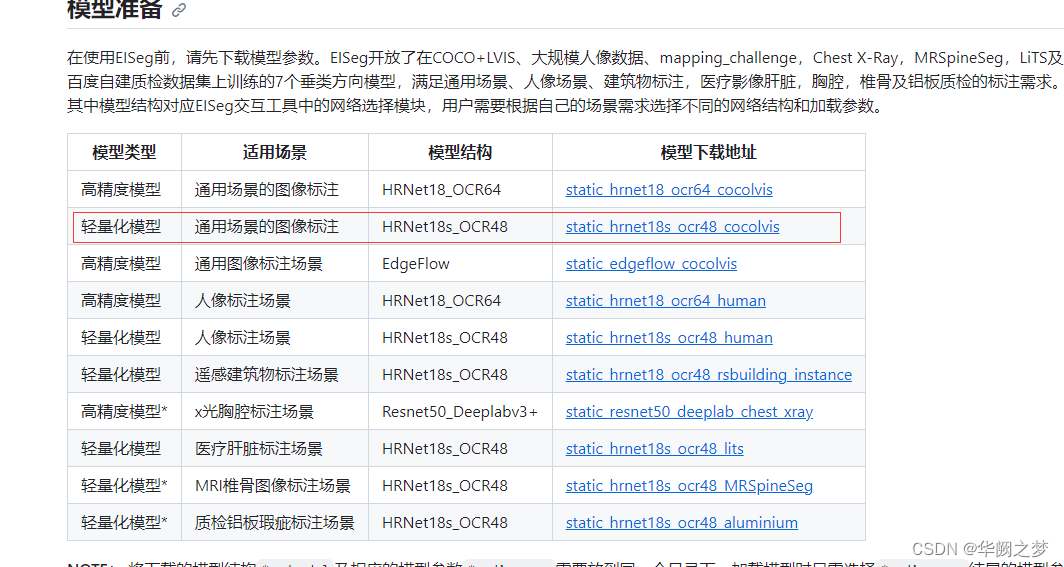
安装EISeg
1.1创建conda虚拟环境(建议)
为了不影响其他python环境,建议新建一个环境。(不想新建可以跳过)
这里以创建一个名为eiseg_env,python版本为3.8的环境为例:
 conda create -n eiseg_env python=3.8
 conda activate eiseg_env
 pip install paddlepaddle -i https://pypi.tuna.tsinghua.edu.cn/simple
 pip install eiseg -i https://pypi.tuna.tsinghua.edu.cn/simple
 eiseg
pip uninstall opencv-python
pip install --user opencv-python --upgrade -i https://pypi.tuna.tsinghua.edu.cn/simple # 更新opencv库
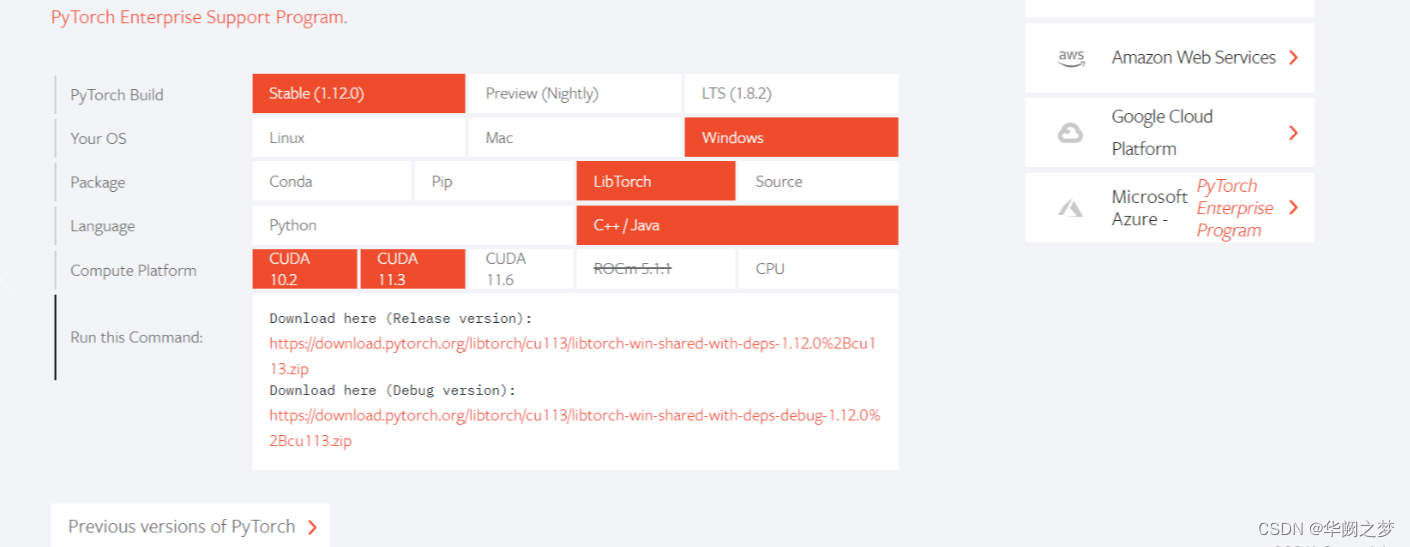
libtorch的C++部署
libtorch各版本
1.查看自己需要的torch 和cuda版本号
https://download.pytorch.org/libtorch/cu113/libtorch-win-shared-with-deps-1.12.1%2Bcu113.zip
https://download.pytorch.org/libtorch/cu113/libtorch-win-shared-with-deps-debug-1.12.1%2Bcu113.zip
https://download.pytorch.org/libtorch/cpu/libtorch-win-shared-with-deps-debug-1.12.1%2Bcpu.zip
https://download.pytorch.org/libtorch/cpu/libtorch-win-shared-with-deps-1.12.1%2Bcpu.zip
环境搭建地址
环境搭建参考地址二
libtorch学习地址
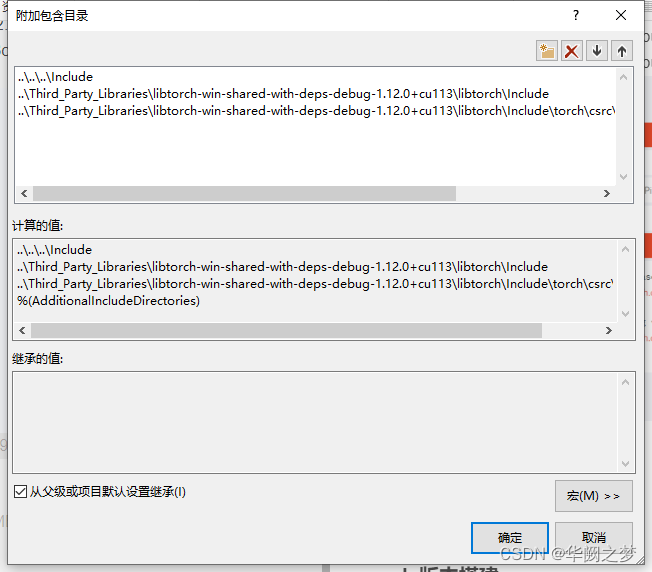
一、修改头文件
..\..\..\Include
..\Third_Party_Libraries\libtorch-win-shared-with-deps-debug-1.12.0+cu113\libtorch\Include
..\Third_Party_Libraries\libtorch-win-shared-with-deps-debug-1.12.0+cu113\libtorch\Include\torch\csrc\api\include
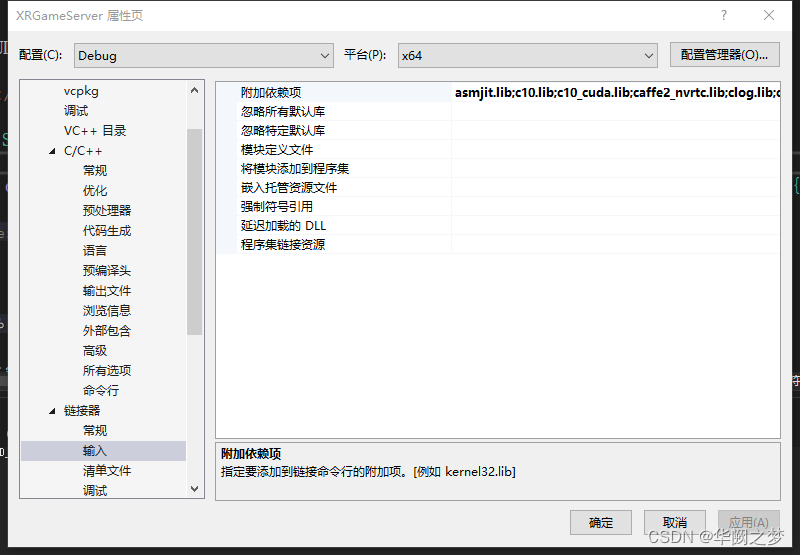
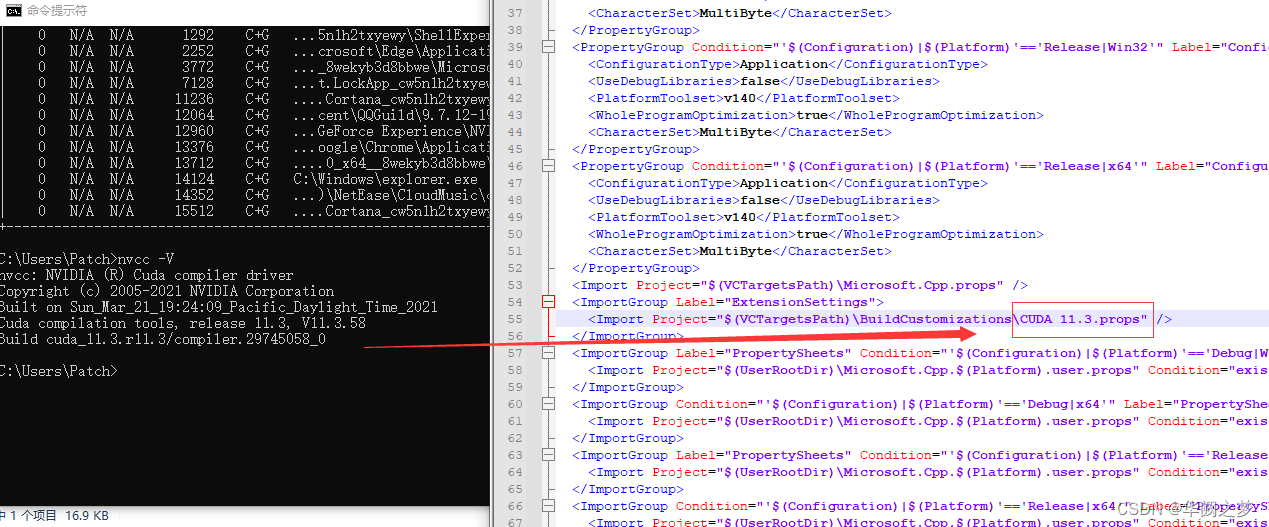
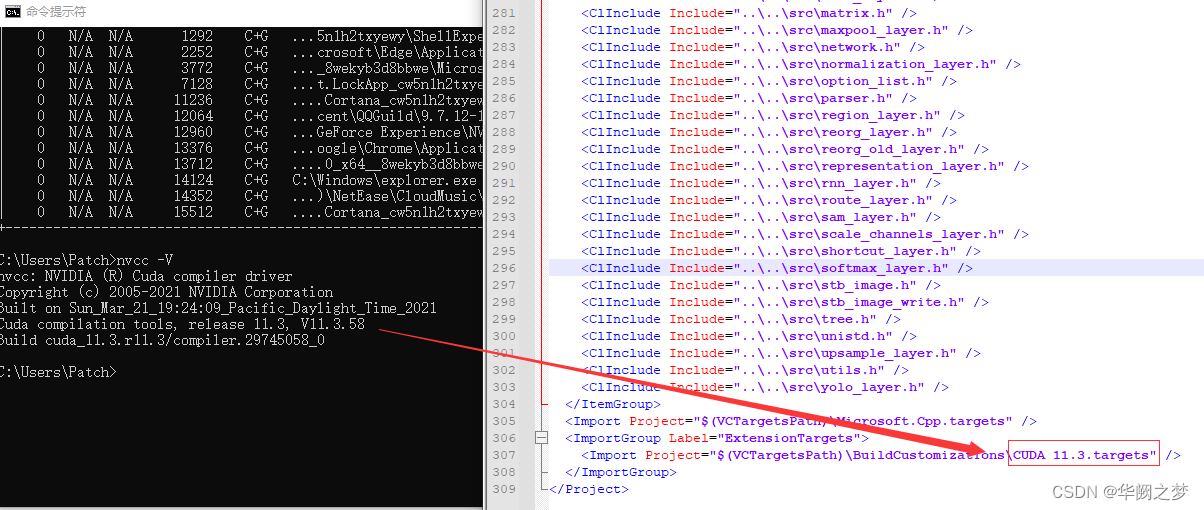
二、依赖库
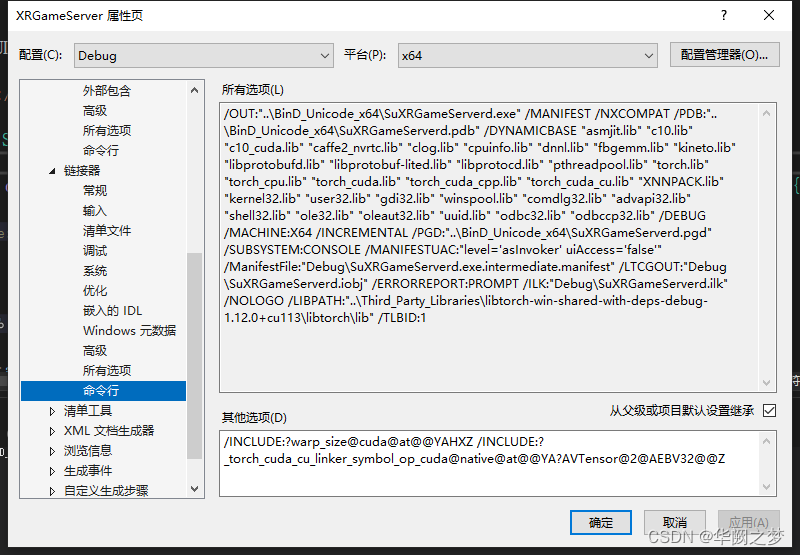
三、支持cuda编译
asmjit.lib;c10.lib;c10_cuda.lib;caffe2_nvrtc.lib;clog.lib;cpuinfo.lib;dnnl.lib;fbgemm.lib;kineto.lib;libprotobufd.lib;libprotobuf-lited.lib;libprotocd.lib;pthreadpool.lib;torch.lib;torch_cpu.lib;torch_cuda.lib;torch_cuda_cpp.lib;torch_cuda_cu.lib;XNNPACK.lib;%(AdditionalDependencies)
debug和release都必须设置这个不然cudu不可用
/INCLUDE:?warp_size@cuda@at@@YAHXZ /INCLUDE:?_torch_cuda_cu_linker_symbol_op_cuda@native@at@@YA?AVTensor@2@AEBV32@@Z
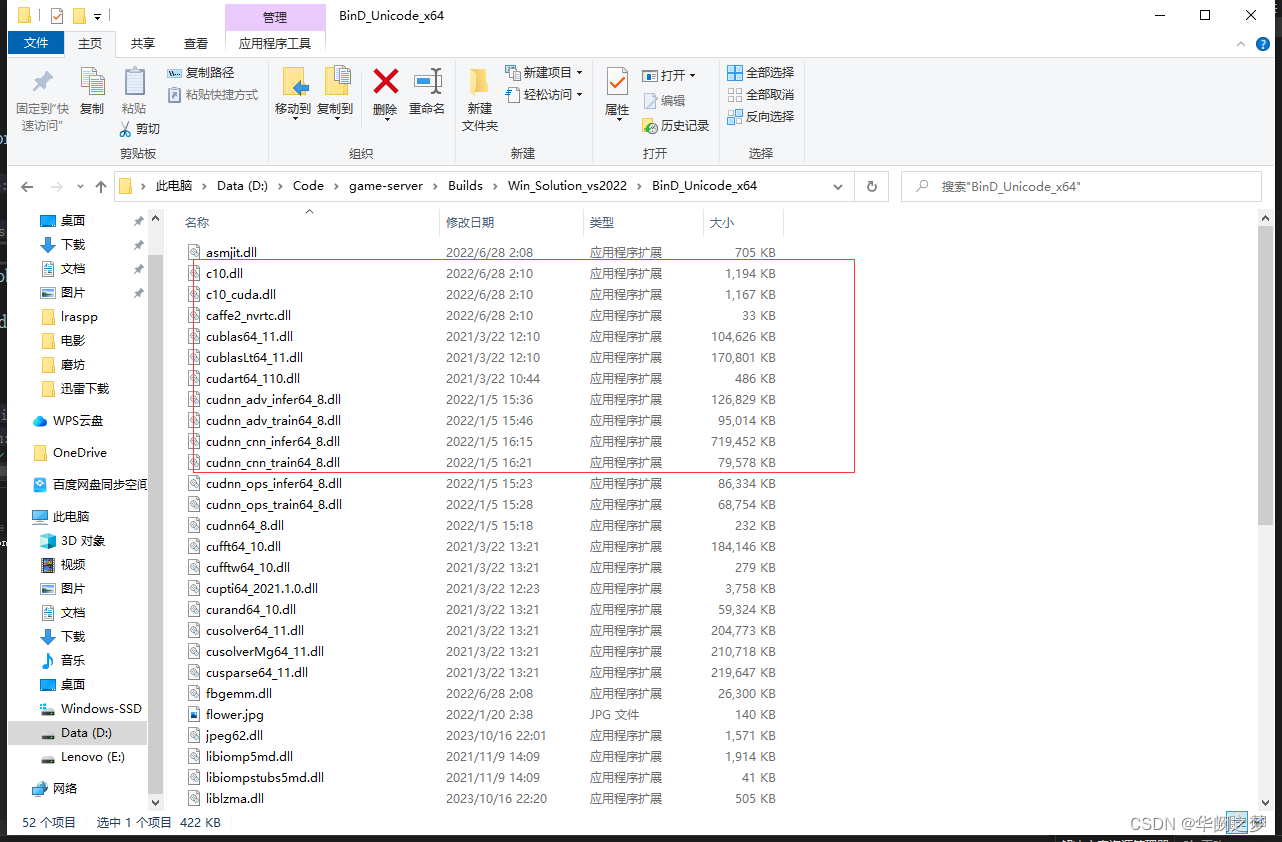
四、第三方dll迁移到输出目录
darknet框架
cuda版本搭建
安装参考博文
1.下载源码
https://github.com/AlexeyAB/darknet/archive/master.zip
添加链接描述
vs编译会报错
1>nvcc fatal : Unsupported gpu architecture ‘compute_30’
http://arnon.dk/matching-sm-architectures-arch-and-gencode-for-various-nvidia-cards/
通过上面的链接可以发现,CUDA11已经不支持compute_30了!
https://arnon.dk/matching-sm-architectures-arch-and-gencode-for-various-nvidia-cards/
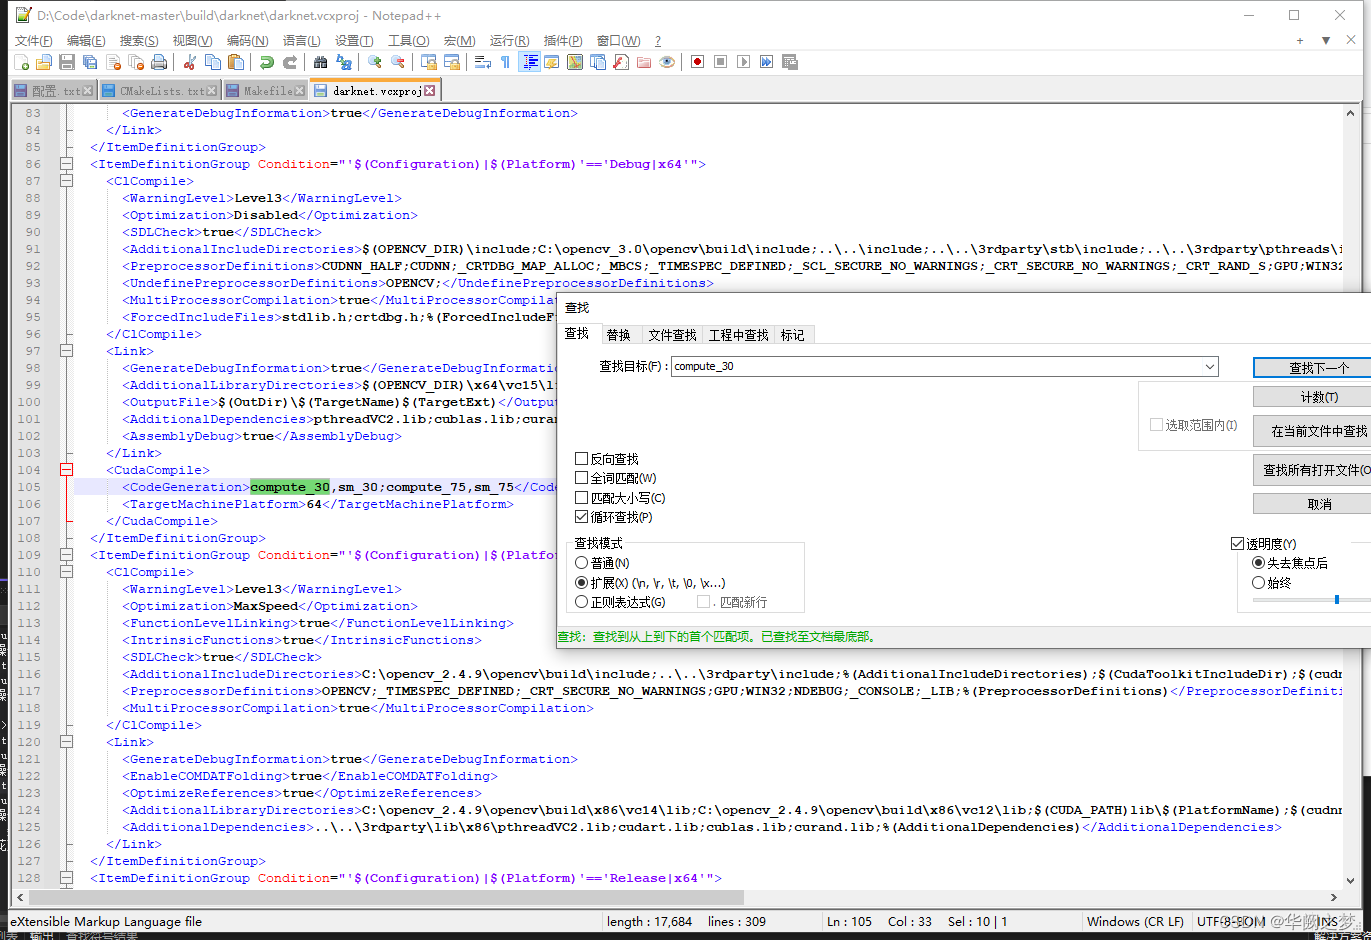
找到cuda支持编译的命令并修改
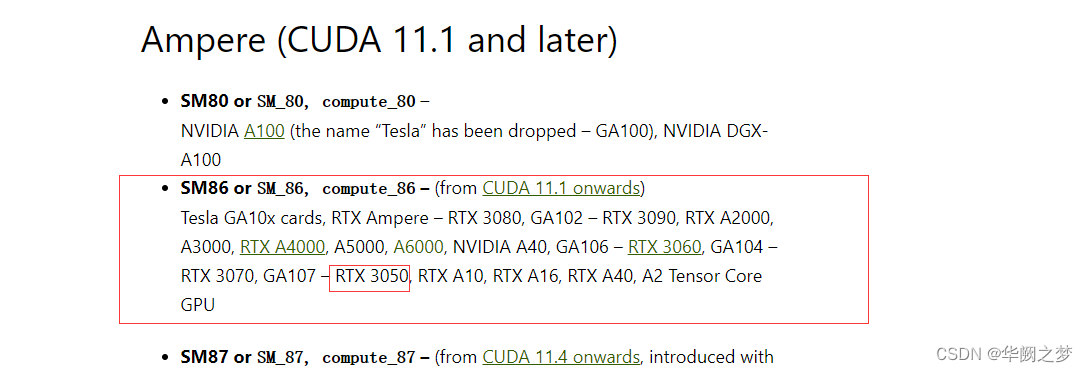

所以:
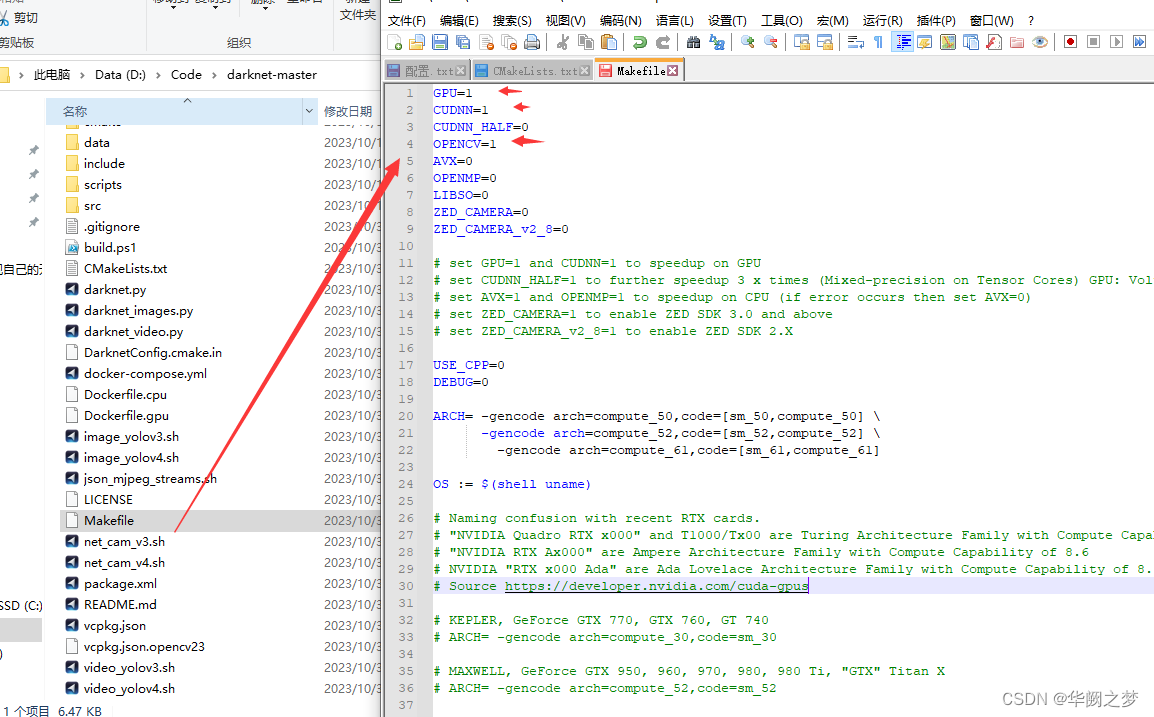
修改src/darknet_ros/darknet/Makefile和src/darknet_ros/darknet_ros/CMakeList.txt
修改方式:将其中包含compute_30的行进行注释
再次编译就行了!
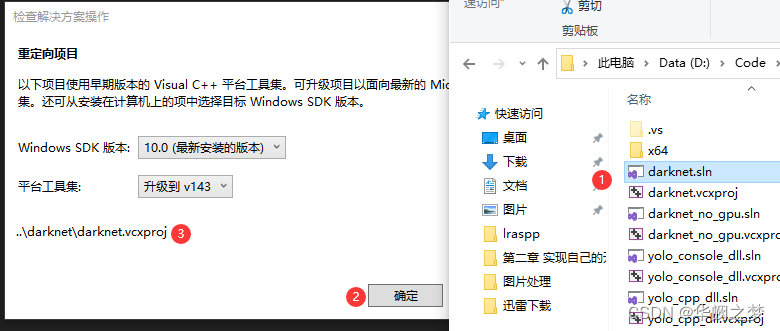
Visua
l Studio 2019打开YOLOv4项目
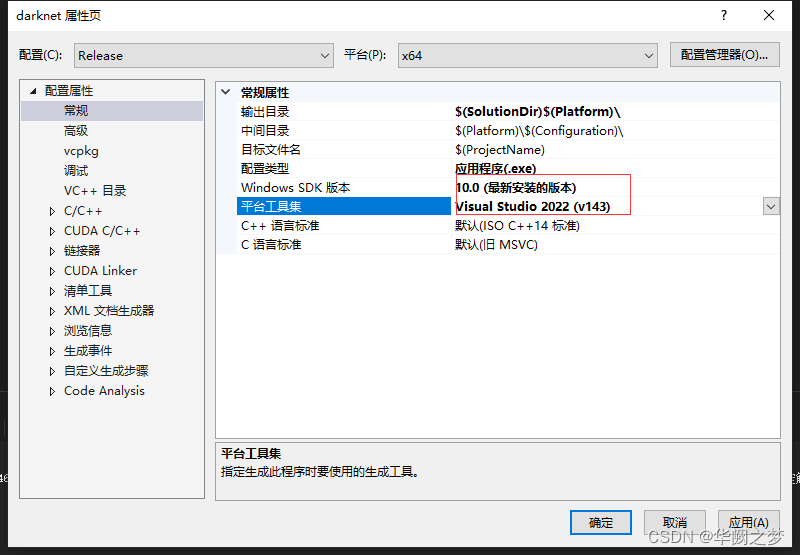
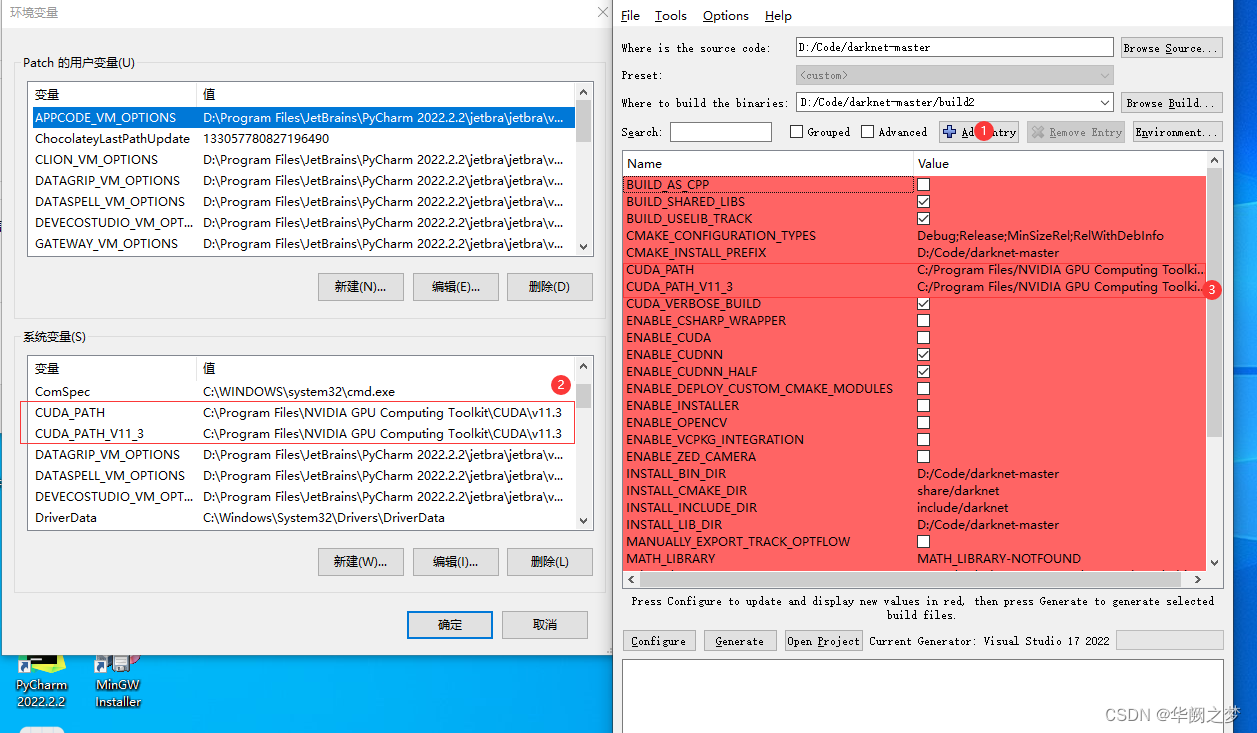
2.可选:如果需要配置cuda
CMAME_CUDA_COMPLER
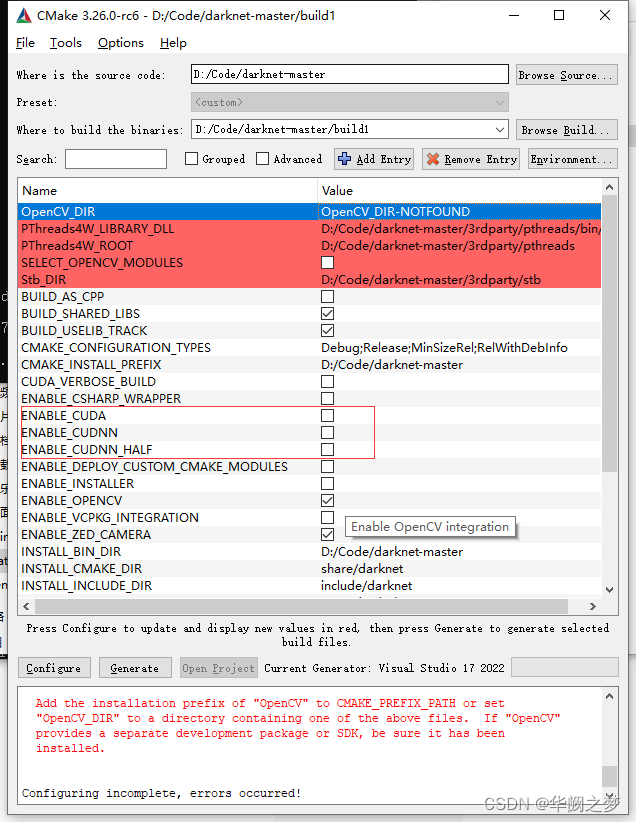
cpu版本搭建
vcpkg install opencv:x64-windows
如下全部去掉


 1456
1456


 被折叠的 条评论
为什么被折叠?
被折叠的 条评论
为什么被折叠?
 到【灌水乐园】发言


