文章目录
简介
目标检测 r-cnn原论文 r-cnn参考csdn讲解
目标检测 fast r-cnn原论文 fast r-cnn参考csdn讲解
目标检测 faster r-cnn原论文 faster r-cnn参考csdn讲解
目标检测+语义分割 mask r-cnn原论文 mask r-cnn参考csdn讲解
R-CNN Fast R-CNN Faster R-CNN视频讲解
网页备份:
链接:https://pan.baidu.com/s/12AfJQCKzdCwF0IUVPfkeEA?pwd=x74i
提取码:x74i
SS & RPN
Region Proposal的两种生成方式。
SS(Selective Search): R-CNN、Fast R-CNN中使用,独立于模型之外。
RPN(Region Proposal Network): Faster R-CNN、Mask R-CNN使用,包含在模型之中。
# RPN anchor_generate
# base_size: 原图 到 feature map 的缩放比例
# ratios: anchor的高宽比h/w
# anchor_scales: anchor的缩放比例
假设anchor的base_size=16, ratios=[0.5, 1, 2], anchor_scales=[8, 16, 32],
则要在feature map上截取9种shape的anchor,即3种面积[(8)**2, (16)**2, (32)**2]和3种高宽比h/w[0.5, 1, 2]的笛卡尔乘积,
映射到原图上为3种面积[(8*16)**2, (16*16)**2, (32*16)**2]和3种高宽比h/w[0.5, 1, 2]的笛卡尔乘积。

从feature_map的基准点(0.5, 0.5), 沿x, y方向以步长1移动,每移动到一个新位置则截取9种shape的anchor,
映射到原图上位基准点(8, 8),沿x, y方向以步长16移动,每移动到一个新位置则截取9种shape的anchor。

最终返回的RP均以原图为尺度。
FPN
mask r-cnn使用,r-cnn、fast r-cnn、faster r-cnn没有使用。
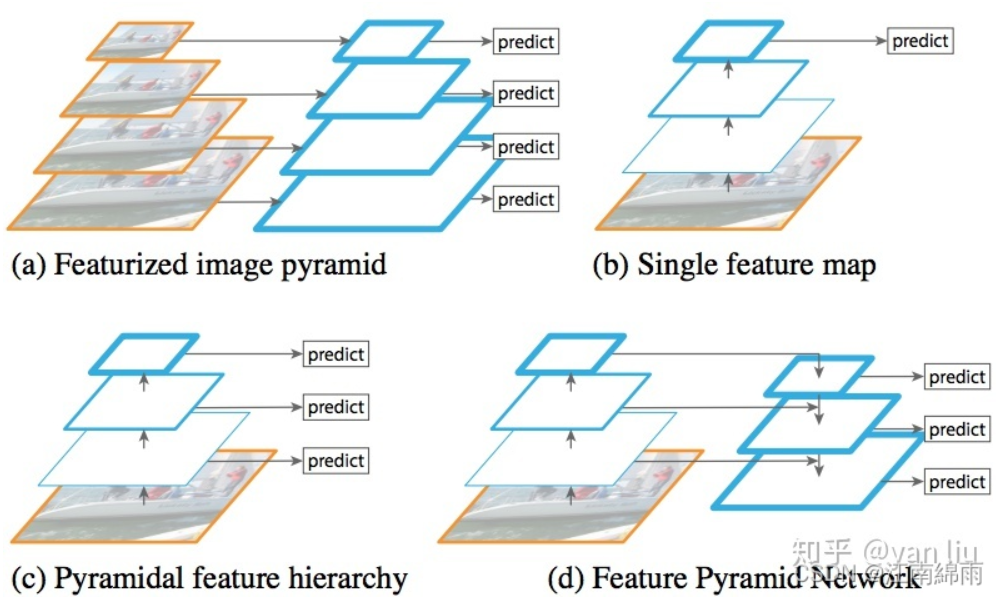
高层网络提取的特征 语义特征多,几何特征少,不利于分割;浅层网络提取的特征 语义特征少,几何特征多,不利于分类。
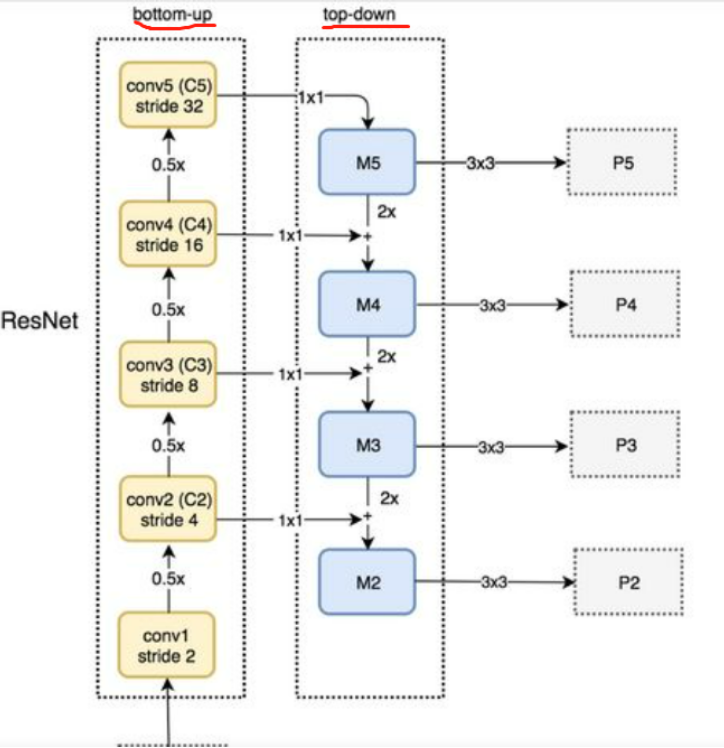
(图a)采用输入多尺度图像的方式构建多尺度的特征,该方法的最大问题便是识别时间为单幅图的k倍,其中k是缩放的尺寸个数。Faster R-CNN等方法为了提升检测速度,使用了单尺度的Feature Map(图b),但单尺度的特征图限制了模型的检测能力,尤其是训练集中覆盖率极低的样本(例如较大和较小样本)。SSD利用卷积网络的层次结构,从VGG的第conv4_3开始,通过网络的不同层得到了多尺度的Feature Map(图c),该方法虽然能提高精度且基本上没有增加测试时间,但没有使用更加低层的Feature Map,然而这些低层次的特征对于检测小物体是非常有帮助的。与SSD不同的是,FPN不仅使用了层次深的Feature Map,并且浅层的Feature Map也被应用到FPN中。并通过自底向上的结构(bottom-up),自顶向下(top-down)以及横向连接(lateral connection)将这些Feature Map高效的整合起来,在提升精度的同时并没有大幅增加检测时间(图d)。
具体在Mask R-CNN中的FPN结构为:即使用[P2 P3 P4 P5]作为特征,若region proposal很大,将从更深层的P5上切出ROI进行后续的分类和回归预测,很小将从更浅层的P2上进行切割。
RoIPool & RoIAlign

# PyTorch API
torchvision.ops.roi_pool(input: torch.Tensor, boxes: Union[torch.Tensor, List[torch.Tensor]], output_size: None, spatial_scale: float = 1.0)

torchvision.ops.roi_align(input: torch.Tensor, boxes: Union[torch.Tensor, List[torch.Tensor]], output_size: None, spatial_scale: float = 1.0, sampling_ratio: int = - 1, aligned: bool = False)


import torch
from torchvision.ops import roi_pool, roi_align

# N=1, C=1, H=8, W=8
input = torch.tensor(
    [[[[0, 1, 0, 0, 0, 0, 0, 0],
     [0, 0, 0, 0, 0, 0, 0, 0],
     [0, 0, 0, 0, 0, 0, 0, 0],
     [0, 0, 0, 0, 0, 0, 0, 0],
     [0, 0, 0, 0, 0, 0, 0, 0],
     [0, 0, 0, 0, 0, 0, 0, 0],
     [0, 0, 0, 0, 0, 0, 0, 0],
     [0, 0, 0, 0, 0, 0, 0, 0]]]]
, dtype=torch.float)

# List[Tensor[L, 4]] L=1
boxes = [torch.tensor([[0.2, 0.3, 4, 4]], dtype=torch.float)]

# output_size = (2, 2), spatial_scale=1
print(roi_pool(input, boxes, output_size=2, spatial_scale=1))
print(roi_align(input, boxes, output_size=2, spatial_scale=1))
# tensor([[[[1., 0.],
#           [0., 0.]]]])
# tensor([[[[0.0623, 0.0000],
#           [0.0000, 0.0000]]]])
Detectron2
简介
Detectron2是Facebook AI Research的下一代库,提供最先进的检测和分割算法。它是Detectron和maskrcnn-benchmark的继承者。它支持Facebook中的许多计算机视觉研究项目和生产应用。
可以直接使用的预训练模型列表见最后一节
安装环境
# 演示为ubuntu16.04下cpu版本的安装和使用,其他见官网
conda create -n detectron2 python=3.7
source activate detectron2
conda install pytorch==1.10.0 torchvision==0.11.0 torchaudio==0.10.0 cpuonly -c pytorch
python -m pip install detectron2 -f https://dl.fbaipublicfiles.com/detectron2/wheels/cpu/torch1.10/index.html
pip install opencv-python
目标检测&语义分割
目标检测测试使用“COCO-Detection/faster_rcnn_R_101_FPN_3x.yaml”
语义分割“COCO-InstanceSegmentation/mask_rcnn_R_101_FPN_3x.yaml”
测试图片可以使用“wget http://images.cocodataset.org/val2017/000000439715.jpg -q -O input.jpg”(下载一张coco数据集图片到本地),也可以使用自己准备的图片。
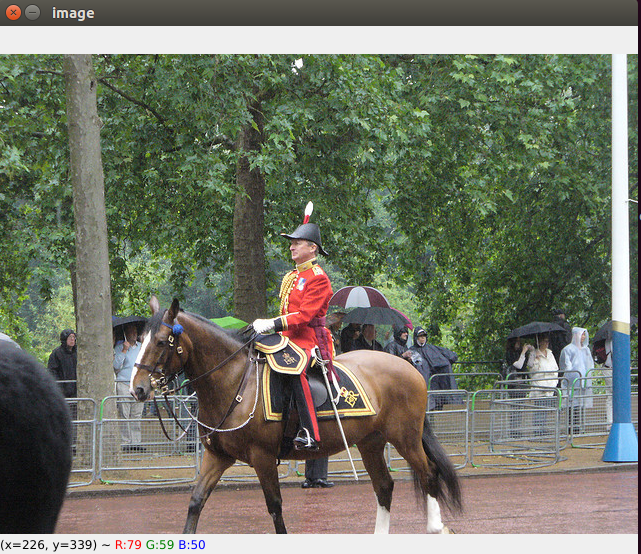
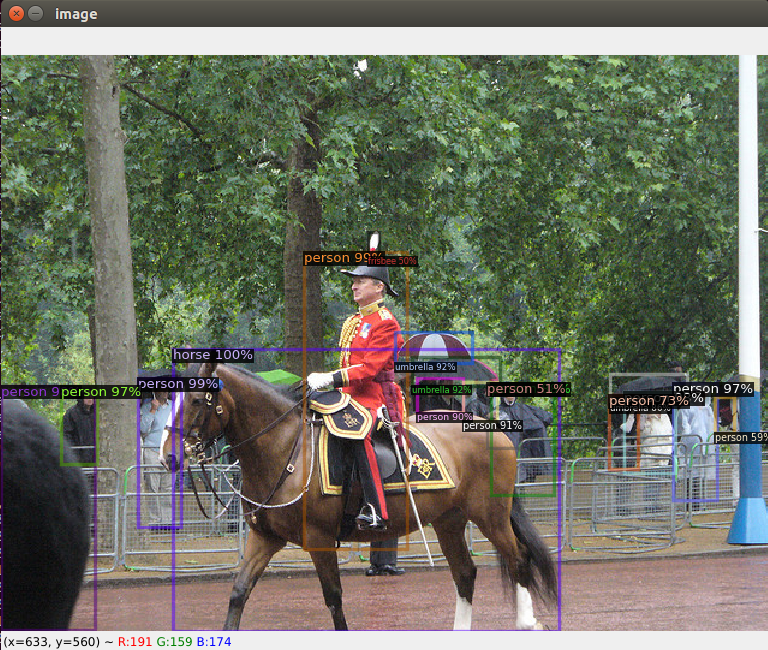
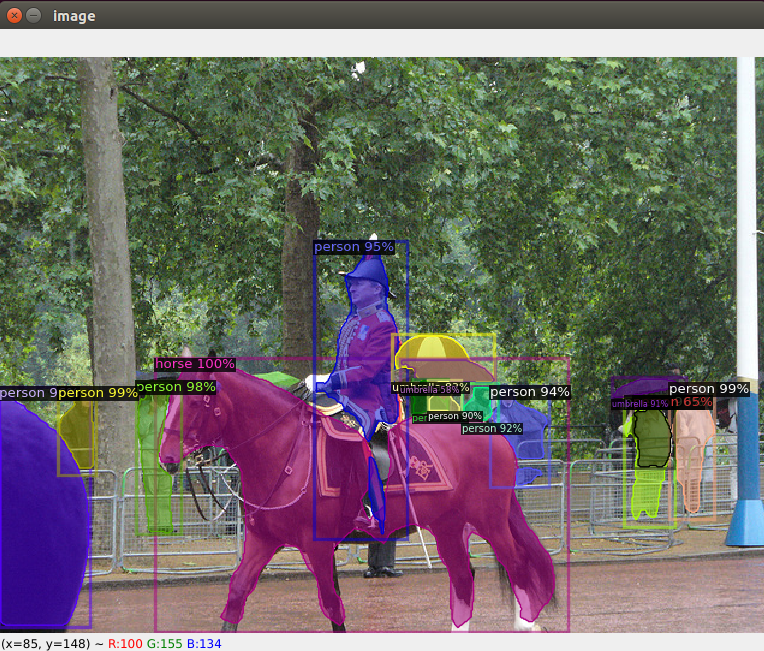
使用封装predictor(简洁)
# main.py
import cv2
from detectron2 import model_zoo
from detectron2.config import get_cfg
from detectron2.engine import DefaultPredictor
from detectron2.utils.visualizer import Visualizer
from detectron2.data import MetadataCatalog

# 使用预训练模型构建预测器
config_file = "COCO-Detection/faster_rcnn_R_101_FPN_3x.yaml"
cfg = get_cfg()
cfg.merge_from_file(model_zoo.get_config_file(config_file))
cfg.MODEL.ROI_HEADS.SCORE_THRESH_TEST = 0.5  # set threshold for this model
cfg.MODEL.DEVICE = 'cpu'
cfg.MODEL.WEIGHTS = model_zoo.get_checkpoint_url(config_file)
predictor = DefaultPredictor(cfg)

# 显示原图
im = cv2.imread("input.jpg")
cv2.imshow("image", im)
cv2.waitKey()
cv2.destroyAllWindows()

# 对图片im进行预测
outputs = predictor(im)

# 输出当前预训练模型所能检测的所有类别(str)
print('------所有类------')
print(MetadataCatalog.get(cfg.DATASETS.TRAIN[0]).get("thing_classes", None))
print('------------------')
# 输出目标检测结果:类别 边框 分数
print(outputs["instances"].pred_classes)
print(outputs["instances"].pred_boxes)
print(outputs["instances"].scores)

# 显示结果图
v = Visualizer(im[:, :, ::-1], MetadataCatalog.get(cfg.DATASETS.TRAIN[0]), scale=1.2)
out = v.draw_instance_predictions(outputs["instances"].to("cpu"))
cv2.imshow("image", out.get_image()[:, :, ::-1])
cv2.waitKey()
cv2.destroyAllWindows()
使用model(传统)
# 输入格式:
# 测试时,仅需输入image即可,对于不带有RPN的Fast R-CNN,还需输入proposal_boxes。
“image”: Tensor in (C, H, W) format. The meaning of channels are defined by cfg.INPUT.FORMAT. Image normalization, if any, will be performed inside the model using cfg.MODEL.PIXEL_{MEAN,STD}.

“height”, “width”: the desired output height and width in inference, which is not necessarily the same as the height or width of the image field. For example, the image field contains the resized image, if resize is used as a preprocessing step. But you may want the outputs to be in original resolution. If provided, the model will produce output in this resolution, rather than in the resolution of the image as input into the model. This is more efficient and accurate.

“instances”: an Instances object for training, with the following fields:
	“gt_boxes”: a Boxes object storing N boxes, one for each instance.
	“gt_classes”: Tensor of long type, a vector of N labels, in range [0, num_categories).
	“gt_masks”: a PolygonMasks or BitMasks object storing N masks, one for each instance.
	“gt_keypoints”: a Keypoints object storing N keypoint sets, one for each instance.

“sem_seg”: Tensor[int] in (H, W) format. The semantic segmentation ground truth for training. Values represent category labels starting from 0.

“proposals”: an Instances object used only in Fast R-CNN style models, with the following fields:
	“proposal_boxes”: a Boxes object storing P proposal boxes.
	“objectness_logits”: Tensor, a vector of P scores, one for each proposal.
“instances”: Instances object with the following fields:
	“pred_boxes”: Boxes object storing N boxes, one for each detected instance.
	“scores”: Tensor, a vector of N confidence scores.
	“pred_classes”: Tensor, a vector of N labels in range [0, num_categories).
	“pred_masks”: a Tensor of shape (N, H, W), masks for each detected instance.
	“pred_keypoints”: a Tensor of shape (N, num_keypoint, 3). Each row in the last dimension is (x, y, score). Confidence scores are larger than 0.

“sem_seg”: Tensor of (num_categories, H, W), the semantic segmentation prediction.

“proposals”: Instances object with the following fields:
	“proposal_boxes”: Boxes object storing N boxes.
	“objectness_logits”: a torch vector of N confidence scores.

“panoptic_seg”: A tuple of (pred: Tensor, segments_info: Optional[list[dict]]). The pred tensor has shape (H, W), containing the segment id of each pixel.
	If segments_info exists, each dict describes one segment id in pred and has the following fields:
		“id”: the segment id
		“isthing”: whether the segment is a thing or stuff
		“category_id”: the category id of this segment.
	If a pixel’s id does not exist in segments_info, it is considered to be void label defined in Panoptic Segmentation.
	If segments_info is None, all pixel values in pred must be ≥ -1. Pixels with value -1 are assigned void labels. Otherwise, the category id of each pixel is obtained by category_id = pixel // metadata.label_divisor.
# main.py
import cv2
from detectron2 import model_zoo
from detectron2.config import get_cfg
from detectron2.modeling import build_model
from detectron2.checkpoint import DetectionCheckpointer
from detectron2.utils.visualizer import Visualizer
from detectron2.data import MetadataCatalog
import torch

# 构建模型并加载预训练参数
config_file = "COCO-Detection/faster_rcnn_R_101_FPN_3x.yaml"
cfg = get_cfg()
cfg.merge_from_file(model_zoo.get_config_file(config_file))
cfg.MODEL.ROI_HEADS.SCORE_THRESH_TEST = 0.5  # set threshold for this model
cfg.MODEL.DEVICE = 'cpu'
cfg.MODEL.WEIGHTS = model_zoo.get_checkpoint_url(config_file)
model = build_model(cfg)
DetectionCheckpointer(model).load(cfg.MODEL.WEIGHTS)
model.eval()

# 显示原图
im = cv2.imread("input.jpg")
cv2.imshow("image", im)
cv2.waitKey()
cv2.destroyAllWindows()

# 对图片im进行预测
# 格式为BGR CHW
im_tensor = torch.tensor(im, dtype=torch.float)
im_tensor = torch.permute(im_tensor, (2, 0, 1))
outputs = model([{"image":im_tensor}])
print(outputs)

# 输出当前预训练模型所能检测的所有类别(str)
print('------所有类------')
print(MetadataCatalog.get(cfg.DATASETS.TRAIN[0]).get("thing_classes", None))
print('------------------')
# 输出目标检测结果:类别 边框 分数
print(outputs[0]["instances"].pred_classes)
print(outputs[0]["instances"].pred_boxes)
print(outputs[0]["instances"].scores)

# 显示结果图
v = Visualizer(im[:, :, ::-1], MetadataCatalog.get(cfg.DATASETS.TRAIN[0]), scale=1.2)
out = v.draw_instance_predictions(outputs[0]["instances"].to("cpu"))
cv2.imshow("image", out.get_image()[:, :, ::-1])
cv2.waitKey()
cv2.destroyAllWindows()
提取特征
2048d特征
使用COCO-Detection/faster_rcnn_R_101_C4_3x.yaml
import cv2
import torch
from detectron2 import model_zoo
from detectron2.checkpoint import DetectionCheckpointer
from detectron2.config import get_cfg
from detectron2.modeling import build_model
from detectron2.structures import ImageList
from detectron2.data import MetadataCatalog
from detectron2.utils.visualizer import Visualizer

device = 'cuda' if torch.cuda.is_available() else 'cpu'

# 构建模型并加载预训练参数
config_file = "COCO-Detection/faster_rcnn_R_101_C4_3x.yaml"
cfg = get_cfg()
cfg.merge_from_file(model_zoo.get_config_file(config_file))
cfg.MODEL.ROI_HEADS.SCORE_THRESH_TEST = 0.5  # set threshold for this model
cfg.MODEL.DEVICE = device
cfg.MODEL.WEIGHTS = model_zoo.get_checkpoint_url(config_file)
model = build_model(cfg)
DetectionCheckpointer(model).load(cfg.MODEL.WEIGHTS)
model.eval()
class_names = MetadataCatalog.get(cfg.DATASETS.TRAIN[0]).get("thing_classes", None)


def get_classes_boxes_emb(img_path, return_list=['embedding']):
	"""
	使用faster r-cnn提取目前检测对象特征
	:param img_path: 图片文件路径
	:param retrun_list:
		all、embedding、num_instances、pred_boxes、scores、class_ints、class_strs、image_size、result_img
	:return:
		embedding:      tensor shape(n, 2048) float32
		num_instances:  int
		pred_boxes:     tensor shape(n, 4)    float32
		scores:         tensor shape(n)       float32
		class_ints:     tensor shape(n)       int64
		class_strs:     list   shape(n)       str
		image_size:     (int, int)  表示(height, width)
		result_img:     cv2格式图片numpy数据 hwc uint8 可以使用cv2.imshow显示或cv2.imwrite保存
	"""
	im = cv2.imread(img_path)
	images = ImageList.from_tensors([torch.permute(torch.tensor(im, dtype=torch.float, device=device), (2, 0, 1))])

	# 完整执行整个目标检测过程,获取 roi_heads所需要的backbone图片特征、 检测结果框(我们要提取该框内的特征)
	features = model.backbone(images.tensor)
	proposals, _ = model.proposal_generator(images, features)
	instances, _ = model.roi_heads(images, features, proposals)

	# 从instances读取各种信息
	data = instances[0].get_fields()

	result = {}
	if 'all' in return_list or 'embedding' in return_list:
		# 将 roi_heads所需要的backbone图片特征、检测结果框重新输入到roi_heads、获取特征向量
		mask_features = [features[f] for f in model.roi_heads.in_features]
		mask_features = model.roi_heads.pooler(mask_features, [x.pred_boxes for x in instances])
		embedding = model.roi_heads.res5(mask_features).mean(dim=[2, 3])
		result['embedding'] = embedding.clone().detach().cpu()
	if 'all' in return_list or 'num_instances' in return_list:
		result['num_instances'] = data['scores'].clone().detach().cpu().shape[0]
	if 'all' in return_list or 'pred_boxes' in return_list:
		result['pred_boxes'] = data['pred_boxes'].tensor.clone().detach().cpu()
	if 'all' in return_list or 'scores' in return_list:
		result['scores'] = data['scores'].clone().detach().cpu()
	if 'all' in return_list or 'class_ints' in return_list:
		result['class_ints'] = data['pred_classes'].clone().detach().cpu()
	if 'all' in return_list or 'class_strs' in return_list:
		result['class_strs'] = [class_names[i] for i in data['pred_classes'].clone().detach().cpu()]
	if 'all' in return_list or 'image_size' in return_list:
		result['image_size'] = instances[0]._image_size
	if 'all' in return_list or 'result_img' in return_list:
		v = Visualizer(im[:, :, ::-1], MetadataCatalog.get(cfg.DATASETS.TRAIN[0]), scale=1.2)
		result_img = v.draw_instance_predictions(instances[0].to('cpu')).get_image()[:, :, ::-1]
		result['result_img'] = result_img

	return result


if __name__ == '__main__':
	t = get_classes_boxes_emb("input.jpg", return_list=['all'])
	print(t)
1024d特征
使用COCO-Detection/faster_rcnn_R_101_FPN_3x.yaml
import cv2
import torch
from detectron2 import model_zoo
from detectron2.checkpoint import DetectionCheckpointer
from detectron2.config import get_cfg
from detectron2.modeling import build_model
from detectron2.structures import ImageList
from detectron2.data import MetadataCatalog
from detectron2.utils.visualizer import Visualizer

device = 'cuda' if torch.cuda.is_available() else 'cpu'

# 构建模型并加载预训练参数
config_file = "COCO-Detection/faster_rcnn_R_101_FPN_3x.yaml"
cfg = get_cfg()
cfg.merge_from_file(model_zoo.get_config_file(config_file))
cfg.MODEL.ROI_HEADS.SCORE_THRESH_TEST = 0.5  # set threshold for this model
cfg.MODEL.DEVICE = device
cfg.MODEL.WEIGHTS = model_zoo.get_checkpoint_url(config_file)
model = build_model(cfg)
DetectionCheckpointer(model).load(cfg.MODEL.WEIGHTS)
model.eval()
class_names = MetadataCatalog.get(cfg.DATASETS.TRAIN[0]).get("thing_classes", None)


def get_classes_boxes_emb(img_path, return_list=['embedding']):
    """
	使用faster r-cnn提取目前检测对象特征
	:param img_path: 图片文件路径
	:param retrun_list:
		all、embedding、num_instances、pred_boxes、scores、class_ints、class_strs、image_size、result_img
	:return:
		embedding:      tensor shape(n, 1024) float32
		num_instances:  int
		pred_boxes:     tensor shape(n, 4)    float32
		scores:         tensor shape(n)       float32
		class_ints:     tensor shape(n)       int64
		class_strs:     list   shape(n)       str
		image_size:     (int, int)  表示(height, width)
		result_img:     cv2格式图片numpy数据 hwc uint8 可以使用cv2.imshow显示或cv2.imwrite保存
	"""
    im = cv2.imread(img_path)
    images = ImageList.from_tensors([torch.permute(torch.tensor(im, dtype=torch.float, device=device), (2, 0, 1))])

    # 完整执行整个目标检测过程,获取 roi_heads所需要的backbone图片特征、 检测结果框(我们要提取该框内的特征)
    features = model.backbone(images.tensor)
    proposals, _ = model.proposal_generator(images, features)
    instances, _ = model.roi_heads(images, features, proposals)

    # 从instances读取各种信息
    data = instances[0].get_fields()

    result = {}
    if 'all' in return_list or 'embedding' in return_list:
        # 将 roi_heads所需要的backbone图片特征、检测结果框重新输入到roi_heads、获取特征向量
        mask_features = [features[f] for f in model.roi_heads.in_features]
        mask_features = model.roi_heads.box_pooler(mask_features, [x.pred_boxes for x in instances])
        embedding = model.roi_heads.box_head(mask_features)
        result['embedding'] = embedding.clone().detach().cpu()
    if 'all' in return_list or 'num_instances' in return_list:
        result['num_instances'] = data['scores'].clone().detach().cpu().shape[0]
    if 'all' in return_list or 'pred_boxes' in return_list:
        result['pred_boxes'] = data['pred_boxes'].tensor.clone().detach().cpu()
    if 'all' in return_list or 'scores' in return_list:
        result['scores'] = data['scores'].clone().detach().cpu()
    if 'all' in return_list or 'class_ints' in return_list:
        result['class_ints'] = data['pred_classes'].clone().detach().cpu()
    if 'all' in return_list or 'class_strs' in return_list:
        result['class_strs'] = [class_names[i] for i in data['pred_classes'].clone().detach().cpu()]
    if 'all' in return_list or 'image_size' in return_list:
        result['image_size'] = instances[0]._image_size
    if 'all' in return_list or 'result_img' in return_list:
        v = Visualizer(im[:, :, ::-1], MetadataCatalog.get(cfg.DATASETS.TRAIN[0]), scale=1.2)
        result_img = v.draw_instance_predictions(instances[0].to('cpu')).get_image()[:, :, ::-1]
        result['result_img'] = result_img

    return result


if __name__ == '__main__':
    t = get_classes_boxes_emb("input.jpg", return_list=['all'])
    print(t)
预训练模型列表
# 注意原生配置Faster R-CNN和Mask R-CNN使用RPN产生RP
# 原生配置Fast R-CNN使用独立的SS产生RP,所以使用下列不带RPN的Fast R-CNN时,注意显式输入proposals。

# COCO Detection with Faster R-CNN		(fc层特征维度)
COCO-Detection/faster_rcnn_R_50_C4_1x		(2048d)
COCO-Detection/faster_rcnn_R_50_DC5_1x		(1024d)
COCO-Detection/faster_rcnn_R_50_FPN_1x		(1024d)
COCO-Detection/faster_rcnn_R_50_C4_3x		(2048d)
COCO-Detection/faster_rcnn_R_50_DC5_3x		(1024d)
COCO-Detection/faster_rcnn_R_50_FPN_3x		(1024d)
COCO-Detection/faster_rcnn_R_101_C4_3x		(2048d)
COCO-Detection/faster_rcnn_R_101_DC5_3x		(1024d)
COCO-Detection/faster_rcnn_R_101_FPN_3x		(1024d)
COCO-Detection/faster_rcnn_X_101_32x8d_FPN_3x		(1024d)

# COCO Detection with RetinaNet
COCO-Detection/retinanet_R_50_FPN_1x
COCO-Detection/retinanet_R_50_FPN_3x
COCO-Detection/retinanet_R_101_FPN_3x

# COCO Detection with RPN and Fast R-CNN
COCO-Detection/rpn_R_50_C4_1x
COCO-Detection/rpn_R_50_FPN_1x
COCO-Detection/fast_rcnn_R_50_FPN_1x

# COCO Instance Segmentation Baselines with Mask R-CNN
COCO-InstanceSegmentation/mask_rcnn_R_50_C4_1x
COCO-InstanceSegmentation/mask_rcnn_R_50_DC5_1x
COCO-InstanceSegmentation/mask_rcnn_R_50_FPN_1x
COCO-InstanceSegmentation/mask_rcnn_R_50_C4_3x
COCO-InstanceSegmentation/mask_rcnn_R_50_DC5_3x
COCO-InstanceSegmentation/mask_rcnn_R_50_FPN_3x
COCO-InstanceSegmentation/mask_rcnn_R_101_C4_3x
COCO-InstanceSegmentation/mask_rcnn_R_101_DC5_3x
COCO-InstanceSegmentation/mask_rcnn_R_101_FPN_3x
COCO-InstanceSegmentation/mask_rcnn_X_101_32x8d_FPN_3x  # noqa

# COCO Person Keypoint Detection Baselines with Keypoint R-CNN
COCO-Keypoints/keypoint_rcnn_R_50_FPN_1x
COCO-Keypoints/keypoint_rcnn_R_50_FPN_3x
COCO-Keypoints/keypoint_rcnn_R_101_FPN_3x
COCO-Keypoints/keypoint_rcnn_X_101_32x8d_FPN_3x

# COCO Panoptic Segmentation Baselines with Panoptic FPN
COCO-PanopticSegmentation/panoptic_fpn_R_50_1x
COCO-PanopticSegmentation/panoptic_fpn_R_50_3x
COCO-PanopticSegmentation/panoptic_fpn_R_101_3x

# LVIS Instance Segmentation Baselines with Mask R-CNN
LVISv0.5-InstanceSegmentation/mask_rcnn_R_50_FPN_1x  # noqa
LVISv0.5-InstanceSegmentation/mask_rcnn_R_101_FPN_1x  # noqa
LVISv0.5-InstanceSegmentation/mask_rcnn_X_101_32x8d_FPN_1x  # noqa

# Cityscapes & Pascal VOC Baselines
Cityscapes/mask_rcnn_R_50_FPN
PascalVOC-Detection/faster_rcnn_R_50_C4

# Other Settings
Misc/mask_rcnn_R_50_FPN_1x_dconv_c3-c5
Misc/mask_rcnn_R_50_FPN_3x_dconv_c3-c5
Misc/cascade_mask_rcnn_R_50_FPN_1x
Misc/cascade_mask_rcnn_R_50_FPN_3x
Misc/mask_rcnn_R_50_FPN_3x_syncbn
Misc/mask_rcnn_R_50_FPN_3x_gn
Misc/scratch_mask_rcnn_R_50_FPN_3x_gn
Misc/scratch_mask_rcnn_R_50_FPN_9x_gn
Misc/scratch_mask_rcnn_R_50_FPN_9x_syncbn
Misc/panoptic_fpn_R_101_dconv_cascade_gn_3x
Misc/cascade_mask_rcnn_X_152_32x8d_FPN_IN5k_gn_dconv  # noqa

# D1 Comparisons
Detectron1-Comparisons/faster_rcnn_R_50_FPN_noaug_1x  # noqa
Detectron1-Comparisons/mask_rcnn_R_50_FPN_noaug_1x  # noqa
Detectron1-Comparisons/keypoint_rcnn_R_50_FPN_1x


 2615
2615

 被折叠的 条评论
为什么被折叠?


