


drawContours
之前使用mask图还进行了连通域有无status分析,然后才进行的绘制。
今天发现直接使用mask图进行绘制,然后通过设置drawContours的参数可以进行不同层次上缺陷的绘制,然后通过这个事情也说明,有问题可以直接找opencv官网源码进行查看和分析说明。
方法1:
    cv::RNG rng(12345);
    cv::Mat cc_out;

    std::vector<std::vector<cv::Point>> contours;
    std::vector<cv::Vec4i> hierarcy;
    cv::findContours(mask, contours, hierarcy, cv::RETR_CCOMP, cv::CHAIN_APPROX_SIMPLE);
    //绘制全部轮廓,直接绘制全部会很快 9ms 10ms  8ms
//    drawContours(out, contours, -1, cv::Scalar(rng.uniform(0,256), rng.uniform(0, 256), rng.uniform(0, 256)), 2);

    for (int k = 0; k < contours.size(); k++) {
        cv::Scalar colors = cv::Scalar(rng.uniform(0, 256), rng.uniform(0, 256), rng.uniform(0, 256));
        if (contourArea(contours[k]) < 50)
            continue;
        if(isFilled)
            drawContours(out, contours, k, colors, cv::FILLED, 8, hierarcy);
        else
            drawContours(out, contours, k, colors, 2);
    }
cv::FILLED 第五个参数设置成这个,可以以填充的方式进行绘制缺陷区域。之前是通过遍历整个mask区域然后绘制,不仅慢,而且调用复杂。
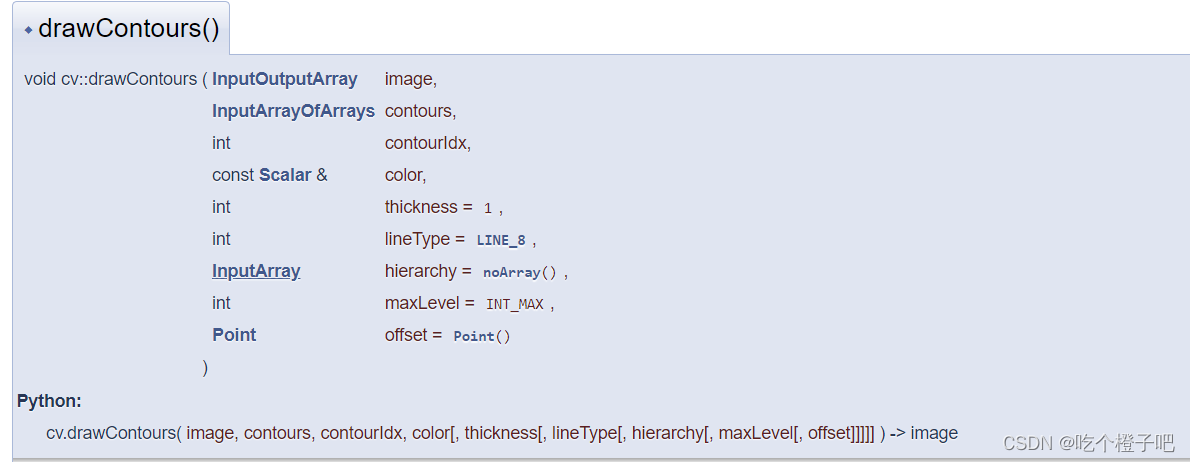
Parameters
image Destination image.
contours All the input contours. Each contour is stored as a point vector.
contourIdx Parameter indicating a contour to draw. If it is negative, all the contours are drawn.
color Color of the contours.
thickness Thickness of lines the contours are drawn with. If it is negative (for example, thickness=FILLED ), the contour interiors are drawn.
lineType Line connectivity. See LineTypes
hierarchy Optional information about hierarchy. It is only needed if you want to draw only some of the contours (see maxLevel ).
maxLevel Maximal level for drawn contours. If it is 0, only the specified contour is drawn. If it is 1, the function draws the contour(s) and all the nested contours. If it is 2, the function draws the contours, all the nested contours, all the nested-to-nested contours, and so on. This parameter is only taken into account when there is hierarchy available.
offset Optional contour shift parameter. Shift all the drawn contours by the specified offset=(dx,dy) .
Note
When thickness=FILLED, the function is designed to handle connected components with holes correctly even when no hierarchy data is provided. This is done by analyzing all the outlines together using even-odd rule. This may give incorrect results if you have a joint collection of separately retrieved contours. In order to solve this problem, you need to call drawContours separately for each sub-group of contours, or iterate over the collection using contourIdx parameter.
百度翻译后:
当厚度=填充时,该函数设计用于正确处理带孔的连接部件,即使未提供层次结构数据。这是通过使用奇偶规则一起分析所有轮廓来完成的。如果您有单独检索的等高线的联合集合,这可能会给出错误的结果。为了解决这个问题,您需要为每个等高线子组分别调用drawContours,或者使用contourIdx参数遍历集合。
其实大致的写法应该就是上述那样,每个轮廓都挑选出来进行一个绘制。
如果进行一个连通域的分析,可以调用如下的代码进行尝试。
注意:使用下述connectedComponentsWithStats代码进行分析时比较费时的,可按需看是否需要。
方法2:
		cv::Mat labels, stats, centroids, img_color;
		int nccomps = cv::connectedComponentsWithStats(rsp_pair.second.mask, labels, stats, centroids);//轮廓个数

		std::cout << "label.size : " << labels.size() << " , nccomps : " << nccomps << std::endl;
		std::vector<cv::Vec3b> colors(nccomps + 1);
		colors[0] = cv::Vec3b(0, 0, 0); // background pixels remain black.
		int area_1 = 0;
		for (int i = 1; i < nccomps; i++) {
			colors[i] = cv::Vec3b(rand() % 256, rand() % 256, rand() % 256);
			std::cout << "area : " << stats.at<int>(i, cv::CC_STAT_AREA) << std::endl;
			area_1 += stats.at<int>(i, cv::CC_STAT_AREA);
			//cv::CC_STAT_AREA更换这个参数可以找出该轮廓的x y width height area

			int cx = centroids.at<double>(i, 0);
			int cy = centroids.at<double>(i, 1);
			// rectangle and area
			int x = stats.at<int>(i, CC_STAT_LEFT);
			int y = stats.at<int>(i, CC_STAT_TOP);
			int width = stats.at<int>(i, CC_STAT_WIDTH);
			int height = stats.at<int>(i, CC_STAT_HEIGHT);
			int area = stats.at<int>(i, CC_STAT_AREA);
			putText(g_image, format("%d", area), Point(x, y), FONT_HERSHEY_PLAIN, 1.0, Scalar(0, 255, 0), 1);

		}


		std::vector<std::vector<cv::Point>> contours;
		std::vector<cv::Vec4i> hierarcy;
		cv::findContours(rsp_pair.second.mask, contours, hierarcy, cv::RETR_CCOMP, cv::CHAIN_APPROX_SIMPLE);
		绘制全部轮廓,直接绘制全部会很快 9ms 10ms  8ms
		//drawContours(g_image, contours, -1, cv::Scalar(rng.uniform(0,256), rng.uniform(0, 256), rng.uniform(0, 256)), 2);

		std::cout << "size of contours: " << contours.size() << std::endl;
		for (int k = 0; k < contours.size(); k++) {
			cv::Scalar colors = cv::Scalar(rng.uniform(0, 256), rng.uniform(0, 256), rng.uniform(0, 256));
			if (contourArea(contours[k]) < 50)
				continue;

			drawContours(g_image, contours, k, colors, FILLED, 8, hierarcy);
		}
另一种通过创建一个同等类型大小,并且全部为0的图然后重新进行绘制,这样会时间更长
方法3:
		//59ms  64ms 61ms
		cv::Mat labels, stats, centroids, img_color;
		int nccomps = cv::connectedComponentsWithStats(rsp_pair.second.mask, labels, stats, centroids);//轮廓个数

		std::cout << "label.size : " << labels.size() << " , nccomps : " << nccomps << std::endl;
		std::vector<cv::Vec3b> colors(nccomps + 1);
		colors[0] = cv::Vec3b(0, 0, 0); // background pixels remain black.
		int area_1 = 0;
		for (int i = 1; i < nccomps; i++) {
			colors[i] = cv::Vec3b(rand() % 256, rand() % 256, rand() % 256);
			std::cout << "area : " << stats.at<int>(i, cv::CC_STAT_AREA) << std::endl;
			area_1 += stats.at<int>(i, cv::CC_STAT_AREA);
			//cv::CC_STAT_AREA更换这个参数可以找出该轮廓的x y width height area

			int cx = centroids.at<double>(i, 0);
			int cy = centroids.at<double>(i, 1);
			// rectangle and area
			int x = stats.at<int>(i, CC_STAT_LEFT);
			int y = stats.at<int>(i, CC_STAT_TOP);
			int width = stats.at<int>(i, CC_STAT_WIDTH);
			int height = stats.at<int>(i, CC_STAT_HEIGHT);
			int area = stats.at<int>(i, CC_STAT_AREA);
			putText(g_image, format("%d", area), Point(x, y), FONT_HERSHEY_PLAIN, 1.0, Scalar(0, 255, 0), 1);

		}


		for (int i = 0; i < rsp_pair.second.mask.rows; i++)
			for (int j = 0; j < rsp_pair.second.mask.cols; j++)
			{
				int label = labels.at<int>(i, j);
				if (label >= 1 && nccomps > 0)
				{
					//label表示当前像素第几个轮廓
					//tmp.mask.at<cv::Vec3b>(i, j) = colors[label];
					g_image.at<cv::Vec3b>(i, j) = colors[label];
				}
			}
这种其实就是写法的稍微不一样点,和方法1基本上一样,除了带上了一个连通域分析,但是耗时都差不多的。
方法4:
		cv::Mat cc_out;
		int cc_num = cv::connectedComponents(rsp_pair.second.mask, cc_out, 8);
		std::cout << "cc_num : " << cc_num << std::endl;

		Mat dst = Mat::zeros(cc_out.rows, cc_out.cols, CV_8UC3);
		vector<vector<Point> > contours;
		vector<Vec4i> hierarchy;
		findContours(cc_out, contours, hierarchy, RETR_CCOMP, CHAIN_APPROX_SIMPLE);
		// iterate through all the top-level contours,
		// draw each connected component with its own random color
		int idx = 0;
		for (; idx >= 0; idx = hierarchy[idx][0])
		{
			Scalar color(rand() & 255, rand() & 255, rand() & 255);
			//drawContours(g_image, contours, idx, color, FILLED, 8, hierarchy);
			drawContours(g_image, contours, idx, color, 2);
		}


 4723
4723


 被折叠的 条评论
为什么被折叠?
被折叠的 条评论
为什么被折叠?
 到【灌水乐园】发言


