


1.安装anaconda
2.更新显卡驱动,查询CUDA版本
- 如果很久没有更新显卡驱动,建议更新。
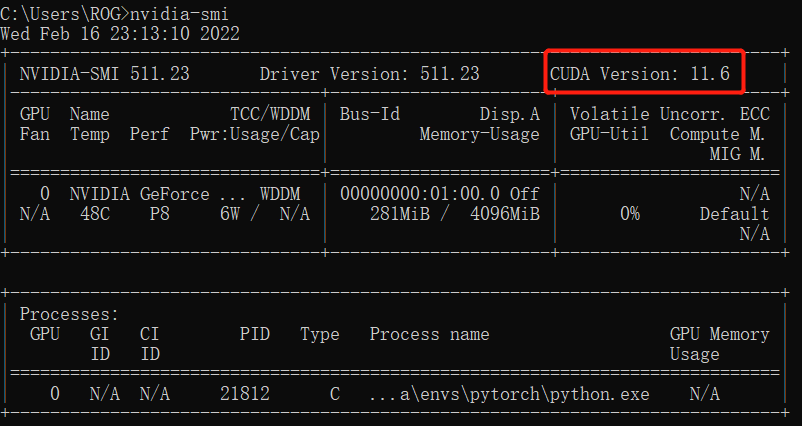
- 在cmd中输入
nvidia-smi即可查询到显卡信息如下,其中就有CUDA版本
3.使用清华镜像
1.生成.condarc文件
- 在anaconda prompt中输入
conda config --set show_channel_urls yes
- 然后可以在 C:\Users\xxx 中找到
.condarc文件 - 用记事本打开
.condarc文件,将其中的内容替换为以下内容并保存
channels:
  - defaults
show_channel_urls: true
default_channels:
  - https://mirrors.tuna.tsinghua.edu.cn/anaconda/pkgs/main
  - https://mirrors.tuna.tsinghua.edu.cn/anaconda/pkgs/r
  - https://mirrors.tuna.tsinghua.edu.cn/anaconda/pkgs/msys2
custom_channels:
  conda-forge: https://mirrors.tuna.tsinghua.edu.cn/anaconda/cloud
  msys2: https://mirrors.tuna.tsinghua.edu.cn/anaconda/cloud
  bioconda: https://mirrors.tuna.tsinghua.edu.cn/anaconda/cloud
  menpo: https://mirrors.tuna.tsinghua.edu.cn/anaconda/cloud
  pytorch: https://mirrors.tuna.tsinghua.edu.cn/anaconda/cloud
  simpleitk: https://mirrors.tuna.tsinghua.edu.cn/anaconda/cloud
如果上面的配置不行的话,可以用下面的
channels:
 - http://mirrors.tuna.tsinghua.edu.cn/anaconda/pkgs/free/
 - http://mirrors.tuna.tsinghua.edu.cn/anaconda/pkgs/main/
 - http://mirrors.tuna.tsinghua.edu.cn/anaconda/cloud/conda-forge/
show_channel_urls: true
report_errors: true
- 在anaconda prompt中输入
conda clean -i命令清除缓存
4.创建anaconda虚拟环境
-
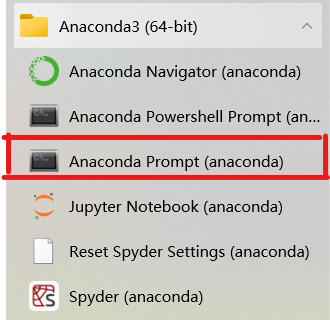
打开anaconda prompt
-
输入
conda create -n PyTorch python=3.9,其中PyTorch是虚拟环境的名字,可以自己取;笔者用的是python3.9版本 -
之后会有确认步骤,输入y确认等待创建完成即可
5.安装pytorch
- 进入pytorch官网,下拉找到下面的界面,注意CUDA版本要选择对应自己的GPU的版本
- 笔者使用的GPU是RTX 3050Ti Laptop,CUDA版本是11.6,之前安装了CUDA10.2版本的pytorch,在pycharm中使用pytorch时出现下面的报错,(旧版本的pytorch卸载方式可以见本文末)
如果安装的pytorch的CUDA版本错误,之后使用pytorch的时候会出现下面的报错:
NVIDIA GeForce RTX 3050 Ti Laptop GPU with CUDA capability sm_86 is not compatible with the current PyTorch installation.The current PyTorch install supports CUDA capabilities sm_37 sm_50 sm_60 sm_61 sm_70 sm_75 compute_37.
此报错的详细解释点这里

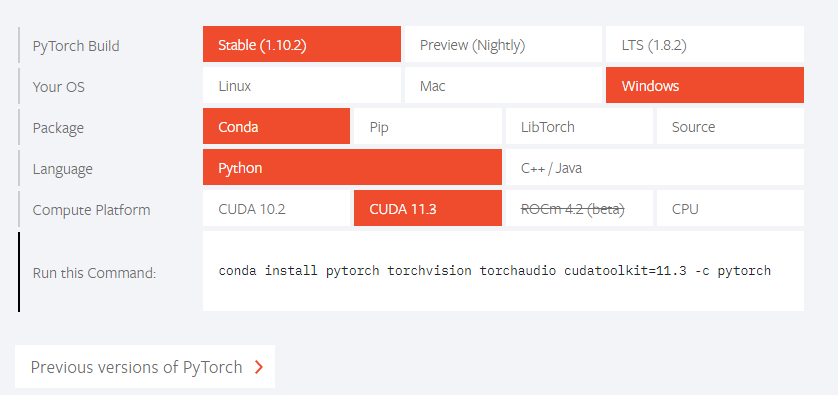
- 复制这里的命令
conda install pytorch torchvision torchaudio cudatoolkit=11.3 -c pytorch - 打开anaconda prompt,使用
conda activate PyTorch命令进入刚刚创建的虚拟环境(笔者取的名字是PyTorch) - 粘贴刚刚复制的命令安装即可
6.验证安装
进入虚拟环境,输入python进入python环境,输入import torch和 torch.cuda.is_available(),返回true表示安装成功

n.卸载pytorch
1.使用conda activate PyTorch进入anaconda的虚拟环境PyTorch(笔者取的名字是PyTorch)
2.在anaconda的虚拟环境中使用命令conda uninstall pytorch卸载之前的pytorch
3.会出现询问确认与否,输入y等待卸载完成即可

安装过程有其他问题或者pycharm相关的问题可以看参考[1]喔
参考:
1.PyTorch 最新安装教程(2021-07-27)_风口IT猪的成长录-CSDN博客
2.anaconda重新安装pytorch,使用GPU加速_音程的博客-CSDN博客
3.GeForce RTX 3060 Laptop GPU with CUDA capability sm_86 is not compatible with the current PyTorch in_地中海の养成记-CSDN博客


 89
89


 被折叠的 条评论
为什么被折叠?
被折叠的 条评论
为什么被折叠?
 到【灌水乐园】发言


