


《博主简介》
小伙伴们好,我是阿旭。专注于人工智能、AIGC、python、计算机视觉相关分享研究。
👍感谢小伙伴们点赞、关注!
《------往期经典推荐------》
二、机器学习实战专栏【链接】,已更新31期,欢迎关注,持续更新中~~
三、深度学习【Pytorch】专栏【链接】
四、【Stable Diffusion绘画系列】专栏【链接】
五、YOLOv8改进专栏【链接】,持续更新中~~
六、YOLO性能对比专栏【链接】,持续更新中~
《------正文------》
目录
引言
自动驾驶汽车是人工智能领域最具颠覆性的创新之一。在深度学习算法的推动下,自动驾驶汽车不断推动社会向前发展,并在移动出行领域创造新机遇。自动驾驶汽车可以去任何传统汽车可以去的地方,并能做经验丰富的人类驾驶员所做的一切。但对自动驾驶汽车进行适当的训练非常重要。自动驾驶汽车训练过程中涉及的众多步骤之一是车道检测,这是初步步骤。这篇文章将详细介绍如何使用Opencv进行视频中的车道检测。
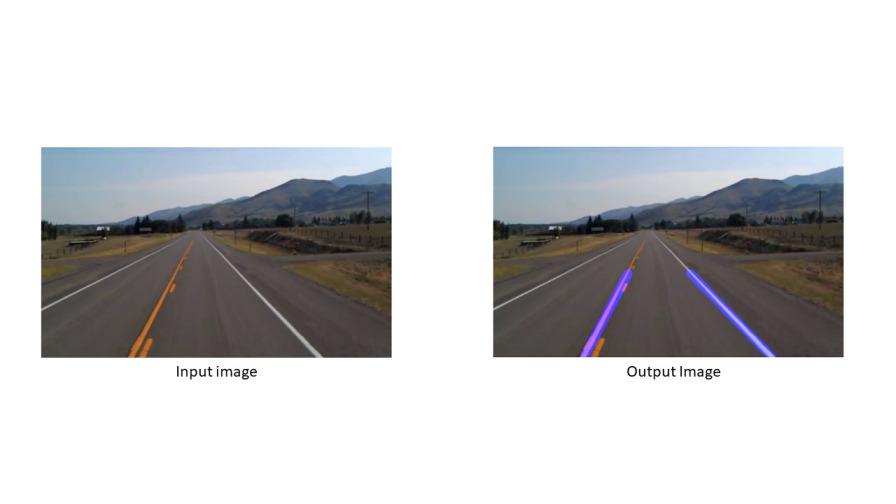
实现效果如下:

车道检测的简要步骤
道路车道检测需要检测自动驾驶汽车的路径并避免进入其他车道的风险。车道识别算法通过分析视觉输入可靠地识别车道的位置和边界。高级驾驶辅助系统 (ADAS) 和自动驾驶汽车系统都严重依赖它们。今天我们将讨论其中一种车道检测算法。涉及的步骤如下:
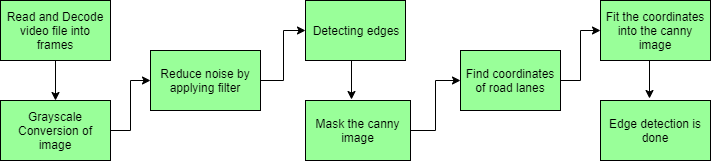
- 捕获和解码视频文件:我们将使用 VideoFileClip 对象捕获视频,并在初始化捕获后对每个视频帧进行解码(即转换为一系列图像)。
- 图像的灰度转换:视频帧是RGB格式,将RGB转换为灰度是因为处理单通道图像比处理三通道彩色图像更快。
- 降低噪音:噪音会产生假边缘,因此在进一步处理之前,必须进行图像平滑处理。高斯模糊用于执行此过程。高斯模糊是一种典型的图像过滤技术,用于降低噪音和增强图像特性。权重是使用高斯分布选择的,每个像素都会受到考虑其周围像素的加权平均值的影响。通过减少高频元素并提高整体图像质量,这种模糊技术可以创建更柔和、更视觉上令人愉悦的图像。
- Canny 边缘检测器:它计算模糊图像各个方向的梯度,并追踪强度变化较大的边缘。
- 感兴趣区域:此步骤仅考虑车道覆盖的区域。这里创建一个蒙版,其尺寸与我们的道路图像相同。此外,在我们的 Canny 图像的每个像素和此蒙版之间执行按位 AND 运算。它最终遮盖 Canny 图像并显示蒙版多边形轮廓所描绘的感兴趣区域。
- 霍夫线变换:在图像处理中,霍夫变换是一种特征提取方法,用于查找线和圆等基本几何对象。通过将图片空间转换为参数空间,可以通过累积投票点来识别形状。我们将在算法中使用概率霍夫线变换。霍夫变换已扩展为使用概率霍夫变换来解决计算复杂性。为了加快处理速度同时保持形状检测的准确性,它会随机选择一组图片点并仅对这些点应用霍夫变换。
- 在图像或视频上画线:使用霍夫线变换识别我们感兴趣的领域中的车道线后,我们将它们叠加在我们的视觉输入(视频流/图像)上。
实时车道检测步骤
步骤 1:安装 OpenCV 库
pip install -q opencv-python
第 2 步:导入必要的库
# Libraries for working with image processing
import numpy as np
import pandas as pd
import cv2
from google.colab.patches import cv2_imshow
# Libraries needed to edit/save/watch video clips
from moviepy import editor
import moviepy
步骤3:定义视频预处理函数
def process_video(test_video, output_video):
	"""
	Read input video stream and produce a video file with detected lane lines.
	Parameters:
		test_video: location of input video file
		output_video: location where output video file is to be saved
	"""
	# read the video file using VideoFileClip without audio
	input_video = editor.VideoFileClip(test_video, audio=False)
	# apply the function "frame_processor" to each frame of the video
	# will give more detail about "frame_processor" in further steps
	# "processed" stores the output video
	processed = input_video.fl_image(frame_processor)
	# save the output video stream to an mp4 file
	processed.write_videofile(output_video, audio=False)
步骤 4:定义车道检测函数
对视频中的每一帧图片进行车道检测。
def frame_processor(image):
"""
Process the input frame to detect lane lines.
Parameters:
image: image of a road where one wants to detect lane lines
(we will be passing frames of video to this function)
"""
# convert the RGB image to Gray scale
grayscale = cv2.cvtColor(image, cv2.COLOR_BGR2GRAY)
# applying gaussian Blur which removes noise from the image
# and focuses on our region of interest
# size of gaussian kernel
kernel_size = 5
# Applying gaussian blur to remove noise from the frames
blur = cv2.GaussianBlur(grayscale, (kernel_size, kernel_size), 0)
# first threshold for the hysteresis procedure
low_t = 50
# second threshold for the hysteresis procedure
high_t = 150
# applying canny edge detection and save edges in a variable
edges = cv2.Canny(blur, low_t, high_t)
# since we are getting too many edges from our image, we apply
# a mask polygon to only focus on the road
# Will explain Region selection in detail in further steps
region = region_selection(edges)
# Applying hough transform to get straight lines from our image
# and find the lane lines
# Will explain Hough Transform in detail in further steps
hough = hough_transform(region)
#lastly we draw the lines on our resulting frame and return it as output
result = draw_lane_lines(image, lane_lines(image, hough))
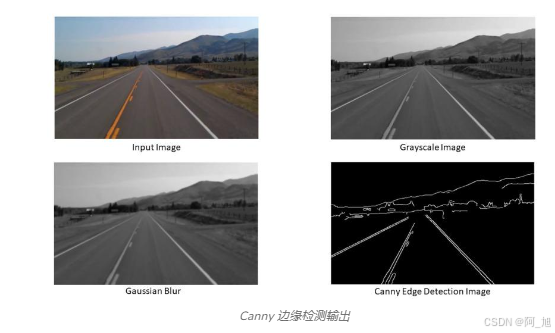
return result
输出:
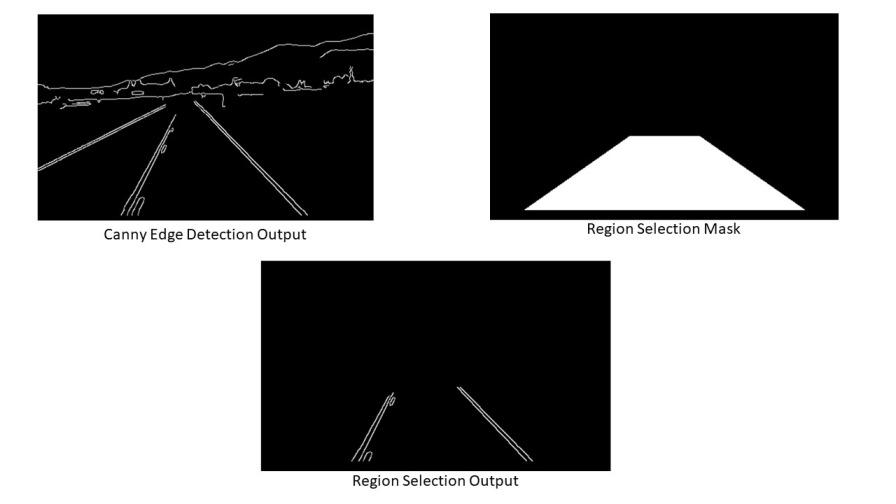
步骤5:区域选择
到目前为止,我们已经将帧从 RGB 转换为灰度,应用高斯模糊来降低噪音,并使用了 Canny 边缘检测。接下来,我们将选择要检测车道的区域。
def region_selection(image):
	"""
	Determine and cut the region of interest in the input image.
	Parameters:
		image: we pass here the output from canny where we have
		identified edges in the frame
	"""
	# create an array of the same size as of the input image
	mask = np.zeros_like(image)
	# if you pass an image with more then one channel
	if len(image.shape) > 2:
		channel_count = image.shape[2]
		ignore_mask_color = (255,) * channel_count
	# our image only has one channel so it will go under "else"
	else:
		# color of the mask polygon (white)
		ignore_mask_color = 255
	# creating a polygon to focus only on the road in the picture
	# we have created this polygon in accordance to how the camera was placed
	rows, cols = image.shape[:2]
	bottom_left = [cols * 0.1, rows * 0.95]
	top_left	 = [cols * 0.4, rows * 0.6]
	bottom_right = [cols * 0.9, rows * 0.95]
	top_right = [cols * 0.6, rows * 0.6]
	vertices = np.array([[bottom_left, top_left, top_right, bottom_right]], dtype=np.int32)
	# filling the polygon with white color and generating the final mask
	cv2.fillPoly(mask, vertices, ignore_mask_color)
	# performing Bitwise AND on the input image and mask to get only the edges on the road
	masked_image = cv2.bitwise_and(image, mask)
	return masked_image
输出:
步骤 6:霍夫变换识别直线
现在我们将使用概率霍夫变换识别上述函数输出图像中的直线
def hough_transform(image):
	"""
	Determine and cut the region of interest in the input image.
	Parameter:
		image: grayscale image which should be an output from the edge detector
	"""
	# Distance resolution of the accumulator in pixels.
	rho = 1
	# Angle resolution of the accumulator in radians.
	theta = np.pi/180
	# Only lines that are greater than threshold will be returned.
	threshold = 20
	# Line segments shorter than that are rejected.
	minLineLength = 20
	# Maximum allowed gap between points on the same line to link them
	maxLineGap = 500
	# function returns an array containing dimensions of straight lines
	# appearing in the input image
	return cv2.HoughLinesP(image, rho = rho, theta = theta, threshold = threshold,
						minLineLength = minLineLength, maxLineGap = maxLineGap)
输出:
 [[[284 180 382 278]]

 [[281 180 379 285]]

 [[137 274 183 192]]

 [[140 285 189 188]]

 [[313 210 388 285]]

 [[139 285 188 188]]

 [ [132 282 181 194]]

 [[146 285 191 196]]

 [[286 187 379 284]]]
步骤 7:在视频帧上绘制线条
现在我们已经使用霍夫变换获得了坐标,我们将它们绘制在原始图像(框架)上,但正如我们所见,我们得到的坐标超过 2 条线,因此我们将首先找到左右车道的坡度,然后将它们叠加在原始图像上。
我们在这里定义了 4 个函数来帮助在输入框上绘制左车道和右车道:
- Average_Slope_Intercept:此函数接收霍夫变换线并计算其斜率和截距。如果线的斜率为负,则该线属于左车道,否则该线属于右车道。然后我们计算左车道和右车道的加权平均斜率和截距。
- Pixel_Points:通过使用直线的斜率、截距和 y 值,我们找到直线的 x 值,并以整数形式返回车道的 x 和 y 坐标。
- Lane_Lines:调用Average_Slope_Intercept和Pixel Points并计算右车道和左车道坐标的函数。
- Draw_Lane_Lines:此函数在输入帧上绘制道路的左车道和右车道。返回输出帧,然后将其存储在我们的驱动程序函数“process_video”中的变量“processed”中。
def average_slope_intercept(lines):
	"""
	Find the slope and intercept of the left and right lanes of each image.
	Parameters:
		lines: output from Hough Transform
	"""
	left_lines = [] #(slope, intercept)
	left_weights = [] #(length,)
	right_lines = [] #(slope, intercept)
	right_weights = [] #(length,)

	for line in lines:
		for x1, y1, x2, y2 in line:
			if x1 == x2:
				continue
			# calculating slope of a line
			slope = (y2 - y1) / (x2 - x1)
			# calculating intercept of a line
			intercept = y1 - (slope * x1)
			# calculating length of a line
			length = np.sqrt(((y2 - y1) ** 2) + ((x2 - x1) ** 2))
			# slope of left lane is negative and for right lane slope is positive
			if slope < 0:
				left_lines.append((slope, intercept))
				left_weights.append((length))
			else:
				right_lines.append((slope, intercept))
				right_weights.append((length))
	#
	left_lane = np.dot(left_weights, left_lines) / np.sum(left_weights) if len(left_weights) > 0 else None
	right_lane = np.dot(right_weights, right_lines) / np.sum(right_weights) if len(right_weights) > 0 else None
	return left_lane, right_lane

def pixel_points(y1, y2, line):
	"""
	Converts the slope and intercept of each line into pixel points.
		Parameters:
			y1: y-value of the line's starting point.
			y2: y-value of the line's end point.
			line: The slope and intercept of the line.
	"""
	if line is None:
		return None
	slope, intercept = line
	x1 = int((y1 - intercept)/slope)
	x2 = int((y2 - intercept)/slope)
	y1 = int(y1)
	y2 = int(y2)
	return ((x1, y1), (x2, y2))

def lane_lines(image, lines):
	"""
	Create full lenght lines from pixel points.
		Parameters:
			image: The input test image.
			lines: The output lines from Hough Transform.
	"""
	left_lane, right_lane = average_slope_intercept(lines)
	y1 = image.shape[0]
	y2 = y1 * 0.6
	left_line = pixel_points(y1, y2, left_lane)
	right_line = pixel_points(y1, y2, right_lane)
	return left_line, right_line


def draw_lane_lines(image, lines, color=[255, 0, 0], thickness=12):
	"""
	Draw lines onto the input image.
		Parameters:
			image: The input test image (video frame in our case).
			lines: The output lines from Hough Transform.
			color (Default = red): Line color.
			thickness (Default = 12): Line thickness.
	"""
	line_image = np.zeros_like(image)
	for line in lines:
		if line is not None:
			cv2.line(line_image, *line, color, thickness)
	return cv2.addWeighted(image, 1.0, line_image, 1.0, 0.0)
输出:
实时道路车道检测完整代码
import numpy as np
import pandas as pd
import cv2
from google.colab.patches import cv2_imshow
#Import everything needed to edit/save/watch video clips
from moviepy import editor
import moviepy

def region_selection(image):
	"""
	Determine and cut the region of interest in the input image.
	Parameters:
		image: we pass here the output from canny where we have
		identified edges in the frame
	"""
	# create an array of the same size as of the input image
	mask = np.zeros_like(image)
	# if you pass an image with more then one channel
	if len(image.shape) > 2:
		channel_count = image.shape[2]
		ignore_mask_color = (255,) * channel_count
	# our image only has one channel so it will go under "else"
	else:
		# color of the mask polygon (white)
		ignore_mask_color = 255
	# creating a polygon to focus only on the road in the picture
	# we have created this polygon in accordance to how the camera was placed
	rows, cols = image.shape[:2]
	bottom_left = [cols * 0.1, rows * 0.95]
	top_left	 = [cols * 0.4, rows * 0.6]
	bottom_right = [cols * 0.9, rows * 0.95]
	top_right = [cols * 0.6, rows * 0.6]
	vertices = np.array([[bottom_left, top_left, top_right, bottom_right]], dtype=np.int32)
	# filling the polygon with white color and generating the final mask
	cv2.fillPoly(mask, vertices, ignore_mask_color)
	# performing Bitwise AND on the input image and mask to get only the edges on the road
	masked_image = cv2.bitwise_and(image, mask)
	return masked_image

def hough_transform(image):
	"""
	Determine and cut the region of interest in the input image.
	Parameter:
		image: grayscale image which should be an output from the edge detector
	"""
	# Distance resolution of the accumulator in pixels.
	rho = 1
	# Angle resolution of the accumulator in radians.
	theta = np.pi/180
	# Only lines that are greater than threshold will be returned.
	threshold = 20
	# Line segments shorter than that are rejected.
	minLineLength = 20
	# Maximum allowed gap between points on the same line to link them
	maxLineGap = 500
	# function returns an array containing dimensions of straight lines
	# appearing in the input image
	return cv2.HoughLinesP(image, rho = rho, theta = theta, threshold = threshold,
						minLineLength = minLineLength, maxLineGap = maxLineGap)

def average_slope_intercept(lines):
	"""
	Find the slope and intercept of the left and right lanes of each image.
	Parameters:
		lines: output from Hough Transform
	"""
	left_lines = [] #(slope, intercept)
	left_weights = [] #(length,)
	right_lines = [] #(slope, intercept)
	right_weights = [] #(length,)

	for line in lines:
		for x1, y1, x2, y2 in line:
			if x1 == x2:
				continue
			# calculating slope of a line
			slope = (y2 - y1) / (x2 - x1)
			# calculating intercept of a line
			intercept = y1 - (slope * x1)
			# calculating length of a line
			length = np.sqrt(((y2 - y1) ** 2) + ((x2 - x1) ** 2))
			# slope of left lane is negative and for right lane slope is positive
			if slope < 0:
				left_lines.append((slope, intercept))
				left_weights.append((length))
			else:
				right_lines.append((slope, intercept))
				right_weights.append((length))
	#
	left_lane = np.dot(left_weights, left_lines) / np.sum(left_weights) if len(left_weights) > 0 else None
	right_lane = np.dot(right_weights, right_lines) / np.sum(right_weights) if len(right_weights) > 0 else None
	return left_lane, right_lane

def pixel_points(y1, y2, line):
	"""
	Converts the slope and intercept of each line into pixel points.
		Parameters:
			y1: y-value of the line's starting point.
			y2: y-value of the line's end point.
			line: The slope and intercept of the line.
	"""
	if line is None:
		return None
	slope, intercept = line
	x1 = int((y1 - intercept)/slope)
	x2 = int((y2 - intercept)/slope)
	y1 = int(y1)
	y2 = int(y2)
	return ((x1, y1), (x2, y2))

def lane_lines(image, lines):
	"""
	Create full lenght lines from pixel points.
		Parameters:
			image: The input test image.
			lines: The output lines from Hough Transform.
	"""
	left_lane, right_lane = average_slope_intercept(lines)
	y1 = image.shape[0]
	y2 = y1 * 0.6
	left_line = pixel_points(y1, y2, left_lane)
	right_line = pixel_points(y1, y2, right_lane)
	return left_line, right_line


def draw_lane_lines(image, lines, color=[255, 0, 0], thickness=12):
	"""
	Draw lines onto the input image.
		Parameters:
			image: The input test image (video frame in our case).
			lines: The output lines from Hough Transform.
			color (Default = red): Line color.
			thickness (Default = 12): Line thickness.
	"""
	line_image = np.zeros_like(image)
	for line in lines:
		if line is not None:
			cv2.line(line_image, *line, color, thickness)
	return cv2.addWeighted(image, 1.0, line_image, 1.0, 0.0)

def frame_processor(image):
	"""
	Process the input frame to detect lane lines.
	Parameters:
		image: image of a road where one wants to detect lane lines
		(we will be passing frames of video to this function)
	"""
	# convert the RGB image to Gray scale
	grayscale = cv2.cvtColor(image, cv2.COLOR_BGR2GRAY)
	# applying gaussian Blur which removes noise from the image
	# and focuses on our region of interest
	# size of gaussian kernel
	kernel_size = 5
	# Applying gaussian blur to remove noise from the frames
	blur = cv2.GaussianBlur(grayscale, (kernel_size, kernel_size), 0)
	# first threshold for the hysteresis procedure
	low_t = 50
	# second threshold for the hysteresis procedure
	high_t = 150
	# applying canny edge detection and save edges in a variable
	edges = cv2.Canny(blur, low_t, high_t)
	# since we are getting too many edges from our image, we apply
	# a mask polygon to only focus on the road
	# Will explain Region selection in detail in further steps
	region = region_selection(edges)
	# Applying hough transform to get straight lines from our image
	# and find the lane lines
	# Will explain Hough Transform in detail in further steps
	hough = hough_transform(region)
	#lastly we draw the lines on our resulting frame and return it as output
	result = draw_lane_lines(image, lane_lines(image, hough))
	return result

# driver function
def process_video(test_video, output_video):
	"""
	Read input video stream and produce a video file with detected lane lines.
	Parameters:
		test_video: location of input video file
		output_video: location where output video file is to be saved
	"""
	# read the video file using VideoFileClip without audio
	input_video = editor.VideoFileClip(test_video, audio=False)
	# apply the function "frame_processor" to each frame of the video
	# will give more detail about "frame_processor" in further steps
	# "processed" stores the output video
	processed = input_video.fl_image(frame_processor)
	# save the output video stream to an mp4 file
	processed.write_videofile(output_video, audio=False)

# calling driver function
process_video('input.mp4','output.mp4')
最终输出:

结论
我们介绍了使用 Canny 边缘检测器和霍夫变换检测车道的众多方法之一。其他一些车道检测方法使用复杂的神经网络和传感器数据。这种先进的技术和算法目前在特斯拉的自动驾驶中使用。本文讨论的算法是理解自动驾驶汽车基本工作原理的第一步。
好了,这篇文章就介绍到这里,喜欢的小伙伴感谢给点个赞和关注,更多精彩内容持续更新~~
关于本篇文章大家有任何建议或意见,欢迎在评论区留言交流!


 940
940

 被折叠的 条评论
为什么被折叠?
被折叠的 条评论
为什么被折叠?
 到【灌水乐园】发言


