


《------往期经典推荐------》
二、机器学习实战专栏【链接】,已更新31期,欢迎关注,持续更新中~~
三、深度学习【Pytorch】专栏【链接】
四、【Stable Diffusion绘画系列】专栏【链接】
五、YOLOv8改进专栏【链接】,持续更新中~~
六、YOLO性能对比专栏【链接】,持续更新中~
《------正文------》
模型概述
- 发布时间:2025年3月20日
- 作者:Peter Robicheaux, James Gallagher, Joseph Nelson, Isaac Robinson
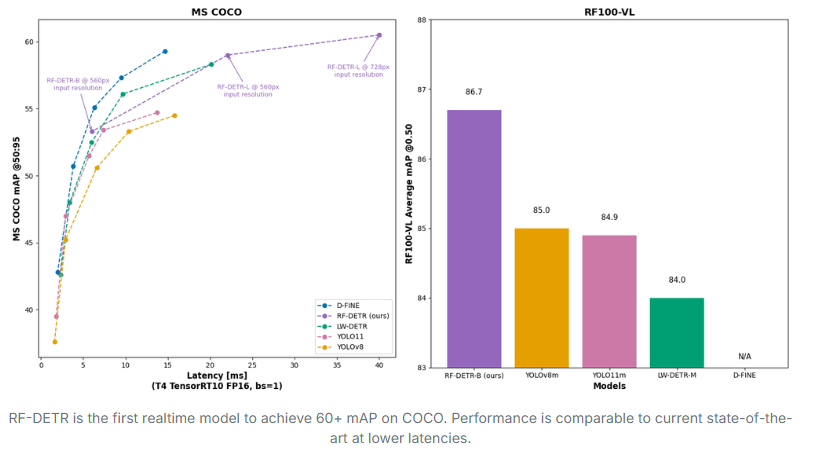
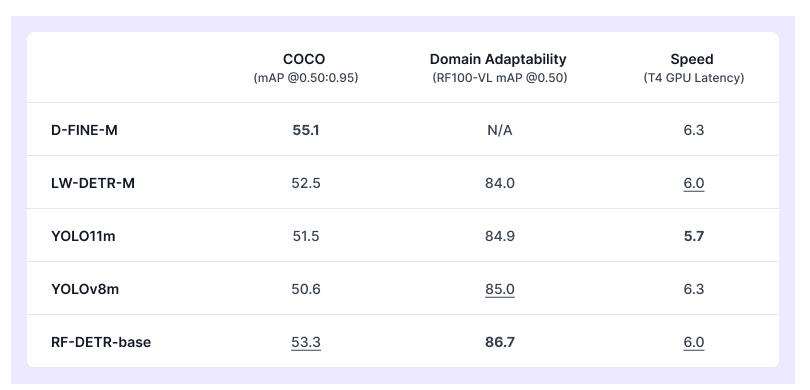
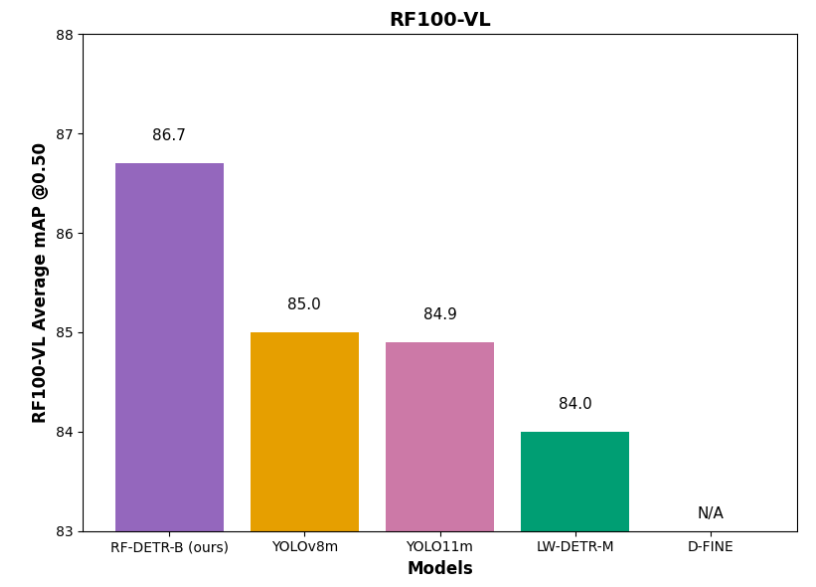
- 核心成就:RF DETR是首个在COCO数据集上实现超过60 mAP的实时模型,并且性能优于所有现有的目标检测模型。
性能与基准测试
-
评估标准:COCO mAP,RF100 VL mAP及速度。
-
RF100 VL:从Roboflow Universe中的50多万个开源数据集中精选出的100个数据集,代表了计算机视觉在不同领域的实际应用情况。
-
比较对象:D-FINE、LW-DETR(实时COCO SOTA transformer模型)以及YOLO11和YOLOv8(SOTA YOLO CNN架构)。
-
结果:RF-DETR在所有类别中均位列第一或第二。
架构细节
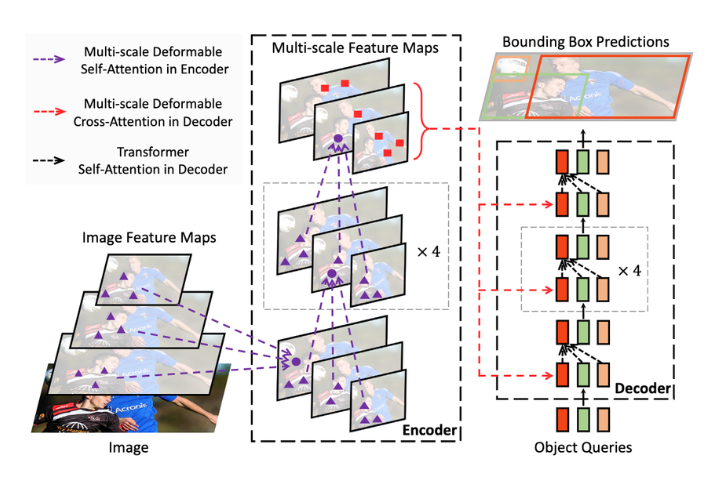
- 基础架构:基于Deformable DETR论文中的架构,但使用单一尺度的主干网络提取图像特征图。
- 结合最佳实践:通过将LW DETR与预训练的DINOv2主干网络结合,提高了对新领域的适应能力。
- 多分辨率训练:允许用户在运行时选择不同的分辨率以平衡准确性和延迟,而无需重新训练模型。
使用方法
安装
在 Python>=3.9 环境中安装 rfdetr 包。
pip install rfdetr
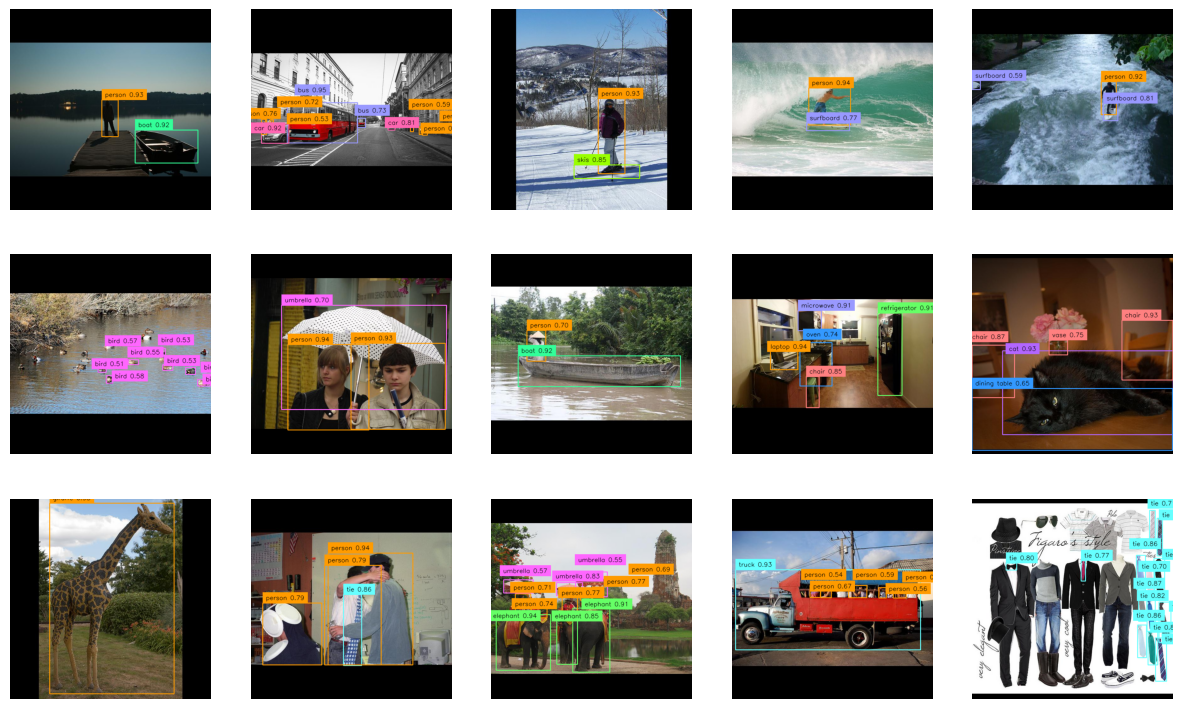
模型推理
官方提供了在COCO数据集上的预训练模型。
图片推理
import io
import requests
import supervision as sv
from PIL import Image
from rfdetr import RFDETRBase
from rfdetr.util.coco_classes import COCO_CLASSES

model = RFDETRBase()

url = "test1.jpg"

image = Image.open(io.BytesIO(requests.get(url).content))
detections = model.predict(image, threshold=0.5)

labels = [
    f"{COCO_CLASSES[class_id]} {confidence:.2f}"
    for class_id, confidence
    in zip(detections.class_id, detections.confidence)
]

annotated_image = image.copy()
annotated_image = sv.BoxAnnotator().annotate(annotated_image, detections)
annotated_image = sv.LabelAnnotator().annotate(annotated_image, detections, labels)

sv.plot_image(annotated_image)
视频推理
import supervision as sv
from rfdetr import RFDETRBase
from rfdetr.util.coco_classes import COCO_CLASSES

model = RFDETRBase()

def callback(frame, index):
    detections = model.predict(frame, threshold=0.5)

    labels = [
        f"{COCO_CLASSES[class_id]} {confidence:.2f}"
        for class_id, confidence
        in zip(detections.class_id, detections.confidence)
    ]

    annotated_frame = frame.copy()
    annotated_frame = sv.BoxAnnotator().annotate(annotated_frame, detections)
    annotated_frame = sv.LabelAnnotator().annotate(annotated_frame, detections, labels)
    return annotated_frame

process_video(
    source_path=<SOURCE_VIDEO_PATH>,
    target_path=<TARGET_VIDEO_PATH>,
    callback=callback
)
摄像头推理
import cv2
import supervision as sv
from rfdetr import RFDETRBase
from rfdetr.util.coco_classes import COCO_CLASSES

model = RFDETRBase()

cap = cv2.VideoCapture(0)
while True:
    success, frame = cap.read()
    if not success:
        break

    detections = model.predict(frame, threshold=0.5)

    labels = [
        f"{COCO_CLASSES[class_id]} {confidence:.2f}"
        for class_id, confidence
        in zip(detections.class_id, detections.confidence)
    ]

    annotated_frame = frame.copy()
    annotated_frame = sv.BoxAnnotator().annotate(annotated_frame, detections)
    annotated_frame = sv.LabelAnnotator().annotate(annotated_frame, detections, labels)

    cv2.imshow("Webcam", annotated_frame)

    if cv2.waitKey(1) & 0xFF == ord('q'):
        break

cap.release()
cv2.destroyAllWindows()
模型变体
RF-DETR 有两种型号:RFDETRBase 和 RFDETRLarge。初始化任一类时,会自动加载相应的 COCO 预训练模型。
输入分辨率
两种型号都支持可修改的输入分辨率。较高的分辨率通常会通过捕获更多细节来提高预测质量,但它可能会减慢推理速度。在初始化模型时,可以通过传递 resolution 参数来调整分辨率。 分辨率值必须能被 56 整除。
model = RFDETRBase(resolution=560)
模型训练
数据集结构
RF-DETR 期望数据集为 COCO 格式。将数据集分为三个子目录:train、valid 和 test。每个子目录都应该包含自己的 _annotations.coco.json 文件,该文件包含该特定分割的注释以及相应的图像文件沿着。下面是一个目录结构的例子:
dataset/
├── train/
│   ├── _annotations.coco.json
│   ├── image1.jpg
│   ├── image2.jpg
│   └── ... (other image files)
├── valid/
│   ├── _annotations.coco.json
│   ├── image1.jpg
│   ├── image2.jpg
│   └── ... (other image files)
└── test/
    ├── _annotations.coco.json
    ├── image1.jpg
    ├── image2.jpg
    └── ... (other image files)
模型训练
可以从预训练的 COCO 模型微调 RF-DETR。默认情况下,将使用 RF-DETR-B 模型。
from rfdetr import RFDETRBase,RFDETRLarge
model = RFDETRBase()
# model = RFDETRLarge()
model.train(dataset_dir=<DATASET_PATH>, epochs=10, batch_size=4, grad_accum_steps=4, lr=1e-4, output_dir=<OUTPUT_PATH>)
使用微调模型推理
from rfdetr import RFDETRBase
model = RFDETRBase(pretrain_weights=<CHECKPOINT_PATH>)
detections = model.predict(<IMAGE_PATH>)
导出ONNX格式
RF-DETR 支持将模型导出为 ONNX 格式,从而实现与各种推理框架的互操作性,并可以提高部署效率。要导出模型,只需初始化模型并调用 .export() 方法。
from rfdetr import RFDETRBase
model = RFDETRBase()
model.export()
此命令将 ONNX 模型保存到输出目录。
参考
代码地址:https://github.com/roboflow/rf-detr
好了,这篇文章就介绍到这里,喜欢的小伙伴感谢给点个赞和关注,更多精彩内容持续更新~~
关于本篇文章大家有任何建议或意见,欢迎在评论区留言交流!


 497
497

 被折叠的 条评论
为什么被折叠?
被折叠的 条评论
为什么被折叠?
 到【灌水乐园】发言


