


 本文详细介绍了如何使用V-Rep模拟器创建一个具备舵轮控制的小车模型,包括安装V-Rep、构建机器人基体、舵轮及关节、添加视觉传感器、编写控制脚本等步骤,并演示了如何通过ROS接口实现对小车的远程控制。
https://github.com/jianhengLiu/CoppeliaSim_Steeringwheel_Tutorial
文章目录
V-Rep舵轮教程
2019/11/16
written by Chris Liu
0.概述
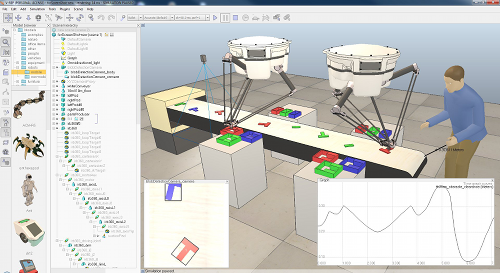
具有集成开发环境的机器人模拟器V-REP基于分布式控制体系结构:每个对象/模型都可以通过嵌入式脚本,插件,ROS或BlueZero节点,远程API客户端或自定义进行单独控制解。这使得V-REP非常通用,非常适合多机器人应用。控制器可以用C / C ++,Python,Java,Lua,Matlab或Octave编写。
V-REP用于快速算法开发,工厂自动化仿真,快速原型制作和验证,机器人技术相关的教育,远程监控,安全性双重检查以及数字孪生等等。您可以在此处找到功能概述。
1.安装
| 官网链接 | http://www.coppeliarobotics.com/ |
|---|---|
| 下载链接 | http://www.coppeliarobotics.com/downloads.html |
根据系统自行下载教育版本

解压压缩包V-REP_PRO_EDU_V3_6_2_Ubuntu16_04.tar.xz
在解压所得文件夹内执行命令./vrep.sh,即可运行程序
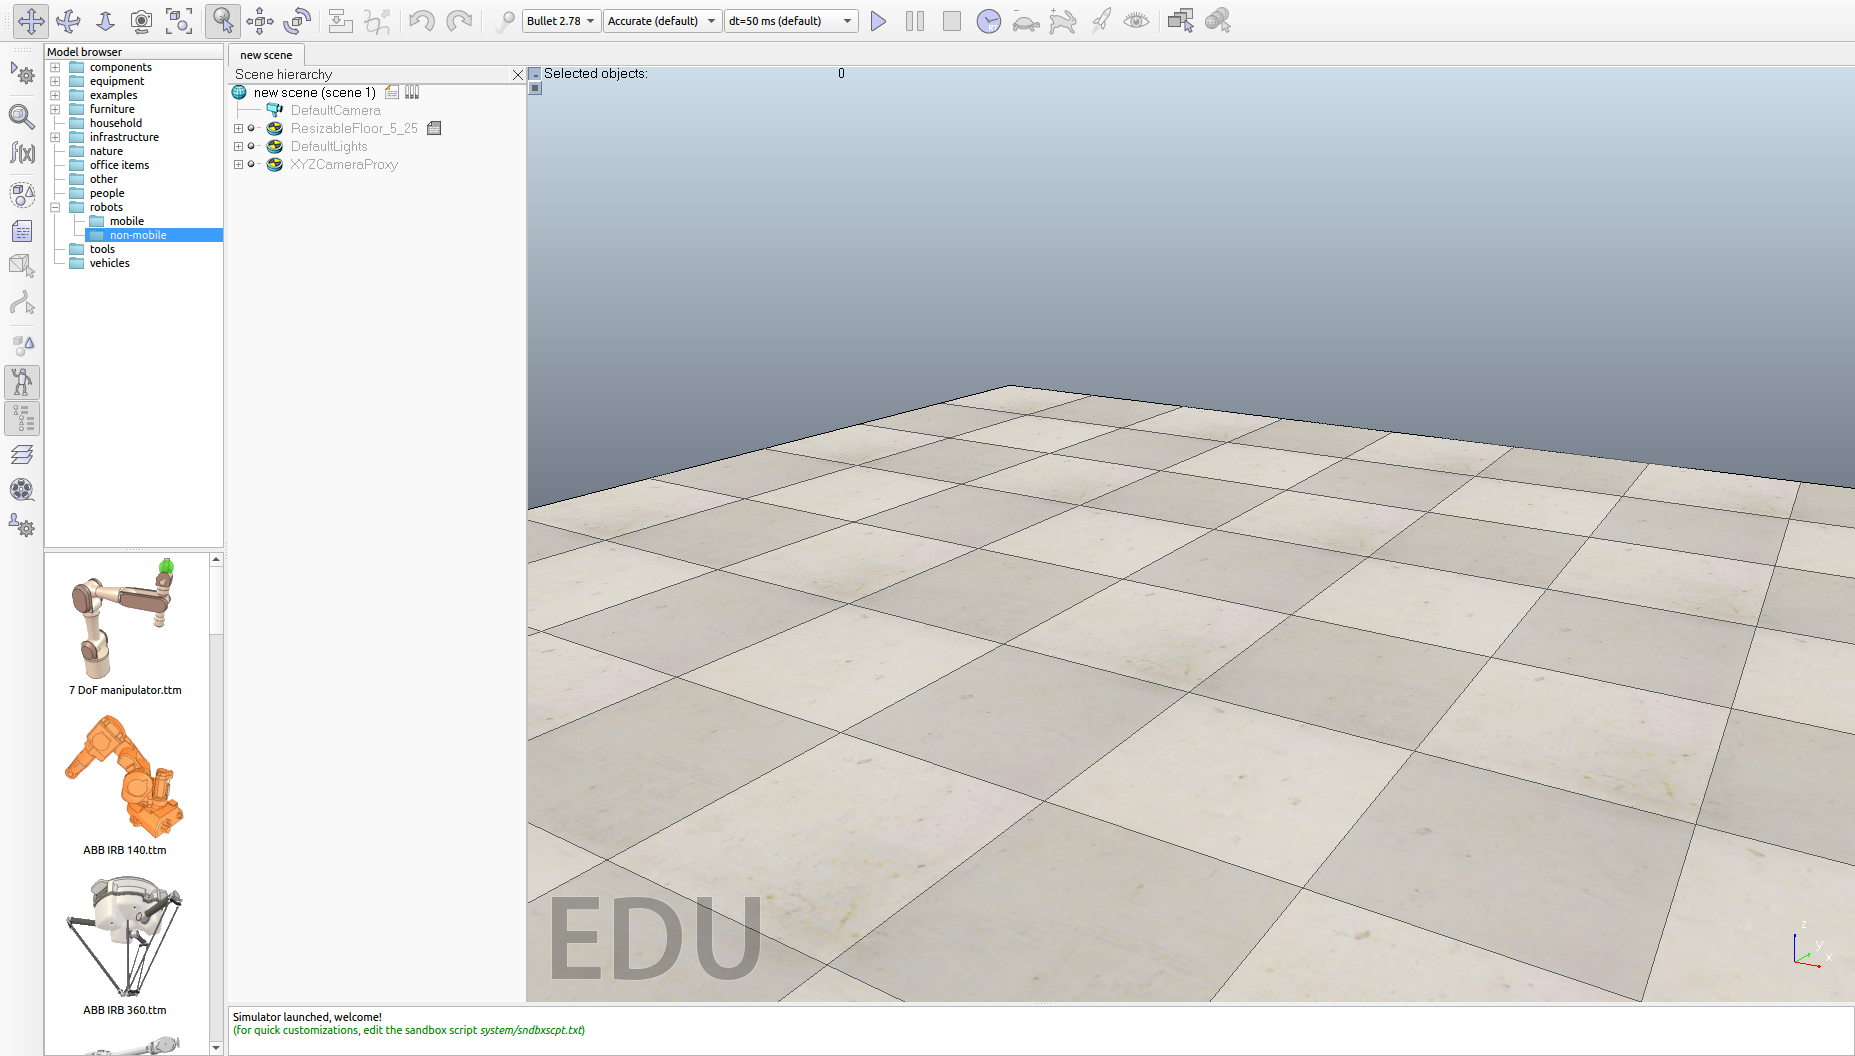
2.创建基体(躯干)
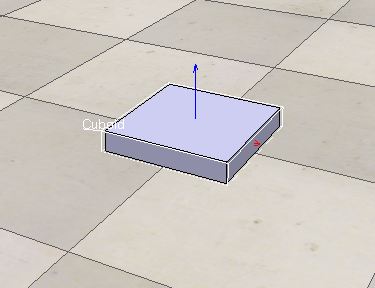
2.1.生成立方体

从菜单栏依次选择[Add --> Primitive shape --> Cuboid]
修改立方体参数如下:
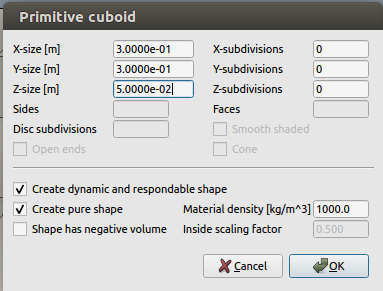
生成立方体
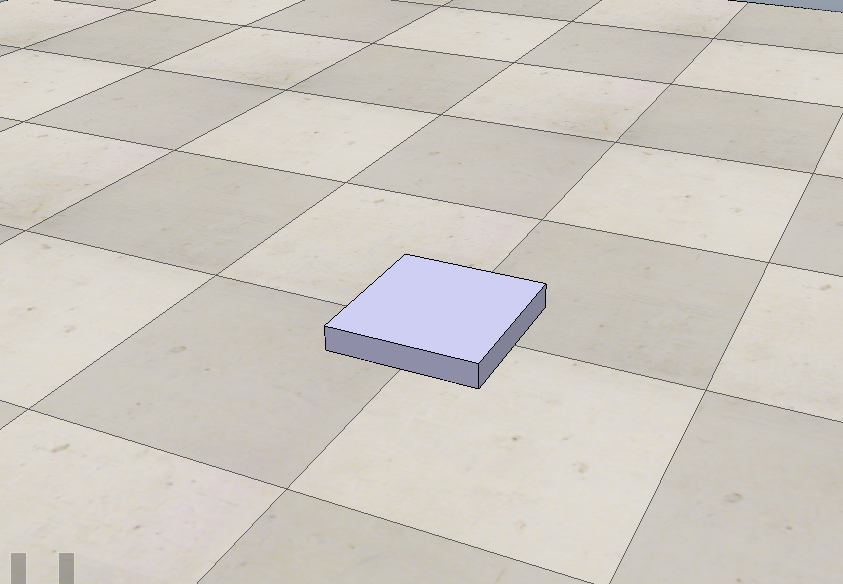
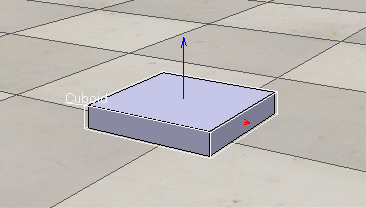
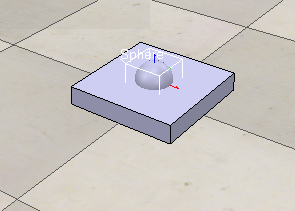
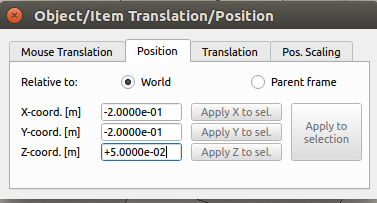
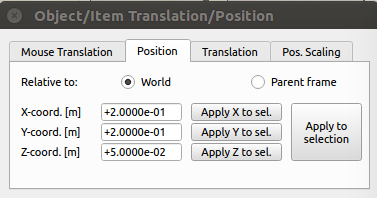
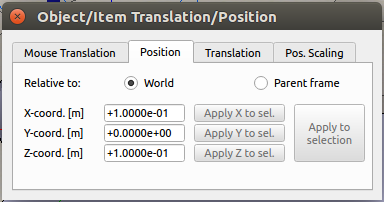
2.2.移动
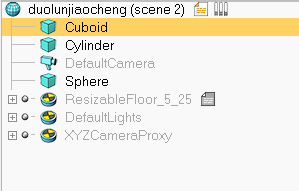
选中立方体
或选中物体菜单栏中
选择菜单栏上的移动按钮
出界面如下
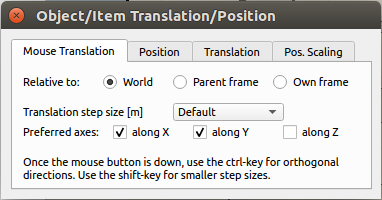
设置参数如下

3.创建舵轮
3.1.创建转轴
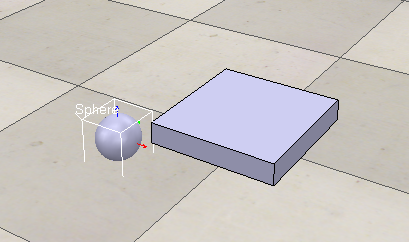
3.1.1.生成圆
从菜单栏依次选择[Add --> Primitive shape --> Sphere]
参数如下

生成圆
3.1.2.移动物体
步骤如上并设置参数如下
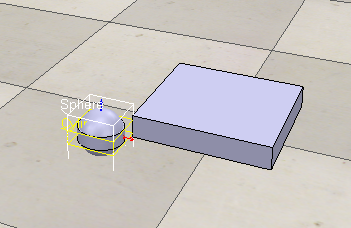
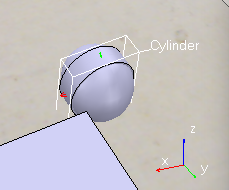
3.2.创建轮子
3.2.1.生成圆柱
从菜单栏依次选择[Add --> Primitive shape --> Cylinder]
参数如下
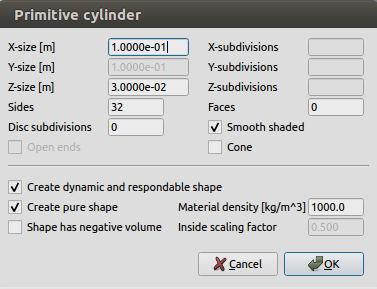
生成圆柱
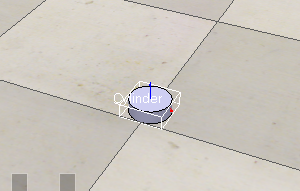
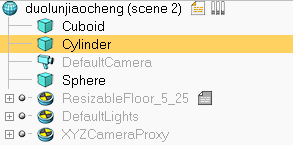
3.2.2.快速移动物体
选中圆柱
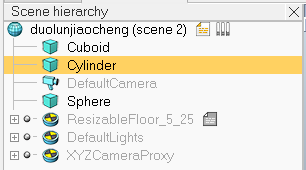
然后按住shift或ctrl选择圆球
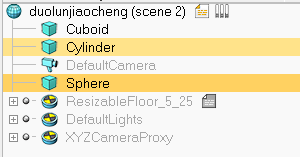
在位置移动的窗口中
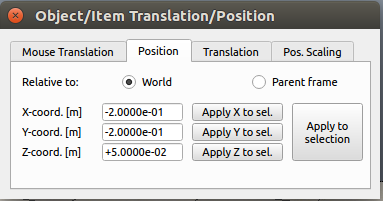
选择Apply to selection
圆柱的位置将会和圆球位置一致
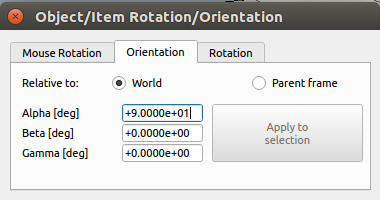
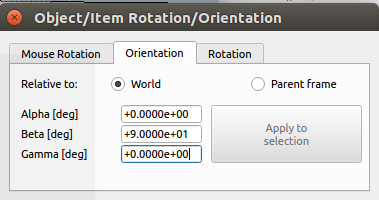
3.2.3.旋转圆柱
单独选择圆柱
选择菜单栏上的旋转按钮

根据欧拉角定义
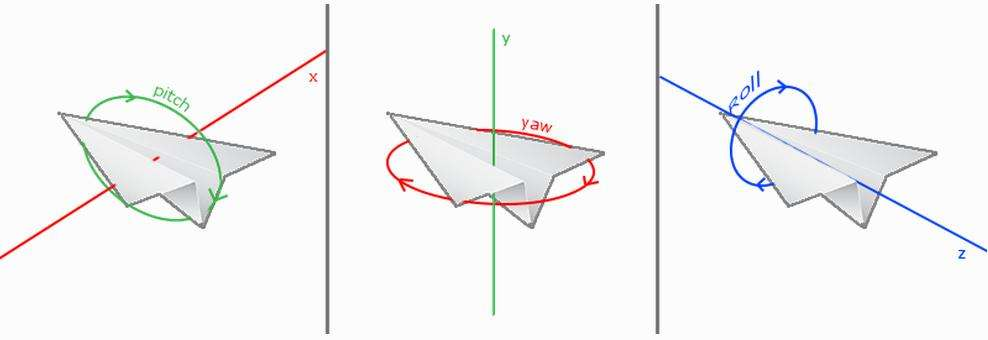
Pitch(俯仰角α):欧拉角向量的x轴
Roll(翻滚β): 欧拉角向量的z轴
Yaw(偏航γ):欧拉角向量的y轴
但在vrep的世界坐标系下定义为
Pitch(俯仰角α):欧拉角向量的y轴
Roll(翻滚β): 欧拉角向量的z轴
Yaw(偏航γ):欧拉角向量的x轴
比对
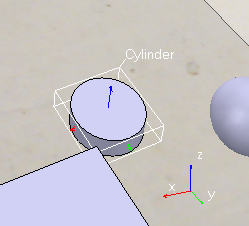
设置参数如下

得

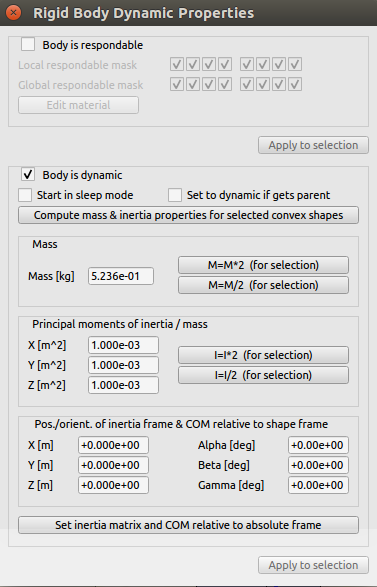
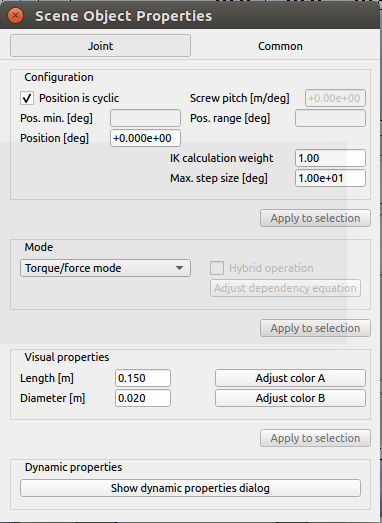
3.3.配置参数
对双击列表中的转轴

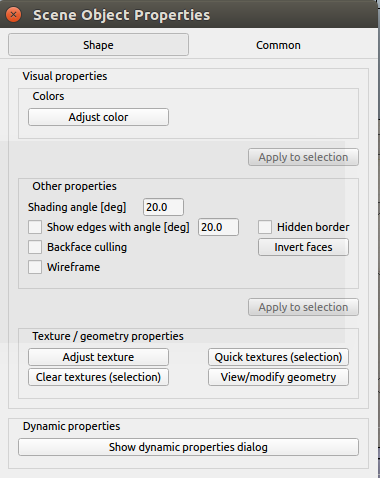
选择Show dynamic properties dialog
设置如下
轮子无需配置
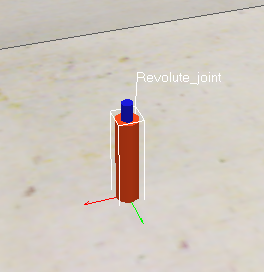
4.转动关节
4.1.创建转向电机
从菜单栏依次选择[Add --> Joint --> Revolute]

设置位置是其于转轴同轴
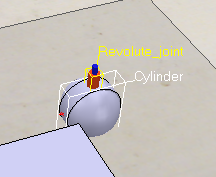
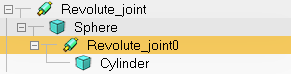
将其转轴放入转动关节中

4.2.创建动力电机
从菜单栏依次选择[Add --> Joint --> Revolute]
设置位置和旋转是其与轮子同轴
将其轮子放入转动关节中

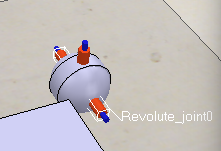
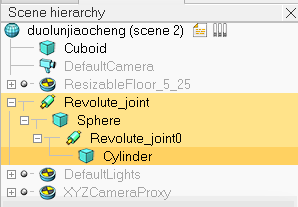
4.3.组装舵轮
将轮子组件放入转向组件中
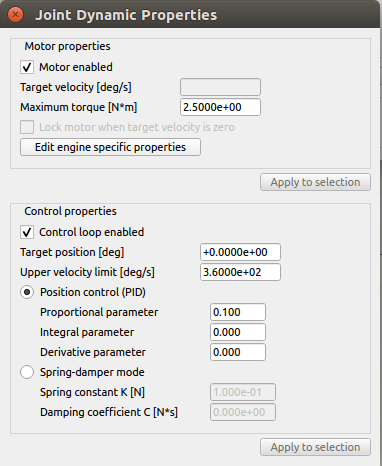
4.4.配置转动关节
- 配置转向关节
双击列表中的转向关节
选择Show dynamic properties dialog
设置如下,只需勾选了两个enabled选项就好
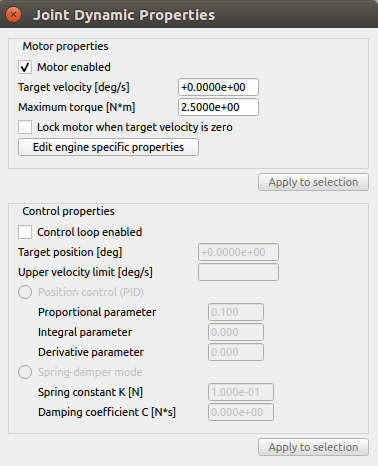
- 配置轮子关节
双击列表中的轮子关节

选择Show dynamic properties dialog
设置如下
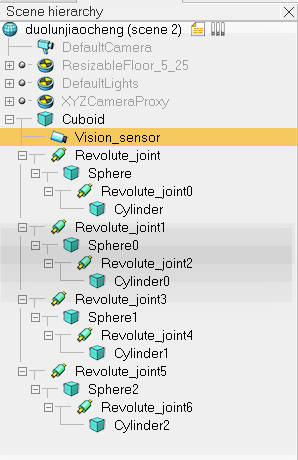
4.5.复制舵轮
选择舵轮
复制粘贴三份
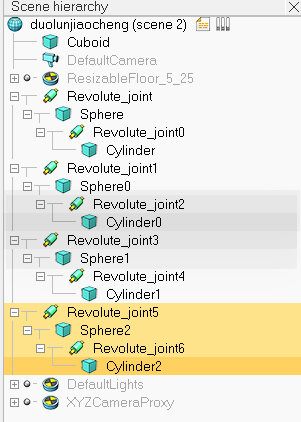
选中其中一个舵轮
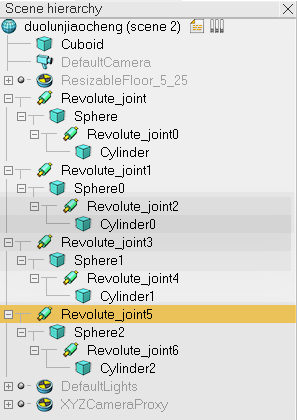
打开移动界面
设置好位置
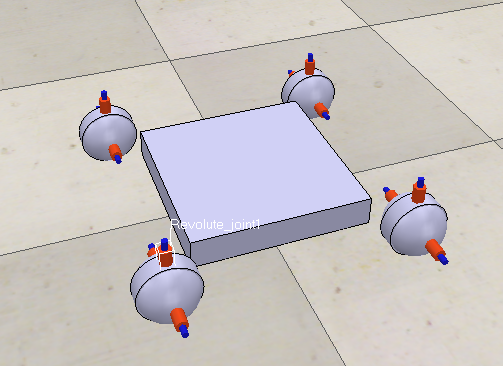
对其余三对进行相同操作得
5.创建视觉传感器
从菜单栏依次选择[Add --> Vision Sensor --> Perspective type]
设置位置
设置旋转角度
我们以摄像头方向作为头
- 添加图像的窗口
场景中右键--> Add--> Floating View
选中Vision Sensor
Floating View中右键--> View-->Associate View with selected vision sensor
运行即可
6.组装小车
将舵机和视觉传感器放入躯干长方体Cuboid里
此时点击运行 按钮应维持原样保持不动
可自行尝试将组件不放入躯干下会有什么效果
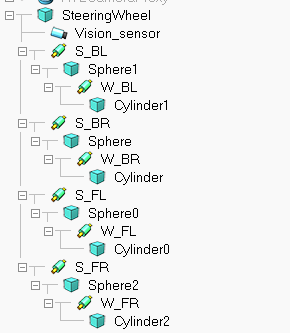
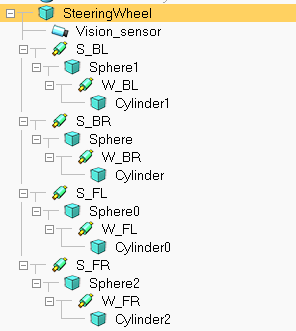
更名
双击名字即可
定义名字如下
前
F——Front
后
B——Back
左
L——Left
右
R——Right
转向电机
S——Steer
轮子电机
W——Wheel

左前方转向电机
S_FL
更改各组件名字如下
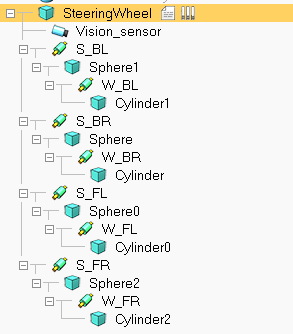
7.添加控制脚本
右击SteeringWheel-->Add-->Associated child script-->Non thread
双击
将下列代码替换源代码
---
--- Generated by EmmyLua(https://github.com/EmmyLua)
--- Created by chrisliu.
--- DateTime: 2019/9/25 ??6:35
---
function sysCall_init()

    robotHandle = sim.getObjectAssociatedWithScript(sim.handle_self)

    FrontLeft_MoveMotor = sim.getObjectHandle("W_FL") -- Handle of the left motor
    FrontLeft_SteerMotor = sim.getObjectHandle("S_FL") -- Handle of the left motor

    FrontRight_MoveMotor = sim.getObjectHandle("W_FR") -- Handle of the left motor
    FrontRight_SteerMotor = sim.getObjectHandle("S_FR") -- Handle of the left motor

    BackLeft_MoveMotor = sim.getObjectHandle("W_BL") -- Handle of the left motor
    BackLeft_SteerMotor = sim.getObjectHandle("S_BL") -- Handle of the left motor

    BackRight_MoveMotor = sim.getObjectHandle("W_BR") -- Handle of the left motor
    BackRight_SteerMotor = sim.getObjectHandle("S_BR") -- Handle of the left motor

    --noseSensor=sim.getObjectHandle("rosInterfaceControlledBubbleRobSensingNose") -- Handle of the proximity sensor
    -- Check if the required ROS plugin is there:
    moduleName = 0
    moduleVersion = 0
    index = 0
    pluginNotFound = true
    while moduleName do
        moduleName, moduleVersion = sim.getModuleName(index)
        if (moduleName == 'RosInterface') then
            pluginNotFound = false
        end
        index = index + 1
    end
    -- Ok now launch the ROS client application:
    if (not pluginNotFound) then
        local sysTime = sim.getSystemTimeInMs(-1)

        local All_MoveMotorTopicName = 'All_MoveMotor'
        local All_SteerMotorTopicName = 'All_SteerMotor'

        local FrontLeft_MoveMotorTopicName = 'FrontLeft_MoveMotor'--..sysTime -- we add a random component so that we can have several instances of this robot running
        local FrontLeft_SteerMotorTopicName = 'FrontLeft_SteerMotor'--..sysTime -- we add a random component so that we can have several instances of this robot running

        local FrontRight_MoveMotorTopicName = 'FrontRight_MoveMotor'--..sysTime -- we add a random component so that we can have several instances of this robot running
        local FrontRight_SteerMotorTopicName = 'FrontRight_SteerMotor'--..sysTime -- we add a random component so that we can have several instances of this robot running

        local BackLeft_MoveMotorTopicName = 'BackLeft_MoveMotor'--..sysTime -- we add a random component so that we can have several instances of this robot running
        local BackLeft_SteerMotorTopicName = 'BackLeft_SteerMotor'--..sysTime -- we add a random component so that we can have several instances of this robot running

        local BackRight_MoveMotorTopicName = 'BackRight_MoveMotor'--..sysTime -- we add a random component so that we can have several instances of this robot running
        local BackRight_SteerMotorTopicName = 'BackRight_SteerMotor'--..sysTime -- we add a random component so that we can have several instances of this robot running
        --local sensorTopicName='sensorTrigger'--..sysTime -- we add a random component so that we can have several instances of this robot running
        local simulationTimeTopicName = 'simTime'--..sysTime -- we add a random component so that we can have several instances of this robot running
        -- Prepare the sensor publisher and the motor speed subscribers:
        --sensorPub=simROS.advertise('/'..sensorTopicName,'std_msgs/Bool')
        simTimePub = simROS.advertise('/' .. simulationTimeTopicName, 'std_msgs/Float32')

        All_MoveMotorSub = simROS.subscribe('/' .. All_MoveMotorTopicName, 'std_msgs/Float32', 'setAll_MoveMotorVelocity_cb')
        All_SteerMotorSub = simROS.subscribe('/' .. All_SteerMotorTopicName, 'std_msgs/Float32', 'setAll_SteerMotorVelocity_cb')

        FrontLeft_MoveMotorSub = simROS.subscribe('/' .. FrontLeft_MoveMotorTopicName, 'std_msgs/Float32', 'setFrontLeft_MoveMotorVelocity_cb')
        FrontLeft_SteerMotorSub = simROS.subscribe('/' .. FrontLeft_SteerMotorTopicName, 'std_msgs/Float32', 'setFrontLeft_SteerMotorVelocity_cb')

        FrontRight_MoveMotorSub = simROS.subscribe('/' .. FrontRight_MoveMotorTopicName, 'std_msgs/Float32', 'setFrontRight_MoveMotorVelocity_cb')
        FrontRight_SteerMotorSub = simROS.subscribe('/' .. FrontRight_SteerMotorTopicName, 'std_msgs/Float32', 'setFrontRight_SteerMotorVelocity_cb')

        BackLeft_MoveMotorSub = simROS.subscribe('/' .. BackLeft_MoveMotorTopicName, 'std_msgs/Float32', 'setBackLeft_MoveMotorVelocity_cb')
        BackLeft_SteerMotorSub = simROS.subscribe('/' .. BackLeft_SteerMotorTopicName, 'std_msgs/Float32', 'setBackLeft_SteerMotorVelocity_cb')

        BackRight_MoveMotorSub = simROS.subscribe('/' .. BackRight_MoveMotorTopicName, 'std_msgs/Float32', 'setBackRight_MoveMotorVelocity_cb')
        BackRight_SteerMotorSub = simROS.subscribe('/' .. BackRight_SteerMotorTopicName, 'std_msgs/Float32', 'setBackRight_SteerMotorVelocity_cb')


        -- Now we start the client application:
        --result=sim.launchExecutable('rosBubbleRob2',leftMotorTopicName.." "..rightMotorTopicName.." "..sensorTopicName.." "..simulationTimeTopicName,0)
    else
        print("<font color='#F00'>ROS interface was not found. Cannot run.</font>@html")
    end

end

function setFrontLeft_MoveMotorVelocity_cb(msg)
    -- Left motor speed subscriber callback
    sim.setJointTargetVelocity(FrontLeft_MoveMotor, msg.data)
end
function setFrontLeft_SteerMotorVelocity_cb(msg)
    -- Left motor speed subscriber callback
    sim.setJointTargetPosition(FrontLeft_SteerMotor, msg.data)
end

function setFrontRight_MoveMotorVelocity_cb(msg)
    -- Left motor speed subscriber callback
    sim.setJointTargetVelocity(FrontRight_MoveMotor, msg.data)
end
function setFrontRight_SteerMotorVelocity_cb(msg)
    -- Left motor speed subscriber callback
    sim.setJointTargetPosition(FrontRight_SteerMotor, msg.data)
end

function setBackLeft_MoveMotorVelocity_cb(msg)
    -- Left motor speed subscriber callback
    sim.setJointTargetVelocity(BackLeft_MoveMotor, msg.data)
end
function setBackLeft_SteerMotorVelocity_cb(msg)
    -- Left motor speed subscriber callback
    sim.setJointTargetPosition(BackLeft_SteerMotor, msg.data)
end

function setBackRight_MoveMotorVelocity_cb(msg)
    -- Left motor speed subscriber callback
    sim.setJointTargetVelocity(BackRight_MoveMotor, msg.data)
end
function setBackRight_SteerMotorVelocity_cb(msg)
    -- Left motor speed subscriber callback
    sim.setJointTargetPosition(BackRight_SteerMotor, msg.data)
end

function setAll_MoveMotorVelocity_cb(msg)
    -- Left motor speed subscriber callback
    sim.setJointTargetVelocity(FrontLeft_MoveMotor, msg.data)
    sim.setJointTargetVelocity(FrontRight_MoveMotor, msg.data)
    sim.setJointTargetVelocity(BackLeft_MoveMotor, msg.data)
    sim.setJointTargetVelocity(FrontRight_MoveMotor, msg.data)
end

function setAll_SteerMotorVelocity_cb(msg)
    -- Left motor speed subscriber callback
    sim.setJointTargetPosition(FrontLeft_SteerMotor, msg.data)
    sim.setJointTargetPosition(FrontRight_SteerMotor, msg.data)
    sim.setJointTargetPosition(BackLeft_SteerMotor, msg.data)
    sim.setJointTargetPosition(BackRight_SteerMotor, msg.data)
end

-- function setRightMotorVelocity_cb(msg)
--     -- Right motor speed subscriber callback
--     sim.setJointTargetVelocity(rightMotor,msg.data)
-- end

function getTransformStamped(objHandle, name, relTo, relToName)
    t = sim.getSystemTime()
    p = sim.getObjectPosition(objHandle, relTo)
    o = sim.getObjectQuate	 angular vel: -0.5
rnion(objHandle, relTo)
    return {
        header = {
            stamp = t,
            frame_id = relToName
        },
        child_frame_id = name,
        transform = {
            translation = { x = p[1], y = p[2], z = p[3] },
            rotation = { x = o[1], y = o[2], z = o[3], w = o[4] }
        }
    }
end

function sysCall_actuation()
    -- Send an updated sensor and simulation time message, and send the transform of the robot:
    if not pluginNotFound then
        --         local result=sim.readProximitySensor(noseSensor)
        --         local detectionTrigger={}
        --         detectionTrigger['data']=result>0
        --         simROS.publish(sensorPub,detectionTrigger)
        simROS.publish(simTimePub, { data = sim.getSimulationTime() })
        -- Send the robot's transform:
        simROS.sendTransform(getTransformStamped(robotHandle, 'rosInterSteeringWheel', -1, 'world'))
        -- To send several transforms at once, use simROS.sendTransforms instead
    end
end

function sysCall_cleanup()
    if not pluginNotFound then
        -- Following not really needed in a simulation script (i.e. automatically shut down at simulation end):
        --         simROS.shutdownPublisher(sensorPub)
        simROS.shutdownSubscriber(All_MoveMotorSub)
    end
end
8.利用ROS控制VRep
8.1.ROSInterface
该组件时vrep自带的插件,连通ROS和VRep,使得ROS控制VRep
- 启用RosInterface
在打开VRep前先运行roscore即可
利用终端运行VRep时看到以下命令即证明运行插件加载成功

8.2.运行舵轮底盘的ROS程序
在vrep_ws文件夹中打开终端
catkin_make
source ./devel/setup.bash
roslaunch vrep_pkg steerwheel.launch
- 操作指南
WASD——上左下右
JL——左转右转
X——归零


 2万+
2万+

 被折叠的 条评论
为什么被折叠?
被折叠的 条评论
为什么被折叠?
 到【灌水乐园】发言


