


-
实训目的
在ros系统中使用摄像头,并实现基于opencv的形状与颜色识别,完成图像处理基类的编程以便进行后续调用。
掌握opencv中图像处理的一些基本操作函数,通过霍夫变换进行形状识别。
-
实训操作步骤
-
使用rviz订阅仿真机器人摄像头话题,实现图像可视化。
-
编写ros_opencv.py脚本,实现图像处理基类。
-
编写yellow_ball_detector.py脚本,实现基于opencv的形状与颜色检测功能。
-
运行仿真环境,完成黄色圆形标志识别。
1、使用RViz订阅图像话题,可视化图像消息
首先开启仿真环境。打开终端输入如下命令:
| $ export TURTLEBOT3_MODEL=waffle_pi $ roslaunch turtlebot3_gazebo turtlebot3_house.launch |
查看机器人传感器发布的话题,另起终端输入:
| $ rostopic list |
可以看到/camera/rgb/image_raw 就是摄像头发布的话题名称。

图1 话题列表
终端输入如下命令启动RViz:
| $ rviz |
点击左下角add按钮,在弹窗顶部by topic选项卡,订阅/camera/rgb/image_raw下的image项

成功接收摄像头数据
使用以下命令查看当前系统中的图像话题信息:
| $ rostopic info /camera/rgb/image_raw |

图2 话题详细信息
可以看到图像话题的消息类型是sensor_msgs/Image,这是ROS定义的一种摄像头原始图像的消息类型,可以使用以下命令查看该图像消息的详细定义:
$ rosmsg show sensor_msgs/Image
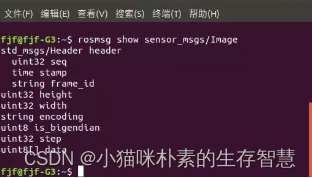
图3 消息数据
该类型图像数据的具体内容如下:
-
header:消息头,包含图像的序号、时间戳、绑定坐标系。
-
height:图像的纵向分辨率,即图像包含多少行的像素点。
-
width:图像的横向分辨率,即图像包含多少列的像素点。
-
encoding:图像编码格式,包含RGB、YUV等常用格式。
-
is_bigendian:图像数据的大小端存储模式。
-
step:一行图像数据的字节数量,作为数据的步长参数,width*3字节。
-
data:存储图像数据的数组,大小为step*height字节
2、使用opencv视觉库处理图像信息
获取到ros图像信息之后,我们需要使用opencv来进行一系列图像处理操作。
进入自己工作空间的src目录下,通过如下命令创建一个名为proj04_detect的功能包:
| $ catkin_create_pkg proj04_detect std_msgs rospy sensor_msgs cv_bridge image_transport gazebo_ros |
在/scripts目录下新建一个python脚本ros_opencv.py,代码如下:
-
#!/usr/bin/env python

# coding:utf-8


import rospy

import cv2

from cv_bridge import CvBridge,CvBridgeError

from sensor_msgs.msg import Image

from geometry_msgs.msg import  Twist

import numpy as np

import time

import os, sys


class ROS2OPENCV(object):

    # 基类的初始化方法,实例化时自动调用

    def __init__(self,node_name):

        self.node_name = node_name

        os.chdir(sys.path[0])

        rospy.init_node(node_name)

        rospy.on_shutdown(self.shutdown)

        ### 定义ros图像消息的订阅者和处理后图像的发布者

        # 发布/display_image话题,类型为Image,队列大小设置为1

        self.rgb_image_pub = rospy.Publisher("/display_image",Image,queue_size=1)

        # 订阅/camera/rgb/image_raw图像话题,回调函数rgb_image_callback(self, data)

        # 该回调函数实现了图像处理、帧率输出

        self.rgb_topic = rospy.get_param("~rgb_image_topic", "/camera/rgb/image_raw")

        self.rgb_image_sub = rospy.Subscriber(self.rgb_topic,Image,self.rgb_image_callback)

        # 订阅深度图像

        self.depth_topic = rospy.get_param("~depth_image_topic", "/camera/depth/image_raw")

        self.depth_image_sub = rospy.Subscriber(self.depth_topic,Image,self.depth_image_callback)

        self.move = rospy.get_param("~if_move", False)

        # 定义机器人速度消息的发布者,用于机器人运动驱动

        self.cmd_pub = rospy.Publisher('/cmd_vel', Twist, queue_size=1)

        self.bridge = CvBridge()

        self.frame = None

        self.frame_width = None

        self.frame_height = None

        self.frame_size = None

        self.track_box = None

        self.detect_box = None

        self.display_box = None

        self.marker_image = None

        self.processed_image = None

        self.display_image = None

        self.target_center_x = None

        self.cascade_frontal = None

        self.cascade_profile = None

        self.cps = 0

        self.cps_values = list()

        self.cps_n_values = 20

        self.linear_speed = 0.0

        self.angular_speed = 0.0


    def rgb_image_callback(self, data):

        start = time.time()

        frame = self.convert_image(data)

        if self.frame is None:

            self.frame = frame.copy()

            self.marker_image = np.zeros_like(frame)

            self.frame_size = (frame.shape[1], frame.shape[0])

            self.frame_width, self.frame_height = self.frame_size

        else:

            self.frame = frame.copy()

            self.marker_image = np.zeros_like(frame)

            # 调用图像处理方法,获取处理后图像

            processed_image = self.process_image(frame)

            self.processed_image = processed_image.copy()

            self.display_image = cv2.bitwise_or(self.processed_image, self.marker_image)

            # 绘制跟踪框

            if self.track_box is not None and self.is_rect_nonzero(self.track_box):

                tx, ty, tw, th = self.track_box

                cv2.rectangle(self.display_image,(tx,ty),(tx+tw,ty+th),(255,255,0),2)


                ### 计算机器人移动速度

                # 计算跟踪目标中心x坐标

                self.target_center_x = int(tx+tw/2)

                # 计算目标中心与视野中心x坐标的偏移量

                offset_x = (self.target_center_x - self.frame_width/2)

                # 计算目标区域的面积

                target_area = tw*th

                # 若允许机器人跟踪目标

                if self.move:

                    # 目标距离较远时速度大

                    if target_area < 25000:

                        linear_vel = 0.3

                    # 到达目标时停止前进

                    elif target_area > 45000:

                        linear_vel = 0.0

                    # 接近目标时速度减慢

                    else:

                        linear_vel = 0.1

                    # 根据偏移量计算角速度

                    angular_vel = float(-0.01 * (offset_x))

                    # 设置角速度极大极小值

                    if angular_vel > 0.1:

                        angular_vel = 0.1

                    if angular_vel < -0.1:

                        angular_vel = -0.1

                    # 调用update_cmd方法发布速度消息

                    self.update_cmd(linear_vel,angular_vel)

            # 绘制检测框

            elif self.detect_box is not None and self.is_rect_nonzero(self.detect_box):

                dx, dy, dw, dh = self.detect_box

                cv2.rectangle(self.display_image, (dx, dy), (dx+dw, dy+dh), (255, 50, 50), 2)

            ### 计算时间与帧率,并打印至图像

            # self.cps_values包含若干条最新fps数据,最多为20条,对其求和取平均得到cps值

            end = time.time()

            duration = end - start

            fps = int(1.0/duration)

            self.cps_values.append(fps)

            if len(self.cps_values)>self.cps_n_values:

                self.cps_values.pop(0)

            self.cps = int(sum(self.cps_values)/len(self.cps_values))

            # 根据不同的窗体大小设置字体位置

            font_face = cv2.FONT_HERSHEY_SIMPLEX

            font_scale = 0.5

            if self.frame_size[0] >= 640:

                vstart = 25

                voffset = int(50+self.frame_size[1]/120.)

            elif self.frame_size[0] == 320:

                vstart = 15

                voffset = int(35+self.frame_size[1]/120.)

            else:

                vstart = 10

                voffset = int(20 + self.frame_size[1] / 120.)

            # cv2.putText函数实现在画面上输出文字信息

            cv2.putText(self.display_image, "CPS: " + str(self.cps), (10, vstart),font_face, font_scale,(255, 255, 0))

            cv2.putText(self.display_image, "RES: " + str(self.frame_size[0]) + "X"+ str(self.frame_size[1]), (10, voffset), font_face, font_scale, (255, 255, 0))


            # 发布处理后的图像

            try:

                self.rgb_image_pub.publish(self.bridge.cv2_to_imgmsg(self.display_image,"bgr8"))

            except CvBridgeError as e:

                print(e)


    # 深度图像回调函数

    def depth_image_callback(self,data):

        depth_frame = self.convert_depth_image(data)


    # 转换ros图像为cv2图像

    def convert_image(self,ros_image):

        try:

            cv_image = self.bridge.imgmsg_to_cv2(ros_image,"bgr8")

            cv_image = np.array(cv_image,dtype= np.uint8)

            return cv_image

        except CvBridgeError  as e:

            print (e)


    # 转换ros深度图为cv2图像

    def convert_depth_image(self,ros_image):

        try:

            depth_image = self.bridge.imgmsg_to_cv2(ros_image,"passthrough")

            depth_image =np.array(depth_image,dtype=np.float32)

            return depth_image

        except CvBridgeError as e:

            print (e)


    # 图像处理方法

    def process_image(self,frame):

        return frame


    # 深度图处理方法

    def process_depth_image(self,frame):

        return frame


    # 判断矩形框是否存在

    def is_rect_nonzero(self,rect):

        try:

            (_,_,w,h) = rect

            return ((w>0)and(h>0))

        except :

            try:

                ((_,_),(w,h),a) = rect

                return (w > 0)and (h > 0)

            except:

                return False


    # shut down

    def shutdown(self):

        rospy.loginfo("Shutting down node")


    # 构造速度消息并发布

    def update_cmd(self, linear_speed, angular_speed):

        self.linear_speed = linear_speed

        self.angular_speed = angular_speed

        move_cmd = Twist()

        move_cmd.linear.x = linear_speed

        move_cmd.angular.z = angular_speed

        self.cmd_pub.publish(move_cmd)


if __name__ == "__main__":

    try:

        ROS2OPENCV("ros_opencv")

        rospy.loginfo("Please subscribe the ROS image.")

        rospy.spin()

    except KeyboardInterrupt:

        print ("Shutting down cv_bridge_test node")
在这个代码里,我们完成了以下功能:
-
初始化ros节点
-
在这个节点里接收/camera/rgb/image_raw消息,转化为opencv可处理的图像矩阵
-
将这个功能封装成 python 基类,留出图像处理接口,用于后续功能实现
-
发布/cmd_vel 消息,将图像处理与运动控制相结合
-
发布/display_image话题,将处理帧率等消息打印在图像上
程序运行流程:
程序入口:主函数,实例化ROS2OPENCV类。
实例化时执行该类的构造方法,完成后返回主函数。
主函数中通过rospy.spin()不断触发所有回调函数,当回调函数对应的消息队列中存在消息时,进入回调函数。
进入rgb_image_callback回调函数,调用图像处理方法process_image。
图像处理方法执行完毕,返回回调函数继续执行。
接下来我们来运行这个节点,打开新的终端输入:
| $ rosrun proj04_detect ros_opencv.py |
重新打开RViz订阅/display_image得到以下结果:
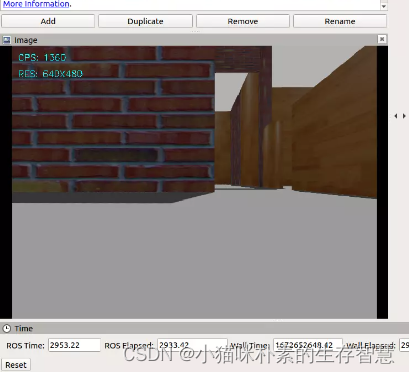
图4 opencv返回界面
可以看到在获取到图像的同时,在左上角显示出了处理的帧率和分辨率。后续想实现其他基于opencv的图像处理,都可以继承此基类,重写process_image 函数,完成视觉任务。这个python脚本是后续我们所有图像操作的基础。
3、黄色圆形标志识别
完成ros到opencv的图像处理后,我们就可以在此基础上使用opencv进行形状与颜色的识别检测了。
首先在proj04_detect/scripts目录下编写yellow_ball_detector.py,内容如下所示:
-
#!/usr/bin/env python

# coding:utf-8


import rospy

import cv2

import numpy as np

from sensor_msgs.msg import Image

from ros_opencv import ROS2OPENCV

from std_msgs.msg import String

from cv_bridge import CvBridge,CvBridgeError


class YellowBallDetector(ROS2OPENCV):

    def __init__(self, node_name):

        super(YellowBallDetector, self).__init__(node_name)

        self.detect_box = None

        self.proce_image_pub = rospy.Publisher("/process_image",Image,queue_size=1)

        self.initRange()


    def process_image(self, frame):

        src = frame.copy()

        # 将图像从 BGR 空间转化为 HSV 空间

        hsv = cv2.cvtColor(src, cv2.COLOR_BGR2HSV)

        res = src.copy()

        #二值化函数,将在颜色HSV阈值内的像素值变为黑色(0),阈值外的变为白色(255)

        mask = cv2.inRange(hsv, self.yellow_min, self.yellow_max)

        #与函数,起到将两张黑色区域合并的效果

        res = cv2.bitwise_and(src, src, mask=mask)

        h,w = res.shape[:2]

        #滤波函数,滤除噪点:

        blured = cv2.blur(res,(5,5))

        ret, bright = cv2.threshold(blured,10,255,cv2.THRESH_BINARY)


        gray = cv2.cvtColor(bright,cv2.COLOR_BGR2GRAY)

        #开闭运算函数,滤除噪点,使得集合区域更加平滑

        kernel = cv2.getStructuringElement(cv2.MORPH_RECT, (5, 5))

        opened = cv2.morphologyEx(gray, cv2.MORPH_OPEN, kernel)

        closed = cv2.morphologyEx(opened, cv2.MORPH_CLOSE, kernel)

        try:

            self.proce_image_pub.publish(self.bridge.cv2_to_imgmsg(closed))

        except CvBridgeError as e:

            print(e)

        #霍夫变换函数,检测圆环

        circles = cv2.HoughCircles(closed, cv2.HOUGH_GRADIENT, 1, 30, param1=100, param2=20, minRadius=5, maxRadius=150)

        if circles is not None:

            circles = np.uint16(np.around(circles))

            for i in circles[0, : ]:

                #绘制圆形图案

                cv2.circle(frame, (i[0], i[1]), i[2], (0, 0, 255), 2)

                cv2.circle(frame, (i[0], i[1]), 2, (0, 0, 255), 2)


        processed_image = frame.copy()

        return processed_image

    #初始化圆的颜色检测范围

    def initRange(self):

        self.yellow_min = np.array([26, 128, 46])

        self.yellow_max = np.array([34, 255, 255])


if __name__ == '__main__':

    try:

        node_name = "yellow_ball_detector"

        YellowBallDetector(node_name)

        rospy.loginfo("Please subscribe the ROS image.")

        rospy.spin()

    except KeyboardInterrupt:

        print ("Shutting down yellow ball detector node.")
这里我们实现了一个扩展类,继承了ros_opencv.py,在这个扩展类中,我们通过一系列函数变换,能够提取出摄像头视野中的黄色圆形。
程序运行流程:
程序入口:主函数,实例化扩展类YellowBallDetector。
实例化时执行类的构造方法,其中包含了超类的构造方法。执行完毕后返回主函数。
主函数中通过rospy.spin()不断触发所有回调函数,当回调函数对应的消息队列中存在消息时,进入回调函数。
由于继承了父类的rgb_image_callback回调函数,因此进入该回调函数,并调用子类重写的图像处理方法process_image。
图像处理方法执行完毕,返回回调函数继续执行。
修改CMakeLists.txt内容,找到catkin_install_python项,修改内容如下:
catkin_install_python(PROGRAMS
scripts/ros_opencv.py
scripts/yellow_ball_detetor.py
DESTINATION ${CATKIN_PACKAGE_BIN_DESTINATION}
)
接下来我们运行yellow_ball_detector.py。
首先我们需要引入billboard包,其中包含了红、黄、蓝三种颜色的告示牌模型,以及house环境模型的world文件及launch文件,其中添加了黄色告示牌。
编译工作空间后,终端输入:
| $ roslaunch billboard tb3_house_with_yellow_board.launch |
图5 gazebo画面
运行yellow_ball_detector.py脚本进行检测,终端输入:
$ rosrun proj04_detect yellow_ball_detector.py
打开RViz,分别添加话题/display_image与/process_image话题下的Image类型
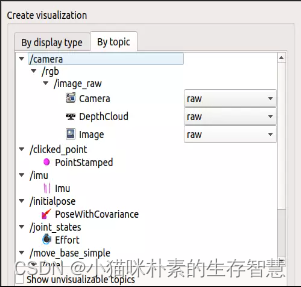
图6 添加订阅话题
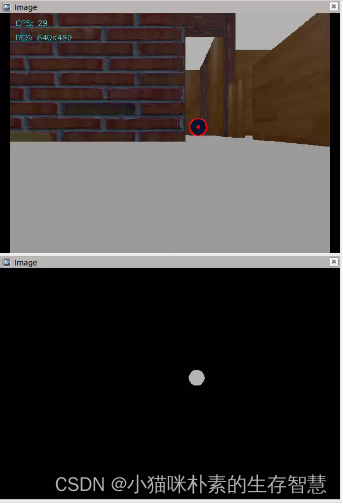
图7 检测结果
成功检测到画面中的圆形。
-
实训结果
-
能够接收虚拟仿真摄像头图像数据,并使用 opencv 来处理图像数据。
-
能够熟练掌握 opencv 图像处理常用函数,进行颜色识别,形状识别。


 1822
1822


 被折叠的 条评论
为什么被折叠?
被折叠的 条评论
为什么被折叠?
 到【灌水乐园】发言


