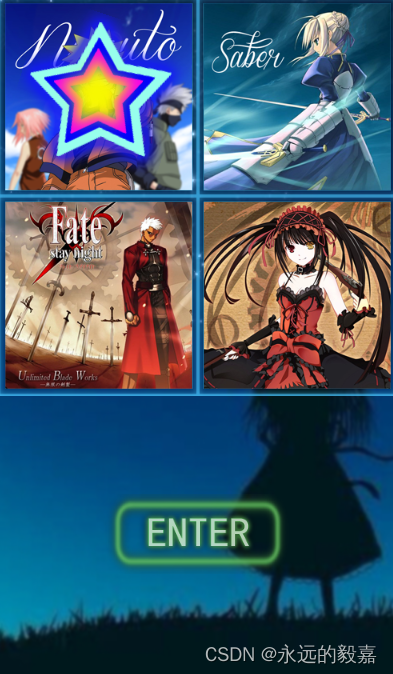
1.选择关卡:
利用点击事件的返回值event获取点击的坐标,用坐标转换为节点坐标来获取需要的坐标,通过点击坐标的所属象限选择四个象限的来进入对应关卡

    onTouchStart(event){//获取鼠标点击的位置
        if(this.lock){
            return ;
        }
        this.lock = true;
        // cc.log(event.getLocation());//获取的是世界坐标
        //获取点击的位置(基于世界坐标)
        let location = event.getLocation();
        //坐标系转换,转到节点坐标系里面来
        //this.你需要的节点.convertToNodeSpaceAR(你需要转换的坐标)
        //this.你需要的节点.convertToWorldSpaceAR(你需要转换的坐标)---将节点内坐标转到世界坐标上
        location = this.clover.convertToNodeSpaceAR(location);
        let res = this.getPos(location);
        let pos = res.pos;
        cc.vv.currentLevel = res.degree;//设置对应关卡等级
        //让星星移动
        cc.tween(this.star)
            .parallel(
                cc.tween().to(0.2,{position:pos}),
                cc.tween().by(0.2,{angle:72})
            )
            .call(()=>{//当前面动作都执行完毕以后才会调用这个回调函数,写法是箭头函数
                this.lock = false;
            })
            .start();
    },
    getPos(location){
        let res = {};
        let dis = this.clover.width / 4;//将移动的坐标规定出来
        if(location.x > 0 && location.y < 0){//第四象限
            res.pos = cc.v2(dis,-dis);
            res.degree = 4;
        }//第三象限
        else if(location.x < 0 && location.y < 0){
            res.pos = cc.v2(-dis,-dis);
            res.degree = 3;
        }//第二象限
        else if(location.x < 0 && location.y > 0){
            res.pos = cc.v2(-dis,dis);
            res.degree = 1;
        }
        else{
            res.pos = cc.v2(dis,dis);
            res.degree = 2;
        }
        return res;
    },
2.游戏准备:
这里可以用layout来排布切分的图片块,也可以设置基准点来逐个设置拼图位置
    createCell() {
        //用盒子的大小除以行数或列数得到每个方块的大小
        let cellSize = this.answerSkin.node.width / this.line;
        let gap = (this.cellPar.width - this.answerSkin.node.width) / (this.line + 1);
        //保证放置方块的位置从左上角开始
        let basePos = {
            x: -this.cellPar.width / 2 + gap + cellSize / 2,
            y: this.cellPar.height / 2 - gap - cellSize / 2,
        };
        for (let i = 0; i < this.row; i++) {//行
            this.cellList[i] = [];//添加二维数组
            for (let j = 0; j < this.line; j++) {//列
                let cell = cc.instantiate(this.cellPrefab);//实例化预制体
                //调用预制体上的函数将参数传进去
                cell.getComponent("Cell").init(this.skin, [i, j], cellSize);
                //将预制体的宽高重新规定
                cell.width = cellSize;
                cell.height = cellSize;
                //设置预制体的位置
                cell.x = basePos.x + i * (gap + cellSize);
                cell.y = basePos.y - j * (gap + cellSize);
                this.cellPar.addChild(cell);
                this.cellList[i][j] = cell.getComponent("Cell");//方便调用各自脚本
                if (i === this.row - 1 && j === this.line - 1) {
                    cell.opacity = 0;
                    this.blackIndex = [i, j];
                }
            }
        }
    },
3.拼图移动:
首先打乱拼图,需要交换图片和数据层:
    //打乱拼图
    chaos() {
        //定义方向
        let dir = [[0, -1], [0, 1], [-1, 0], [1, 0]];//下上左右
        //打乱次数
        let count = 0;
        while (count < 100) {
            //随机一个方向
            let ran = Math.random() * dir.length | 0;
            //让下标随机变换--实际上是下标的变换方块并没有动
            let index = [this.blackIndex[0] + dir[ran][0], this.blackIndex[1] + dir[ran][1]];
            if (this.cross(index)) {//交换方块的条件满足之后才会进行交换
                //交换方块(传入的是黑块的下标和要去交换的下标)
                this.exchangeCell(this.blackIndex, index);
                //将黑块的坐标变为移动后的坐标
                this.blackIndex = index;
                count++;
            }
        }
    },
    //判断是否越界
    cross(index) {
        //行数不能超过定义的行数,并且行数要大于0,列数不能超过定义的列数,并且列数也要大于0
        return index[0] < this.row && index[0] >= 0 && index[1] < this.line && index[1] >= 0;
    },
    exchangeCell(blackIndex, index) {
        //黑块当前的位置(通过黑块在cellList里面的下标去拿到对应位置)
        let pos = this.cellList[blackIndex[0]][blackIndex[1]].node.getPosition();//getPosition可以拿到节点在父坐标系的位置
        //将黑块设置到要index所在的地方
        this.cellList[blackIndex[0]][blackIndex[1]].node.setPosition(this.cellList[index[0]][index[1]].node.getPosition());
        //将index所在的位置设置成原来黑块所在的位置
        this.cellList[index[0]][index[1]].node.setPosition(pos);
        //交换完图片交换cellList下标
        let obj = this.cellList[blackIndex[0]][blackIndex[1]];
        this.cellList[blackIndex[0]][blackIndex[1]] = this.cellList[index[0]][index[1]];
        this.cellList[index[0]][index[1]] = obj;
    },
    blackCellGoHome() {
        //当黑块不在最后一行的时候
        while (this.blackIndex[0] < this.row - 1) {
            //让黑块一直向下走直到最后一行为止
            this.exchangeCell(this.blackIndex, [this.blackIndex[0] + 1, this.blackIndex[1]]);
            this.blackIndex = [this.blackIndex[0] + 1, this.blackIndex[1]];
        }
        while (this.blackIndex[1] < this.line - 1) {
            //一直往右边走
            this.exchangeCell(this.blackIndex, [this.blackIndex[0], this.blackIndex[1] + 1]);
            this.blackIndex = [this.blackIndex[0], this.blackIndex[1] + 1];
        }
    },
    //判断点击的方块是不是和我想要的判断的方块相邻
    isNeighbor(index1, index2) {
        return (Math.abs(index1[0] - index2[0]) + Math.abs(index1[1] - index2[1]) === 1);
    },

    //开启点击事件后的逻辑
    onCellClicked(cell) {//这里的参数是为了知道点击的是哪个方块
        let audio = this.node.getComponent(cc.AudioSource);
        audio.play();//不需要名字因为只会播放组件上面有的
        //拿到当前点击方块的下标
        let currentIndex = this.getIndexByCell(cell);
        if (this.isNeighbor(this.blackIndex, currentIndex)) {
            this.exchangeCell(this.blackIndex, currentIndex);
            this.blackIndex = currentIndex;
            this.addStep();
            if (this.isGameWon()) {
                cc.vv.isGameOver = true;
                this.cellList[this.blackIndex[0]][this.blackIndex[1]].node.opacity = 255;
                this.showWonAnima();
                this.unschedule(this.addTime);
            }
        }
        else {
            //表示位置不相邻
            if (currentIndex != this.blackIndex) {
                cell.node.color = cc.color(255, 255, 255);
                cc.Tween.stopAllByTarget(cell.node);
                cc.tween(cell.node)
                    .to(0, { color: cc.color(255, 100, 100) })
                    .delay(0.2)
                    .to(0, { color: cc.color(255, 255, 255) })
                    .start();
            }
        }
        // let bool = this.isNeighbor(this.blackIndex,currentIndex);
        // cc.log(bool);
    },
因为通过点击获取的坐标比较难判断所在的方块,所以直接把点击事件放在生成的预制体里面,通过点击对应的预制体进行方块的交换
    onTouchStart(){
        cc.find("Canvas/gameLayer").getComponent("Game").onCellClicked(this);
    },
getPosition()可以拿到节点在父坐标系的位置
setPosition()可以设置位置
需要设置两个数组,一个存图片用来图片的交换一个存下标用来记录交换节点的下标相当于ID
获取下标(通过方块获取)遍历数组cellList里面的元素是否和这个cell===(相等)
只有需要移动的cell周遭有黑块才能移动交换(数据层也要跟着换)
拼图BFS思路:(还原)
1.创建一个State类来存状态(目标还原数组,父状态,当前坐标,移动方向,记录走过的路,黑块下标)
//越界判断
function checkCross(index) {
    return index[0] >= 0 && index[0] < global.row && index[1] >= 0 && index[1] < global.line;
};

//在语法层面,引用数据类型的深拷贝
function arrClone(arr) {
    return JSON.parse(JSON.stringify(arr));
};


class State {
    //包含的属性
    constructor(target, par, codeID, dir, recordList, blackIndex) {
        //目标  --->最终还原的数组
        this.target = target;
        //父状态
        this.par = par;
        //当前状态的唯一识别码,当前位置
        this.codeID = codeID
        //父状态到目前状态行走的方位
        this.dir = dir;
        //记录表---->记录走过的路   key:value
        this.recordList = recordList;
        //黑块下标
        this.blackIndex = blackIndex;
    };

    //以当前状态诞生子状态,获取所有可行的下一步  方法
    getChildren() {
        let children = [];
        //4个方向遍历尝试
        let dirList = [[1, 0], [-1, 0], [0, 1], [0, -1]];
        for (let i = 0; i < dirList.length; i++) {
            //获取方向
            let dir = dirList[i];
            //获取到下一步
            let nextIndex = [this.blackIndex[0] + dir[0], this.blackIndex[1] + dir[1]];
            //判断是否越界
            if (checkCross(nextIndex)) {
                //克隆数据,需要深拷贝
                let clone = arrClone(this.codeID);
                let temp = clone[nextIndex[0]][nextIndex[1]];
                clone[nextIndex[0]][nextIndex[1]] = clone[this.blackIndex[0]][this.blackIndex[1]];
                clone[this.blackIndex[0]][this.blackIndex[1]] = temp;
                //查看改变后的数据是否重复  不存在就记录
                if (!this.recordList.hasOwnProperty(JSON.stringify(clone))) {
                    this.recordList[JSON.stringify(clone)] = "";
                    //诞生子状态
                    let state = new State(this.target, this, clone, dir, this.recordList, nextIndex);
                    children.push(state);
                }

            }
        }
        return children
    }

}

//设置一个接口,对应的模块,对外暴露内容
module.exports = State;
//在语法层面,引用数据类型的深拷贝 但是对于vec类型会自动转换为object类型
function arrClone(arr) {
return JSON.parse(JSON.stringify(arr));
};2.创建一个专门放BFS算法的文件,里面只有function定义的方法
通过递归每次调用生成子状态,子状态会拥有父状态,通过子状态达到终点的情况倒退父节点,把路径塞入path,最后绘制路径
这里两个文件都是需要module.exports = 内容
在game脚本里面导入
import 名字 from "路径"
//检查数组是否完全一致
function checkIsSame(arr1, arr2) {
    return JSON.stringify(arr1) === JSON.stringify(arr2);
}


function search(start) {
    let path = [];

    //每一层的容器
    let stateList = [start];
    //终点
    let destination = null;

    f(stateList);
    //核心逻辑,递归到终点为止
    function f(list){
        //获取所有的子状态
        let allChildren = [];
        for(let i = 0;i < list.length;i++){
            let children = list[i].getChildren();
            children.forEach(e => {
                allChildren.push(e);
            });
        }

        //判断子节点中是否存在终点
        for(let j = 0;j < allChildren.length;j++){
            if(checkIsSame(allChildren[j].target,allChildren[j].codeID)){
                destination = allChildren[j];
            }
        }
        // cc.log(destination);
        //检查是否找到了终点
        if(destination){
            cc.log("找到啦");
            //找到则绘制路径
            drawPath();
        }else{
            f(allChildren);
        }
    }

    //绘制还原路径
    function drawPath(){
        let p = destination;
        while(p.par){
            path.unshift(p.dir);
            p = p.par;
        }
    }

    return path;
}
module.exports = search;


 3001
3001


 被折叠的 条评论
为什么被折叠?


