


前言
例程均为官方提供,非常适合用来入门arduino。这篇帖子用来记录下自己学习例程的点滴。
参考:
官方例程
官方函数
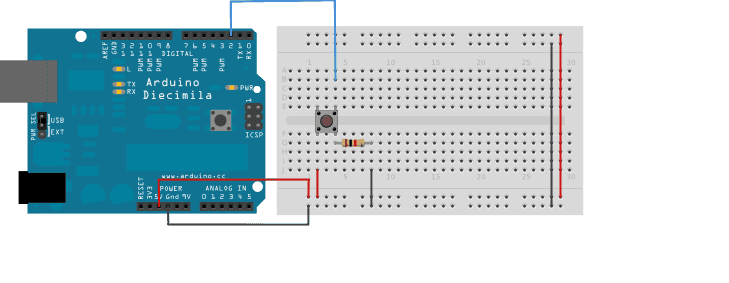
Debouce(防按键抖动)
-
按键:按下后4个引脚全短接,主要有一下两种按键。


-
官方代码如下:
const int buttonPin = 2; // the number of the pushbutton pin const int ledPin = 13; // the number of the LED pin // Variables will change: int ledState = HIGH; // the current state of the output pin int buttonState; // the current reading from the input pin int lastButtonState = LOW; // the previous reading from the input pin // the following variables are unsigned longs because the time, measured in // milliseconds, will quickly become a bigger number than can be stored in an int. unsigned long lastDebounceTime = 0; // the last time the output pin was toggled unsigned long debounceDelay = 50; // the debounce time; increase if the output flickers void setup() { pinMode(buttonPin, INPUT); //设定Pin2为输入 pinMode(ledPin, OUTPUT); //设定Pin13为输出(系统自带Led,输出模式下内部给1它就亮了) // set initial LED state digitalWrite(ledPin, ledState); //Pin 13置1 } void loop() { // read the state of the switch into a local variable: int reading = digitalRead(buttonPin); //digitalRead()只返回0/1;analogread()返回0~1023.此处按下按键为1 // check to see if you just pressed the button // (i.e. the input went from LOW to HIGH), and you've waited long enough // since the last press to ignore any noise: // If the switch changed, due to noise or pressing: if (reading != lastButtonState) { //Pin2脚不为0 // reset the debouncing timer lastDebounceTime = millis();//记录从运行开始到这步的时间 } if ((millis() - lastDebounceTime) > debounceDelay) {// 按键震动时必然<50,这里是一直等到按键震动结束后才开始执行条件内容。 // whatever the reading is at, it's been there for longer than the debounce // delay, so take it as the actual current state: // if the button state has changed: if (reading != buttonState) { //更新按键状态,1为按下。 buttonState = reading; // only toggle the LED if the new button state is HIGH if (buttonState == HIGH) { //切换Pin13的状态,这儿变量是0/1,不是ledPin(存放引脚号) ledState = !ledState; } } } // set the LED: digitalWrite(ledPin, ledState); // save the reading. Next time through the loop, it'll be the lastButtonState: lastButtonState = reading; } -
结果:按一次换一次灯(此程序重在去抖)。


 8375
8375


 被折叠的 条评论
为什么被折叠?
被折叠的 条评论
为什么被折叠?
 到【灌水乐园】发言


